1
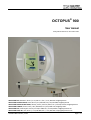
OCTOPUS® 900
User manual
© Haag-Streit AG 2008-04-09, 1500.7220031.02020
HAAG-STREIT AG, Switzerland, Phone: (+41-31) 978 0111, Fax: (+41-31) 978 0282, [email protected]
HAAG-STREIT AUSTRIA GmbH, Austria, Phone (+43-1) 895 0364, Fax (+431) 895 0368, [email protected]
HAAG-STREIT DEUTSCHLAND GmbH, Germany, Phone: (+49-4103) 709 02, Fax: (+49-4103) 709 370, [email protected]
HAAG-STREIT FRANCE, France, Phone (+33-4) 5009 0033, Fax (+33-4) 5009 7190, [email protected]
HAAG-STREIT UK, United Kingdom, Phone (+44-1279) 414969, Fax (+44-1279) 635232, [email protected]
HAAG-STREIT USA, INC., USA, Phone: (+1-513) 336 6858, Fax: (+1-513) 336 7828, [email protected]
OCTOPUS 900 instruction_manual
Page 1 / 19
CONTENTS
1
2
3
4
5
6
7
8
9
INTRODUCTION ............................................................................................................................................................................3
PURPOSE OF USE ........................................................................................................................................................................3
ITEMS SUPPLIED ..........................................................................................................................................................................3
SAFETY INFORMATION ...............................................................................................................................................................4
4.1
General points........................................................................................................................................................................4
4.2
Ambient conditions.................................................................................................................................................................4
4.3
Mains connection ...................................................................................................................................................................5
4.4
Transporting the appliance.....................................................................................................................................................5
4.5
Special instructions in text......................................................................................................................................................5
WARRANTY AND PRODUCT LIABILITY .....................................................................................................................................6
5.1
Safety requirements...............................................................................................................................................................6
5.2
Type plate ..............................................................................................................................................................................7
5.3
Pictogram symbols.................................................................................................................................................................7
INTRODUCTION ............................................................................................................................................................................8
6.1
OCTOPUS Perimeter 900......................................................................................................................................................8
6.1.1
Housing .......................................................................................................................................................................10
6.1.2
Cupola.........................................................................................................................................................................10
6.1.3
Forehead rest..............................................................................................................................................................10
6.1.4
Chin rest with sensors .................................................................................................................................................10
6.1.5
Refractive lens holder module.....................................................................................................................................10
6.1.6
Refractive lens holder..................................................................................................................................................10
6.1.7
Patient-response button ..............................................................................................................................................11
6.1.8
Mains connection ........................................................................................................................................................11
6.1.9
Light sources...............................................................................................................................................................11
6.1.10 Light intensities............................................................................................................................................................11
6.1.11 Stimulus.......................................................................................................................................................................11
6.1.12 Periphery or background lighting.................................................................................................................................11
6.1.13 Fixation marks.............................................................................................................................................................11
6.1.14 Fixation control............................................................................................................................................................12
6.1.15 Diagnosis data.............................................................................................................................................................12
6.2
Octopus 900 control unit / PC ..............................................................................................................................................12
6.2.1
Minimum PC requirements..........................................................................................................................................12
6.3
Support stand.......................................................................................................................................................................13
6.4
Safe system configuration in accordance with IEC / EN 60601-1........................................................................................14
6.4.1
System variant I, OCTOPUS 900 with laptop as control unit ......................................................................................14
6.4.2
System variant II, OCTOPUS 900 with PC and monitor as control unit ......................................................................14
6.5
Installation............................................................................................................................................................................15
6.5.1
Support stand..............................................................................................................................................................15
6.5.2
OCTOPUS 900............................................................................................................................................................15
INSTALLATION AND USAGE OF EYESUITE PERIMETRY SOFTWARE .................................................................................16
CARE AND MAINTENANCE........................................................................................................................................................17
8.1
Cleaning...............................................................................................................................................................................17
8.1.1
Cupola.........................................................................................................................................................................17
8.1.2
Response button, chin and forehead rest, eye occluder .............................................................................................17
8.1.3
Display, control panel ..................................................................................................................................................17
8.2
Light sources........................................................................................................................................................................17
APPENDIX....................................................................................................................................................................................18
9.1
Technical specifications .......................................................................................................................................................18
9.2
Instrument OCTOPUS 900 ..................................................................................................................................................18
9.2.1
Support stand for OCTOPUS 900 (optional) ...............................................................................................................19
9.3
Safety regulations ................................................................................................................................................................19
Page 2 / 19
OCTOPUS 900 instruction manual
1
INTRODUCTION
We would like to thank you for your decision to purchase this Haag-Streit product. If the instructions in this manual are carefully
followed we are confident that this product will give you reliable and trouble-free usage.
2
PURPOSE OF USE
The Perimeter Octopus® 900 is used, at room temperature, in the examination, diagnosis and documentation of the differential light
sensitivity and other functional aspects of the human eye. It is usually used by Ophthalmologists, Optometrists, Opticians, Orthoptists
or other trained health personnel in their consulting rooms, clinics, hospitals or teaching facilities.
3
ITEMS SUPPLIED
We congratulate you on choosing the OCTOPUS 900 – 90° visual-field perimetry of the latest generation. Depending on your order,
the items supplied are as follows:
−
−
−
OCTOPUS 900
Accessory kit
optional support stand
Please check the delivery with care
1 x OCTOPUS Perimeter 900
1 x accessory kit, consisting of:
1 x patient-response button
1 x Ethernet switch 100Mbps
2 x Ethernet cable
1 x dust cover
1 x instruction manual
1 x CD with all Octopus 900 and EyeSuite Perimetry manuals
1 x eye occluder set
2 x spare fuses (T3.15 A / 250 V)
1 x support stand, consisting of:
1 x stand base
1 x O-900 table top
1 x set of accessories for support stand
1803000
1802439
1803090
1803094
1803061
7220031
7220030
1802349
3000481
1801187
1803051
1801194
Please keep all packaging material, as this can be reused for possible returns or when relocating.
OCTOPUS 900 instruction_manual
Page 3 / 19
SAFETY INFORMATION
4
4.1
General points
•
The appliance must only be used for the purpose described in this instruction manual.
•
Note that condensation may form on the cold surfaces of the appliance if it is brought into the operating area from a colder
place. If this occurs, leave the appliance to stand for an hour or two, and do not switch on until the temperature is equalised
and the device has dried out.
•
All examination of patients, operation of the appliance and interpretation of the results obtained must be carried out by properly
trained and qualified persons.
•
The appliance, which is installed on a height-adjustable support stand, is designed for medical use in a darkened room.
•
Please keep this instruction manual near the appliance at all times, in a place where it can be accessed easily by operating
staff. Warranty claims will only be considered if the instructions in the manual have been followed as specified.
•
The doctor or medical professional operating the device must inform patients of the safety requirements that affect them, and
ensure that these are followed.
•
Ensure that the appliance is only connected to a power supply that matches the specifications given on its type plate. Note that
the ON/OFF switch DOES NOT shut off the mains power supply to the perimeter. Before carrying out cleaning or maintenance
work of any kind, ensure that the appliance is unplugged from the mains power socket.
•
Do not use the appliance in explosion-hazard zones, and do not store volatile solvents (such as alcohol or benzene) or other
flammable substances nearby.
•
Always remove the dust cover before switching on the power, as failure to do so may result in irreparable damage to the light
sources.
In the same way, ensure that the appliance is switched off before covering it.
•
The removal of housing components and repairs must only be carried out by suitably-trained specialists who are qualified and
authorised to do so. Attempts to carry out unauthorised repairs are likely to result in danger to operating staff and patients.
•
Use only original spares and accessories when carrying out repairs.
4.2
Ambient conditions
•
Transport
•
Storage
•
Usage
Temperature
Air pressure
Relative humidity
Temperature
Air pressure
Relative humidity
Temperature
Air pressure
Relative humidity
-40°C
500hPa
10%
-10C
700hPa
10%
+10°C
700hPa
20%
to
to
to
to
to
to
to
to
to
+70°C
1060hPa
95%
+55°C
1060hPa
95%
+40°C
1060hPa
75%
Environmental considerations
• Note that scrap electrical and electronic equipment must be disposed of separately from normal
household waste. This appliance was placed in circulation after 13.08.2005.
• Please arrange for the appliance to be sent to a local collection point or your Haag-Streit distributor when
it reaches the end of its service life.
• This will prevent contaminants escaping into the environment, while helping to ensure that valuable raw
materials can be recycled.
Page 4 / 19
OCTOPUS 900 instruction manual
Mains connection
4.3
•
Use only a type-approved, three-wire electric power supply lead. In order to lessen the risk of electric shock, this appliance must
be properly grounded.
•
The plug, cable and ground connection to the power socket must be free of damage and in full working order.
Transporting the appliance
4.4
Keep the appliance in its original packaging when transporting over long distances. When moving over short distances, lift the device
with both hands, holding it in the area around the lower cupola (see also section 6.5.2).
Special instructions in text
4.5
Further safety instructions are added throughout the text as required. They are classified according to importance, and designed to
help avoid risk to patients and operating staff, while preventing damage to the perimeter appliance and helping to ensure that it
functions safely and remains in perfect working order.
!
)
DANGER
Instruction that must be followed at all times in order to prevent risk to patients and
operating staff.
CAUTION
Instruction that must be followed in order to prevent damage to the appliance.
NOTE
Instruction designed to ensure that the perimeter appliance functions smoothly and
without giving trouble.
This handbook contains descriptions of all the functions of the OCTOPUS 900. Certain functions are supplied as options, and may
not be available or activated on your particular appliance.
OCTOPUS 900 instruction_manual
Page 5 / 19
WARRANTY AND PRODUCT LIABILITY
5
•
The appliance and its accessories are made of high-quality materials and manufactured to the latest technical standards. They
left our factory in a perfect state of repair. If an incident should occur however, please contact your dealer.
•
The manufacturer supplies the appliance with a one-year warranty, counted from the date of purchase. The warranty covers
malfunctions and defects attributable to faulty materials or design. The warranty does not cover malfunctions or defects arising
from incorrect use or external factors.
•
Any attempt to carry out unauthorised repairs will immediately void all warranty liability.
•
Continued use of a product that has been damaged by incorrect operation can lead to personal injury. The manufacturer will
accept no liability whatsoever in such cases.
•
Before unpacking the appliance, check the outside of the packaging for signs of incorrect handling and possible damage. If you
do detect such damage, please notify the carrier who carried out delivery, and unpack the appliance in the presence of a
representative from the transport firm concerned. You should then make out a report detailing any damage detected. The
report should be signed by you and the carrier’s representative.
5.1
Safety requirements
•
The OCTOPUS 900 appliance has been designed and manufactured in accordance with standards IEC / EN 60601-1, EN ISO
15004 and EN ISO 12866. Manufacture, testing, setup, maintenance and repair are carried out in conformity with the
corresponding Swiss and international standards.
•
The appliance’s CE designation shows the conformity of the OCTOPUS 900 with European Directives 93/42/EEC and
89/336/EEC, and conformity module A.
•
Haag-Streit can supply a copy of the corresponding European Declaration of Conformity on request at any time.
•
The statutory accident-prevention regulations must be observed.
•
Classification
Norm IEC 60601-1 / EN 60601-1
European Directive 93/42/EEC
The Perimeter OCTOPUS 900 conforms to equipment safety class I.
Application unit type B
Operating mode: Continuous operation
Class I
EMC
The OCTOPUS 900 meets the electromagnetic compatibility requirements of IEC / EN 60601-1-2. The appliance is designed to keep
the generation and emission of electromagnetic interference to a level that does not affect the normal operation of other items of
equipment. The appliance is likewise designed to provide a certain level of resistance to outside sources of electromagnetic
interference.
Page 6 / 19
OCTOPUS 900 instruction manual
5.2
Type plate
Read through the instruction manual with special care
Manufacturer
Serial number
Appliance number
Product classification type B
Date of manufacture
Do not push
c
d
e
f
g
h
i
2
5.3
3
41
56 7
Pictogram symbols
Ground connection lead.
Do not push. The appliance is liable to tip over if pushed from the side.
This appliance conforms to European Directive 2002/95/EC (RoHS).
OCTOPUS 900 instruction_manual
Page 7 / 19
INTRODUCTION
6
6.1
OCTOPUS Perimeter 900
The OCTOPUS 900 is an automatic projection perimeter for the examination of the whole field of sight (90°).
The system is divided into an examination element (OCTOPUS 900) and a control unit (notebook computer or PC). The examination
element communicates with the external PC via an Ethernet link. The OCTOPUS 900 is controlled using the software installed on the
PC. The perimeter may be controlled, if required, from a fully-lit adjacent room.
The integrated, automatic patient-fixation control function guarantees the reliability of diagnosis.
The OCTOPUS 900 is suitable for both clinical and investigation purposes, as its flexibility is virtually unlimited.
Thanks to its spherical, Goldmann-type cupola design, the OCTOPUS 900 tests the entire field of sight (up to 90° eccentricity). The
flexibility of this appliance allows it to deal with all perimetry tasks, both in the 30° and 90° range, using kinetic, static or flicker
perimetry.
New PC and perimetry software can be downloaded and updated by going to www.octopus.ch.
Components
1
2
3
4
5
6
7
8
1
2
3
4
5
6
7
8
9
10
11
12
13
Top cover for stimulus projector
Front cover
Housing / Cupola
Mirror unit cover
Forehead rest
Display
Key panel
Refractive lens holder with IR eye
illumination and refractive lenses
Chinrest
Response button
Response button connector
Type plate
Table height adjustment
9
10
11
12
13
Page 8 / 19
OCTOPUS 900 instruction manual
*
14
15
LCD display
The high-contrast TFT colour display allows the
video image to be viewed from an oblique angle.
The following messages are displayed on-screen:
16
14 Indication of a ' ' during stimulus
presentation.
15 Indication of an ' ', if the patient-response
button is pressed.
16 The crosshairs help to centre up the eye,
scale = 1mm intervals.
17 Display of left (OS) or right eye (OD)
18 Warning or error message
18
17
OD
Fig. 6-1
19
22
20
Control panel
The control panel consists of an easy-to-use
keypad made of soft but hard-wearing rubber
material. All buttons are backlit with white light to
facilitate their use in a darkened room.
The backlighting can be disabled, if required, by
adjusting the display brightness settings.
Turning the refractive lens holder in and out
Display brightness settings
Adjustment of chin support
Start examination
21
19
20
21
22
24
25
26
Connections
Fig. 6-2
27
23
24
25
26
27
Plug-in mains power unit
Mains switch
Holder for two T3.15AL/250V fuses
Mains connection
Ethernet connection
23
Fig. 6-3
DANGER
OCTOPUS 900 instruction_manual
All externally connected appliances and items of equipment must conform to the relevant safety
standards.
Page 9 / 19
6.1.1
Housing
Optical and electronic components are protected from light and dust by five housing covers. They can be removed in just a few
moments for the purpose of servicing. Once the four screws in the back panel have been removed, the panel, hood and both IR
covers can be lifted out. The optical unit and electronic components of the OCTOPUS 900 are now accessible.
DANGER
Always disconnect the appliance from the mains power supply before opening it. The removal of
housing components must only be carried out by suitably-trained specialists who are qualified and
authorised to do so.
6.1.2
Cupola
The cupola of the OCTOPUS 900 has a diameter of 600mm, and thus conforms to the Goldmann standard. Test zones with
eccentricity up the following levels can be measured:
•
•
•
•
Nasal
Temporal
Superior
Inferior
60°
89°
60°
70°
6.1.3
Forehead rest
A wide, ergonomically-designed forehead rest allows the patient to remain in a comfortable position while examination is taking place.
6.1.4
Chin rest with sensors
The four buttons on the control panel are used to adjust the chin rest and thus the position of the head. Fine adjustment can also be
carried out from the control unit (PC) using the computer mouse. Sensors in the chin rest detect if the patient’s head is correctly
positioned.
6.1.5
Refractive lens holder module
An automatic swing arm allows the refractive lens holder to swing in an out during the examination, without having to alter the
position of the patient. This swing arm can be operated either from the control panel or on-screen with the computer mouse. Once
the refractive lens holder has been swung in, it can be fine-adjusted to the correct distance with respect to the eye being examined.
!
CAUTION
Always use the control-panel buttons on the device itself or on-screen control from the PC to
swing the refractive lens holder in an out. Do not attempt to move the refractive lens holder
manually.
6.1.6
Refractive lens holder
Refractive lenses can be used during examinations within 30° eccentricity. The corresponding lenses are inserted before the test.
The refractive lens holder can be tipped forward by about 25° to make it easier to insert the refractive lenses.
Additional
refractive
correction for presbyopia:
30-40yrs
+1.0
40-45yrs
+1.5
45-50yrs
+2.0
50-55yrs
+2.5
55-60yrs
+3.0
>60yrs
+3.25
Fig. 6-4 Swing out the lensholder to insert lenses
Page 10 / 19
Fig. 6-5 Insert spherical lenses towards the
patients eye and cylindrical lenses towards the
cupola
Note: Primary goal of the
refractive correction is that
the patient can see the
fixation target in focus.
OCTOPUS 900 instruction manual
6.1.7
Patient-response button
The patient-response button is connected to the underside of the head-support mounting (RJ11 jumper cable).
6.1.8
Mains connection
The Ethernet connection socket is located at the back of the appliance. Always use a crossover shielded cable of category 5e
designed to transmit reliably at 100MHz. This network connection is electrically isolated, with electrical strength of 4kV, in conformity
with IEC / EN 60601-1.
6.1.9
Light sources
LEDs are fitted for the purposes of periphery or background lighting, fixation help and stimulus. LEDs do not emit any heat, so no
active cooling system is required in this respect.
6.1.10
Light intensities
The intensity of stimulus and periphery light is measured by independent light-sensors and compared to the preset default values
every time the perimeter is switched on.
6.1.11
Stimulus
The stimulus light is projected indirectly into the cupola via a mirror unit. The user-defined programs offer a selection of five different
diaphragm diameters (Goldmann I - V). Stimulus intensity-damping is infinitely adjustable via the electronic control system. Stimulus
presentations of 100-500ms are permitted. A mechanical lock und optical damping elements are no longer required.
White stimulus for W/W perimetry and optional blue und red stimulus for B/Y and R/W are possible.
Stimulus intensity is detected by a light sensor, which also serves as a reference point for the system of coordinates for test locations.
The stimulus LED has a service life of >20,000h and is thus maintenance-free.
6.1.12
Periphery or background lighting
White background brightness amounts to 31.4 or 4asb for W/W perimetry. You can also select a yellow background with 314asb for
B/Y perimetry. Background brightness is based on two light sources, each fitted with several LEDs. The background LEDs have a
service life of >20,000h and are thus maintenance-free. Background brightness is detected by a separate light sensor.
6.1.13
Fixation marks
Three different fixation marks can be selected and their brightness infinitely adjusted by electronic means. The light source is a
maintenance-free green LED with a service life of >20,000h.
Fig. 6-6 (centre point)
OCTOPUS 900 instruction_manual
Fig. 6-7 (cross markers)
Fig. 6-8 (circle)
Page 11 / 19
6.1.14
Fixation control
The eye being examined is illuminated with IR LEDs, photographed by a CMOS camera and shown on the LCD display. The built-in,
automatic fixation-control function guarantees the reliability of diagnosis. Precise positioning of the eye being examined is carried out
by motorised fine-adjustment of the chin rest.
6.1.15
Diagnosis data
All diagnosis data are transferred via the Ethernet connection to the control unit (PC / Laptop) for processing and saving to a
database. The use of a second Ethernet connection (LAN card) allows these data to be exported to a server. Diagnosis data can
also be printed out using a printer connected to the control unit.
Octopus 900 control unit / PC
6.2
A standard PC can be used as a control unit for the Perimeter. The control-system software runs on WINDOWS XP.
6.2.1
•
•
•
•
•
Minimum PC requirements
Pentium III / 1.7GHz
512 MB RAM
40GB hard disk
CD-ROM / DVD
T100 (100MHz) Ethernet interface
Page 12 / 19
OCTOPUS 900 instruction manual
6.3
Support stand
An electrically adjustable support stand (available as an option) allows the appliance to be adjusted easily and smoothly to the
individual patient. The support stand offers ample legroom and is wheelchair-compatible.
Support stand
1
Table top with mountings for patient-response button
2
Electrical connection box
3
Patient-response button
4
Electrically-actuated lifting column
5
Stand feet with castors
1
2
3
4
5
Fig. 6-9
6
7
Electrical voltage selector in electrical connection box
Power socket for connection of the OCTOPUS 900
6
7
DANGER
Check that the mains voltage is correct
before connecting to the power supply.
Fig. 6-10
Mains connection with fuse holder on electrical connection box.
Fig. 6-11
ON/OFF switch on electrical connection box.
DANGER
Fig. 6-12
OCTOPUS 900 instruction_manual
Take special care, especially when dealing
with patients in wheelchairs, to ensure that
the table top does not come into contact with
the patient’s legs.
Page 13 / 19
6.4
6.4.1
Safe system configuration in accordance with IEC / EN 60601-1
System variant I, OCTOPUS 900 with laptop as control unit
LAN connection
Mains connection
Safety isolating transformer
Mains connection
Ethernet cable
OCTOPUS 900
Power
unit
LAN (optional)
Laptop / control
unit
Printer
USB cable
Ethernet cable*
Support stand
< 1.5m
1
Fig. 6-13 , *A network switch has to be placed in every situation between Notebook and Octopus 900
6.4.2
System variant II, OCTOPUS 900 with PC and monitor as control unit
Mains connection
LAN connection
Mains connection
Safety isolating transformer
Ethernet cable
LAN (optional)
OCTOPUS 900
Multi-socket strip
PC with monitor
control unit
Printer
Ethernet cable*
USB cable
Support stand
< 1.5m 1
Fig. 6-14 *A network switch has to be placed in every situation between the PC and Octopus 900
Please note
1
If the control unit (notebook computer or PC) and printer are farther than 1.5m from the OCTOPUS 900, there is no need
for a safety isolating transformer conforming to IEC 60601-1 / EN 60601-1.
If a medically-approved control unit or a control unit with network element approved for medical use is in operation
without a printer or optional LAN connection, neither a safety isolating transformer nor a distance of > 1.5m from the
OCTOPUS 900 are required.
Page 14 / 19
OCTOPUS 900 instruction manual
For safety reasons, you are however recommended to maintain the minimum distance of 1.5 m wherever possible. All
other non-medical appliances and items of equipment must be operated via a safety isolating transformer.
6.5
Installation
6.5.1
Support stand
The support standard is supplied in a separate package. Assemble the support stand according to the instructions supplied with it,
and ensure that you select the correct mains voltage before connecting the power supply lead.
6.5.2
OCTOPUS 900
Transporting and relocating the appliance (over short distances only)
a) Stand in front of the device and grasp it by the cupola with both hands before lifting (Fig. 6-15).
b) Stand to one side of the appliance, with one hand on the front cover and the other at the back. Then take a firm hold and lift
(Fig. 6-16, Fig. 6-17).
Fig. 6-15
Fig. 6-16
Fig. 6-17
Push the patient-response button into its connection socket.
The connection socket for the response button is
located at the bottom of the front cover. The retaining
catch on the connection plug of the response button
faces forwards
CAUTION
!
Fig. 6-18
Fig. 6-19
The RJ11 plug is designed for
connection of the patient-response
button only. Do not use it with any
other item.
Front cover
Cupola housing
Connection plug with retaining catch
− Push in the connection plug until you hear the retaining catch click into place. To remove the response button, push the retaining
catch towards the headrest and pull the cable downwards.
− Connect the OCTOPUS 900 and PC with the Ethernet cable or integrate the Perimeter appliance into a LAN. You are
recommended to use a direct connection, as variations due to network load can affect the diagnostic performance of the
appliance. Further information can be found in section 6.4 ’Safe system configuration in accordance with IEC / EN 60601-1'.
− Connect the electric power supply lead. The integrated mains-power units operate at the voltages specified in section 9.1
'Technical specifications'. There is no need to make a voltage selection on the appliance itself. If the appliance is supplied with a
support stand, the OCTOPUS 900 can be connected to the plug socket in the electrical box on the stand.
OCTOPUS 900 instruction_manual
Page 15 / 19
7
INSTALLATION AND USAGE OF EYESUITE PERIMETRY SOFTWARE
Instructions on how to use the appliance for diagnostic purposes and a description of the EyeSuiteTM user software are included in a
separate manual.
Fig. 7-1
Page 16 / 19
OCTOPUS 900 instruction manual
CARE AND MAINTENANCE
8
DANGER
•
The housing components of the Perimeter appliance must only be removed by suitablyqualified service personnel.
•
Note that the ON/OFF switch DOES NOT shut off the mains power supply to the perimeter.
Before removing the housing components, ensure that the appliance is unplugged from the
mains power socket.
•
All repairs must be carried out by suitably-trained specialists who are qualified and
authorised to do so. Attempts to carry out unauthorised repairs are highly likely to result in
danger to operating staff and patients.
•
Any parts that are removed must be replaced with original spares supplied by HAAGSTREIT or one of its authorised dealers.
•
Failure to follow the instructions in this manual may result in warranty claims being
invalidated.
The OCTOPUS 900 is practically maintenance-free, and requires only a minimal amount of care to ensure that it remains in full
working condition. We nevertheless recommend that you have the Perimeter appliance serviced regularly by a qualified technician.
HAAG-STREIT or your local dealer will be pleased to supply you with further information.
8.1
Cleaning
An occasional dusting and wipe-down with a damp cloth is sufficient. Dried-on dirt can be removed using a cloth dampened with
water or alcohol.
!
CAUTION
Do not allow the appliance to become wet and do not use solvents of any kind.
The accessory kit supplied with the OCTOPUS 900 includes a dust cover. Cover the appliance whenever the room is being cleaned
or if it is to be out of use for any length of time. Always remove the dust cover before switching on the power.
!
CAUTION
Do not cover the appliance while it is switched on, as this can cause build-ups of heat and a
possible fire hazard.
8.1.1
Cupola
The inner surface of the cupola is coated with a special paint finish designed to ensure optimum results for perimetric examinations.
The inner surface only requires occasional cleaning. Normal practice is as follows:
Dust twice a year with a soft, long-bristle brush. Do this carefully, so as not to scratch the surface. If more intensive cleaning is
required, use a solution of mild detergent and a soft cloth.
8.1.2
Response button, chin and forehead rest, eye occluder
These items are all made of easy-to-clean plastic materials. In order to preserve their hygienic state, wipe down regularly with a soft
cloth or piece of cotton wool moistened with alcohol.
8.1.3
Display, control panel
Fingerprints and dust can be removed using a soft, moist cloth.
8.2
Light sources
In contrast to other perimetry devices, perimeter and stimulus lighting on the OCTOPUS 900 is supplied by LED light sources. These
have a virtually unlimited service life. If any of the LEDs should ever require replacement however, please contact your dealers’
customer service department.
OCTOPUS 900 instruction_manual
Page 17 / 19
APPENDIX
9
9.1
Technical specifications
Manufacturer
HAAG-STREIT AG
Gartenstadtstrasse 10
CH-3098 Köniz / Switzerland
9.2
Instrument OCTOPUS 900
Designation:
Power requirements:
Power consumption:
Operating frequency
Fuses:
Classification:
Measures (W x L x H):
Weight:
Shipping size (W x L x H):
Shipping weight:
Temperature:
Humidity:
Operation principle:
Measurement principle:
Patient positioning:
Fixation control:
Eccentricity:
Measurement range:
Measurement accuracy:
Max. stimulus intensity:
Stimulus color (I):
Stimulus color (II):
Stimulus color (III):
Stimulus size:
Stimulus duration:
Stimulus interval:
Background intensity (I):
Background color (I):
Background intensity (II):
Background color (II):
Interface:
Display:
Page 18 / 19
OCTOPUS 900
100 – 120VAC, 220 - 240 VAC
145VA, 165 VA
50 / 60 Hz
2 x T3.15 AL 250 V
Class I, Type B
648mm x 519mm x 796 mm
25 kg
800mm x 600mm x 900mm
40 kg
Operation:
+15°C ... +40°C
Storage, Transport: -40°C ... +70°C
Operation:
20% ... 75%
Storage, Transport: 10% ... 95%
Projection cupola perimeter
Bracketing procedure
(depending on testing strategy)
Adjustable headrest
Permanent video based fixation control
90°
0 ... 47 dB
0.5dB
1910 cd/m2 (6000 asb)
White (wide spectrum white LED)
Blue (440nm +/- 25nm)
Red (> 610nm)
Goldmann I, II, III, IV, V
100 ms, 200 ms, 500ms,
Adaptive, fix 1 ... 4 sec
4asb (1.27cd/m2), 31.4asb (10cd/m2)
White (LED)
314 asb (100cd/m2)
Yellow ( > 530 nm)
Ethernet T100
Color TFT Display (320 x 240 Pixel)
OCTOPUS 900 instruction manual
9.2.1
Support stand for OCTOPUS 900 (optional)
Model type designation:
Mains voltage:
Power consumption:
Fuses:
Dimensions (W x D x H):
Support surface:
Weight:
Transport dimensions:
Transport weight:
Functioning principle:
9.3
M-table 900
100 V / 60 Hz, 115 V AC / 60 Hz, 250 V / 50 Hz
100 / 115 V / 1 A, 250 V / 0.5 A
2 x T4AH 250 V
600 x 520 x 680 / 880 mm
0.31 m2 (600 x 520 mm)
15 kg
650 x 570 x 730 mm
20 kg
Lifting column (electrically actuated and infinitely
adjustable)
Safety regulations
This perimeter appliance conforms to the international safety requirements established in EN 60601-1, Class I, Type B.
EMC
The OCTOPUS 900 meets the electromagnetic compatibility requirements of IEC / EN 60601-1-2. The appliance is designed to keep
the generation and emission of electromagnetic interference to a level that does not affect the normal operation of other items of
equipment. The appliance is likewise designed to provide a certain level of resistance to outside sources of electromagnetic
interference.
European Directives
•
•
93/42/EEC (medical equipment products)
IEC60601-1-2 (Electromagnetic compatibility – EMC)
Norms and standards
•
•
•
•
•
•
•
IEC / EN60601-1:2005
EN 60601-1-2: 2001 + prA1
IEC 60601-1-2: 2001 + A1: 2004
EN ISO 15004-1: 2006
EN ISO 12866: 1999 + AC:2000
IEC 60825-1: 2001-08 Ed. 1.2
CIE S 009/E: 2002
We reserve the right to change specifications without prior notice
OCTOPUS 900 instruction manual
Page 19 / 19