1
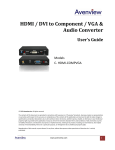
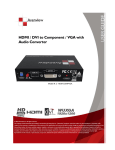
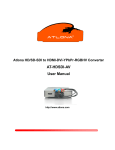
 HDMI/DVI to VGA/Component & Audio Break‐out Converter User Manual (HCV‐VA) All information is subject to change without notice. All names & trademarks are property of their respective owners. Rev.1002 Made in Taiwan Safety and Notice
The HCV‐VA HDMI/DVI to VGA/Component & Audio Break‐out Converter has been tested for conformance to safety regulations and requirements, and has been certified for international use. However, like all electronic equipments, the HCV‐VA should be used with care. Please read and follow the safety instructions to protect yourself from possible injury and to minimize the risk of damage to the unit. z Follow all instructions and warnings marked on this unit. z Do not attempt to service this unit yourself, except where explained in this manual. z Provide proper ventilation and air circulation and do not use near water. z Keep objects that might damage the device and assure that the placement of this unit is on a stable surface. z Use only the power adapter and power cords and connection cables designed for this unit. z Do not use liquid or aerosol cleaners to clean this unit. Always unplug the power to the device before cleaning. Warning! This device is served purely for conversion between video formats. This device CANNOT convert the input/output video resolutions. Table of Contents ◇ INTRODUCTION
……………………………………………………… p.2
◇ PANEL DESCRIPTION
………………………………………………… p.4
◇ HARDWARE INSTALLATION
◇ EDID LEARNING
◇ NOTICE
……………………………………… p.5
……………………………………………………… p.5
………………………………………………………………… p.6
◇ SUPPORTED RESOLUTIONS
……………………………………… p.6
1
INTRODUCTION
This HCV‐VA HDMI/DVI to VGA/Component & Audio Break‐out Converter offers an easy and instant approach for converting digital HDMI to analog PC video (VGA) and component video (YPbPr) with digital audio (S/PDIF) and analog stereo audio. With this module, YPbPr/VGA based receivers such as LCD monitors or plasma TV can be readily connected to HDMI sources such as DVD players or PS3. In addition, the embedded HDMI / DVI selector facilitates the switch between the HDMI and DVI input sources. This cost effective solution let you keep using your non‐HDMI/DVI display to access HDMI or DVI source, and enjoy high definition digital video and audio.
Features
z HDMI 1.2a & DVI 1.1 compliant z HDMI video supports up to 1080p z Support HD (1080i / 720p) component video output z Support up to UXGA (1600x1200@60) & WUXGA (1920x1200@60) PC graphics output z Coaxial S/PDIF audio output z Stereo analog audio output z Front panel LED indicators and push button z EDID learning ability z Wall mounting housing design for easy and robust installation VGA monitor
HDMI source VGA cable HDMI cable HCV‐VA
VGA‐to‐YPbPr
breakout cable
HDTV DVI cable YPbPr cable YPbPr or VGA display/projector DVI source Earphone audio cable
Analog PC Speaker
RCA audio cable
2
S/PDIF AV Amplifier Specifications & Package Contents Model Name Technical Role of usage HDMI compliance DVI compliance Video bandwidth Video support Audio support Input TMDS signal Input DDC signal Input Output HDMI connector DVI connector VGA connector RCA connector 3.5mm connector Push‐in button DIP switch Mechanical Housing Dimensions Model [L x W x H] Package Weight Model Package Fixedness Power supply Power consumption Operation temperature
Storage temperature Relative humidity Package Contents HCV‐VA D/A converter HDMI 1.2a DVI 1.0 Single‐link 165MHz [4.95Gbps] Up to 1080p60, WUXGA [1920x1200@60] & UXGA [1600x1200@60] Stereo audio 1.2 Volts [peak‐to‐peak] 5 Volts [peak‐to‐peak, TTL] 1x HDMI 1x DVI 1x VGA/Component (through VGA‐component breakout cable) 1x RCA digital audio 1x 3.5mm analog audio Type A [19‐pin female] DVI‐I [29‐pin female digital only] HD‐15 [15‐pin D‐sub female] Coaxial socket for S/PDIF digital stereo audio [PCM 48kHz] Earphone socket for analog stereo audio [1] HDMI/DVI input switch [2] VGA/component output switch 2‐pin for EDID learning Metal enclosure 128 x 100 x 28mm [5.0” x 3.9” x 1.1”] 270 x 175 x 80mm [10.6” x 6.9” x 3.1”] 420g [15oz] 795g [1.8 lbs] Wall‐mounting case with screws 5V 2A DC 6 Watts [max] 0~40°C [32~104°F] ‐20~60°C [‐4~140°F] 20~90% RH [no condensation] 1x HCV‐VA 1x VGA‐component breakout cable 1x 5V power supply unit 1x User Manual 3
PANEL DESCRIPTION
Input View EDID: 2‐pin DIP switch for EDID setting (see more details below) Pin 1 On (Æ) Off (Å) Pin 2 On (Æ) Off (Å) Function Learn EDID from VGA socket and save EDID to HDMI socket Write back the default EDID to HDMI socket Function Learn EDID from VGA socket and save EDID to DVI socket Write back the default EDID to DVI socket DVI / HDMI: DVI or HDMI source selector HDMI IN: Connect to a HDMI source device with a HDMI male‐male cable DVI IN: Connect to a DVI source device with a DVI male‐male cable +5V DC: Connect to a 5V DC power supply unit Output View S/PDIF OUT: Connect to S/PDIF digital stereo audio speakers. Stereo OUT: Connect to analog stereo audio speakers. VGA / YPbPr OUT: VGA or component video output to respective display or projector. For component YPbPr output, attach the VGA‐component breakout cable to the VGA socket. VGA / YPbPr: Push button to select between VGA and component video output. 4
HARDWARE INSTALLATION
1. Connect HDMI or DVI source to the video input. 2. Connect S/PDIF or stereo audio source to RCA jack or 3.5mm earphone jack respectively. 3. For connecting to VGA display/projector, link VGA cable to the VGA output connector. For connecting to component (YPbPr) video display/projector, link VGA‐component breakout cable first to the VGA output connector then link a component cable to the component (YPbPr) display/projector. 4. Power up the HCV‐VA. EDID LEARNING
1. Power up the HCV‐VA. Connect display to VGA/YPbPr Output. 2. To learn EDID for HDMI source, pull down the DIP switch pin 1 to ON (Æ) and turn off the device. Turn on the HCV‐VA again then the red light will be dark and bright to indicate the EDID learning process is complete. You DON’T NEED to pull up the DIP switch again unless you want to learn another EDID by pulling DIP switch pin 1 up and down. 3. To learn EDID for DVI source, pull down the DIP switch pin 2 to ON (Æ) and turn off the device. Turn on the HCV‐VA again then the red light will be dark and bright to indicate the EDID learning process is complete. You DON’T NEED to pull up the DIP switch again unless you want to learn another EDID by pulling DIP switch pin 2 up and down. *The EDID learning function only applies for VGA display. 5
NOTICE
1. Only HDMI enabled TV sets with underscan/overscan* support, the full active video can be accurately displayed. Some HDMI equipped TV sets may not support this feature. If underscan/overscan* is NOT supported, the top, bottom, left and right border of the active video may be screened, and the S/PDIF audio may not sound right. 2. Analog stereo audio can merely support 2‐channel audio. This model does NOT support 8‐channel analog audio applications. 3. S/PDIF audio output supports 2‐channel stereo audio only. 4. S/PDIF supports only 48KHz audio sample rate. Other than this rate, the input digital audio should be adjusted to 48KHz in order to get audio signal correctly sent. *The underscan mode displays the full video frame, which reveals content on the edge that is recorded. In overscan, the field monitor zooms in to the area that would be visible on most televisions. Set the field monitor to underscan if your video will be viewed on a computer monitor or shown with a projector and also to look for light stands, microphones, and other unwanted objects on the edges of your shot. Set it to overscan to see how the video will look on a television. SUPPORTED RESOLUTIONS
PC Graphics [DVI or VGA] VESA 640x400 @85Hz VESA 1024x768 @60Hz VESA 1280x960 @85Hz 1152x864@60Hz VESA 720x400 @85Hz VESA 1024x768 @75Hz VESA 1280x1024 @60Hz Mac 480‐66A VESA 640x480 @72Hz VESA 1024x768 @85Hz VESA 1280x1024 @85Hz Mac 480‐66B VESA 640x480 @75Hz VESA 1152x864 @60Hz VESA 1360x768 @60Hz Mac 600‐66 VESA 640x480 @85Hz VESA 1152x864 @75Hz VESA 1440x900 @60Hz Mac 768‐60 VESA 800x600 @60Hz VESA 1280x768 @60Hz VESA 1400x1050 @60Hz Mac 870‐75 VESA 800x600 @72Hz VESA 1280x768 @75Hz VESA 1400x1050 @75Hz IBM 6000 VESA 800x600 @75Hz VESA 1280x768 @85Hz VESA 1920x1200 @60Hz NEC 1024‐70 VESA 800x600 @85Hz VESA 1280x960 @60Hz VESA 1600x1200 @60Hz SUN 1024‐76 Video [HDMI or component (YPbPr)] EIA 720x480p @59.94Hz EIA 720x576p @50Hz EIA 1280x720p @50 / 59.94 / 60Hz EIA 1920x1080i @50 / 59.94 / 60Hz EIA 1920x1080p @23.98 / 24 / 25 / 29.97 / 30 / 50 / 59.94 / 60Hz 712x484 (NTSC) 702x574 (PAL) 6