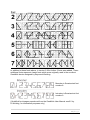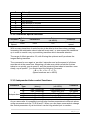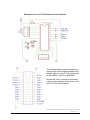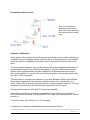
1
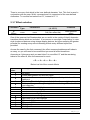
USER’S MANUAL
IV-17/IV-4
Smartsockets
By Chris Barron
Release
Rev 0
Rev 1
Rev 2
PCB1
V2.24
V2.25
V2.26
V2.27
V2.28
V2.29
V2.30
Date
07/03/2010
13/06/2010
25/01/2011
04/11/2011
30/11/2011
12/12/2011
17/12/2011
29/12/2011
Revision Description
User‟s Manual Preliminary Layout
Beta release, version 2.07. JS & AJ
Release of Version 12, public
Version PCB1, kitted product
New functionality including digit rotation
Addressable clock and group functions added
Further transition effects added
Added test feature, set baudrate at 9600, fixed Microchip MOVFF
bug
31/12/2011 Auto baudrate detection in first 1500mS, default 9.6k
01/01/2011 Core message handler speed increase. Group DP command
added
02/02/2011 „Independent‟ commands to address single tubes added
TABLE OF CONTENTS
1.0
General Information
1.1
1.2
1.3
2.0
3.0
What are Smartsockets ?
.................................................................
How do they work ? .............................................................................
What do you need to make Smartsockets work ? ...............................
3
3
3
Operational Details
2.1
2.2
2.3
Principle of operation .............................................................................
Command structures .............................................................................
Commands
..................................................................
2.3.1 M – Message commands
......................................................
2.3.2 P – Decimal Point commands
..........................................
2.3.3 V – Version of software in use
..........................................
2.3.4 Z – Maximum tubes (system command)
...............................
2.3.5 N – Manual eNumeration
......................................................
2.3.6 F – Font setting command ......................................................
2.3.7 E – Effect setting command .......................................................
2.3.8 S – Transition Speed setting command
...............................
2.3.9 I – Independent tube control functions
...............................
2.3.10 G – Group functions ..................................................................
2.3.10.1
GR – Group Digit Rotation ................................
2.3.10.2
GC – Group Contraflow
................................
2.3.11 D – Delays of transition
.......................................................
2.3.12 C – Clock related functions .......................................................
2.3.13 W – Write custom character .......................................................
4
4
4
6
7
9
9
9
10
12
13
13
14
15
15
16
18
20
2.4
2.5
Initialisation and schematics ................................................................... 21
HOWTO‟s
.......................................................................................... 24
Troubleshooting
3.1
3.2
Test Modes .......................................................................................... 25
Problems you might encounter
........................................................ 26
A list of commands which can be printed out is available on the
last two pages of this document
2|Page
1.1
What are Smartsockets ?
The Smartsocket concept was created to meet the demand for a standalone device which
acts as the interface between a display device and the designer. A display device is defined
as any Nixie, VFD, or LED device capable of being used to generate characters and/or
numbers to convey information.
Smartsockets greatly simplify the process of creating a visual output device array by
handling all character and font generation as well as all transition effects, within the device
itself.
With the IV-17/IV-4 Smartsocket is is possible for you to offload all of your display control
functions to the Smartsocket device, leaving you free to concentrate on the type of data you
would like to display.
With a single command you can scroll a line of text across a set of VFD tubes instantly,
display the time and date and toggle individual decimal points on and off. If you are trying to
make a wordplay device, such as a word ladder or a „Four Letter Word‟ device, you are
going to find no easier way to handle the complex task of moving the data from your
controller and putting it on the displays.
This list presents a few of the unique benefits to using the IV-17/IV-4 Smartsockets...
o
o
o
o
o
o
o
o
1.2
Flexibility of design using modular hardware (up to 252 tubes may be used)
Programmable fonts and effects make display customization an inherent feature.
Integrates seamlessly with existing microcontroller projects
Software updates are possible using Flash technology
Control via a standard serial protocol makes interfacing with Smartsockets an easy
task.
Due to extremely low standby power, backup batteries can be small
Each tube in the array behaves completely independently of it‟s neighbour
Automatic baudrate detection is possible
How do they work ?
At the heart of the IV-17/IV-4 Smartsocket is a high speed microcontroller which performs
the following tasks...
o
o
o
o
o
1.3
Handles communication with the host device
Communicates with „downstream‟ Smartsockets
Keeps an onboard real time clock updated
Performs display multiplexing by communicating with the onboard driver IC
Monitors for user input, IE test modes
What do you need to make Smartsockets work ?
Almost any serial data capable source can be used, such as a PC, a PDA or a
microcontroller. The 9.6k 8N1 (NRZ) protocol operates at TTL levels (5Vdc logic), so an
RS232 convertor may be required in some circumstances. (EG MAX232).
Of course, you will also need to supply 5V to the circuit too !
3|Page
2.0 Operational Details
2.1
Principle of operation
TTL level serial data is sent to the micocontroller using the 8N1 NRZ protocol. The data
consists of command and control messages, as well as data which you wish to display
directly.
The IV-17/IV-4 Smartsockets are programmed to respond to specific messages which have
been sent using a particular format. If you do not use the correct format you should not
expect anything to happen !
The microcontroller captures the incoming data into buffer memory and at the end of the
data transmission the message which was just sent is analysed. If the message contains
data which is to be displayed the controller sends the data to the relevant tubes. If the
message contains control and configuration commands the message contents are
immediately made effective.
For a more in-depth understanding of the system it is probably a good idea to think of each
tube as a standalone device with it‟s own controller chip and power supply. This will make it
easy for you to visualise how the message structure has been designed to suit the array of
tubes which you have.
When power is first applied, to all Smartsockets simultaneously (very important), a software
programme called „enumeration‟ is run. This gives each tube a virtual position within the
controllers which relates to each tube‟s position in the real world. The leftmost tube is
number 1, followed by 2, then 3 and so on.
Commands are sent in groups, so for example if you would like to set the font of tube 2 and
3, but leave the font of tube 1 and 4 the same, you must send a command which addresses
all of the tubes. The font command begins with the letter „F‟, then the next character relates
to tube number 1‟s font, then tube number 2‟s font, and so on. This means that if you want to
change the font only for tubes 2 and 3 you will need to know the font of tube 1 and 4 already
if you do not want to change them.
(HINT- You can use an array to hold that information in your PC or microcontroller program)
In other words, a command such as „Tube2, Font 3‟ and „Tube 3, Font 3‟ is not really
feasible. This method of keeping a „mirror‟ in your host has many benefits which makes this
method most suitable in this application.
If you are using the
IV17/IV4 explorer
boards with
Smartsocket
controllers, you will
only have to jumper
4 connections
between each
board to increase
the number of tubes
in the array.
4|Page
2.2
Command structures
Messages for the Smartsockets take the following form
<Command_Function><Function_Parameters><Function_Data>
There are many types of commands, listed later in section 2.4 and they all begin with
a single significant ASCII letter. (or hex equivalent)
Most commands have operational parameters which the functions use to implement
those commands. It is important to note that some numeric parameters are in ASCII
format while some are in decimal format. This mixed use of formats for parameter
values has been necessary to satisfy specific requirements of each function.
The function data is not required for all commands. The most common command
which you will have to use that requires function data is probably the command for
displaying a message on the tubes.
This command begins with letter „M‟ for Message, then „D‟ for Direct, followed by the
position in the array you would like to make the start point of the message (sent as a
decimal value, not ASCII). After the start point comes the message body itself.
For example, to display the text WOW! at position 1, send the following data
(excluding the pointy brackets )
<MD><decimal 1 or $01 or %00000001><WOW!>
It isn‟t obvious why the tube position should be sent as a decimal number here, but
let‟s send the text „WOW!‟ to tube position 244 now.
<MD><decimal 244><WOW!>
In the previous example it would have been easy to use the ASCII character „1‟
(decimal 49), to represent the tube position where you wanted the message to start.
But what can we use in the second example when we want to make the message
start position tube number 244 ? Can you send ASCII character 244 easily or even,
can you remember that that particular ASCII character relates to decimal number
244 ?. I can‟t !
( ASCII 244 = character ô , member of the extended ASCII character
set )
Traditional end of message characters such as carriage return, CR, and line feed,
LF, are not required and should not be sent.
Note that the „<‟ „>‟ braces are used only in the documentation and they should not
be sent in the actual command
5|Page
2.3
Commands
Not all commands are available with earlier versions of software. The introduction of
various commands can be observed in the revision list on the front page of this
guide.
The IV17/IV4 Smartsocket commands can generally be broken down into two types.
Display information commands, and the control/configuration commands.
Command
M
MESSAGE
P
DECIMAL
POINT
Sub
Type
Parameters
(binary)
Data
(all ASCII)
MD
tube_position(b)
message
MS
scroll_wait(b)-start_pos(b)-end_pos(b)
message
MC
none
none
none
none
none
none
O,L,R,B
(each
tube)
1,2,3,4
(each
tube)
Comment
Direct to
tube
Scroll
message
Clears
display
Switches
DP‟s
on/off
DP
animation
2.3.1 Message commands
As you can see there are only two command types which are required to control what
data is displayed by the tubes, including the decimal points.
Let‟s say you want to scroll a line of text from tube 4 to tube 1(left to right), then you
need to use the MS command. The parameters which are required relate to the
scrolling step delay, the start position and the end position.
The „(b)‟ denotes this data is not ASCII, but actual decimal or binary data. When you
do not see (b) then it is safe to assume that the numeric value is in ASCII.
So, to scroll our message „Hello World‟ across 4 tubes, starting at tube 4, leaving at
tube 1, with a short delay between each scroll step, you should send the following
command (excluding „<‟ and „>‟)
< M > < S > < 60 > < 4 > < 1 >< Hello World >
When you send that command you will notice that the display scrolling stops with the
last 4 digits displayed on the tubes „orld‟ . If you like, you can clear the tubes after a
scroll simply by sending enough trailing blank spaces as required to move the text off
6|Page
the tubes. For a 4 tube display this would be 4 spaces, for 8 tubes it is 8 spaces, and
so on.
An easier way to display data is to use the „Direct‟ message command, „MD‟. To use
this command the only parameter which you need to provide is the start position of
your text. If you wanted to display the word „HI‟ on tubes 2 and 3, send the following
command
< M > < D > < 2 > < HI >
There is a distinct exception to the use of ACSII characters for the message body
which is related to the use of user defined characters. In this case you need to
provide the binary character number in the range 0-125, instead of the ASCII
character.
2.3.2 Decimal point commands
Decimal points can be independently controlled and in some circumstances they can
also be animated too !
The basic decimal point command operates on a „per tube‟ basis. This means that
for each tube in the display there is a corresponding position in the decimal point
control command which refers to each particular tube.
EG
<P><Tube 1 DP‟s><Tube 2 DP‟s><Tube 3 DP‟s><Tube 4 DP‟s> etc
If we say that you want to turn on the left hand decimal point of tube number 3 then
in conjunction with the „P‟ command we also need to send the „L‟ instruction.
O = Off
L = Left
R = Right
B = Both
It is important when you control DP‟s in this way that you also send the DP data for
every decimal point too. Assuming that the only decimal point you would like to turn
on is the left DP of tube number 3, and you have 4 tubes in the array, you need to
send the following command.
<P><O><O><L><O>
And if you want to turn on all DP‟s, send this
<P><B><B><B><B>
Animating the decimal points is possible using inbuilt routines, but it is important to
remember that these routines are only designed for use with 4 tube arrays. If you
7|Page
have larger arrays then you might find that the display patterns will not always be
synchronised !
There are 4 different patterns, numbered 1 to 4 (ASCII) , These patterns offer some
visual appeal by adding movement to your display. If you have a larger array than
just 4 tubes, then most likely you will want to use your own imagination and create
some patterns of your own, which can be done using the DP control commands
above.
To activate an animation send the animation program number after the „P‟ command.
You can set any groups of 4 tubes to any pattern in a large array with this command
too. Let us say you have 4 sets of Smartsockets (16 tubes total) and you wish to set
the middle 8 tubes to run animation number 1. Bearing in mind that you still need to
send data for Smartsockets and tubes which will not be displaying DP animations,
send the following command
<P><O><1><1><O>
As with all DP commands, none of the numeric values or characters are in binary
format so you can type this command directly from a PC keyboard, via a terminal
program such as Hyperterm.
Configuration and control commands
The group of commands which are of this type give you the control and flexibility to
manage every aspect about how your data is displayed on the tubes.
You will find there are also some shortcuts and ‟group‟ commands which become
very useful when you start to build larger arrays using Smartsockets. This grouping
of commands has been done to make it possible for even the most modest host
microcontroller to control large arrays of Smartsocket devices.
Some of the following commands operate on system variables which are very
important for the correct operation of the devices, especially when making arrays of
Smartsockets Those particular commands will be highlighted for you in the following
text. However, you should not worry about making any mistakes, because if you
make a mistake the Smartsockets are reset to a standard configuration once power
is removed.
Note that with all commands, a minimum time of at least 5mS should be allowed
between sending the previous command and sending the next command. If yoiu
send data too quickly it will be ignored.
The exception to this is when writing a new user defined character, when 80mS
should be allowed for the software to write the new command in to the non-volatile
flash memory.
8|Page
2.3.3 Version Command
Command
Sub
Type
Parameters
Data
Comment
V
Version
none
None
none
Displays
Version
The version command returns 4 characters on the display which represent the
version of software being used. V224 means that you are using code version 2.24
2.3.4 Maximum tubes command
Command
Sub
Type
Parameters
Z
Total tubes
none
None
Data
(binary)
Total number of
tubes(b)
Comment
Sets number of
tubes
It is important for the code on each Smartsocket to know how many other tubes are
in the network and therefore this command is important. Because of the potentially
large number of tubes, the data must be sent as non-ASCII value, so for example the
correct command to use for an array of 16 tubes will be as follows.
< Z > < 16 >
2.3.5 Forced enumeration
Command
N
eNumerate
Sub
Type
Parameters
Data
(Binary)
ND
none
0
NN
none
0
Comment
Pause 40mS (Displays
position)
Pause 40mS(Does not
display)
As was previously explained, the Smartsockets enumerate themselves automatically
when power is applied. With a larger array it may be the case that you are required
to use more than one power supply and in this case it is most likely that they will not
power up at the same time. If this happens then the Smartsockets will not enumerate
correctly
The manual enumeration command „N‟ allows you to force the array to enumerate
even after power has been turned on for a long period of time.
9|Page
Once the command has been sent all Smartsockets change into a state where they
are waiting for one byte of data to be sent. A short time after the „N‟ command is sent
(50mS works well) the host should send a single byte 0 ,zero (Non ASCII) after which
the array will enumerate itself once again.
The two types of N command are ND and NN. When NN is sent the Smartsockets
enumerate and return to the normal wait state. When ND is sent , enumeration is
carried out just as above, except the last digit of each tube‟s position is displayed on
the respective tube. In the case of ND being used a large display array would show
digits 0123456789012345 and so on.
2.3.6 Font selection
Command
Sub
Type
Parameters
Data
(all ASCII)
Comment
F
Font
none
none
0-9 (See font list)
Sets Font
This is a simple way to be able to set the font of each tube. Fonts only apply to
numeric characters. There are fonts for upper case and lower case letters, as well as
some punctuation marks. You can create your own fonts too, because there are 120
custom characters available for you to edit , but more about that later.
The font command structure follows the same protocol as the decimal point
command which means that instead of using this command to set only one font on
one tube, you must set the neighbouring fonts of the tubes next to the one which
interests you too. (This isn‟t always the case, there are a few shortcuts available, but
more about that later, too !)
The system font is font number 1, which means that if the Smartsockets are powered
off then when they are next powered back on the font will default to type 1
To change fonts the method is straightforward. Assuming an 8 tube array (two
Smartsockets daisychained) and you want the last two tubes on the right to display
numbers using font 4, leaving the other tubes using font 1, send the following
command
<F><1><1><1><1><1><1><4><4> (font numbers are in ASCII)
10 | P a g e
In addition to these fonts above, in version 2.28 a further 2 fonts were added. These
additional fonts represent classic fonts which were originally used in the excellent
GeekKlok device designed by Raymond Weisling.
Moocher is Smartsocket font
number 8.
Intruders is Smartsocket font
number 9
(GeekKlok font images reproduced from the GeekKlok User Manual vers2.5 by
R.Weisling, for information purposes only)
11 | P a g e
There is one more font which is the „user defined character‟ font. This font is used in
conjunction with the user „Write‟ command and it is comprised of the user defined
characters. To use this font select font “U”, instead of 0 - 9
2.3.7 Effect selection
Command
Sub
Type
Parameters
Data
(all ASCII)
Comment
E
Effect
none
none
0-N (See effect list)
Sets transition
effect
One of the reasons that Smartsockets are so useful is the variety of inbuilt character
transition effects which are included. It is common to see digits „cross fading‟ in retro
style clocks and devices using vintage display devices, but upon realising the greater
potential for creating many more interesting effects many different styles are
provided.
As was the case for the font command, the effect command addresses all tubes in
an array, so you still need to be careful that you send all effect transitions.
Assuming a 4 tube array and you want tube 3 to use effect „G‟ and the remaining
tubes to use effect 8, then the command to use is
<E><8><8><G><8>
Below is a list of the current effects
Effect
value
0
1
2
3
4
5
6
7
8
9
A
B
C
D
E
Description of effect
No effect
Cross fade between old and new digits
Jump fade. The new character displays immediately while the old one
fades out
Step fade. The old digit begins to fade before the new digit replaces it
Fade up. All segments begin to light before switching off to reveal the
next character
Rotor, CW, without highlight
Rotor, CCW, without highlight
Rotor, CW, with highlight
Rotor, CCW, with highlight
Split Rotor, CW, with highlight
Split Rotor CCW, with highlight
Spin wash CW
Spin wash CCW
Shiftright-left
Shiftright-left
12 | P a g e
F
G
H
I
J
K
L
M
N
O
Bullets [1]
Bullets[2]
Another rotor
Another rotor in reverse
Slip and spin
Slip and spin in reverse
Intense combo wash
Intense combo wash in reverse
Intense combo bullets
Intense combo bullets in reverse
2.3.8 Transition speed selection
Command
Sub
Type
Parameters
Data
(all ASCII)
Comment
S
Speed
none
none
0-9
Sets transition
speed
With so many transitions it would be nice to be able to slow them down, perhaps
increasing the anticipation about „what will come next‟, or even speed the transitions
up in order to create a very eye-catching transition which demands attention.
The range of effect speeds is 0-9, with 0 being the quickest and 9 produces the
longest lasting transition.
The command is once again a „per tube‟ instruction and so the speed of all tubes
must be set at the same time. Assuming a 4 tube array which needs the first two
tubes to run quickly, say at speed 3, and the remaining two tubes to transition more
slowly, say at speed 7, you should send the following command
<S><3><3><7><7>
(Speed numbers are in ASCII)
2.3.9 Independent tube control functions
Command
I
Independent
Sub
Type
IF
IS
IE
IM
IP
Parameters
(binary)
tube_position(b)
tube_position(b)
tube_position(b)
tube_position(b)
tube_position(b)
Data
(all ASCII)
Font number (0-9)
Speed Set (0-9)
Effect (0-N)
Any valid Character
O,L,R,B
Comment
Sets Font
Set Speed
Set Effect
Set character
Set DP‟s
As you saw earlier it is possible to set all tube function parameters to different values
using commands such as F,S,E,M and P. When you use these commands to change
the control parameter of just one tube it can be long winded (not to mention
13 | P a g e
microcontroller memory hungry !) to have to send the values for every tube beside
the one you wish to change.
For this reason, the Independent command has been introduced which allows for a
single tube‟s parameters to be changed with a single instruction
For example, to change tube 162‟s operating parameters to font 6, effect 4 and
transition speed,8, the following commands should be sent
< I > < F > < 162 > < 6 >
< I > < E > < 162 > < 4 >
< I > < S > < 162 > < 8 >
2.3.10
Command
G
Group
Group tube control functions
Sub
Type
GF
GS
GE
GP
GR
GC
none
none
none
none
none
Data
(all ASCII)
Font number (0-9)
Speed Set (0-9)
Effect type (0-N)
O,L,R,B
0,1,2,3
none
1 or 0
Parameters
Comment
Sets Font
Set Speed
Set Effect
Set DP‟s
Digit Rotation
Set
Contraflow
Group commands have been created to also reduce the number of command
characters which are required to achieve control of the displays. In one way these
group commands may be thought of as performing a „quick set‟ function, because
they act on all 4 tubes of each Smartsocket at the same time and in the same way.
The format for this command is a little different to previous commands but is still very
easy to understand. In a similar way that some commands already introduced
address individual tubes, the group command addresses individual Smartsockets.
The protocol for group commands is as follows
<G><sub_command F,S,R,E,P,C><smartsocket 1><smartsocket 2><smartsocket 3>
etc
As an example, let‟s assume that you have 2 Smartsockets daisychained (8 tubes)
and would like all 4 tubes of Smartsocket 1 to use font 2, all tubes of Smartsocket 2
to use font 8, while at the same time setting all right decimal points to their on state,
then the following commands should be used
<G><F><2><8>
<G><P><R><R>
14 | P a g e
2.3.10.1
Group digit rotation
Perhaps one day you might become either bored of using an IV17/IV4 tube in it‟s
usual vertical orientation, or you might wish to experiment with a new way of
mounting the tubes, perhaps on their side or upside down ?
The usual way to deal with this scenario is to write some new rotated or inverted
fonts, but why do that when you have perfectly good fonts already, except that they
need to be rotated to suit the new orientation of the tube. This is where the rotate
command is useful, because it rotates the digits through 90,180, and 270 degrees
<G><R><smartsocket 1><smartsocket 2><smartsocket 3> etc
The parameters are 0 = no rotation, 1 = 90 deg, 2 = 180 deg, 3 = 270 deg
So let‟s assume you have 3 Smartsockets. You have mounted Smartsocket 1 in
standard vertical orientation, Smartsocket 2 is mounted next to it but inverted and
the last Smartsocket is normally oriented too. The only tubes which need to have the
characters rotated will be those of Smartsocket 2 in the middle. As with all group
commands, suitable for the other Smartsockets must also be transmitted, so in this
case the correct command is
<G><R><0><2><0>
It might not be obvious why you would do this, but there will be a day when you think
up a great idea for a new enclosure for your tubes which demands that the middle 4
tubes be inverted. Then suddenly it will all make sense !
2.3.10.1
Group Contraflow
This command was created because there might be a time when you have used the
digit rotation function and mounted your tubes on their side. Depending which way
you mount your Smartsockets in the array, you could find that a scroll command
seems to operate in reverse. Instead of the digits scrolling from top to bottom they
could scroll from bottom to top. To correct this problem, just issue the Contraflow
command and the relative positions of the tubes to each other is completely
reversed. Tube 1 becomes tube 4 and so on. Importantly, you do not need to change
the order of any data you are going to send. The use of one contraflow command is
the only compensation you will need to make
<G><C><smartsocket 1><smartsocket 2><smartsocket 3>
In this example using 3 Smartsockets, let‟s assume that Smartsocket 2 needs to be
reversed because it has been mounted on it‟s side, but Smartsockets 1 and 3 are
normally oriented, then the command to use is
<G><C><0><1><0>
(The numeric values are ASCII characters)
15 | P a g e
2.3.11
Command
D
Delay
Transition Delays
Sub
Type
Parameters
Data
(all ASCII)
DA
none
Delay 1,delay 2
DS
O,C,L,R,U
Cycle delay
DR
none
none
Comment
Absolute
delay, each
tube
Synchronised
delays
All delays
cleared
So far in this guide, any digit change transition mentioned has referred to an instant
change or the instant reception of commands. In earlier versions of the software,
when you wanted to scroll a message across the display you literally had to send the
scrolling character data, line by line, with the relevant pauses, to move a static line of
text across the tubes, one tube at a time. This brought about the creation of the scroll
command which now does everything required in one simple command.
A very eyecatching effect can also be created by changing the digits in a display one
character at a time, with a pause in between. This sort of effect might start at tube
position 1 which begins to change immediately, then after a short time delay tube 2
begins to transition, after another short pause tube 3 begins to transition. In this way
a sweeping reveal effect can be created.
To do this without any special commands requires that your host device sends a
sequence of messages, each with a short pause following it, to one tube at a time.
That can be very longwinded !
To make life easier the delay commands have been created and these allow you to
force each tube position to wait before transitioning to the new character you would
like to send.
There are more than enough delay patterns to choose from so you will hopefully be
able to find the right one for your needs.
DA
Delay Absolute
All delays begin counting down when a new character is sent to the displays, the first
delays to expire are the shorter delays. A longer delay means more time passes
before a tube changes from the existing character to the new character.
Absolute delays are defined as a parameter which every tube possesses and which
can be unique and distinct from any delay programmed into a neighbouring display
position.
16 | P a g e
The DA command is a „per tube‟ command, which like other „per tube‟ commands
already detailed requires that a value for every tube position be transmitted with
every instruction.
Valid ranges of delay values are 1-9 (ASCII), with 9 being the longest delay and
roughly equivalent to about 2 seconds duration.
Therefore, if tube 1 has a delay value of 2 and tube 2 has a delay value of 4, then
tube 1‟s delay will expire before tube 2‟s delay and tube 1 will begin the transition to
the new digit before tube 2 will.
If four tubes each have delay values of 2,4,6 and 8 respectively then the effect will
be that the new word will be displayed, revealed from the left to the right, one digit at
a time. The command to use in this example is as follows
<D><A><2><4><6><8>
DS
Delay Synchronised
Synchronised delays are the shortcut way of creating controlled delays where the
one digit‟s delay parameter is a function of the current one.
Let‟s use the previous example where a left to right sweep reveal was constructed
using the command <D><A><2><4><6><8>. The shortest delay is on the left and
the longest on the right.
In situations like this where the delays are a function of each other, where each delay
increases in size by 2. A synchronised delay can easily replace the longwinded „per
tube‟ method.
The correct instruction in this case is
< D > < S > < L > < 2 > (left sweep reveal)
„L‟ in this instruction indicates that the first tube to transition will be the leftmost tube
and the value of 2 defines the wait period before each subsequent tube transitions.
It may not seem like much of a saving with four tubes, but you can imagine how
much easier a left sweep reveal will be with 16 tubes, because exactly the same
command works as well with 16 or even 60 tubes, as it does with 4 !
That covers a left sweep reveal, so you can probably guess the command to use for
a right sweep reveal now. Yes, you just replace the letter L with the letter R
< D > < S > < R > < 2 > (right sweep reveal)
There are three remaining sub-types of this command, O,C and U.
17 | P a g e
O = The transitioning begins from the Outer two tubes and moves towards the centre
C = The transitioning begins in the Centre tubes and works it‟s way outwards
U = Undefined. A pseudo random algorithm selects different values for each tube.
The O and C command structure us the same as for the left and right commands.
The U command requires no additional data, so the command for pseudo random
„undefined‟ delays is simply
<D><S><U>
DR
Delays Reset to zero
Well, after playing around with all those delays it might be the case that it is
impossible to remember what tube is set to which delay value, so why not just issue
a the reset command to bring some sanity back into things !
<D><R>
2.3.12
Command
C
Clock
Clock Commands
Sub
Type
CS
CD
T, D
Data
(all ASCII)
HHMMSS or DDMMYY
T, D
0 or 1 ( „per tube‟ )
Parameters
Comment
Set Time or Date
Display Time or
Date
Basic timekeeping functions have been provided for use in your Smartsocket
projects. This is not a full alarm clock with timezone functionality (yet !) but in terms
of keeping track of the date and time it works well enough.
It has always been assumed that a Smartsocket host will have it‟s own way of
keeping track of the time but it became clear that there are times when a constantly
updated display would be difficult to achieve. In these cases the common factor was
the use of secondary time sources, such as GPS or longwave radio time signals.
In the case of GPS devices these can be quite power hungry and may not always
receive a good signal. In these cases the Smartsocket has it‟s own clock which can
be periodically update or set with the host. The clock was never designed to be
completely free running, however an accuracy of 1 second per day has been
observed in some devices, meaning that only a periodical update of the correct time
will be required.
18 | P a g e
If power failure detection has been implemented in your circuit (which is a standard
feature with the IV17/IV4 explorer boards) then the clock will continue to run even in
the low power standby mode if there is a backup battery connected.
CS Clock Set.
To set the time use the command
< C > < S > < T > < Hours > < Minutes > < Seconds >
Hours minutes and seconds are in ASCII format, 24 hour clock protocol and must
include any leading zero to make up a six digit time. To set the time to 2.25pm the
command is
< C > < S > < T > < 142500 >
To set the date, simply replace the letter T above with the letter D.
< C > < S > < D > < Day > < Month > < Year >
The date is in six digit format again so leading zeros need to be used, together with a
2 digit value for the year. 12th April 2014 would be
< C > < S > < D > < 120414 >
CD Clock Display
Displaying the time or the date is very simple. The command to display the time
looks like this
< C > < D > < T > < Socket 1 (1 or 0) > < socket 2 (1 or 0) > etc
The time display command appears to operate like a group command. The clock is
either displayed or not displayed. A value of 1 in any socket‟s position means that it
will display the time while a value of 0 means the clock display is switched off. (the
clock is always running)
With three Smartsockets and assuming that you want to display the time on the 4
tubes of the last device in your array, the command to use is
<C><D><T><0><0><1>
When the time is displayed the hours and minutes are displayed as HH:MM, while
the seconds tick by on the 6 innermost decimal points in binary code.
The command to display the date is almost identical that that used to display the
time, and you simply need to replace the letter T with the letter D. If we use the three
Smartsockets form the example used to display the time, above, then the command
used to display the ate on the middle 4 tubes of the array, Smartsocket 2 in the
array, is as follows
19 | P a g e
<C><D><T><0><1><0>
The date is displayed as DD:MM on four tubes and the year is displayed in binary
format on the innermost 6 decimal points.
Where a Smartsocket has been displaying the time or the date and the time/date
command is turned off, the previous characters which were being displayed on those
tubes concerned are restored.
2.3.13 Write user defined characters
Command
Sub
Type
Parameters
(all binary)
W
Write
none
Location (1 – 125)
Data
(all binary)
Bit pattern a – p
( 0 or 1 )
Comment
Write a user
character
There are 125 user definable characters available for general use.
To define a character, the state of each segment needs to be set or cleared,
depending on whether or not it is to be set to an on state or an off state.
The segments of the IV-17 have been assigned letters to identify each one, from „a‟
through to „p‟.
To create the number 8 it can be seen that
segments a to h need to be set, as do segments p
and l. To express this as an instruction with which
to store the character in the onboard eeprom
memory, at a desired location, the following
command should be transmitted
< W > < address 0-125 > < 1111111100010001 >
The string of sixteen 1‟s and 0‟s in the previous
command represent the state of the segments a
through p , the first segment after the address
relates to segment „a‟, followed by „b‟, then „c‟ and
so on.
Both the address and the segment bit states are binary values, not ASCII
You will just need to remember where you store your characters so that you can use
them later.
20 | P a g e
2.4
Initialisation
Most electronic devices need to be initialised to a known state before they are used
and the IV17/IV4 Smartsocket is no different.
Before attempting to operate the device the following conditions need to be met.
If you received the Smartsocket
software on a preprogrammed
PIC chip you will receive the
pullup resistor with the chip.
Please install the resistor (4k7)
between PIC pin 2 (RA0) and any
+5V supply line from the main
power supply.
This PIC input is used to detect
power failure of the main supply
which forces the PIC into low
power mode, so the resistor
should not be connected to the
battery backup +ve contact .
If you intend to use the clock functions you
should connect a 32.768kHz timing crystal to
pins 11 and 12, with appropriate capacitors to
suit the crystal (Cx). Some crystals require
12pF load capacitors, others require 20pF. It is
important to be sure that you are using the
correct load capacitors for your crystal.
21 | P a g e
Schematic for an IV17/IV4 Smartsocket controller
The Smartsocket has been designed to
operate with a shift register based driver
design, which for the IV17/IV4 tubes can
be an HV5812, A6812 or MAX6921.
Shown left is the connection schematic
relating to the outputs of the driver used
with IV17/IV4 Smartsockets.
22 | P a g e
Decimal point drive circuit.
This circuit has been
tested and is known to
work well when switching
the decimal point control
lines.
Software initialisation
When power is first supplied to the Smartsocket controller the first task it attempts to
complete is an enumeration routine, where an array of Smartsockets communicates
with one another to establish which tube is tube 1 and which is the last tube of the
array.
This enumeration happens very quickly and should not be disturbed and therefore it
is important that you do not send any messages for the first 100mS after power is
applied. Also note that power should be applied to all Smartsockets at the same
time, if this condition is not met then a manual enumeration can be generated using
the „NN‟ or „ND‟ commands.
The next thing to consider is the speed of your data. Between 300mS and 2000mS
after power is applied the Smartsocket controller listens for a capital letter „U‟ to
arrive, which is the automatic baudrate detection synchronisation character. If you do
not send a character then the speed will be assumed to be 9.6k baud.
Data speeds of between 9.6k and 57.6k baud are possible
Once the baudrate has been set the Smartsockets need to know the number of
IV17/IV4 tubes in the array. One Smartsocket = 4 tubes, two Smartsockets = 8 tubes
and so on.
To set this value, see „section 2.3.4 „Z‟ command‟
In summary, the software initialisation should proceed as follows
23 | P a g e
POWER ON, t = 0mS
Wait 100mS
t=300mS
Send „U‟ if Autobaud is desired
t= 2000mS
Send „Z‟ command to set the number of tubes
END OF INITIALISATION
That is the end of the initialisation process and the Smartsockets are now ready to
operate as commanded.
2.5
HOW TO ?
(In this section it has been assumed that the correct initialisation procedure has been
followed)
With so many commands at your disposal where do you start ?
I will try to cover some of the basic functions to help you to get to grips with how
easy it can be to create stunning effects using very few commands.
Values in <braces> are binary values
How to display the word ‘IV17’ ? (4 tubes)
Send message MD<1>IV17
How to scroll the word ‘IV17’ left to right ? (4 tubes)
Send message MS<50><4><1>IV17
How to scroll the word ‘IV17’ left to right and leave the tubes blank ? (4 tubes)
Send message MS<50><4><1>IV17(4 spaces)
How to scroll the word ‘IV17’ right to left and leave the tubes blank ? (4 tubes)
Send message MS<50><1><4>(4 spaces)IV17
How to make a smooth sweep reveal ? (4 tubes)
24 | P a g e
Set the effect to 1 (fade), speed to 5 (medium) and delay each transition by a value
of <80>
Send GE1
pause 5mS
Send GS5
pause 5mS
Send DSL<80>
This method assume that shorthand „group‟ commands are used, but the same
result can be achieved using the „per tube‟ commands
Send E1111
pause 5mS
Send S5555
pause 5mS
Send DSL<80>
3.1
Test modes
New in Version 2.26 is the facility to test the Smartsocket without the need for a host
device to send data.
Test 1 – Device function (Pin 5 = Pin 1)
Test 1 may be carried out without the need for the HV supply or the tube deck pcb to
be connected because it tests that the microcontroller is operational. Pin 5 (PortA,3)
of the microcontroller will mirror the status of pin 1 during this test. Pin 1 is normally
held high by a pull up resistor so normally Pin 5 will also be high. However, if pin 1 is
connected to 0V then pin 5 will change to 0V too.
Test 2 – Display connections
Test 2 is invoked by connecting pin 1 of the microcontroller to ground. During this
test each segment is tested on it‟s own, from a to p. For example, all segment a‟s will
light first, then all segment b‟s and so on, allowing you to detect if there are any short
circuits or missing connections.
If at any point during this phase of the test cycle 2 segments are lit at the same time
in any tube then you need to check for a short circuit. A likely place to find a short
would be through the creation of a „solder bridge‟ between 2 pins of the HV driver IC.
While each segment is being tested each decimal point in each tube is tested
individually in a scanning pattern from right to left and back again.
Once the segment test is complete the screen test takes place. In alternate tubes all
a to h segments are lit and then all i to p segments are lit. After a short pause the
pattern switches tubes. If any neighbouring tubes display the same pattern then
there is a probably a short circuit between connections to individual tube screens,
possibly at the HV driver again.
25 | P a g e
All displays in all tubes should be of an even brightness during this test.
Test 3 – Data packet reception confirmation (Pin 14 toggles with data)
Test 3 requires that data be sent to the Smartsocket from a host device. This test
confirms that data is being received, although the actual speed may not be correct
for the microcontroller. This test provides confirmation that the host device is able to
communicate with the microcontroller. During this test the status of pin 14 (PortC,3)
alternates between high and low (+5Vdc and 0V) whenever a string of characters
has been received.
All test modes are available at all times, the device does not need to be set to a
special mode to invoke the tests above.
3.2 Troubleshooting
Hopefully you will have trouble free operation, however there are certain limitations
which affect all electronic devices and these should be taken into consideration.
Some effects appear to be corrupt
The only time this has been known to happen is when new message data is sent to
the array before the previous transition effects have completed their cycle. The
solution is to increase the wait time between messages to allow the effect more time
to complete.
The clock stops ticking
This could happen if any message is sent to the displays while the clock is being
displayed, the solution is to send the clock display command again after sending any
other messages
Power Distribution
When connecting several Smartsocket controllers together, solid connections with
good quality wire needs to be made between the power pins of each device. In
addition to this a 0.1uF capacitor and 100uF capacitor should be connected in
parallel with each device‟s power supply pins, as close to the microcontroller as
possible.
When making an array of 2 or more Smartsockets it is advisable to apply power in
the middle of the array, for example, if you have 4 Smartsockets then apply power
after socket 2 and before socket 3 if that is possible. This is especially important if
you have a small 35V supply mounted with each Smartsocket microcontroller.
Data connections should be made using good quality cable, and if long distances are
expected then a shielded cable is better than using multiple core ribbon cables.
26 | P a g e
Command
M
MESSAGE
P
DECIMAL
POINT
Sub
Type
Parameters
(binary)
Data
(all ASCII)
MD
tube_position(b)
message
MS
scroll_wait(b)-start_pos(b)-end_pos(b)
message
MC
none
none
none
none
none
none
O,L,R,B
(each
tube)
1,2,3,4
(each
tube)
Comment
Direct to
tube
Scroll
message
Clears
display
Switches
DP‟s
on/off
DP
animation
Command
Sub
Type
Parameters
Data
Comment
V
Version
none
None
none
Displays Version
Command
Sub
Type
Parameters
Z
Total tubes
none
None
Command
Sub
Type
Parameters
Data
(Binary)
ND
none
0
NN
none
0
Command
Sub
Type
Parameters
Data
(all ASCII)
Comment
F
Font
none
none
0-9 (See font list)
Sets Font
Command
Sub
Type
Parameters
Data
(all ASCII)
Comment
E
Effect
none
none
0-N (See effect list)
Sets transition
effect
Command
Sub
Type
Parameters
Data
(all ASCII)
Comment
S
Speed
none
none
0-9
Sets transition
speed
N
eNumerate
Data
(binary)
Total number of
tubes(b)
Comment
Sets no. Of
tubes
Comment
Pause 40mS (Displays
position)
Pause 40mS(Does not
display)
27 | P a g e
Command
Sub
Type
Parameters
(binary)
Data
(all ASCII)
Comment
I
Independe
nt
IF
tube_position(b)
Font number (0-9)
Sets Font
IS
IE
IM
IP
tube_position(b)
tube_position(b)
tube_position(b)
tube_position(b)
Speed Set (0-9)
Effect (0-N)
Any valid Character
O,L,R,B
Set Speed
Set Effect
Set character
Set DP‟s
Command
G
Group
Sub
Type
GF
GS
GE
GP
GR
GC
Command
D
Delay
Command
C
Clock
none
none
none
none
none
Data
(all ASCII)
Font number (0-9)
Speed Set (0-9)
Effect type (0-N)
O,L,R,B
0,1,2,3
none
1 or 0
Parameters
Sub
Type
Parameters
Data
(all ASCII)
DA
none
Delay 1,delay 2
DS
O,C,L,R,U
Cycle delay
DR
none
none
Sub
Type
CS
CD
T, D
Data
(all ASCII)
HHMMSS or DDMMYY
T, D
0 or 1 ( „per tube‟ )
Parameters
Command
Sub
Type
Parameters
(all binary)
W
Write
none
Location (1 – 125)
Data
(all binary)
Bit pattern a – p
( 0 or 1 )
Comment
Sets Font
Set Speed
Set Effect
Set DP‟s
Digit Rotation
Set
Contraflow
Comment
Absolute
delay, each
tube
Synchronised
delays
All delays
cleared
Comment
Set Time or Date
Display Time or
Date
Comment
Write a user
character
28 | P a g e