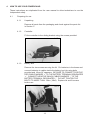
1
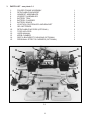
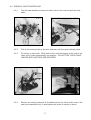
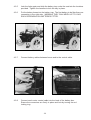
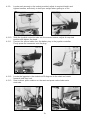
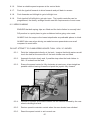
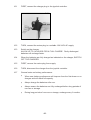
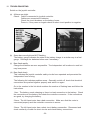
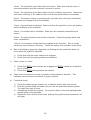
Operator Manual
For
THE METEOR INDEPENDENT
Wheelchair
THE TRULY VERSATILE
FOLDAWAY POWERCHAIR
Before using your wheelchair please read this manual
as it contains important information for the assembly,
transportation and use of your wheelchair.
This user manual should be read carefully before you use your powerchair.
It contains important information regarding the safe operation and maintenance of your
powerchair. Please make sure that you understand all the instructions thoroughly.
If you fail to understand anything or have any questions concerning operation and
maintenance, please contact your supplier who will provide you with expert professional
advice.
The wheelchair has been manufactured in a factory registered to ISO9002.
This product is manufactured to comply with the essential
requirements of the Medical Devices Directive 93/42 EEC.
In line with our policy of continuous improvement we welcome any suggestions that could
lead to product improvement. Features may alter but the information and the instructions in
this manual will be representative.
-1-
CONTENTS
1
INTRODUCTION
2
WHEELCHAIR TRANSPORTATION IN MOTOR VEHICLES
3
PARTS LIST
4
HOW TO USE THE POWERCHAIR
5
USING YOUR POWERCHAIR DO's & DONT's
6
USING YOUR POWERCHAIR ADJUSTMENTS
7
GETTING IN
8
TRANSFERRING SIDEWAYS
9
DRIVING
10 BATTERIES & CHARGING
11 TROUBLESHOOTING
12 MAINTENANCE SCHEDULE
13 SERVICE HISTORY
14 WARRANTY
Issue 2: Jan 2000
-2-
RJINDUSB
1
INTRODUCTION
Your new product is an outdoor powered wheelchair that can be used indoors.
It is designed to transport one person up to 114 kg's (18 stone) in weight and this total weight
should not be exceeded.
The Powerchair has been produced to incorporate features requested by customers.
●
Easily detachable motors to reduce lifting weight.
●
Armrests that adjust for width as well as height to allow for different clothing.
●
Individual battery boxes to reduce lifting weight.
●
The latest programmable controller. The smallest self-contained controller
with the latest technology.
●
Legrests that lock in forward and rear position.
●
Compact folding frame.
●
Fully detachable backrest.
●
Comfort cushion seating.
●
Kerb climber.
●
Optional personal effects holders.
This User Manual has been produced to help you get the best out of your new powerchair.
Driving and using your powerchair is simplicity itself.
Please read all this user manual and keep it in a safe place so that you can refer to it later.
-3-
2
WHEELCHAIR TRANSPORTATION IN MOTOR VEHICLES
All of the wheelchairs in our range are designed to be easily transported and most of them dismantle
into manageable parts in seconds.
Consideration should be given to the type of vehicle in which the wheelchair may be carried. A small car
with a heavy power chair in the boot may be affected in the way in which it steers or brakes, so care should
be taken to distribute the load sensibly.
It should also be noted that even a lightweight manual wheelchair has considerable mass in the event of
emergency braking and some form of restraint is essential when transporting any wheelchair in any
vehicle.
It is strongly recommended that the user transfers to a vehicle seat and the wheelchair is transported
separately. However, if this is not possible and the user intends to travel in a moving vehicle whilst seated
in the wheelchair, it is essential they follow clear safety guidelines and understand that this is not
as safe as using the vehicle seat.
Many of our wheelchairs have been shown to withstand simulated crash conditions without injury to the
user. We have compiled a separate document describing the conditions in which these tests were carried
out and clearly detailing the manner in which the wheelchair should be restrained. Any wheelchair
restraints must be separate to the user restraints.
It is the responsibility of the transport operator and the wheelchair user to ensure that safety measures
taken are suitable for both the wheelchair user and other passengers.
All passengers in motor vehicles accept that risk is involved in travel but this is compounded by
wheelchair use. The wheelchair brakes are not designed to withstand forces such as cornering,
acceleration and braking within a motor vehicle, therefore additional special restraints must be provided.
The wheelchair should be secured to the vehicle floor in-line with the direction of travel. The occupant
should be separately restrained to the vehicle and NOT to the wheelchair. Installers and operators of
restraint systems should be trained in their correct use by the restraint manufacturer, or approved
specialist. Additional fittings such as trays should be removed and stowed separately. It is recommended
that wheelchairs with a full height backrest are used.
R J Mobility have undertaken crash testing to latest known international standard test methods and
recommend the use of the Unwin 4 - Point Tie Down system. The following wheelchairs have been tested
and we have published details which are available upon request.
Barrett 101
Barrett 7H
Barrett 10H
Original Meteor
Mini-Meteor
Independent Meteor
Other products in our range and R J Mobility products manufactured prior to testing have been used to
transport users in motor vehicles over many years without serious incident and it must be decided by the
user/carer whether to continue to do so. It is not as safe as travelling in a vehicle seat and there are
risks involved. These are minimised with the use of effective recommended equipment/restraints and
our company believes in freedom of choice for informed individuals so please be aware of the risks and
make your own informed choice.
To obtain free written details of the tests we have carried out, please write to:
R J Mobility Limited
Boy Lane
Wheatley
Halifax
HX3 5AF
-4-
3
PARTS LIST - see photo 3.1
1.
2.
3.
4.
5.
6.
7.
8.
9.
10.
11.
12.
13
14.
15.
FOLDED FRAME ASSEMBLY
DETACHABLE BACKREST
ARMREST ASSEMBLIES
LEGREST ASSEMBLIES
BATTERY TRAY
BATTERY CHARGER
BATTERY BOXES
JOYSTICK CONTROLLER AND BRACKET
GEL BATTERIES
DETACHABLE MOTORS (OPTIONAL)
TYRE INFLATOR
USER MANUAL
KERB CLIMBER
SEAT & BACKREST CUSHIONS (OPTIONAL)
PERSONAL EFFECTS CARRIERS (OPTIONAL)
1
1
2
2
1
1
2
1
2
2
1
1
1
1
3
1
9
9
10
10
5&6
7
3
7
3
8
2
14
14
4
4
15
15
13
3.1
-5-
4
HOW TO USE YOUR POWERCHAIR
These instructions are duplicated from the user manual to allow technicians to use the
Independent safely.
4.1
Preparing for use
4.1.1
Unpacking
Remove all parts from the packaging and check against the parts list
in Section 3.
4.1.2
Controller
Fit the controller to the sliding bracket using the screws provided.
4.1.2
4.1.3
Battery Box
Remove the two screws securing the lid. Put batteries in the boxes and
connect batteries to cables inside the battery box lids using bolts
provided and 10mm AF spanners. BE SURE TO CONNECT POSITIVE
RED CABLE MARKED ‘+’ TO THE BATTERY TERMINAL DESIGNATED
‘+’. CONNECT NEGATIVE BLACK CABLES MARKED ‘-’ TO THE
BATTERY TERMINAL DESIGNATED ‘-’. DO NOT TIGHTEN THE
BOLTS TO MORE THAN 13Nm (10lbft). Replace lid and fit screws
before use.
4.1.3
-6-
4.2 OPENING YOUR POWERCHAIR
4.2.1
Grip the seat handles or frame at either side of the seat and pull the chair
open.
4.2.2
4.2.1
4.2.2
Pull up the locking links at the front and rear until they automatically latch.
4.2.3
Fit motors to each side. Slide each motor onto the tongue at the rear of the
chair until it locks automatically into position. DO NOT USE YOUR CHAIR
UNLESS BOTH MOTORS ARE SECURED.
4.2.3
4.2.4
4.2.4
Slacken the locking links and fit the backrest into the tubes at the rear of the
seat, push backrests fully in and tighten the knobs to secure in place.
-7-
4.2.5
Lock the links again and slide the battery tray under the seat into the locations
provided. Tighten the handles to lock the tray in place.
4.2.6
Put the battery boxes into the battery tray. The first battery to be fitted has one
connection in the right side. WARNING THEY CAN WEIGH UP TO 15KG
EACH DEPENDING ON BATTERIES FITTED.
4.2.5
4.2.7
4.2.6
Connect battery cables between boxes and to the control cable.
4.2.7
4.2.8
4.2.8
Connect each motor control cable into the back of the battery box.
Ensure the connectors are firmly in place and lock by turning the red
locking ring.
-8-
4.2.9
Locate each armrest in the socket provided, adjust to required height and
tighten handles, sufficiently to hold your weight when getting in or out.
4.2.9
4.2.10
4.2.11
4.2.10
Slide the joystick controller tube into the armrest socket, adjust for required
position and tighten the knob.
Connect the control cable from the battery tray to the joystick controller.
Firmly press the connector onto the plug.
4.2.12
4.2.11
4.2.12
4.2.13
Locate the legrests in the sockets at 90 degrees to the chair and rotate
forwards until they lock.
Seat cushion: place cushion on the seat and press velcro tabs under
seat tube.
4.2.13
4.2.15
-9-
4.2.14
Backrest cushion: place cushion against backrest and fold pocket
over the backrest fabric.
4.2.15
Press seat flap onto backrest velcro, trapping optional backrest pocket tabs
also.
4.2.16
Optional armrest personal effects carriers: Slide a loop over the rear of the
armrest, slide the carrier forward and push the other loop over the front of
the armrest.
4.2.16
4.2.17
4.2.17
Kerb climber:
Rotate legrests to rear. Put the kerb climber tube in both sockets of the side
frame and push in spring pins through holes in the sockets and tubes.
ENSURE THAT THE PINS ARE THROUGH BOTH SIDES OF EACH
SOCKET AND THE KERB CLIMBER IS FIRMLY LOCATED BEFORE USING
THE CHAIR.
4.3 FOLDING YOUR POWERCHAIR
4.3.1
The way to fold the Independent is generally the reverse sequence of
previous Section. A brief description of each operation is given.
4.3.2
Remove backrest cushion by releasing the seat flap, lifting the pocket and
cushion off.
4.3.3
Remove seat cushion by pulling the velcro tabs to release.
4.3.4
Flip up footplates and rotate legrests to rear or remove them when they point
away from the chair.
4.3.5
Remove the kerb climber (if fitted) by pulling out the spring pins.
4.3.6
Disconnect the joystick controller by pulling off the control cable connector.
4.3.7
Remove the controller by loosening the locking knob and pulling the
controller tube out of the armest.
-10-
4.3.8
Loosen the armrest handles and lift out the armrest.
4.3.9
Disconnect the motors and the batteries.
4.3.10
Remove both battery boxes. WARNING: THEY CAN WEIGH UP TO 15KG
EACH DEPENDING ON BATTERIES FITTED.
4.3.11
Remove the battery tray by releasing the two locking knobs and lifting at the
back and pulling towards you. (Guide the cable through the frame).
4.3.12
Slacken the locking links and remove the backrest by releasing the
thumb knobs.
4.3.13
Remove each motor by pulling each locking lever in turn backwards and
sliding a motor and wheel off the locating tongue.
Fold the frame by initially pulling upwards on the seat fabric at front and rear.
Fully fold by pushing on the OUTSIDE of the seat tubes - KEEPING FINGERS
OUTSIDE OF THE FRAME.
Fold the seat fabric into a ‘W’ shape and tuck lightly between the seat tubes.
-11-
5
USING YOUR POWERCHAIR : DO'S AND DONT'S
DO check that the controller is switched off and the parking brakes are on before getting in.
DO take care negotiating inclines, uneven, soft or slippery surfaces, as the risk of tipping over is
increased and directional control may be impaired.
DO be aware of the surface temperature of all powerchair parts in hot and cold weather.
DO be aware that erratic control can cause injury to the user and other people.
DO be aware that effectiveness of the parking brakes may be reduced if the tyres are wet, muddy
or greasy.
DO observe the Highway Code.
DO avoid soft ground.
DO keep clothes, rugs, covers, etc. clear of the wheels.
DO fit a waist safety belt for additional security.
DO be aware that most pavements slope slightly towards the kerb and the powerchair may tend
to pull towards the road.
DO use two hands for pushing.
DO take care when starting off as the castors require to swivel in the direction of travel before
steering is fully effective.
DO leave sufficient distance to brake.
DO remember sudden braking can throw the user forward.
DO use the parking brakes when leaving the powerchair unattended.
DO use the parking brakes when the free wheel device is disengaged.
DO
DO
DO
DO
DO
DO
DO
keep moving when travelling up inclines.
proceed slowly up inclines allowing the speed to build up to the desired level.
engage the free wheel device before switching on the controller.
proceed slowly down inclines.
operate only from a seated position.
reduce speed when turning and manoeuvring in confined spaces.
take care when turning on a slope.
DO release the joystick when requiring to stop in an emergency.
DO take extra care when performing a spin turn to avoid striking people or objects.
DO check the battery fuel gauge before using.
DO check that ramps are sturdy enough to take combined weight of the powerchair and
occupant.
DO restrain powerchair components when transporting in a motor vehicle.
DO check that the controller is switched off when leaving the powerchair unattended.
DO keep the control system and joystick clean.
DO ensure that the powerchair is hygienically clean and suitable for multi-user use, if applicable.
-12-
DO NOT use without footplates, as feet may become trapped underneath.
DO NOT use without armrests fitted, as you may fall out, or catch clothing in the wheels.
DO NOT carry heavy objects/passengers, as this may lead to instability.
DO NOT lift using the armrests or footrests - always use the main frame.
DO NOT trap fingers between the brake pad and the tyre.
DO NOT use while under the influence of drugs or alcohol.
DO NOT strap feet to the footplates on this type of powerchair as the footrest assemblies cannot
be locked into position.
DO NOT force the powerchair forward if it becomes unstuck.
DO NOT use the powerchair if pneumatic tyres are fitted and are not inflated to the correct
pressure as this may render the brakes ineffective.
DO NOT stand on footplates under any circumstances.
DO NOT attempt to turn at full speed.
DO NOT use if a flashing light on the controller indicates a fault.
DO NOT descend steps or kerbs forwards.
DO NOT attempt to drive until the parking brakes have been released.
DO NOT attempt to climb kerbs without a kerb climber attachment.
DO NOT attempt to climb kerbs greater than 100mm (4") with a kerb climber fitted.
DO NOT rely solely on the parking brakes when parked on a slope.
DO NOT totally exhaust the batteries as this will reduce their effective life.
DO NOT use if the controller or electrical system is damaged.
DO NOT seat the occupant in the powerchair when in a motor vehicle.
DO NOT spill liquids on the controller.
-13-
6
USING YOUR POWERCHAIR
6.1 Armrest adjustment
The armrest can be adjusted for both height above seat and to additional width.
Slacken the appropriate handle, move the armrest and re-tighten the handle.
6.1
HEIGHT
ADJUSTMENT
WIDTH
ADJUSTMENT
6.2 Legrest adjustment
6.2.1
The footplate to seat distance can be adjusted by slackening the stem clamp
nut, selecting stem length and re-tightening to 27Nm (20 lbs ft).
6.2.2
6.2.1
6.2.2
The footplate angle to stem can be adjusted by slackening the locknut on the
adjusting screw, and rotating the screw until the required footplate angle is
obtained. Re-tighten the locknut on the adjusting screw to 13Nm (10lb ft).
6.3 Parking Brake Adjustment
Adjust the brakes by loosening the locknut and
rotating the brake shoe to achieve effective
parking brake. The brake is intended to hold the
chair facing down a 10 degrees slope with a 90kg
occupant and operating force of less than
60N (13lbf).
-14-
7
GETTING IN
ALWAYS MAKE SURE THAT THE PARKING BRAKES ARE ON.
DO CHECK THAT THE JOYSTICK CONTROLLER IS SWITCHED OFF.
DO NOT STEP ON THE FOOTPLATES WHEN GETTING IN YOUR POWERCHAIR.
DO CHECK THAT THE ARMRESTS ARE SECURE IF YOU INTEND TO LEAN ON
THEM WHILE GETTING IN.
8
1.
Flip up footplates.
2.
Rotate legrest support to rear if necessary by lifting the legrest support and
turning to rear, where they will lock into position.
3.
Assume a comfortable seated position.
4.
Lift and rotate legrest supports forward.
5.
Lower footplates and put feet on plates against heel loops.
TRANSFERRING SIDEWAYS
ALLWAYS MAKE SURE THAT PARKING BRAKES ARE ON WHERE POSSIBLE
AND MOTOR CLUTCHES ARE ENGAGED BY TURNING LATCHES OUTWARDS.
DO CHECK THAT THE JOYSTICK CONTROLLER IS SWITCHED OFF.
1.
Position your powerchair next to the seat or surface you wish to move onto.
2.
Switch off the controller, put on the brakes if accessable.
3.
Ensure motor clutches are engaged as this will also prevent movemnet.
4.
Flip up footplates.
5.
Place one hand on the surface you are moving to.
6.
Place the other hand onto the chair.
7.
Move forwards on the seat, and leaning slighlty forward, push upwards and
slide sideways.
-15-
9
DRIVING
NEVER carry passengers or excessive personal effects.
ONLY sit facing forwards in a comfortable position.
DO put feet on footplates.
DO engage the motor clutches before releasing parking brakes.
9.1 BASICS
9.1.1.
When in a comfortable seated position check motor clutches are engaged by
turning them outwards towards each wheel.
9.1.1
BATTERY
GAUGE
ON/OFF
JOYSTICK
SPEED
CONTROL
9.1.2.
9.1.2.
Turn the overall speed control anti-clockwise to minimum.
9.1.3.
Release both the parking brakes.
9.1.4.
Switch on the controller:
If lights flash slowly the batteries will need charging before use. If the display
flashes repeatedly, switch off and try again. If the display flashes again refer
to the Troubleshooting Section (8).
9.1.5.
Driving and steering the Independent is straightforward. Always bear in mind
the general safety hints that follow and you should have few problems.
DO remember that the best controlled braking is achieved by simply releasing
the joystick.
DO remember your powerchair is very quiet and may not be heard by other
people.
DO NOT attempt to turn at full speed, ALWAYS reduce speed with the joystick
or at the speed control knob.
DO TAKE CARE on slippery, soft or loose surfaces - drive and turn slowly.
DO TAKE CARE on slopes, ALWAYS approach steps slowly especially
turning or driving across slopes or you may tip the chair over.
-16-
9.1.6.
Select a suitable speed response at the control knob.
9.1.7.
Push the joystick forwards to drive forwards and pull back to reverse.
9.1.8.
Push forwards and left/right to get a left/right turn.
9.1.9.
Push joystick full left/right to get spin turns. The joystick controller can be
programmed, the factory settings should meet the requirements of most users.
9.2 KERB CLIMBING
ENSURE that both spring clips are fitted and the kerb climber is securely held.
DO practice in a quiet place to gain confidence before going onto roads.
ALWAYS look for ramps or the lowest steps/kerbs as preferable places to climb.
ALWAYS take care when driving on roads because powerchairs are small
compared to most traffic.
DO NOT ATTEMPT TO CLIMB KERBS HIGHER THAN 11CM / 41/4 INCHES.
9.2.1.
Point the Independent directly at the kerb. Imagine that both castors would
touch the kerb at the same time if the kerb climber was not fitted.
9.2.2.
Approach the kerb slowly and, if possible stop when the kerb climber is
5cm / 2 inches from the kerb.
9.2.3.
Ensure the speed control is fully clockwise at maximum, sit as straight as
possible without leaning forward and push the joystick fully forward.
9.2.3.
9.2.4.
Maintain full power as the kerb climber lifts the castors followed by the rear
wheels climbing the kerb.
9.2.5.
Reduce speed to maintain control when the rear wheels have climbed.
9.2.6.
Reset the speed control to suit normal use.
-17-
9.3 DESCENDING KERBS
DO practise in a quiet place to gain confidence before going onto roads.
LOOK first for ramps or very low steps (21/2 cm / 1 inch) that can safely be
negotiated forwards.
ALWAYS descend higher steps very slowly backwards.
ALWAYS take care when driving on roads because powerchairs are small compared to
most traffic.
9.3.1.
Stop before reaching the step or kerb.
9.3.2.
Turn to face away from the step.
9.3.3.
Turn the speed control anti-clockwise to minimum.
9.3.4.
Reverse very slowly until the rear wheels reach the edge of the step and then
slowly drive over the edge. If possible lean forwards.
9.3.5.
Continue reversing very slowly to lower both front castors down the step.
9.3.6.
Turn the chair and reset the speed control to a suitable level.
9.4 PARKING
ALWAYS switch the joystick controller off.
ALWAYS apply both parking brakes.
Before leaving the Independent:
9.4.1.
Apply both parking brakes.
9.4.2.
Engage both the motor clutches.
9.4.3.
Switch off the joystick controller.
9.4.4.
If legrest supports are rotated to the rear ensure footplates are turned up to
prevent people bumping into them.
9.4.5.
When leaving your powerchair for longer periods, e.g. overnight charging,
winter storage, leave both motor clutches engaged.
9.5 NON POWERED MOVEMENT
REMEMBER that the Independent is heavier than a manual wheelchair and can be
more difficult to hold or to push on slopes.
DO NOT switch on the joystick controller.
After parking, you can manoeuvre your powerchair by hand as follows:
9.5.1.
Release both the motor clutches.
9.5.2.
Check that your powerchair will not “run away” if parked on a slope and, if
satisfied, release both parking brakes.
9.5.3.
Push at the hand grips on the backrest. You will find that more effort is
required than pushing a manual wheelchair.
9.5.4.
When finished, apply both parking brakes and engage motor clutches.
-18-
10 BATTERIES & CHARGING
Please note the following safety information. In normal use you should have few
problems using and charging your batteries.
NEVER SMOKE OR USE NAKED FLAMES NEAR THE BATTERY. THE GASES THAT
CAN BE GIVEN OFF ARE EXPLOSIVE. THE ACID CONTAINED WITHIN THE GEL
BATTERIES IS FIXED WITHIN THE GEL ITSELF. IT CAN ONLY ESCAPE IF THE
CASING IS DAMAGED. IT IS STILL ACID AND IT WILL BURN. AVOID CONTACT
WITH THE SKIN AND EYES. IF YOU DO GET IN TO CONTACT WITH ACID, WASH
IT OFF WITH PLENTY OF WATER AND CONSULT YOUR DOCTOR.
BATTERY MAINTENANCE
IT IS IMPORTANT TO REALISE THAT GEL BATTERIES ARE DIFFERENT FROM
CONVENTIONAL WET LEAD BATTERIES. THERE IS ABSOLUTELY NO
REQUIREMENT TO TOP UP THE BATTERY WITH DISTILLED WATER AT ALL.
DO NOT attempt to remove the valve covers. This will void the guarantee.
DO NOT put any metal objects on top of the battery. This is dangerous and can
damage the battery.
DO NOT allow the battery to be left in a discharged condition.
DO KEEP the battery top clean and dry.
DO LEAVE the battery in a fully charged state before any long periods of non-use of
the chair (during winter months for instance). In this condition the batteries need no
further attention for up to 6 months when it is then necessary to recharge.
CHARGING BATTERIES
DO USE only the charger that has been recommended for use with the gel batteries.
THIS IS VERY IMPORTANT.
DO remove the charger from its packaging and stand it on a level surface ensuring
an adequate flow of air around the charger.
DO switch off at mains before disconnecting it from the chair when it is fully charged.
DO keep the charger away from water and damp conditions.
DO NOT cover or obstruct the passage of air around the charger.
DO NOT use the charger unless the mains supply is properly earthed.
DO NOT switch the charger on until you have plugged it into the wheelchair.
DO NOT use the charger outdoors.
-19-
10.1
FIRST, connect the charger plug to the joystick controller.
5.9.1
10.2
THEN, connect the mains plug to a suitable 13A 240V AC supply.
10.3
Switch on the charger.
ALLOW UP TO 14 HOURS FOR A FULL CHARGE. Partly discharged
batteries will recharge faster.
10.4
When the batteries are fully charged as indicated on the charger, SWITCH
OFF THE CHARGER.
10.5
FIRST, remove the mains plug from supply.
10.6
THEN, disconnect the charger from the joystick controller.
10.7
General notes on battery performance:
●
When new, battery performance will improve from the first dozen or so
charges and will reach full capacity.
●
Always charge the batteries after use.
●
Always ensure the batteries are fully recharged before long periods of
non-use or storage.
●
During long periods of non-use or storage, recharge every 6 months.
-20-
11 TROUBLESHOOTING
Switch on the joystick controller.
(a) All bars are alight.
Check: Cable is connected to joystick controller.
Cables are connected to batteries.
Check the circuit breakers on the battery boxes.
Press in, if they come out again check for short circuit positive to negative.
BATTERY
GAUGE
ON/OFF
JOYSTICK
SPEED
CONTROL
8.1(a)
8.1
(b) Some bars are alight and NOT flashing.
The battery gauge indicates the state of the battery charge in a similar way to a fuel
gauge. Recharge the batteries before use if necessary.
(c) Bars flash rapidly.
Charge the batteries as soon as possible. The Independent will continue to work but
may lose power.
(d) Bars flash slowly.
This indicates the joystick controller safety circuits have operated and prevented the
Independent from moving.
The following list indicates problem areas. Generally, switch off, check that electrical
connections are pushed together properly and switch on again.
Go to the number in the list which matches the number of flashing bars and follow the
instructions.
1 bar: The battery needs charging or there is a bad connection to the battery. Check
the connections to the battery and check the controller connector. If the connections
are good, try charging the battery.
2 bars: The left hand motor has a bad connection. Make sure that the motor is
connected properly and the controller connector is secure.
3 bars: The left hand motor has a short circuit battery connection. Disconnect and
check continuity of cable for short circuits and check battery connections.
-21-
4 bars: The right hand motor has a bad connection. Make sure that the motor is
connected properly and the controller connector is secure.
5 bars: The right hand motor has a short circuit to a battery connection. Disconnect
and check continuity of the cable for short circuits and check battery connections.
6 bars: The battery charger is preventing the controller from driving the wheelchair.
Disconnect the charger from the wheelchair.
7 bars: A joystick fault is indicated. Make sure that the joystick is in the rest position
before switching on the controller.
8 bars: A controller fault is indicated. Make sure the controller connections are
secure.
9 bars: The parking brakes have a bad connection. Check the parking brake and
motor connections.
10 bars: An excessive voltage has been applied to the controller. This is usually
caused by a poor battery connection. Check the battery and controller connections.
e)
Bars of the battery gauge are alight and not flashing but the powerchair does not
move when the joystick is operated.
1)
2)
f)
Check that both the motor latches are engaged.
Check that both the parking brakes are released.
Chair moves in a circle.
1)
2)
Check that BOTH motor latches are engaged and BOTH wheels are locked/not
free to rotate.
Check that BOTH parking brakes are relased.
g)
Chair does not respond correctly to joystick in either speed or direction. This
indicates incorrect motor connection or faulty controller.
h)
Functional check.
1)
2)
3)
4)
Check the battery gauge remains on, or flashes, slowly, after one second.
Push the joystick slowly forwards until you hear the automatic brakes operate.
The chair may start to move.
Immediately release the joystick. You must be able to hear each parking brake
operate within a few seconds.
Repeat the test a further three times, pushing the joystick slowly backwards, left
and right.
-22-
12 MAINTENANCE SCHEDULE
IMPORTANT
It is advisable that professional
servicing is carried out at six monthly
intervals for a powerchair in constant
daily use.
For a powerchair exposed to less
usage, the weekly checks should be
carried out every time the powerchair
is used.
DAILY CHECK:
Battery fuel level.
Power braking is effective.
Parking brake operation.
Steering is effective.
WEEKLY CHECK:
Set and backrest upholstery/cushions for tears or damage.
Push handles for security.
Wheel and castor security.
Locking link and thumb catch security and operation.
Cross brace folding mechanism. Check that the pivot bolts are not loose.
Do not overtighten as this will cause securing tab fracture.
Tyre pressure and condition (if pneumatic option fitted).
Folding mechanism.
Castor and wheel security.
-23-
GENERAL CHECKS TO BE CARRIED OUT AT
MONTHLY INTERVALS
IMPORTANT
If any of the items listed below give cause for
concern, consult your powerchair supplier
immediately.
It is advisable that professional servicing is
carried out at six monthly intervals for a
powerchair in constant daily use.
FRAME
1
Inspect frame for damage or fractures and condition of chrome plating.
2
Open the powerchair. All movements should be free throughout the folding range and
should not bind or seize whilst operating.
3
Examine folding mechanism; all pivot bolts should be secure with no sign of nuts or bolts
working loose, but must be free enough to allow the component parts to move whilst
operating. Check thumb catches and lock are not damaged.
UPHOLSTERY AND ARMRESTS
1
Examine the seat and backrest fabric for wear or damage. Examine retaining screws for
tightness. Any that are protruding or loose should be tightened with a Philips style (cross
point) screwdriver.
PARKING BRAKES
1
Examine the parking brakes for wear, damage or misalignment. Ensure that both brakes
prevent the rear wheels turning, when fully applied and the tyres are inflated to the correct
pressure. If not, refer to your powerchair supplier or agent for adjustment. Do not attempt
to do it yourself.
CASTORS AND WHEELS
1
Check castors for security and free rotation of castor wheel and swivel assembly. Look for
looseness or binding.
2
Check rear wheels for free and easy rotation. Check that the powerchair does not have a
tendency to veer to the left or right.
3
Examine tyres for wear and tear and check inflation pressures if fitted with pneumatic tyre
option.
-24-
13 SERVICE HISTORY
As it is important to keep a documented record of service and repairs to your wheelchair, this
section of your manual should be completed by your wheelchair supplier with details of any work
carried out. This information will also be helpful to your supplier, and to you, should you decide
to sell or exchange your wheelchair. Please ensure that this manual accompanies your
wheelchair whenever a service is required (recommended every 6 months) or any work is carried
out.
Service Interval
Details of work carried out
Repairer’s stamp
6 Months
Date
Service Interval
Details of work carried out
Initial
Repairer’s stamp
6 Months
Date
Service Interval
Details of work carried out
Initial
Repairer’s stamp
6 Months
Date
Service Interval
Details of work carried out
Initial
Repairer’s stamp
6 Months
Date
Service Interval
Details of work carried out
Initial
Repairer’s stamp
6 Months
Date
-25-
Initial
Service Interval
Details of work carried out
Repairer’s stamp
6 Months
Date
Service Interval
Details of work carried out
Initial
Repairer’s stamp
6 Months
Date
Service Interval
Details of work carried out
Initial
Repairer’s stamp
6 Months
Date
Service Interval
Details of work carried out
Initial
Repairer’s stamp
6 Months
Date
Service Interval
Details of work carried out
Initial
Repairer’s stamp
6 Months
Date
-26-
Initial
14 WARRANTY
In the unlikely event of your needing it, The Manufacturers warranty is:
1
Defective parts and items of faulty workmanship will be replaced or repaired free of
charge for the first 12 months following delivery (24 months in the case of the
crossbrace and frame).
2
This warranty does not apply to fair wear and tear, or where deterioration results from
neglect, carelessness, accident, misuse, unauthorised modification or the fitting of
parts not supplied by The Original Manufacturer.
Please contact the supplier of your wheelchair to arrange warranty repairs.
This does not affect your statutory rights.
-27-
The Foldaway Powerchair
Being the newest design available, this Powerchair incorporates a host of individual
details following extensive consultation with users and prescribers. It quickly dismantles
into light, folding sections. The armrests and footrests are fully adjustable. Re-charging
the sealed for life batteries is simple.
The latest state-of-the-art fully programmable electronic controller gives easy-to-use
superior performance. Automatic braking, back-up manual parking brake, super comfort
upholstery, the personal effects holder, all demonstrate attention to detail, performance
and quality.
FEATURES
●
●
●
●
●
●
●
Battery gauge
Sealed for Life batteries
Manual parking brakes for
added safety
Automatic braking system
Super-comfort upholstery
Personal effects holder
Seat width choice 36cm - 46cm (14” - 18”)
●
●
●
●
●
●
●
Fully adjustable armrests
for height and width
Detachable swinging height
adjustable foot rest
Fully programmable controls
Front charging facility
Tyre inflator
Anti tip rollers
Detachable Kerb Climber
Detachable drive system for
ease of carrying
● Folding frame
● Individual battery boxes for
ease of lifting
● Detachable backrest
● Heel loops
● Comfort Seating System
●
PERFORMANCE
●
SPEED 4mph (6kph)
●
RANGE UP TO 10 MILES (16km)
TECHNICAL SPECIFICATION
DESCRIPTION
Boy Lane
Wheatley
Halifax
HX3 5AF
Telephone
+44 (0)1422 358888
Facsimile: 355924
INDEPENDENT
Overall Width (46cm Chair)
67cm (26.5”)
Height of Back from Seat
Seat to footrest
Seat to ground
46cm (18”)
33cm - 46cm (13” - 18”)
48cm (19”)
Castor Size
Wheel Size
19cm (7.5”)
31cm (12.5”)
Weight Complete
Heaviest Component
66.2kg (146lb)
12.7kg (28lb)
Folded Size (LHW)
64x48x38cm
Without Motors
(25x19x15”)
Seat Width (Nominal)
36cm - 46cm (14” - 18”)
Seat Depth (Nominal)
41cm (16”)
Maximum Carrying Weight
114kg (18stone)
CONDITIONS: THE MANUFACTURERS reserve the right to alter or modify specifications without prior notification. The information in this
literature is for guidance purposes only and must not be regarded as a manufacturing standard.