1
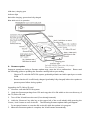
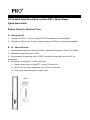
X1 Portable High Resolution Lossless DAP / Music Player
Quick Start Guide
Before Using for the First Time
A. Charge the X1
1. Charges to full in ~3 hours using DC 5V/2A adapter (recommended)
2. Charges to full in over 5 hours using computer USB port (not recommended)
B. TF / Micro SD card
1. Recommended brands: Genuine Sandisk, Transcend, Kingston—Class 6 or above
2. Maximum supported size: 128G
3. Recommend formatting card to FAT32 format or inserting card into X1 for
formatting
4. Inserting / removing TF / Micro SD card
i)
Open rubber flap to reveal TF / micro SD card slot
ii) Insert card into slot and press into slot to install card
iii) Press card into slot again to eject card
Slot
Operating the X1
C. Basic Operations
Power on:
Hold “Power / Lock” key for 2s, the screen will turn on and show the boot animation.
On first power-on, the language selection menu will appear.
Turn the scroll wheel to choose the
desired UI language, press “OK” in the middle of the scroll wheel to confirm and enter the main menu.
Main menu: use the scroll wheel or the “previous” “next” buttons below the scroll wheel to choose
between menu options, press “OK” to confirm and enter the corresponding entry.
Data transfer:
Use the included Micro USB cable to connect the X1 to the computer.
would show the below animation to confirm connection.
X1’s display
The TF / Micro SD card you now insert /
have inserted into the X1 will now appear on your computer and you may copy fillies to them.
Headphone out / Line out port
Power / Lock key
Lockscreen: with X1 powered on, press key briefly to lock and turn off screen, press briefly again to
unlock
Volume +
Volume –
Shortcuts key
Scroll wheel: choose between options
360° rotation
Up / Previous track /
hold down to rewind
Display
Back / hold down to return to main menu
Play / Pause / OK / confirm / hold down to show volume control dialog
TF / Micro SD card
Down / Next track / hold down to fast forward
USB data / charging port
Indicator light
Red while charging, green when fully charged
Blue while unit is in operation
D. Firmware update
Improper operations during a firmware update may cause the X1 to malfunction!
Please read
the following guide to updating the firmware carefully before proceeding.
-
Choose a TF card with FAT32 file system, preferably a blank card with capacity at or under
32GB.
-
Ensure that the X1 is sufficiently charged (preferably fully charged) before the update to
prevent power failure during update.
Upgrading via TF / Micro SD card:
1.
Choose a card with FAT32 file system.
2.
Unzip the firmware package from FiiO and copy the x1.fw file within to the root directory of
the TF / Micro SD card.
3.
Turn off the X1 and insert the card (if not already inserted).
4.
Hold the “Shortcuts” key (the key to the upper left of the scroll wheel) while pressing the
“Power / Lock” button to turn on the X1.
The following firmware update dialog will appear.
-
Do not press buttons or turn the dial on the X1 while the update is in progress.
5.
When the firmware update is complete, the X1 will restart automatically.
Firmware updating
Firmware update successful
-
Please delete the x1.fw file from the TF / Micro SD card after the update is complete.
-
Please update the media library again after the firmware update.
Notes on usage
★The X1 will skip any songs it has trouble decoding to prevent hang-ups.
★If the charging current from the power adapter is too high, the X1 would switch off
automatically and stop charging.
Please switch to an appropriate charger; rating of
DC5V/2A is recommended.
★If a system error or hangup occurs, try pressing the reset button with a toothpick or
hold the Power / Lock button for 6s to force a shutdown.
★After copying songs to card(s) on the X1, the media library needs to be updated for songs
to show on the category menus and play under all modes.
“Update media lib” can be set to
Manual or Auto under System Settings. The “Auto” setting is recommended.
Caution
The battery is not designed to be user-serviceable. Attempting to service or change the battery improperly
may lead to explosion risk. Only batteries of the same type may be used in exchange for the original
battery.
If the unit is to be left unused for a long time, please recharge the unit periodically to preserve its
battery life.
Batteries should not be exposed to direct sunlight, fire or other such
high-temperature conditions.
This unit is not suitable for use in tropical climates.
Specifications:
●Power Supply
1700mAH polymer Li-ion battery(DC5V /2A)
●Frequency Response
20Hz~20KHz
●SNR
≥110dB
●THD
<0.004%
●Output power
>100mW(16Ω)
●Battery Charging Time
2A adaptor: About 3.5 hrs(when off);
●Suggested Headphone
16~300Ω
Impedance
●Memory
Supports external TF card with 128G at its
max if system format permits
●Dimensions
96.7mm×57.7mm×14.1mm
●Weight
106g (Battery included)