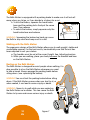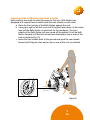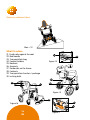
1
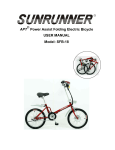
takes you further
User Manual
Rollz Motion
Rollator
EN
Rollz International BV – Rollz Motion
© Copyright 2012 Rollz ® International BV
Information contained in this manual is current and based on the best
information available to date. Our website at rollz.com is continually revised to
provide you with notice of new information and updated manual.
Please register your purchase at www.rollz.com to insure all benefits under the
warranty and so we can notify you of any changes in the Rollz.
FDA (registrationnumber insert)
The Rollz Motion is registered with the Food and Drug Administration as a Class I
Medical Device and conforms to all international standards, including the
ISO 11199-2 Standard for Rollators.
Max 275 lbs.
lbs
25
h
inc
th
wid
Contents
Before you begin4
Important information4
Safety4
Warning5
Using your Rollz Motion5
Unsuitability of the Rollz Motion
5
Check if your delivery is complete
5
Reuse6
Use6
What fits where?7
Fold & unfold8
Adjusting height9
Operating the brakes9
Walking with the Rollz Motion
10
Resting on the Rollz Motion
10
Crossing Curbs or Obstacles less than 6 inches
11
Bag12
Maintenance13
Adjusting the brakes13
Cleaning/disinfection14
Replacing parts15
Accessories15
From rollator to transportchair
15
What fits where?16
Attaching the Rollz transportchair pack
17
Unfolding the transportchair pack
18
Backrest Rollz transportchair pack
20
Folding the transportchair pack
20
Disengaging the transportchair pack
20
Technical specifications21
Contact21
Warranty22
3
EN
Before you begin
Congratulations on the purchase of your Rollz Motion. Rollz International BV has
written this manual so that you can use the Rollz Motion in the safest and most
convenient way.
We hope you will enjoy the use of your Rollz Motion.
Important information
• Read these directions carefully before you use the product and keep them
in a safe place for future reference. Do not compromise your safety and
that of others around you.
• You will find the serial and article numbers on the product information
label, located under the seat cushion
• This product complies with international safety standard ISO 11199-2 for
Rollators
• Use only original Rollz International BV approved parts. For repair or
replacement by an authorized dealer. Use of any other parts can be
unsafe and will void the warranty.
• Only original Rollz accessories can be used. Using unapproved
accessories can be unsafe and will void the warranty.
• Overloading the Rollz and incorrect folding and unfolding damages the
Rollz Motion creating an unsafe condition and voids the warranty.
• US-2012-0256384-A1
• The Rollz Motion is made for people weighing up to 275 lbs. and
6’3” tall.
• Exposure to continuous sunlight may cause the Rollz color to fade.
• Exposure to extreme temperature can cause damage to components
making the Rollator unable to operate.
Safety
• The Rollz Motion is only to be used for supporting/transporting one
person at a time.
• Always adjust the handle to the proper height. Read the chapter on
adjustment/posture (page 35) for the correct positions.
• Check the brakes every two months to make sure that you have
adequate braking power.
4
EN
Warning
• It is essential to make sure that the user has the physical ability to
independently perform all the operations in this manual. If you cannot
accomplish all functions, please make sure that you have continuing
assistance.
• Keep the Rollz Motion away from open flames and other heat sources,
such as electrical heaters or gas heaters.
• Do not use the Rollz Motion if any part has been broken or cracked, or if
any part is missing.
• While using the Rollz Motion make sure that all parts are completely
locked in place before using.
Using your Rollz Motion
The Rollz Motion provides support while walking for people with limited mobility,
both inside and outside your house. The comfortable seat cushion will allow you
to rest at any time during your walk.
The Rollz Motion is suitable for walking on any hard level surfaces. The
maximum incline for any hard level surface to walk on with a Rollz Motion is 15%
Unsuitability of the Rollz Motion
The Rollz Motion is not suitable for people who:
• Have a severe balance disorder
• Become disoriented or dizzy while walking
• Cannot stand behind a rollator for at least 5 minutes.
• Cannot sit comfortably on the seat cushion.
The Rollz Motion is not suitable to climb stairs or any natural terrain such as:
gravel paths, grass, dirt, sand and mud.
Check if your delivery is complete
The Rollz Motion comes packed and ready for use. Check that all parts have
been supplied. The Rollz Motion comes complete with:
• 1 bag
• 1 user guide
• 1 seat cushion
• 1 transportchair pack
• 2 footrests
• 2 armrests
5
EN
WARNING!
Keep the plastic packaging materials away from children. Children may play
with it and suffocate. Discard the packaging materials without delay.
Reuse
• The Rollz Motion is suitable to assist more than one user.
• All users must receive and review the entire user manual for safety and
operation.
• Before passing the Rollz Motion on to a new user, it should be cleaned,
disinfected and checked by the dealer for damage to insure safe
operation.
Use
The Rollz Motion comes completely assembled and ready for use. However, the
Rollz Motion should be adjusted to meet your personal preferences before use.
Carefully read all the points in this chapter before you put the Rollz Motion into
operation. This chapter contains the following points:
• Fold & unfolding
• Adjusting the height
• Operating the brakes
• Walking with the Rollz Motion
• Resting on the Rollz Motion
• Curbs and obstacles
• Bag
• Maintenance
• Accessories
6
EN
What fits where?
01
Figure 1:
01. Handles
02. Frame
03. Foam-filled rear wheels
04. Red seat lock button
05. Swivel front wheels
06. Front
02
04
03
05
06
Figure 1
Figure 2:
07. Hand brake lever
08. Height adjustment lever
07
09. Adjusting screws (to
tighten brakes)
08
10. Front wheel lift support
11. Parking brake locks
09
12. Height setting
13. Seat cushion
11
12
13
09
10
Figure 2
7
EN
Folding & unfolding in (Fig. 3)
Unfolding the Rollz Motion
a. Gently pull the sides of the Rollz Motion apart until it stops.
b. Push the seat down until it clicks, and locks into place.
WARNING: The Rollz is not fully secured and ready for walking until you clearly hear
the click and it is locked into place. To check the lock, pull up on the middle of the
seat. It must be locked into place.
Folding the Rollz Motion
a. Push the red seat lock button under the seat and slightly lift the seat up.
b. Push the sides of the Rollz Motion together until completely folded.
‘click’
Figure 3
WARNING: Make sure the bag is empty before you fold the Rollz Motion.
8
EN
Adjusting height
Figure 4
All people are different and have their own
requirements when it comes to using the product. The
Rollz Motion can be easily adapted to suit individual
needs. Correct adjustment can be crucial to get the most
out of the Rollz Motion.
a. To set the handlebar height, turn the adjustment
levers counterclockwise (to the right) and slide
the handles up or down for the height setting
that suits you best.
b. To determine the correct height, stand between
the handles of the Rollz Motion and let your arms
hang loosely. The handles should be level with
your wrists (Fig. 4).
c. Make sure each handle is the same height.
Use the same index number on each tube.
The top of the handle must be in a straight line
and pointing forward.
d. Turn the adjustment knobs clockwise to tighten. Check that the handles
are secured in the correct position.
WARNING: Incorrect height adjustment delivers higher impact on the body, which
increases the risk of injury.
WARNING: Always set both handles at the same height to maintain stability.
Operating the brakes
The Rollz Motion has an advanced braking system,
which is easy to control. The harder you squeez the
brake lever, the more braking power you will get and
the faster you will stop. You can also lock the brakes
when parking the Rollz Motion. Test the braking power
during your first use to insure smooth motion.
a. Squeeze the handbrakes to increase the
braking power (Fig. 5).
Figure 5
9
EN
The Rollz Motion is equipped with a parking brake to make sure it will not roll
away when you let go, or if you decide to sit down for a rest.
b. To lock the brakes, squeeze the hand brake
Figure 6
lever and the parking locks firmly at the same
time. Then release.
c. To unlock the brakes, simply squeeze only the
hand brake lever and release.
WARNING: Squeezing the brakes too hard can cause
the Rollz to stop short and may result in a fall.
Walking with the Rollz Motion
The ergonomic design of the Rollz Motion allows you to walk upright, stable and
comfortable manner. For the best results, be absolutely sure that the unit has
been adjusted to suit your stature.
a. The handles must be set at the correct height. See: Adjusting/posture.
b. While you are walking, place your body between the handles and lean
on the Rollz Motion.
Resting on the Rollz Motion
The Rollz Motion is designed to assist people when walking. It is
also possible to sit on the Rollz Motion whenever you want
to take a break. Always engage the parking brake before
sitting down. (see: operating the brakes).
WARNING:You must lock the parking brake before sitting
down. If the Rollz Motion moves when you start to sit, or
when seated, it can lead to serious injury or death.
WARNING: Never try to walk while you are seated on
the Rollz Motion as a rollator. This can cause the Rollz
Motion to tip over and cause serious injury or death.
10
EN
Figure 7
Crossing Curbs or Obstacles less than 6 inches
Rollz products are made to make life easier for the user. Rollz Motion has
designed a lift support lever located inside the rear wheels on both sides.
a. Place the front wheels of the Rollz Motion against the curb.
b. Using your right or left foot, push the lift support lever down. At the same
time pull the Rollz Motion up and back by the handgrips. The front
wheels of the Rollz Motion will now come off the ground. Push the Rollz
Motion forward until the front wheels are clear and on top or over of the
curb or obstacle (Fig. 10).
c. Lower the front wheels back to the ground and push the rear wheels
forward until they are clear and on top or over of the curb or obstacle.
Figure 8
11
EN
Bag
The use of the bag saves you from heavy lifting. You can easily attach or remove
the bag.
Attaching the bag.
a. Place the bag with the narrow mounting loops toward the rear of the
Rollz Motion (Fig.9).
b. Using the Velcro, attach the two wide mounting loops to the frame
(Fig. 10).
c. Connect the narrow mounting loops to the hooks on the frame (Fig. 10).
Using the bag.
a. Access the bag from the back of the Rollz Motion.
b. The empty bag can be left attached while retracting the frame.
Removing the bag.
a. Unhook the wide mounting loops from the frame by pulling off the
Velcro.
b. Unhook the narrow mounting loops and remove the bag.
WARNING: The bag can hold no more than 20 lbs. of goods. Do not overload it.
14.
15.
16.
17.
Bag
Wide mounting loops
Narrow mounting loops
Hooks
15
17
16
Figure 10
Figure 9
12
EN
14
Maintenance
Regular maintenance will increase the life and safety of your Rollz Motion. Rollz
International recommends maintenance takes place every two months.
Adjusting the brakes
After squeezing the handbrakes right in, the Rollz Motion should be unable to
move. After releasing the handbrakes, the Rollz Motion should be able to move
freely. Make sure the brake function as mentoined before every use. If this is not
the case, there are two ways to adjust the brakes: The adjustment below is for
basic/larger adjustments and the adjustment above is for finetuning.
1. Adjustment above (Figure 12)
Unscrew the locking disc just below the height adjustment knob / lever. To
tighten the brakes, turn the adjusting screw clockwise. To loosen the brakes, turn
the adjusting screw counterclockwise.
2. Adjustment below (Figure 11)
Follow the same procedure if you prefer to use the adjusting screw by both the
right and left rear wheel.
WARNING: Make sure the Rollz Motion is locked in place, but not on the parking
break while adjusting the brakes. Using the parking brakes during adjusment
leads to incorrect adjustment.
WARNING: Stop using the Rollz Motion and contact your supplier if the brakes fail
to operate adequately after you have performed the above-mentioned steps.
Adjusting
screw
below
Adjusting
Figure 11
Figure 12
Locking disc
screw
above
13
EN
Cleaning/ disinfection
Frequent cleaning of the Rollz Motion is recommended to keep it in optimal
condition. Before passing the Rollz Motion on to a new user, it has to be
disinfected.
Clean the frame and handgrips using lukewarm water and a cloth. For more
resistant stains you can use a mild detergent. Avoid excessive water contact with
moving parts, such as axles and hinge points. Thoroughly dry your Rollz Motion
after cleaning.
The wheels can be cleaned using lukewarm water and a brush with plastic
bristles (Attention: Do not use a wire brush).
The cover of the seat cushion is washable; always remove the inner cushion
before washing.
Removing the cover before washing.
a. Pull the Velcro of the cover away from the seat.
b. Unzip the seat and remove the inner cushion. The cover is now ready
for washing.
WARNING: Do not:
• Wash the cover in water hotter
than 86°
18
• Bleach the cover
• Iron the cover
19
• Dry-clean the cover
• Run the cover in a clothes
dryer
20
What fits where?
18. Cushion
19. Velcro
20. Zip
Figure 13
14
EN
Putting the cover back on after washing.
a. Put the inner cushion back and zip up the seat.
b. Put the cover and inner cushion back to the seat and attach it, using the
Velcro.
Replacing parts
Some parts, like handles and the seat cushion, are subject to wear and tear
and must be replaced in a timely manner. Please contact your supplier for the
replacement of parts.
WARNING: Only use original or Rollz International BV approved parts.
Accessories
Get more out of your Rollz Motion by using accessories. Only use original or Rollz
International BV approved accessories. New accessories come onto the market
from time to time. For an update, check our web site on www.rollz.com or ask
your supplier.
From rollator to transportchair
The Rollz transportchair pack has been designed for those who like to
take a break during their walk. The Rollz Motion turns from a rollator into a
transportchair in less than a minute, and just as easy back into a rollator.
The Rollz transportchair function is meant to fit one person only. The product
may sustain damage if used by several persons at once. The Rollz transportchair
function may carry no more than 125 kg.
The Rollz transportchair function is very easy to use. The transportchair bag can
be attached to the Rollz Motion before you start. To take a break, all you have to
do is fold out the pack, put the footrests in place and turn the handles around.
WARNING: the Rollz transportchair is not suitable for private or public
transportation by taxi, bus or other vehicles, while seated inside the
transportchair.
WARNING: Caution is needed while transporting a person in the transportchair.
When hitting a curb higher than 1 inch with full force,
the Rollz Motion could tip over which can lead to
serious injury or death.
15
EN
Maximum sideward slope
Max ≈ 15˚
What fits where
21. Guide rails against the seat
22. Red handle
23. Transportchair bag
24. Footrest holders
25. Backrest
26. Armrests
27. Guide rails on the frame
28. Footrests
29. Transportchair function / package
30. Locking bolts
21
22
Figure 14
23
25
27
26
24
Figure 15
28
29
Figure 16
30
16
EN
Figure 17
Attaching the Rollz transportchair pack
a. Take the Rollz transportchair pack and hold the transportchair bag
towards you (Fig. 18).
b. Use your other hand to pull the red handle up and place the Rollz
transportchair pack in the guide rails against the seat (Fig.20).
c. Push the red handle down without any force. You can now simply walk
behind the Rollz Motion (Fig. 19 and 21).
Lock
Unlock
Figure 20
Figure 18
Figure 21
Figure 19
WARNING: If the red handle is not going down without exerting force, take the
Rollz transportchair pack back out of the guide rails and try again. Do not put any
pressure, as this may damage the Rollz Motion. Please contact your supplier if
you have still no luck after several attempts.
17
EN
Unfolding the transportchair pack
Attach the transportchair bag to the Rollz Motion before you leave. If you want to
take a break, just unfold the transportchair pack and click it into the frame.
a. Take the handle of the transportchair pack and pull up the backrest to
the maximum setting and towards the front until halfway up the frame
(Fig. 21). Then pull the backrest back until the locking bolts click into the
guide rails on the frame (Fig. 24).
b. Turn the adjustment knobs for the handles anti-clockwise and turn the
handles around via the outside, until they are pointing towards the
back. Adjust the height for the person pushing the transportchair and
turn the adjustment knobs clockwise to tighten (Fig. 25). (See adjusting/
posture).
c. The footrests are located in the transportchair bag. Place the footrests at
the front of the Rollz Motion into the footrest holders by pushing them
down from the top of the footrest holders (Fig. 26).
d. The armrests are located inside the transportchair bag. Place them
around the frame on the spot where your arms rest. Secure them by
using the Velcro on the bottom of the armrests (Fig. 27).
WARNING: If the locking bolts do not smoothly glide into the guide rails on the
frame, push the backrest back to the front until halfway up the frame and try
again. Do not put any pressure, as this may damage the Rollz transportchair
function. Please contact your supplier if it does not work after several attempts.
WARNING: Do not exert any force if the footrests fail to smoothly glide into the
footrest holders. Pull them up and try again. Please contact your supplier if it
does not work after several attempts.
WARNING: Before you sit down, always check that the locking bolts are correctly
secured in the guide rails. Do not sit down if one of the locking bolts is not
secured. Instead, try again to fit the seat.
18
EN
Figure 22
Figure 23
‘click’
Figure 25
Figure 24
Figure 27
Figure 26
19
EN
Backrest Rollz transportchair
In order to ensure maximum comfort, it is important to adjust the straps in the
back of the transportchair pack. To do so please follow the next three steps:
a. Remove the footrests from the transportchair bag and make sure the
back of Rollz transportchair pack is extracted (see: page 46).
b. Loosen the Velcro at the back of the transportchair pack by pulling the
bag upwards.
c. Adjust the straps by loosening the Velcro. Adjust the straps in a way that
allows the pelvis of the user to be upright and makes sure the user‘s
back is properly supported.
Folding the transportchair pack
a. Remove the armrests and place them in the transportchair bag.
b. Slide the footrests up until released from the footrest holders. Put them
back into the luggage bag for the Rollz transportchair pack.
c. Turn the adjustment knobs for the handles anti-clockwise and turn the
handles around via the outside, until they are pointing towards the
front. Adjust the height for yourself and turn the adjustment knobs
clockwise to tighten (See: adjusting/posture).
d. Hold the handle of the transportchair pack and push the backrest
forward until halfway up the frame. Next, push the backrest backward
and down until it fits against the seat.
After folding away the Rollz transportchair function, you can leave it on the Rollz
Motion while you walk. In that case, you will walk behind the Rollz Motion.
Disengaging the Rollz transportchair pack
a. Pull the red handle up without any force.
b. Hold the handle of the Rollz transportchair pack and pull it up without
any force.
c. Then push the red handle down again.
20
DE
EN
Technical specifications
• Maximum weight of the user: 125 kg
• Minimum and maximum physical height of the user: 160 - 190 cm
• Net weight of the product
o Rollz Motion: 10,6 kg
o Rollz transportchair pack: 3,7 kg
• Dimensions:
o Extended -> HxLxW: 86-102 x 63 x 63 cm
o Retracted -> HxLxW: 86-102 x 63 x 29 cm
o Seat width Rollz transportchair: 420 mm
o Seat depth Rollz transportchair: 400 mm
21
DE
EN