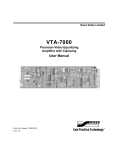
1
Ross Video Limited ADC-8035 Dual Analog Composite to SDI Decoder User Manual Ross Part Number: 8035D-004 Issue: 05A ADC-8035 • Dual Analog Composite to SDI Decoder User Manual • • • • Ross Part Number: 8035D-004 Document Issue: 05A Printing Date: December 6, 2004. Printed in Canada. Software Issue: 1.00 The information contained in this User Manual is subject to change without notice or obligation. Copyright © 2004 Ross Video Limited. All rights reserved. Contents of this publication may not be reproduced in any form without the written permission of Ross Video Limited. Reproduction or reverse engineering of copyrighted software is prohibited. Notice The material in this manual is furnished for informational use only. It is subject to change without notice and should not be construed as a commitment by Ross Video Limited. Ross Video Limited assumes no responsibility or liability for errors or inaccuracies that may appear in this manual. Trademarks • • • is a registered trademark of Ross Video Limited. and MLE are registered trademarks of Ross Video Limited. Ross, ROSS, All other product names and any registered and unregistered trademarks mentioned in this manual are used for identification purposes only and remain the exclusive property of their respective owners. ROSS , Important Regulatory and Safety Notices to Service Personnel Please review the following material to avoid injury to personnel and to prevent product damage. • All product servicing should be carried out by qualified service personnel. • This product may require specific equipment, and/or installation procedures to be carried out to satisfy certain regulatory compliance requirements. The following notices have been included in the manual, to call attention to these specific requirements. Symbol Meanings • Protective Earth — Protective Earth (PE) terminal. Provided for connection of the protective earth (green or green/yellow) supply system conductor. • Caution — This CAUTION symbol on the equipment refers you to the Product Manual for additional information. This symbol appears next to required information in the manual. • WARNING PERSONAL INJURY: Risk of electrical shock. This symbol warns you of a potential shock hazard where HAZARDOUS LIVE voltages greater than 35V peak or 60Vdc may be accessible. Failure to comply with these instructions could result in death or serious injury. Important Safety Instructions • Do not use this device near water. Hazardous voltages can occur. • Clean only with a dry cloth. • Do not block any ventilation openings. Install in accordance with the manufacturer’s instructions. • Do not install near any heat sources such as radiators, heat registers, stoves, or other devices (including amplifiers) that produce heat. • Do not defeat the safety purposes of the polarized or grounding-type plug. A polarized plug has two blades with one wider than the other. A grounding-type plug has two blades and a third grounding prong. The wide blade or the third prong is provided for your safety. If the provided plug does not fit into your outlet, consult an electrician for replacement of the obsolete outlet. • Protect the power cord from being walked on or pinched particularly at plugs, convenience receptacles, and the point where they exit from the device. • Only use attachments/accessories specified by the manufacturer. • Unplug this apparatus during lightning storms or when not in use for long periods of time. • Refer all servicing to qualified service personnel. Servicing is required when the device has been damaged in any way, such as: power-supply cord or plug is damaged, objects have fallen into the device, the device has been exposed to rain or moisture, the device does not operate normally or has been dropped. Power Cord and Supply Grounding Requirements The safe operation of this product requires that a protective earth connection be provided. This protective earth is provided by the grounding conductor in the equipment’s supply cord. To reduce the risk of electrical shock to operator and service personnel, this ground conductor must be connected to an earthed ground. This product is equipped with a Class 1 Type power supply, which for safe operation requires the use of a protective earth connection. To reduce the risk of electrical shock, use only properly earthed three-conductor type line cords as outlined below: • North American Line Cords 100 - 120 Volts In North America, use only certified IEC 320-C13 10A/125V SVT type line cords. Conductors are CEE color coded blue (neutral), brown (line) and green/yellow (ground). North American product orders come equipped with a single 10A/125V SVT type line cord for each GearLite product ordered. • International Line Cords 200 - 240 Volts This product has been designed for use with certified IEC 320- C13 10A/250V - H03 VV-F3G 1.00mm2 type line cords. International product orders come equipped with a single certified 10A/250V line cord using a molded ground connector (IEC 320-C13) at one end and stripped conductors at the other. Conductors are CEE color coded blue (neutral), brown (line) and green/yellow (ground). Install a certified A/C plug approved for the country of use, to the stripped end of each supply cord. Alternatively, other IEC 320 C-13 type power supply cords may be used provided that they meet all safety requirements necessary for the country in which they are to be used. EMC Notices • FCC This equipment has been tested and found to comply with the limits for a class A digital device, pursuant to Part 15 of the FCC Rules. These limits are designed to provide reasonable protection against harmful interference when the equipment is operated in a commercial environment. This equipment generates, uses, and can radiate radio frequency energy and, if not installed and used in accordance with the instruction manual, may cause harmful interference to radio communications. Operation of this equipment in a residential area is likely to cause harmful interference in which case users will be required to correct the interference at their own expense. Changes or modifications to this equipment not expressly approved by Ross Video Ltd. could void the user’s authority to operate this equipment. • CE This product has been tested and meets the requirements of the European CE marking directive. A copy of the CE Declaration of Conformity can be provided upon request. Maintenance/User Serviceable Parts Routine maintenance to this RossGear or GearLite product is not required. This product contains no user serviceable parts. If the module does not appear to be working properly, please contact Technical Support using the numbers listed under the “Contact Us” section on the last page of this manual. All RossGear products are covered by a generous 5-year warranty and will be repaired without charge for materials or labor within this period. See the “Warranty and Repair Policy” section in this manual for details. Contents Introduction 1-1 In This Chapter .......................................................................................................................1-1 A Word of Thanks....................................................................................................1-1 Overview ..................................................................................................................1-2 Functional Block Diagram .......................................................................................1-2 Features ....................................................................................................................1-3 Documentation Terms ..............................................................................................1-3 Installation and Setup 2-1 In This Chapter .......................................................................................................................2-1 Static Discharge........................................................................................................2-1 Unpacking ................................................................................................................2-1 Board Installation .....................................................................................................2-2 BNC Labels ..............................................................................................................2-2 Board Setup ..............................................................................................................2-2 Cable Connections....................................................................................................2-2 User Controls and Menu Items 3-1 In This Chapter .......................................................................................................................3-1 User Controls............................................................................................................3-2 Setup and Configuration...........................................................................................3-5 Function Setup and Configuration Menu Table .......................................................3-6 Function Menu Items................................................................................................3-8 SMPTE 269M Fault Reporting 4-1 In This Chapter .......................................................................................................................4-1 Overview ..................................................................................................................4-1 Jumper Setup ............................................................................................................4-2 Frame Connections...................................................................................................4-2 Details.......................................................................................................................4-2 Specifications 5-1 In This Chapter .......................................................................................................................5-1 Technical Specifications...........................................................................................5-1 Service Information 6-1 In This Chapter .......................................................................................................................6-1 Troubleshooting Checklist .......................................................................................6-1 Warranty and Repair Policy .....................................................................................6-2 ADC-8035 User Manual (Iss. 05A) Contents • i Ordering Information 7-1 In This Chapter ...................................................................................................................... 7-1 ADC-8035 and Related Products ............................................................................ 7-1 ii • Contents ADC-8035 User Manual (Iss. 05A) Introduction In This Chapter This chapter contains the following information sections: • A Word of Thanks • Overview • Functional Block Diagram • Features • Documentation Terms A Word of Thanks Congratulations on choosing the Ross Video ADC-8035 Dual Analog Composite to SDI Decoder. You have purchased a powerful, versatile, and advanced decoder. The ADC-8035 is part of a full line of Digital Conversion Products within the RossGear Terminal Equipment family of products, backed by Ross Video’s experience in engineering and design expertise since 1974. You will be pleased at how easily your new ADC-8035 fits into your overall working environment. Equally pleasing is the product quality, reliability and functionality. Thank-you for joining the group of worldwide satisfied Ross Video customers! Should you have a question pertaining to the installation and operation of your ADC-8035, please contact us at the numbers listed in this publication. Our technical support staff is always available for consultation, training, or service. ADC-8035 User Manual (Iss. 05A) Introduction • 1-1 Overview The ADC-8035 Dual Analog Composite to SDI Decoder is a 10-bit broadcast quality decoder. It is specifically designed for broadcast or production situations in which an analog NTSC or PAL composite signal must be converted to a component 4:2:2 serial digital interface (SDI) signal. The ADC-8035 provides two independent video input decoder streams; Decoder 1 supplies four SDI outputs, and Decoder 2 supplies three SDI outputs. The ADC-8035 fits into the Ross 8000A series digital frames, with four cards in the DFR-8104A (1RU), and up to ten cards in the DFR-8110A (2RU). This means that a fully loaded RossGear 2RU frame could accommodate twenty analog video input streams and provide seventy SDI outputs. Additional installation versatility is achieved as the frames of some competitive equipment manufacturers will also accept Ross cards. To make configuration simple and easy, a rich set of board-level adjustment features is instantly accessible. Simple card-edge switches and controls, in conjunction with front panel LEDs, make setup convenient, especially for programming several ADC-8035 cards with identical configurations. The ADC-8035’s 10-bit decoding process provides excellent performance with all types of picture sources including microwave feeds. In order to achieve the highest level of precision, all signal processing and decoding is performed entirely in the digital domain. The decoder uses a very sophisticated 3-line comb filter with advanced adaptive control algorithms. The ADC-8035 dual decoder is part of a full line of RossGear digital distribution products engineered to satisfy the highest quality broadcast standards and the most demanding requirements of your facility. Functional Block Diagram Figure 1. Simplified Block Diagram of ADC-8035 1-2 • Introduction ADC-8035 User Manual (Iss. 05A) Features The following features make the ADC-8035 Dual Analog Composite to SDI Decoder the most flexible, high-quality dual decoding card for your analog to digital conversion requirements: • 2 independent Analog Composite to SDI video decoders • 10-bit analog to digital conversion • 10-bit decoding with 3-line adaptive comb filter (4-line in PAL) • Handles difficult signals such as microwave feeds • Extensive Proc Amp controls • EDI insertion on SDI outputs • Programmable vertical interval blanking • Setup adjustment • Black Level Offset adjustment • Input and conversion status indicator LEDs on card edge • Four SDI outputs for Decoder 1 • Three SDI outputs for Decoder 2 • SMPTE 269M Fault Reporting • Fits Ross Video 8000 series digital products frames and Leitch * FR-6800 series frames • 5-year transferable warranty Documentation Terms The following terms are used throughout this guide: • “Frame” refers to the DFR-8104A and DFR-8110A frames that house the ADC8035 card. • All references to the DFR-8104A and DFR-8110A also include the DFR-8104A-C and DFR-8110A-C versions with the cooling fan option. See the respective User Manuals for details. • “Operator” and “User” both refer to the person who uses the ADC-8035. • “Board”, “Card”, and “Module” all refer to the ADC-8035 decoder board itself, including all components and switches. • “System” and “Video system” refers to the mix of interconnected digital and analog production and terminal equipment in which the ADC-8035 operates. • All references to PAL-N refer to PAL-N (Combinational) • “525-line mode” refers to broadcast situations using NTSC or PAL-M composite (analog) signal reference inputs. • “625-line mode” refers to broadcast situations using PAL-B or PAL-N composite (analog) signal reference inputs. * Leitch is a trademark of Leitch Technology Corporation ADC-8035 User Manual (Iss. 05A) Introduction • 1-3 1-4 • Introduction ADC-8035 User Manual (Iss. 05A) Installation and Setup In This Chapter This chapter contains the following information sections: • Static Discharge • Unpacking • Board Installation • BNC Labels • Board Setup • Cable Connections Static Discharge Whenever handling the ADC-8035 and other related equipment, please observe all static discharge precautions as described in the following note: Caution Static discharge can cause serious damage to sensitive semiconductor devices. Avoid handling circuit boards in high static environments such as carpeted areas, and when wearing synthetic fiber clothing. Always exercise proper grounding precautions when working on circuit boards and related equipment. Unpacking Unpack each ADC-8035 you received from the shipping container, and check the contents against the packing list to ensure that all items are included. If any items are missing or damaged, contact your sales representative or Ross Video directly. ADC-8035 User Manual (Iss. 05A) Installation and Setup • 2-1 Board Installation Use the following steps to install the ADC-8035 in a RossGear 8000 series digital distribution frame: • Refer to the User Manual of the RossGear 8000 series frame, to ensure that the frame is properly installed according to instructions. If this module is to be installed in any compatible frame other than a Ross Video product, refer to the frame manufacturer’s manual for specific instructions. • Please note that heat and power distribution requirements within a frame may dictate specific slot placement of cards. Cards with many heat-producing components should be arranged to avoid areas of excess heat build-up, particularly in frames using convectional cooling. • After selecting the desired frame installation slot, hold the ADC-8035 card by the edges and carefully align the card edges with the slots in the frame. Then fully insert the card into the frame until the rear connection plug is properly seated. BNC Labels Affix the supplied BNC label, as per the included instructions, to the BNC area on the rear of the rack frame. Board Setup To set up the board for your requirements, refer to Chapter 3, “User Controls and Menu Settings”. Cable Connections This section provides instructions for cable connections when the ADC-8035 is mounted in a RossGear 8000A series Digital Products Frame. (If this card is installed in a compatible distribution frame other than a Ross frame, note that the cable designations may vary.) The BNC designation field is divided into two sections – one for each decoder channel. • Decoder 1 uses BNC’s labeled: IN for one analog video input, and 1 – 4 for SDI output (four output signals). • Decoder 2 uses BNC’s labeled: 7 for one analog video input, and 5, 6, and 8 for SDI output (three output signals). Dec 1 Dec 2 SDI Out 3 SDI Out 2 SDI Out 4 SDI Out 2 8 6 4 2 2 7 5 Video SDI In Out 1 Dec 2 3 1 SDI Out 3 SDI Out 1 Dec 1 IN Video In Figure 2. ADC-8035 BNC designations for RossGear DFR-8104A (1RU frame) 2-2 • Installation and Setup ADC-8035 User Manual (Iss. 05A) 2 SDI Out 2 Dec 1 Dec 2 SDI Out 4 SDI Out 2 SDI Out 3 IN Video In 2 1 4 3 6 5 8 7 SDI Dec Out 1 1 SDI Out 3 SDI Out 1 Video In Dec 2 Figure 3. ADC-8035 BNC designations for RossGear DFR-8110A (2RU frame) ADC-8035 User Manual (Iss. 05A) Installation and Setup • 2-3 2-4 • Installation and Setup ADC-8035 User Manual (Iss. 05A) User Controls and Menu Items In This Chapter This section provides details of all board-level functions and operations, plus comprehensive information on all operating modes and features. The following topics are discussed: • User Controls • Setup and Configuration • Function Setup and Configuration Menu • Function Menu Items ADC-8035 User Manual (Iss. 05A) User Controls and Menu Settings • 3-1 User Controls The following are general descriptions of the user controls identified in the figure below. DS1 Input OK LED, Decoder 1 DS2 Error LED, Decoder 1 DS3 Input OK LED, Decoder 2 DS4 Error LED, Decoder 2 6 SW1 Function Select Switch DS5 Up LED SW2 Mode Select Switch DS6 Down LED Card Ejector Figure 4. ADC-8035 Card-edge User Controls Status and Selection LEDs The front edge of the card features six LEDs, INPUT OK 1, ERROR 1, INPUT OK 2, ERROR 2, UP, DOWN, that display the status of the input signals, and indicate menu function and configuration selections. The LEDs display the status of the input signals for each decoder channel, as well as menu function and configuration selections. Basic LED displays and descriptions are provided in Table 1, below. A complete description of LED references for menu table selections can be found in Table 2 Decoder Function Setup and Configuration Menu. 3-2 • User Controls and Menu Settings ADC-8035 User Manual (Iss. 05A) Table 1. Selection and Status LED Descriptions Decoder LED Label Display and Description 1 DS1 (Green) INPUT LED will be continually lit when a valid * input signal is present and no anomalies have been detected. The card is functioning normally. 2 DS3 (Green) 1 DS2 (Red) 2 DS4 (Red) OK LED will be flashing when a valid * input signal is selected, and menu access for that particular decoder has been enabled. LED will be continually lit when an invalid * signal has been detected, or no input is present. ERROR LED will be flashing when an invalid * signal is present, or no input is present, and menu access for that particular decoder has been enabled. For menu items that are on/off selections: - LED will be continually lit when the selected function is on. - LED will be unlit when the selected function is off. For menu items that have a range: DS5 (Yellow) UP - LED will be flashing when the selected menu item is adjusted to the upper limit. - LED will be continually lit when less than the upper limit, but equal to or greater than unity. - LED will be unlit when the selected menu item is adjusted below unity. 1 and 2 For menu items that are on/off selections: - LED will be continually lit when the selected function is off. - LED will be unlit when the selected function is on. For menu items that have a range: DS6 (Yellow) DOWN - LED will be flashing when the selected menu item is adjusted to the lower limit. - LED will be continually lit when greater than the lower limit, but equal to or less than unity. - LED will be unlit when the selected menu item is adjusted above unity. * A "valid" signal is defined as any analog composite video signal input with the same line rate as the video standard selected in the Video Standard menu. Function Select Switch The SW1 Function Select switch is a 16-position rotary switch used to select functions such as decoder channel, video standard, and video setup menu items. The SW1 switch works in conjunction with the SW2 toggle switch; first, the function category is selected with SW1, and then the SW2 toggle switch is used to select modes or configuration settings within that function selection. See Table 2 Decoder Function Setup and Configuration Menu for complete details. ADC-8035 User Manual (Iss. 05A) User Controls and Menu Settings • 3-3 Mode Select Toggle Switch The SW2 Mode Select switch is used to enable, disable, and select specific ADC-8035 functional modes, or configurations, within the operational function menu (selected first with the SW1 Function Select switch). The Mode Select switch is a 3-position momentary toggle switch with an automatic spring-return to the center position. Toggling the switch for mode selection is made according to two basic menu design categories: • mode selections utilizing a scrolling style of selection • mode selections utilizing a bi-directional upper and lower range limit Two methods of toggling SW2 are used to select basic and advanced level menu items. Selection of basic functions is performed by normal toggling of SW2 with a momentary click of the switch: • The label “ + ” instructs you to momentarily toggle SW2 upwards to move to the desired menu selection • The label “ - ” instructs you to momentarily toggle SW2 downwards to move to the desired menu selection For enabling or disabling specific functions that carry a higher level of importance, selection is performed by holding SW2 in the UP or DOWN position for at least two seconds: • The label “+ (h)” instructs you to hold SW2 upwards for two seconds to achieve selection of the desired menu item • The label “- (h)” instructs you to hold SW2 downwards for two seconds to achieve selection of the desired menu item • If necessary, holding SW2 up or down longer will increase increment/decrement speed See Table 2, Decoder Function Setup and Configuration Menu for complete details. 3-4 • User Controls and Menu Settings ADC-8035 User Manual (Iss. 05A) Setup and Configuration Use the Function Select switch and the Mode Select toggle switch to configure the ADC-8035 to decode analog video signals to SDI. Settings are described in Table 2. General Operating Rules When selecting and configuring all ADC-8035 board-level setup functions from Table 2 on the following page, some general rules and conventions apply. Function menu categories are selected with the SW1 Function Select rotary switch, and then specifically configured with SW2 Mode Select toggle switch. A decoder channel must first be selected. Use the following steps to select Decoder 1 or Decoder 2 as required. • Rotate SW1 Function Select switch to position 0, Menu Access. Note that position 0 is always used to select the decoder channel • Toggle SW2 Mode Select switch up for Decoder 1, down for Decoder 2.. A video standard is selected next from SW1 Function Select position 1 menu to match the format of the analog signal input source being decoded. Video Standard uses a 4-position selection menu. LED displays, indicating an error reading, will show if either the selected decoder or the video standard is incorrect. Always check to see that an INPUT OK LED (DS1 or DS3) is lit, which verifies the presence of a valid input signal. Refer to the preceding Table 1 for complete LED descriptions. A "valid" signal is defined as any analog composite video signal input with the same line rate as the video standard selected in the Video Standard menu. Note If the input signal is not present, then the output for the decoder in question will be muted. Function configurations always power up in the last known state. As well as the default settings, the card stores the last known user-adjusted video settings independently in non-volatile memory. An asterisk symbol (*) beside a menu table item indicates the Factory Default State. The factory defaults include the four Proc Amp settings. Details on Default Set (Proc Amp settings) are provided following Table 2. ADC-8035 User Manual (Iss. 05A) User Controls and Menu Settings • 3-5 Function Setup and Configuration Menu Table Table Legend: • • • • • • • + (h) * ○ ● ☼ Toggle the Mode Select switch (SW2) up momentarily Toggle the Mode Select switch (SW2) down momentarily Hold UP or DOWN button for two seconds Factory Default state Lit LED display Unlit LED display Flashing LED display Table 2. Decoder Function Setup and Configuration Menu Function Selection Switch Position 0 Function Menu UP DOWN (yellow) (yellow) - ○ ● ● ● ● ○ - ☼ ○ ● ● ● ● ○ ☼ ○ ● ● ○ - ○ ● ● ○ Max Level + ☼ ● Level between Unity and Max Unity * Level between Min and Unity + ○ ○ ● ○ - ● ○ Min Level - ● ☼ Max Level Offset between Unity and Max Black Level Offset Unity * Offset between Min and Unity + + ☼ ○ ○ ● ● ● ○ ○ Menu Access (Use to select decoder) Video Standard 2 Auto Gain 4 5 6 See Table Legend for symbol meanings See Table Legend for symbol meanings 1 3 LED Display SW2 Mode Selection Toggle Switch Configuration Menu Decoder 1 No Selection * Decoder 2 NTSC (525/60) * PAL-B (625/50) PAL-M (525/60) PAL-N (625/50) On Off * Standard/VTR Mode Standard Mode On * (See Function Menu Notes) VTR Mode On Luma Gain Chroma Level 3-6 • User Controls and Menu Settings + + - Min Level - ● ☼ Max Chroma Level Level between Unity and Max Unity * Level between Min and Unity Min Chroma Level + + ☼ ○ ○ ● ● ● ● ○ ○ ☼ - ADC-8035 User Manual (Iss. 05A) Function Selection Switch Position 7 Function Menu See Table Legend for symbol meanings Hue 8 Setup On 9 Default Set (See Function Menu Notes) A Force Mono B VI Blanking C SW2 Mode Selection Toggle Switch Configuration Menu VI End +180° Hue between 0° and +180° 0° * Hue between -180° and 0° -180° PLL Enable (See Function Menu Notes) E N/A F N/A ADC-8035 User Manual (Iss. 05A) - On * Off - See Table Legend for symbol meanings UP DOWN (yellow) (yellow) ☼ ○ ○ ● ● ● ● ○ ○ ☼ ○ ● ● ○ Reset All User Settings to Factory + (h) Default state (Unity) Reset Only Proc Amp Settings to - (h) Factory Default state (Unity) On + Off * See notes ○ ● ● ○ On * Off - ○ ● ● ○ VI Ends 1 line before default - ● ☼ ● ○ ○ ● + ☼ ● - ○ ● ● ○ VI Ends at default * (Line 20 for 525, line 23 for 625) VI Ends 1 line after default + VI Ends 2 lines after default D + + LED Display On * Off User Controls and Menu Settings • 3-7 Function Menu Items The Decoder Function Setup menu items from Table 2 are explained here in detail, including the four Proc Amp settings affected by the Factory Default State. 0 — Menu Access Use this menu to determine which decoder channel the operator is accessing. Decoder selection is made with the SW2 Mode Selection switch.. The power-up state has no decoder selected, with no LEDs flashing, and both “up” and “down” LED indicators unlit. 1 — Video Standard Use this menu to select the format of the analog composite input. Selection of the supported video standards is made with the SW2 Mode Selection switch. These video standards include NTSC, PALB, PAL-M, and PAL-N. The default position selection is NTSC, displaying the “up” LED flashing and the “down” LED unlit. Note Alpha channel signals in PAL-B without burst must not contain any chrominance information. 2 — Auto Gain Use this menu to automatically try to compensate for any perceived gain deficiencies. Auto Gain is based on sync amplitude. The SW2 Mode Selection switch toggles Auto Gain on and off. This menu uses a bi-directional type selection with a setting range of “on” or “off”. The default state has Auto Gain inactive, displaying the “up” LED unlit, and the “down” LED lit. 3 — Standard/VTR Mode Use this menu to convert either broadcast quality or non-broadcast quality analog input signals independently, selectable according to the level of the video quality to be received. The level of conversion quality required for a non-broadcast VTR signal is different than a broadcast signal. In the default state, Standard mode, a 3-line adaptive filter is employed to assure the highest quality conversion to SDI video output standards. In VTR mode, however, the 3-line adaptive filter is disabled and a notch filter is used instead. 4 — Luma Gain Use this menu to control the overall amplitude of the video output. This menu uses a bi-directional type selection with a limited upper and lower range. The default state has no Luma Gain adjustment applied (unity) with both “up” and “down” LEDs lit. Changes to this menu setting also affect the Menu 5 — Black Level Offset setting. Note Luma Gain is one of the four “Proc Amp” controls that can be reset using Factory Defaults (Position 9). 5 — Black Level Offset Use this menu to set the video black level. This menu uses a bi-directional type selection with a limited upper and lower range. The default state has no Black Level Offset adjustment applied (unity) and both “up” and “down” LEDs lit. Changes to this menu setting also affect the Menu 4 — Luma Gain setting. Note Black Level Offset is one of the four “Proc Amp” controls that can be reset using Factory Defaults (Position 9). 3-8 • User Controls and Menu Settings ADC-8035 User Manual (Iss. 05A) 6 — Chroma Level Use this menu to control the chroma gain level. This menu uses a bi-directional type selection with a limited upper and lower range. The default state has no Chroma Level adjustment applied (unity) and both “up” and “down” LEDs lit. Chroma Level is one of the four “Proc Amp” controls that can be reset using Factory Defaults (Position 9). Note 7 — Hue Use this menu to set the hue, or phase, of the chroma. This menu uses a bi-directional type selection with a limited upper and lower range. The default state has no Hue phase adjustment applied (unity) and both “up” and “down” LEDs lit. Hue is one of the four “Proc Amp” controls that can be reset using Factory Defaults (Position 9). Note 8 — Setup On If the incoming analog composite video has setup, then this SW2 toggle switch setting should be set to “on”. If there is no setup on the incoming analog composite video, then SW2 setting should be set to “off”. Essentially, this setting controls how the decoder will scale the analog video, and where it will set black in the digital domain. This menu uses a bi-directional type selection with a setting range of “on” or “off”. The default setting for this control is “on”, with the “up” LED lit, and the “down” LED unlit. The setup is affected by the Black Level Offset setting. Note 9 — Default Set Use this menu to return some or all user-controlled function settings to their default values, or simply the four “Proc Amp” controls by themselves. Holding the SW2 toggle switch in the “down” position for two seconds will reset the proc amp settings (Video Gain, Black Level Offset, Chroma Gain, and Hue) to unity. Holding the toggle switch in the “up” position for two seconds will reset all user-controlled settings (including the proc amp settings) to their default states. Note that when selecting this option, the state of the “up” and “down” LEDs will also indicate if any settings are not in their default states. If the “down” LED is flashing, then it indicates that there is at least one proc amp setting that is not in it’s default state. Defaulting the proc amp will make the “down” LED stop flashing. Likewise, if the “up” LED in this setting is flashing, it indicates that at least one user-controlled setting (proc amp setting or otherwise) is not in its default state. Defaulting all user-controlled settings will cause the “up” LED to stop flashing. A — Force Mono Use this menu to remove the chroma from the output SDI. Setting this option to ON results in a monochrome SDI output. B — VI Blanking Use this menu to determine whether the vertical interval is blanked. The ADC-8035 can allow video signals from line 10 to the VI End to be blanked or passed. This menu can be set to "ON" (blanking the VI) or "OFF" (passing video in the VI). ADC-8035 User Manual (Iss. 05A) User Controls and Menu Settings • 3-9 C — VI End Use this menu to set where the end of blanking and the beginning of active video is. Setting is relative to the normal end of VI blanking for SDI (line 20 for 525, and line 23 for 625). With VI Blanking "ON", all lines up to and including the VI END line will be blanked. D — PLL Enable Use this menu to select one of two internal clock locking circuits. For normal operation, the default setting of “On” should be maintained. For input video signals which exhibit asynchronous switches between non-timed sources or signals with excessive noise, the “Off” setting provides faster locking, but adds more jitter to the output signal. 3-10 • User Controls and Menu Settings ADC-8035 User Manual (Iss. 05A) SMPTE 269M Fault Reporting In This Chapter This chapter contains the following sections: • Overview • Jumper Setup • Frame Connections • Details Overview The SMPTE 269M Fault Reporting system, also known as a SMPTE “alarm”, provides indication if one or more frame modules encounter a fault or an abnormal condition. The ADC-8035 module provides a jumper to enable SMPTE-269M fault reporting. The card connects by means of an internal interface circuit to an auxiliary telco connector on RossGear 8000 series frames. When the frame connection is interfaced with a customer-designed system of LEDs or audible alarms, faults can be traced to a specific frame when a card fault occurs within that frame. The following diagram illustrates a general arrangement for SMPTE 269M alarm reporting: Figure 5. SMPTE 269M Alarm Reporting: Internal interface and typical connections ADC-8035 User Manual (Iss. 05A) SMPTE 269M Fault Reporting • 4-1 Jumper Setup If fault reporting for the ADC-8035 is desired, use jumper JP4 - 269M FAULT REPORT to set up the card. 1. To access the jumper, remove the card from the frame by pressing down the white card ejector tab and pulling the card from the frame slot. 2. Observing all static discharge and handling precautions, place the card with the component side facing up on a clean flat surface. 3. To enable SMPTE fault reporting, set jumper JP4 to EN position. 4. To disable SMPTE fault reporting, set jumper JP4 to DIS position. JP4 Figure 6. SMPTE 269M Alarm Reporting Jumper Location Frame Connections The SMPTE 269M Fault Reporting connection on RossGear 8000 series frames is provided by the auxiliary telco connector, AUX A, for interfacing with a customer-designed alarm system. AUX A Connector for SMPTE 269M Fault Reporting Figure 7. SMPTE 269M Alarm Reporting Frame Connections Details Two types of failures are reported: • Loss of power - the contacts will close for the duration of the power loss. • Incoming signal fault - the contacts will close for 1 –2 ms once per field for as long as the card fails to detect a valid analog input to the card. For additional information on alarm system design, refer to the SMPTE document ANSI/SMPTE 269M - 1999. 4-2 • SMPTE 269M Fault Reporting ADC-8035 User Manual (Iss. 05A) Specifications In This Chapter This chapter contains the Technical Specifications table. Technical Specifications Table 3. ADC-8035 - Technical Specifications Category Analog Composite Video Input SDI Output Performance Power Consumption Parameter Specification Number of Inputs 2 (1 for Decoder 1, 1 for Decoder 2) Signal Standards Accommodated NTSC, PAL-B, PAL-M, PAL-N Input Impedance 75Ω terminating Return Loss 36dB to 6MHz Number of Outputs 7 (4 from Decoder 1, 3 from Decoder 2) Signal Standards Accommodated SMPTE 259M-C, 270Mb/s, 525/625 Line, 10 bits Output Return Loss >18dB to 270MHz Signal Level 800mV ±10% DC Offset <50mV Rise and Fall Time >800pS (20 - 80%, ±15%) Overshoot <10% Luminance Frequency Response ±0.25dB to 5MHz, <-0.8dB @ 5.75MHz Group Delay <5ns to 4MHz Signal to Noise Ratio >54dB to 5.5MHz, unweighted Quantization 10 bits Processing Delay (Analog input to SDI output) 1 line 3.13us (NTSC) 1 line 3.19us (PAL) Total 6W Specifications are subject to change without notification ADC-8035 User Manual (Iss. 05A) Specifications • 5-1 5-2 • Specifications ADC-8035 User Manual (Iss. 05A) Service Information In This Chapter This chapter contains: • Troubleshooting Checklist • Warranty and Repair Policy Troubleshooting Checklist Routine maintenance to this RossGear product is not required. In the event of problems with your ADC-8035, the following basic troubleshooting checklist may help identify the source of the problem. If the module still does not appear to be working properly after checking all possible causes, please contact your Ross Video products distributor, or the Ross Video Technical Support department at the numbers listed under the “Contact Us” section at the end of this manual. 1. Visual Review – Performing a quick visual check may reveal many problems, such as connectors not properly seated or loose cables. Check the module, the frame, and any associated peripheral equipment for signs of trouble. 2. Power Check – Check the power indicator LED on the distribution frame front panel for the presence of power. If the power LED is not illuminated, verify that the power cable is connected to a power source and that power is available at the power main. Confirm that the power supplies are fully seated in their slots. If the power LED is still not illuminated, replace the power supply with one that is verified to work. 3. Reseat the Card in the Frame – Eject the card and reinsert it in the frame. 4. Check Control Settings – Refer to the Installation and Operation sections of the manual and verify all user-component settings including correct BNC designations. 5. Input Signal Status – Verify that source equipment is operating correctly and that a valid signal is being supplied. 6. Output Signal Path – Verify that destination equipment is operating correctly and receiving a valid signal. 7. Module Exchange – Exchanging a suspect module with a module that is known to be working correctly is an efficient method for localizing problems to individual modules. ADC-8035 User Manual (Iss. 05A) Service Information • 6-1 Warranty and Repair Policy The RossGear ADC-8035 is warranted to be free of any defect with respect to performance, quality, reliability, and workmanship for a period of FIVE (5) years from the date of shipment from our factory. In the event that your RossGear ADC-8035 proves to be defective in any way during this warranty period, Ross Video Limited reserves the right to repair or replace this piece of equipment with a unit of equal or superior performance characteristics. Should you find that this RossGear ADC-8035 has failed after your warranty period has expired, we will repair your defective product for as long as suitable replacement components are available. You, the owner, will bear any labor and/or component costs incurred in the repair or refurbishment of said equipment beyond the FIVE (5) year warranty period. In no event shall Ross Video Limited be liable for direct, indirect, special, incidental, or consequential damages (including loss of profits) incurred by the use of this product. Implied warranties are expressly limited to the duration of this warranty. This RossGear Dual Analog Composite to SDI Decoder User Manual provides all pertinent information for the safe installation and operation of your RossGear Product. Ross Video policy dictates that all repairs to the RossGear ADC-8035 are to be conducted only by an authorized Ross Video Limited factory representative. Therefore, any unauthorized attempt to repair this product, by anyone other than an authorized Ross Video Limited factory representative, will automatically void the warranty. Please contact Ross Video Technical Support for more information. In Case of Problems Should any problem arise with your RossGear ADC-8035, please contact the Ross Video Technical Support Department. (Contact information is supplied at the end of this publication.) A Return Material Authorization number (RMA) will be issued to you, as well as specific shipping instructions, should you wish our factory to repair your RossGear ADC-8035. A temporary replacement module, if required, will be made available at a nominal charge. Any shipping costs incurred, will be the responsibility of you, the customer. All products shipped to you from Ross Video Limited, will be shipped collect. The Ross Video Technical Support Department will continue to provide advice on any product manufactured by Ross Video Limited, beyond the warranty period without charge, for the life of this equipment. 6-2 • Service Information ADC-8035 User Manual (Iss. 05A) Ordering Information In This Chapter This chapter contains ordering information for the ADC-8035 and related products. ADC-8035 and Related Products Standard Equipment • ADC-8035 Dual Analog Composite to SDI Decoder Optional Equipment • 8035D-004 Dual Analog Composite to SDI Decoder User Manual (additional User Manual) • DFR-8104A Digital Products Frame and Power Supply (PS-8102) (1RU, holds 4 modules, includes 1 power supply) • DFR-8104A-C Digital Products Frame with Cooling Fan Module and Power Supply (PS-8102) (1RU, holds 4 modules, includes 1 power supply) • DFR-8110A Digital Products Frame and Power Supply (PS-8102) (2RU, holds 10 modules, includes 1 power supply) • DFR-8110A-C Digital Products Frame with Cooling Fan Module and Power Supply (PS-8102) (2RU, holds 10 modules, includes 1 power supply) • CFM-8104A Cooling Fan Module (upgrade cooling kit for standard DFR-8104A) • CFM-8110A Cooling Fan Module (upgrade cooling kit for standard DFR-8110A) • PS-8102 Power Supply (85-264 volts) (redundancy option power supply for Ross 8000 series 2RU digital product frames) • FSB-7110 Rear Support Bars and Brackets (additional support for rear frame-to-rack mounting) ADC-8035 User Manual (Iss. 05A) Ordering Information • 7-1 • CRB-8110A Card Retaining Bracket (module retainer used in field installations such as mobile trucks etc.) • CSB-8100 Cable Support Bracket (cable support bar for rear of digital frames) Your ADC-8035 Dual Analog Composite to SDI Decoder is part of the RossGEAR family of products. Ross Video Limited offers a full line of RossGEAR Digital Terminal Equipment including Distribution, Conversion, Monitoring, Synchronizers, Encoders, Decoders, AES, Keyers, Control Switchers, as well as Analog Audio and Video products. 7-2 • Ordering Information ADC-8035 User Manual (Iss. 05A) Notes: ADC-8035 User Manual (Iss. 05A) Ordering Information • 7-3 Notes: 7-4 • Ordering Information ADC-8035 User Manual (Iss. 05A) Notes: ADC-8035 User Manual (Iss. 05A) Ordering Information • 7-5 Contact Us Contact our friendly and professional support representatives for the following: • Name and address of your local dealer • Product information and pricing • Technical support • Upcoming trade show information PHONE E-MAIL POSTAL SERVICE General Business Office and Technical Support 613 • 652 • 4886 After-hours Emergency 613 • 652 • 4886 ext. 333 Fax 613 • 652 • 4425 General Information [email protected] Technical Support [email protected] Ross Video Limited 8 John Street, Iroquois, Ontario, Canada K0E 1K0 Ross Video Incorporated P.O. Box 880, Ogdensburg, New York, USA 13669-0880 Visit Us Please visit us at our website for: • Company information • Related products and full product lines • On-line catalog • Trade show information • News • Testimonials