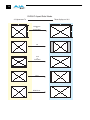
1
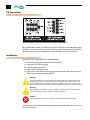
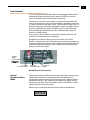
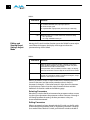
www.aja.com
RH10UC
SD to HD Upconverter
R-series Card Module
Published: 7/13/10
Installation and Operation
Guide
B e c a u s e
i t
m a t t e r s .
2
Trademarks
AJA®, KONA®, Ki Pro®, and XENA® are registered trademarks of AJA Video, Inc. FiDO™, Io HD™ and Io™ are
trademarks of AJA Video, Inc. HDMI, the HDMI logo and High-Definition Multimedia Interface are trademarks
or registered trademarks of HDMI Licensing LLC. DVI is a registered trademark of DDWG. All other trademarks
are the property of their respective holders.
Notice
Copyright © 2010 AJA Video, Inc. All rights reserved. All information in this manual is subject to change
without notice. No part of the document may be reproduced or transmitted in any form, or by any means,
electronic or mechanical, including photocopying or recording, without the express written permission of
AJA Inc.
Contacting Support
To contact AJA Video for sales or support, use any of the following methods:
180 Litton Drive, Grass Valley, CA. 95945 USA
Telephone: 800.251.4224 or 530.274.2048
Fax: 530.274.9442
Web: http://www.aja.com
Support Email: [email protected]
Sales Email: [email protected]
When calling for support, have all information at hand prior to calling.
Limited Warranty
AJA Video warrants that this product will be free from defects in materials and workmanship for a period of
five years from the date of purchase. If a product proves to be defective during this warranty period, AJA
Video, at its option, will either repair the defective product without charge for parts and labor, or will provide
a replacement in exchange for the defective product.
In order to obtain service under this warranty, you the Customer, must notify AJA Video of the defect before
the expiration of the warranty period and make suitable arrangements for the performance of service. The
Customer shall be responsible for packaging and shipping the defective product to a designated service
center nominated by AJA Video, with shipping charges prepaid. AJA Video shall pay for the return of the
product to the Customer if the shipment is to a location within the country in which the AJA Video service
center is located. Customer shall be responsible for paying all shipping charges, insurance, duties, taxes, and
any other charges for products returned to any other locations.
This warranty shall not apply to any defect, failure or damage caused by improper use or improper or
inadequate maintenance and care. AJA Video shall not be obligated to furnish service under this warranty a)
to repair damage resulting from attempts by personnel other than AJA Video representatives to install, repair
or service the product, b) to repair damage resulting from improper use or connection to incompatible
equipment, c) to repair any damage or malfunction caused by the use of non-AJA Video parts or supplies, or
d) to service a product that has been modified or integrated with other products when the effect of such a
modification or integration increases the time or difficulty of servicing the product.
THIS WARRANTY IS GIVEN BY AJA VIDEO IN LIEU OF ANY OTHER WARRANTIES, EXPRESS OR IMPLIED. AJA
VIDEO AND ITS VENDORS DISCLAIM ANY IMPLIED WARRANTIES OF MERCHANTABILITY OR FITNESS FOR A
PARTICULAR PURPOSE. AJA VIDEO’S RESPONSIBILITY TO REPAIR OR REPLACE DEFECTIVE PRODUCTS IS THE
WHOLE AND EXCLUSIVE REMEDY PROVIDED TO THE CUSTOMER FOR ANY INDIRECT, SPECIAL, INCIDENTAL OR
CONSEQUENTIAL DAMAGES IRRESPECTIVE OF WHETHER AJA VIDEO OR THE VENDOR HAS ADVANCE NOTICE
OF THE POSSIBILITY OF SUCH DAMAGES.
AJA RH10UC SD to HD Upconverter User Manual
Features
• Full 10-bit broadcast quality SD to HD upconverter mode of operation
• HD Framesync mode of operation
• 8/10 bit SMPTE 259 SDI input, 2 re-clocked outputs
• 8/10 bit SMPTE 292 HD-SDI output, 4 outputs
• 8 Channels of Embedded SDI Audio are supported in Upconvert mode
(audio is not supported in HD Framesync mode)
• bi/tri-level sync genlock input, 2 BNC loop-through with adjustable
output timing
• 4:3 or 16:9 SD inputs
1
• 4:3 to 16:9 conversion modes:
4:3 pillar box (4:3 image in center of screen, black sidebars)
14:9 pillar box (4:3 image zoomed to fill a 14:9 image, black sidebars)
Full Screen (for anamorphic inputs)
Letterbox (input 16:9 letterbox is zoomed to full screen)
Widezoom (a combination of zoom and horizontal stretch to fill 16:9
screen; will introduce a small aspect ratio error)
• Separate multipoint H and V filters
• Motion adaptive interpolation
• 16 bit coefficients, 16 bit internal data paths
• Accurate 16 bit SD to HD colorspace conversion
• 1 slot AJA FR1 or FR2 frame
Upconverter Specifications
Table 1.
Item
Specification
Input
SDI (525 or 625) in Upconvert Mode
HD SDI (1080i or 720p ) in HD Framesync Mode
Output
HD SDI (1080i or 720p)
Delay
1 Frame. Audio is delayed to compensate for the delay
through the video path.
Power
7 Watts
3
4
I/O Connections
FR1 and FR2 BNC Connector Assignments, RH10UC Card Module
When the RH10UC module is installed in an AJA FR1 or FR2 frame, a corresponding group
of 9 BNCs on the rear panel then provide I/O for the module. The illustration above shows
the connector assignments for both the FR1 and FR2 when used with the RH10UC.
Installation
Typically, RH10UC installation consists of the following:
1.
2.
3.
4.
5.
disconnect power from the frame (remove line cord)
remove the FR1/FR2 front panel
install RH10UC card module
replace the FR1/FR2 front panel
apply power to the frame by connecting a north american-style power cord from
the frame to mains power (90 to 260 VAC)
!
Warning!
Ensure Mains Power is disconnected before installing the FR1 or FR2 frame R-series
modules into the frame, or installing and removing options. If a Mains switch is not
provided, the power cord(s) of this equipment provide the means of disconnection.
The socket outlet must be installed near the equipment and must be easily accessible.
Warning!
FR2 Dual Power Cord Notice—please read this. To reduce the risk of electrical shock,
disconnect both power cords before servicing equipment.
Caution!
The FR1/FR2 front fan door is heavy and is not hinged. Remove with Caution.
Instructions for removing the frame front door for module installation is discussed in the
FR1/FR2 User Manual.
AJA RH10UC SD to HD Upconverter User Manual
User Controls
The user interface for the RH10UC consists of two toggle switches and a 4character alphanumeric display. See the photo “RH10UC User Interface
Controls” that follows for control location and function.
The Parameter Select (PS) switch selects a parameter for adjustment and
viewing on the display. Once a desired parameter is selected by moving the
PS switch, you then use the other switch—called Parameter Adjust (PA)—to
make a change to the parameter setting. Both switches are toggle switches
that can be pushed to the right or left, allowing you to move forward or
backward through available choices. After actuation, either switch will
return to a middle position.
1
If you move a switch and hold it in place (left or right), the RH10UC will
sense this and auto-increment or decrement.
By default, the 4-character display shows the current status of the
RH10UC—referred to as status mode. When you’re adjusting parameters or
settings, the display changes from status mode to adjust mode to show the
new value settings or parameters. After a period of inactivity the display
always reverts to status mode.
Switches
Toggle
Left and Right
PS Switch
Parameter Select
PA Switch
Parameter Adjust
4-Character
Display
RH10UC User Interface Controls
Normal
Operation Status
Mode
The RH10UC display by default will show you which inputs are present, any
detected error conditions, and the functional mode the board is in
(upconverting, downconverting, HD/SD framesync, etc.). After the board is
powered on, it enters status mode and stays there until a toggle switch is
selected and you enter adjust mode. After 5 seconds of inactivity in adjust
mode, it then returns to status mode.
While in status mode, the 4-character display indicates the following:
8 8 88
1
2
3
4
5
6
Table 2.
Character #
1
S—Standard Definition (SD) input signal present
E—Error on input signal
H—High definition signal present (HD Framesync mode only)
2
Blank—not used
3 or 4
Editing and
Viewing Board
Settings Adjust
Mode
Indicates
Mode Mnemonic: these codes show what the board is doing
UP—up convert
HF—High Definition Framesync
Moving the PS switch in either direction causes the RH10UC to enter adjust
mode. When this happens, the display will change to indicate the
parameter being shown/edited.
Table 3.
Character #
Indicates
1
Normally displays parameter number 0 through 9, and A to Z
(some numbers and letters are currently not used—only those
used will be discussed in this document).
If the parameter value (see below) exceeds 3-digits, this display
character will also be used so 4-digits of the value can be viewed.
1 to 4
A 1 to 4-character code that indicates a parameter value.
Usually the value will be shown in characters 2 through 4, except
when the value requires all 4 characters.
When a parameter is shown in adjust mode, the last selected parameter is
shown in character 1and the current parameter value is shown in
characters 2 through 4—if the value exceeds 3 digits, then all 4 characters
in the display are used to show the value. Parameter choices and their
definitions are listed in a table on the following page.
Selecting Parameters
Move the PS switch to the left to increment the parameter number or move
it to the right to decrement the parameter number. Characters 2 through 4
will change to reflect the settings of these parameters as they are
incremented/decremented.
Editing Parameters
When a parameter has been selected with the PS switch, use the PA switch
to then change the parameter value (as displayed by characters 2 through
4) to another value. Like the PS switch, you’ll move PA switch to the left or
AJA RH10UC SD to HD Upconverter User Manual
right to scroll through the setting choices. When a desired choice is found,
simply leave it at that choice to select it.
Changing Operating Modes
Changing the selection in Param 0 from “UP” to “HF” selects the operating
mode of the board and results in alternate sets of parameters and
definitions. The two tables that follow show the parameter choices and
definitions available when the board is in Upconvert or HD Framesync
mode. Making a change in Param 0 results in an alternate bitfile to be
loaded and the HD Framesync H and V output timing params to be loaded
into the registers. During the bitfile loading process you may notice a short
delay when the switches are not responsive. After the process completes,
1
the unit will return to the status display.
In the Status display, which is active when the unit's switches have not
been toggled for 5 seconds or more, an “H” will appear in the character 1
position if the unit is in HD Framesync mode—and there is a valid HD signal
present on both the video input and the genlock input (the two must
match).
Parameter Choices and Definitions When in Upconvert
Mode
Table 4.
Parameter
(Character 1)
Definitions
(Choices are shown in italics)
0
Selects a Mode of operation for the board. Choices are:
UP—up convert
HF—high definition framesync
1
Output Format. Choices are:
li—1080i 59.94Hz
7p—720p 59.94Hz
A—automatic; output follows the tri-sync input (default)
2
Upconvert Mode. Choices are:
43—4x3 pillar box format
14—14x9 pillar box format (default)
FS—full-screen (anamorphic display) format
LB—16x9 letterbox input to full
WZ—wide zoom format
5
Output Timing Mode, Set Reference Source. Choices are:
R—reference input
I—video input
F—free run (default)
6
ON—allows VITC timecode and Closed Caption (CC) information
to be passed on lines 20 and 21.
OFF—lines 20 and 21 are blanked (default).
7
8
Table 4.
Parameter
(Character 1)
Definitions
(Choices are shown in italics)
7
Freeze Video
ON—Freezes the output video.
OFF—Not Frozen (default).
8
Generate test pattern:
ON—75% color bars
OFF—none (default)
9
ON—Sharp Vertical Filter. Results in sharper image, with
increased edge artifacts.
OFF—Standard Vertical Filter (default). Provides the best
possible image, although edges are not as sharp.
A
Display SD Input Format, possible values are:
A—No input detected
AERR— Input error detected
A525—SD 525
A625—SD 625
H
Output Timing Adjust—Horizontal
The maximum range changes based on the output frame rate
and the frame geometry. Switch adjusts value by pixels to shift
horizontally.
The factory defaults are zero-timed values as measured
empirically at AJA. They are given in the table below.
The RH10UC remembers H and stores it in flash, recalling it as
needed when the output frame rate or geometry changes.
Refer to the H and V Parameter Reference Table appearing later
in this manual for value ranges.
V
I
W
Output Timing Adjust—Vertical
The maximum range changes based on the output frame rate
and the frame geometry. Switch adjusts value by lines in frame.
V delays are signed numbers, with zero timing relative to the
reference signal noted as zero (“0”). Zero is the factory default for
both V timing parameters.
The RH10UC remembers V and stores it in flash, recalling it as
needed when the output frame rate or geometry changes.
Refer to the H and V Parameter Reference Table that follows for
ranges.
Information—shows current software version
Set RH10UC To Factory Defaults
To set all values to factory defaults, select Param W, and move
the adjust switch to the right. This will set all parameters in the
system to factory values. After a 5 second inactivity time-out, the
values will be written to flash.
If all the values in the system match the factory defaults, either
through adjustment or by setting them as above, the display for
param W will be “WFAC”. If any of the values are different, the
display for param W will simply be “W”.
AJA RH10UC SD to HD Upconverter User Manual
Parameter Choices and Definitions When in HD Framesync mode
Table 5.
Parameter
(Character 1)
Definitions
(Choices are shown in italics)
0
Selects a Mode of operation for the board. Choices are:
UP—up convert
HF—high definition framesync
5
Output Timing Mode, Set Reference Source. Choices are:
R—reference input
I—video input
F—free run (default)
7
Freeze Video
ON—Freezes the output video.
OFF—Not Frozen (default).
A
Display HD Input Format, possible values are:
A—No input detected
AERR— Input error detected
A1p2—HD1080psf 23.98
A1i6—HD 1080i 59.94 or 1080i 60
A1i5—HD 1080i 50
A7p6—HD 720p 59.94 or 720p 60
V
Output Timing Adjust—Vertical
The maximum range changes based on the output frame rate
and the frame geometry. Switch adjusts value by lines in frame.
V delays are signed numbers, with zero timing relative to the
reference signal noted as zero (“0”). Zero is the factory default for
both V timing parameters.
The RH10UC remembers V and stores it in flash, recalling it as
needed when the output frame rate or geometry changes.
Refer to the H and V Parameter Reference Table that follows for
ranges.
H
Output Timing Adjust—Horizontal
The maximum range changes based on the output frame rate
and the frame geometry. Switch adjusts value by pixels to shift
horizontally.
The factory defaults are zero-timed values as measured
empirically at AJA. They are given in the table below.
The RH10UC remembers H and stores it in flash, recalling it as
needed when the output frame rate or geometry changes.
Refer to the H and V Parameter Reference Table that follows for
ranges.
I
1
Information—shows current software version
9
10
Table 5.
Parameter
(Character 1)
Definitions
(Choices are shown in italics)
W
Set RH10UC To Factory Defaults
To set all values to factory defaults, select Param W, and move
the adjust switch to the right. This will set all parameters in the
system to factory values. After a 5 second inactivity time-out, the
values will be written to flash.
If all the values in the system match the factory defaults, either
through adjustment or by setting them as above, the display for
param W will be “WFAC”. If any of the values are different, the
display for param W will simply be “W”.
H and V Parameter Reference Table For Upconvert Mode
Output Geometry
@ FR
Min V
Delay
Zero-timed V
Delay
Max V Delay
Min H Delay
Zero-timed
H Delay
Max H Delay
1080i @ 29.97 Hz
-999
0
562
0
1877
2199
1080i @ 25 Hz
-999
0
562
0
2014
2639
720p @ 59.94 Hz
-749
0
740
0
1304
1649
720p @ 50 Hz
-749
0
740
0
1304
1649
H and V Parameter Reference Table For HD Framesync Mode
Output Geometry
@ FR
Min V
Delay
Zero-timed V
Delay
Max V Delay
Min H Delay
Zero-timed
H Delay
Max H Delay
1080i @ 29.97 Hz
-999
0
5
0
2134
2199
1080i @ 25 Hz
-999
0
5
0
68
2639
1080psf @ 23.98
Hz
-999
0
5
0
2134
2749
720p @ 59.94 Hz
-749
0
5
0
0
1649
720p @ 50 Hz
-749
0
5
0
1100
1979
External Reference Information
The RH10UC expects the External Reference to be an HD Tri-level sync signal. The
Reference must be consistent with the Output Format selection. If the Output Format
selection is “A” for automatic - the RH10UC will detect the format of the Tri-level sync
input and set the Output Format to the detected format. If no reference is provided, the
RH10UC will lock to the input video.
The External Reference input can come from two different sources on the RH10UC. There
are jumpers on the RH10UC (see figure below) for selecting the external reference source
and for optionally terminating the selected reference source.
AJA RH10UC SD to HD Upconverter User Manual
Looping Reference
The RH10UC cell group of 9 BNCs contains two BNCs that can be used for a looping
reference connection. If this method is used, then the reference select setting on the
RH10UC should be set to “LOOP” and the TERMINATION setting should be set to “OFF” (no
termination). Optionally, if you're using only one of the looping reference BNCs, then the
TERMINATION setting should be set to “ON.”
Frame Reference
Alternatively, the RH10UC installed in a FR1 or FR2 frame can use the frame's frame
reference input BNC connector, which feeds an external reference video signal to all
modules installed in the frame. How the signal is distributed differs for the FR1 and FR2
frames. Additionally, individual modules can usually be strapped as to whether
external
1
reference is distributed from the frame or directly to BNCs on the module's corresponding
cell group (the 9 BNCs on the rear panel).
FR1 Frame: the external reference signal is distributed passively to all frame modules. If
you wish to use the frame reference, the RH10UC should have “FRAME” reference selected
on the module strapping, and one and only one card in the frame should have
“TERMINATION” set to “ON.” All other cards in the frame should have TERMINATION set to
“OFF.”
FR2 Frame: the external reference signal is distributed by an in-frame distribution amplifier
to all frame modules. This system terminates the Frame Reference input BNC and buffers
the signal to all slots. If using frame reference, the RH10UC installed in the FR2 frame should
have “FRAME” set for reference select, and all cards should have TERMINATION set to “OFF.”
Front of Card
Reference Select:
FRAME = Selects Aux BNC on Frame
LOOP = Selects Reference Loop BNC
on Card Module Connectors
Termination:
OFF = No Termination
ON = 75 Ohm Internal Termination
FRAME
Reference Strapping
Field (J6)
LOOP
J6
OFF
ON
Jumpers shown with Reference Select set to “LOOP”
and Termination set to “OFF”
Reference Select and Termination Configuration
11
12
RH10UC Aspect Ratio Modes
4:3 Upconverts To
These displays on 16:9
4
16
Full Screen
or
"Anamorphic"
3
9
4:3
16:9
or
"Letterbox"
14:9
Wide Zoom
AJA RH10UC SD to HD Upconverter User Manual
Specifications
Item
Specification
Input Formats
525/59.94, 625/50, SMPTE 259M
Output Formats
1080i 50/59.94, 720p 59.94 Hz (50Hz output requires 50 Hz input)
Upconversion
Motion adaptive, Multi-point interpolation, 10-bit processing
Inputs
SDI, BNC
Reference
2 x BNC, looping
Outputs
Input Loop, 2 x BNC, Equalized
HD-SDI, 4 x BNC
User Controls
Mode: Upconvert, Frame Synchronizer, Output Format, Aspect
Ratio Convert Select, and Output Timing
Size:
Fits AJA R-Series Frames
Compatible With Leitch® 6800 Series Frames
Power Consumption:
6 watts
1
13
14
Appendix A: Safety & Compliance
Federal Communications Commission (FCC) Compliance Notices
Class A
Interference
Statement
This equipment has been tested and found to comply with the limits for a Class A digital device,
pursuant to Part 15, Subpart B of the FCC Rules. These limits are designed to provide reasonable
protection against harmful interference in a commercial installation. This equipment generates,
uses, and can radiate radio frequency energy and, if not installed and used in accordance with the
instructions, may cause harmful interference to radio communications. However, there is no
guarantee that interference will not occur in a particular installation. Operation of this equipment
in a residential area is likely to cause harmful interference in which case the user will be required to
correct the interference at his own expense. If this equipment does cause harmful interference to
radio or television reception, which can be determined by turning the equipment off and on, the
user is encouraged to try to correct the interference by one or more of the following measures:
• Reorient or relocate the receiving antenna.
• Increase the separation between the equipment and receiver.
• Connect the equipment into an outlet on a circuit different from that to which the receiver is
connected.
• Consult the dealer or an experienced radio/TV technician for help.
FCC Caution
This device complies with Part 15 of the FCC Rules. Operation is subject to the following two
conditions: (1) This device may not cause harmful interference, and (2) this device must accept any
interference received, including interference that may cause undesired operation.
Canadian ICES Statement
Canadian Department of Communications Radio Interference Regulations
This digital apparatus does not exceed the Class A limits for radio-noise emissions from a digital
apparatus as set out in the Radio Interference Regulations of the Canadian Department of
Communications. This Class A digital apparatus complies with Canadian ICES-003.
Règlement sur le brouillage radioélectrique du ministère des Communications
Cet appareil numérique respecte les limites de bruits radioélectriques visant les appareils
numériques de classe A prescrites dans le Règlement sur le brouillage radioélectrique du
ministère des Communications du Canada. Cet appareil numérique de la Classe A est conforme à
la norme NMB-003 du Canada.
European Union and European Free Trade Association (EFTA)
Regulatory Compliance
This equipment may be operated in the countries that comprise the member countries of the
European Union and the European Free Trade Association. These countries, listed in the following
paragraph, are referred to as The European Community throughout this document:
AUSTRIA, BELGIUM, BULGARIA, CYPRUS, CZECH REPUBLIC, DENMARK, ESTONIA, FINLAND,
FRANCE, GERMANY, GREECE, HUNGARY, IRELAND, ITALY, LATVIA, LITHUANIA, LUXEMBOURG,
MALTA, NETHERLANDS, POLAND, PORTUGAL, ROMANIA, SLOVAKIA, SLOVENIA, SPAIN, SWEDEN,
UNITED KINGDOM, ICELAND, LICHTENSTEIN, NORWAY, SWITZERLAND
AJA RH10UC SD to HD Upconverter User Manual
Declaration of
Conformity
Marking by this symbol indicates compliance with the Essential Requirements of the EMC Directive
of the European Union 2004/108/EC.
This equipment meets the following conformance standards:
Safety:
CB- IEC 60065:2001 + A1:2005
NRTL - UL 60065:2003 R11.06, CSA C22.2 NO. 60065:2003 + A1:06
GS - EN 60065:2002 + A1
1
Additional licenses issued for specific countries available on request.
Emissions:
EN 55103-1: 1996
EN61000-3-2:2006, EN61000-3-3:1995 +A1:2001 +A2:2005
Immunity:
EN 55103-2: 1996
EN61000-4-2:1995 + A1:1999 + A2:2001, EN61000-4-3:2006, EN61000-4-4:2004,
EN 61000-4-5: 2005, EN 610004-6:2007, EN61000-4-11:2004
The product is also licensed for additional country specific standards as required for
the International Marketplace.
Warning!
This is a Class A product. In a domestic environment, this product may cause radio
interference, in which case, the user may be required to take appropriate measures.
Achtung! Dieses ist ein Gerät der Funkstörgrenzwertklasse A. In Wohnbereichen
können bei Betrieb dieses Gerätes Rundfunkstörungen auftreten, in welchen Fällen der
Benutzer für entsprechende Gegenmaßnahmen verantwortlich ist.
Attention! Ceci est un produit de Classe A. Dans un environnement domestique, ce produit
risque de créer des interférences radioélectriques, il appartiendra alors à l’utilisateur de prendre
les mesures spécifiques appropriées.
Korea KCC Compliance Statement
15
16
Taiwan Compliance Statement
This is a Class A product based on the standard of the Bureau of Standards, Metrology and
Inspection (BSMI) CNS 13438, Class A.
Japanese Compliance Statement
1. Class A ITE
この装置は、
クラスA 情報技術装置です。
この装置を家庭環境で使用すると電波妨害
を引き起こすことがあります。
この場合には使用者が適切な対策を講ずるよう要求され
ることがあります。VCCI−A
This is a Class A product based on the standard of the VCCI Council (VCCI V-3/2008.04). If this
equipment is used in a domestic environment, radio interference may occur, in which case, the
user may be required to take corrective actions.
Translated caution statements, warning conventions and warning messages
The following caution statements, warning conventions, and warning messages apply to this
product and manual.
Warning Symbol
Caution Symbol
Before operating your unit, please read the instructions in this document
Warning!
Read and follow all warning notices and instructions marked on the product or
included in the documentation.
Avertissement ! Lisez et conformez-vous à tous les avis et instructions
d'avertissement indiqués sur le produit ou dans la documentation.
Warnung! Lesen und befolgen Sie die Warnhinweise und Anweisungen, die auf dem Produkt
angebracht oder in der Dokumentation enthalten sind.
¡Advertencia! Lea y siga todas las instrucciones y advertencias marcadas en el producto o
incluidas en la documentación.
Aviso! Leia e siga todos os avisos e instruções assinalados no produto ou incluídos na
documentação.
Avviso! Leggere e seguire tutti gli avvisi e le istruzioni presenti sul prodotto o inclusi nella
documentazione.
AJA RH10UC SD to HD Upconverter User Manual
Warning!
Do not use this device near water and clean only with a dry cloth.
Avertissement! N'utilisez pas cet appareil près de l'eau et nettoyez-le seulement avec
un tissu sec..
Warnung! Das Gerät nicht in der Nähe von Wasser verwenden und nur mit einem trockenen Tuch
säubern.
¡Advertencia! No utilice este dispositivo cerca del agua y límpielo solamente con un paño seco.
Aviso! Não utilize este dispositivo perto da água e limpe-o somente com um pano seco.
Avviso! Non utilizzare questo dispositivo vicino all'acqua e pulirlo soltanto con un panno asciutto.
Warning!
1
Do not block any ventilation openings. Install in accordance with the manufacturer's
instructions.
Avertissement ! Ne bloquez aucune ouverture de ventilation. Suivez les instructions du fabricant
lors de l'installation.
Warnung! Die Lüftungsöffnungen dürfen nicht blockiert werden. Nur gemäß den Anweisungen des
Herstellers installieren.
¡Advertencia! No bloquee ninguna de las aberturas de la ventilación. Instale de acuerdo con las
instrucciones del fabricante.
Aviso! Não obstrua nenhuma das aberturas de ventilação. Instale de acordo com as instruções do
fabricante.
Avviso! Non ostruire le aperture di ventilazione. Installare in conformità con le istruzioni del
fornitore.
Warning!
Do not install near any heat sources such as radiators, heat registers, stoves, or other
apparatus (including amplifiers) that produce heat.
Avertissement ! N'installez pas l'appareil près d'une source de chaleur telle que des radiateurs, des
bouches d'air de chauffage, des fourneaux ou d'autres appareils (amplificateurs compris) qui
produisent de la chaleur.
Warnung! Nicht in der Nähe von Wärmequellen wie Heizkörpern, Heizregistern, Öfen oder anderen
Wärme erzeugenden Geräten (einschließlich Verstärkern) aufstellen.
¡Advertencia! No instale cerca de fuentes de calor tales como radiadores, registros de calor, estufas
u otros aparatos (incluidos amplificadores) que generan calor.
Aviso! Não instale perto de nenhuma fonte de calor tal como radiadores, saídas de calor, fogões ou
outros aparelhos (incluindo amplificadores) que produzam calor.
Avviso! Non installare vicino a fonti di calore come termosifoni, diffusori di aria calda, stufe o altri
apparecchi (amplificatori compresi) che emettono calore.
Warning!
Refer all servicing to qualified service personnel. Servicing is required when the device
has been damaged in any wav, such as power-supply cord or plug is damaged, liquid
has been spilled or objects have fallen into the device, the device has been exposed to
rain or moisture, does not operate normally, or has been dropped.
Avertissement ! Référez-vous au personnel de service qualifié pour tout entretien. L'entretien est
exigé quand l'appareil a été endommagé de quelque manière que ce soit, par exemple lorsque le
cordon d'alimentation ou la prise sont endommagés, que du liquide a été versé ou des objets sont
tombés dans l'appareil, que l'appareil a été exposé à la pluie ou à l'humidité, ne fonctionne pas
normalement ou est tombé.
17
18
Warnung! Das Gerät sollte nur von qualifizierten Fachkräften gewartet werden. Eine Wartung ist
fällig, wenn das Gerät in irgendeiner Weise beschädigt wurde, wie bei beschädigtem Netzkabel
oder Netzstecker, falls Flüssigkeiten oder Objekte in das Gerät gelangen, das Gerät Regen oder
Feuchtigkeit ausgesetzt wurde, nicht ordnungsgemäß funktioniert oder fallen gelassen wurde.
¡Advertencia! Consulte al personal calificado por cuestiones de reparación. El servicio de
reparación se requiere cuando el dispositivo ha recibido cualquier tipo de daño, por ejemplo cable
o espigas dañadas, se ha derramado líquido o se han caído objetos dentro del dispositivo, el
dispositivo ha sido expuesto a la lluvia o humedad, o no funciona de modo normal, o se ha caído.
Aviso! Remeta todos os serviços de manutenção para o pessoal de assistência qualificado. A
prestação de serviços de manutenção é exigida quando o dispositivo foi danificado mediante
qualquer forma, como um cabo de alimentação ou ficha que se encontra danificado/a, quando foi
derramado líquido ou caíram objectos sobre o dispositivo, quando o dispositivo foi exposto à
chuva ou à humidade, quando não funciona normalmente ou quando foi deixado cair.
Avviso! Fare riferimento al personale qualificato per tutti gli interventi di assistenza. L'assistenza è
necessaria quando il dispositivo è stato danneggiato in qualche modo, ad esempio se il cavo di
alimentazione o la spina sono danneggiati, è stato rovesciato del liquido è stato rovesciato o
qualche oggetto è caduto nel dispositivo, il dispositivo è stato esposto a pioggia o umidità, non
funziona correttamente o è caduto.
Caution!
This device is a Class A product. Operation of this equipment in a residential area is
likely to cause harmful interference, in which case users will be required to take
whatever measures may be necessary to correct the interference at their own
expense.
Attention! Le périphérique est un produit de Classe A. Le fonctionnement de cet équipement
dans une zone résidentielle risque de causer des interférences nuisibles, auquel cas l'utilisateur
devra y remédier à ses propres frais.
Achtung! Dies ist ein Gerät der Klasse A. Bei Einsatz des Geräts in Wohngebieten kann es
Störungen des Radio- und Fernsehempfangs verursachen. In diesem Fall muss der Benutzer alle
notwendigen Maßnahmen ergreifen, die möglicherweise nötig sind, um die Störungen auf eigene
Rechnung zu beheben.
¡Precaución! Este es un producto clase A. El uso de este equipo en áreas residenciales puede
causar interferencias nocivas, en cuyo caso, se requerirá que los usuarios tomen cualquier medida
necesaria para corregir la interferencia por cuenta propia.
Cuidado! Este dispositivo é um produto Classe A. Operar este equipamento em uma área
residencial provavelmente causará interferência prejudicial; neste caso, espera-se que os usuários
tomem as medidas necessárias para corrigir a interferência por sua própria conta.
Attenzione! Questo dispositivo è un prodotto di Classe A. Il funzionamento di questo apparecchio
in aree residenziali potrebbe causare interferenze dannose, nel cui caso agli utenti verrà richiesto
di adottare tutte le misure necessarie per porre rimedio alle interferenze a proprie spese.
Warning!
Disconnect the external AC power supply line cord(s) from the mains power before
moving the unit.
Avertissement ! Retirez le ou les cordons d’alimentation en CA de la source
d’alimentation principale lorsque vous déplacez l’appareil.
Warnung! Trennen Sie die Wechselstrom-Versorgungskabel vom Netzstrom, bevor Sie das Gerät
verschieben.
¡Advertencia! Cuando mueva la unidad desenchufe de la red eléctrica el/los cable(s) de la fuente
de alimentación CA tipo brick.
Advertência! Remova os cabos CA de alimentação brick da rede elétrica ao mover a unidade.
Avvertenza! Scollegare il cavo dell’alimentatore quando si sposta l’unità.
AJA RH10UC SD to HD Upconverter User Manual
Warning!
Ensure Mains Power is disconnected before installing the FR1 or FR2 frame R-series
modules into the frame, or installing and removing options. If a Mains switch is not
provided, the power cord(s) of this equipment provide the means of disconnection. The
socket outlet must be installed near the equipment and must be easily accessible.
Avertissement ! S’assurer que la source principale d’alimentation est débranchée avant d’installer
les modules des cartes série R de boîtier FR1 ou FR2 sur l’appareil, ou avant d’installer ou de
supprimer des options. Si aucun commutateur principal n’est fourni, le ou les cordons
d’alimentation de cet équipement fournissent le moyen nécessaire pour le débranchement. La prise
doit être installée près de l’équipement et doit être facilement accessible.
Warnung! Vor der Installation der FR1 oder FR2 Steckkartenmodule der R-Serie in den Rahmen bzw.
vor der Installation oder dem Entfernen von Optionen muss sichergestellt werden, dass der
Netzstrom ausgeschaltet bzw. abgetrennt ist. Wenn kein Netzschalter verfügbar ist, kann der
Netzstrom mithilfe des/der Netzkabel(s) am Gerät getrennt werden. Die Steckdose
1 muss in der Nähe
des Geräts installiert und leicht zugänglich sein.
¡Advertencia! Asegúrese de que la energía de la red de electricidad esté desconectada antes de
instalar el módulo de tarjeta de cuadro FR1 o FR2 serie R dentro del cuadro, o antes de instalar o
desinstalar opciones. Si el interruptor de la red eléctrica no se encuentra disponible, desconecte el/
los cable(s) eléctrico(s) del equipo. La toma de corriente debe ser instalada cerca del equipo y debe
estar fácilmente accesible.
Advertência! Certifique-se de que a alimentação principal esteja desconectada antes de instalar os
cartões R-series FR1 ou FR2 no quadro ou ao instalar e desinstalar opcionais. Se não houver um
interruptor de alimentação principal, o próprio cabo de alimentação do equipamento é o meio de
desconexão. A tomada de alimentação deve ser instalada próxima ao equipamento e seu acesso
deve ser fácil.
Avvertenza! Verificare che la rete di alimentazione sia scollegata prima di installare i moduli FR1 o
FR2 serie R nel telaio, o installare o rimuovere le opzioni. Se non è disponibile un interruttore di
alimentazione, il/i cavo/i di alimentazione di questa apparecchiatura forniscono i mezzi di
sconnessione. La presa deve essere installata vicino all'apparecchio e deve essere facilmente
accessibile.
Warning!
FR2 Dual Power Cord Notice—please read this. To reduce the risk of electrical shock,
disconnect both power cords before servicing equipment.
Avertissement ! Notice relative aux doubles cordons d’alimentation de FR2—veuillez
lire. Pour réduire le risque de choc électrique, débranchez les deux cordons
d’alimentation avec d’effectuer tout entretien de l’équipement.
Warnung! Hinweis zum FR2 mit doppeltem Netzkabel – bitte beachten. Um das Risiko eines
Elektroschocks zu verringern, sind beide Netzkabel vor der Wartung des Geräts abzutrennen.
¡Advertencia! Aviso: Cable eléctrico FR2 dual — Por favor leer. Para reducir el riesgo de
electrocución, desconecte ambos cables eléctricos antes de reparar el equipo.
Advertência! Aviso do cabo duplo de alimentação FR2 — leia isto. Para reduzir o risco de choque
elétrico, desconecte ambos os cabos de alimentação antes de qualquer manutenção no
equipamento.
Avvertenza! Avviso cavo a doppia potenza FR2. Per ridurre il rischio di scosse elettriche, scollegare
entrambi i cavi di alimentazione prima di effettuare qualsiasi operazione di manutenzione.
Caution!
The FR1/FR2 front fan door is heavy and is not hinged. Remove with Caution.
Attention ! La porte frontale du ventilateur de FR1/FR2 est lourde et ne repose pas sur
des charnières. Retirer avec précaution.
Achtung! Die vordere Gebläsetür des FR1/FR2 ist schwer und lässt sich nicht klappen. Bitte
vorsichtig entfernen.
¡Precaución! La puerta del ventilador delantero del FR1/FR2 es pesada y no posee bisagras. Extraer
con precaución.
Atenção! A porta frontal de acesso aos ventiladores do FR1/FR2 é pesada e não possui dobradiças.
Remova com cuidado.
Attenzione! La porta anteriore della ventola FR1/FR2 è pesante e non è a cerniera. Rimuovere con
cautela.
19
20