1
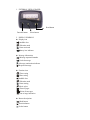
GoNumero Flex USER MANUAL DIRECTORY 1. EXTERNAL VIEW OF PAGER 2. DISPLAY SYMBOLS 3. OPERATION 3.1 Turn on the pager 3.2 Function selection 3.3 Receiving and reading messages 3.4 Message locking and unlocking 3.5 Deleting one message 3.6 Alert message 3.7 Deleting message 3.8 Time setting 3.9 Date setting 3.10 Melody alert selecting 3.11 Alarm setting 4. OTHERS 4.1 Back light 4.2 Low battery indication 1. EXTERNAL VIEW OF PAGER Read button Function button Select button 2. DISPLAY SYMBOLS Display icon [ ] Audible alert [ ] Vibration mode [ ] Alarm activated [ ] Battery low indicator Message information [ [ ] Message sequential number ] Locked message [ ] Message continuation indicator [ ] Repeated message Function icon [ [ ] Time setting ] Date setting [ ] Audible alert [ ] Vibration mode [ ] Alarm setting [ ] Music select [ ] Turn off pager [ [ ] Delete all messages ] Out of range indication Button descriptions [ ] Read button [ ] Function button [ ] Select button 3. OPERATION 3.1 Turn on the pager Place the battery into the pager, the pager will alert and vibrate with full display: And then pager will display the time and date: Press [ ] button, the display will show the day as below: 3.2 Function selecting On the standby mode, press [ ] button to select the function that you desire and press [ ] button to confirm the selected function, the following function will show sequentially. Press [ ] button, the display will show as below. If no any message was received “Clear all” will not show in the function item. Press [ ] button, the display will show as below. Press [ ] button, the display will show as below. Press [ ] button, the display will show as below. Press [ ] button, the display will show as below. Press [ ] button, the display will show as below. 3.3 Receiving and reading message Press [ ] button to read the message, if no any message was received “NO PAGES” will show on the display. When one message has been received, “1 PAGE” will show on display: If this message have not been read, the message unread alert will sound periodically. During reading the message, the display will show the message content first, message sequential number will show at left corner. Press [ the message receiving time. ] again, will show You can press [ ] button to read next message, when the number of message is 20 “MEMORY FULL” will show on display. If all messages are unread, and one unread message is replaced by a new message, the pager will show “OVERFLOW”. When the error message is received, the display will blink to remind you. 3.4 Message locking and unlocking Up to12 messages can be locked and the locked messages can not be deleted. Display the message that you wish to lock, press [ ] button, until “PROTECT” is displayed, press [ ] button to lock this message, the status of the locked message is indicated by [ ]. To unlock the message you can press [ ] and [ ] button during reading this message. 3.5 Delete one message Press [ ] button to display the message that you wish to delete, and then press [ ] button. “DELETE” is displayed. Press [ ] button to confirm the deletion of the particular message. 3.6 Alert setting 3 kinds of alert can be set. (1). Front the standby mode, audible alert, vibration and mute, press [ ] button to enter the alert setting mode and press [ ] to confirm (2). Press [ ] button to enter next alert selection and then press [ ] to confirm. (3). In mute alert select mode, press [ ] to confirm the pager will show “MUTE ALL ”. you can press [ ] to confirm this setting, it means the pager will receive all calls in silent mode or you can press [ ] to enter into the time of silent mode selection. If 1 hour is selected, the pager will return to audible alert mode, after 1 hour. 3.7 Deleting messages There are 2 methods to delete messages. (1). Delete all messages Press [ ] button until “CLEAR ALL ” is displayed and press [ ] to confirm deleting all read and unlocked messages. (2). Delete individual messages. Press [ ] to display the message you wish to delete and press [ ] until “DELETE” appears, press [ ] to confirm deleting it. 3.8 Time setting On standby mode, press [ ] until “SET TIME ” is displayed and press [ ] to enter into time setting mode. When the screen first appears, the hour digits blink, press [ ] button to increment or change the hour to your desired value and press [ ] button to move to minute field, repeat the procedure for minute AM, PM, and 24hr, press [ ] button twice to return to standby mode. 3.9 Date setting From the standby mode, press [ ] until “SET DATE” appears, and press [ ] to enter date setting mode, the screen shows the date digits blinking, press [ ] button to increment or change to your desired date, press [ ] button to confirm and move to month field, repeat the procedure for day and year fields, press [ button to confirm and exit, the pager will return to standby mode. ] 3.10 Melody alert selection From standby mode, press [ ] button until “SET AUDIO ” appears, press [ ] to enter melody select mode, press [ ] button to select the melody that your desired and then press [ ] button to confirm and exit. Note: If the vibration or mute alert is selected, there is no melody alert to set. 3.11 Alarm setting Setting the alarm from the standby mode, press [ ] button until “SET ALARM ” appears, and press [ ] button to enter into alarm setting mode. The screen shows the no. of the alarm blink press [ ] button to select and change the alarm no. and press [ ] to confirm and move to alarm ON/OFF selection field, repeat the procedure for alarm ON/OFF, time field, and press [ ] button to confirm and return to standby mode. A total of 3 alarms can be set, alarm 1 and alarm 2 are available for daily alerts and alarm 3 is available for only once alerts. 4 OTHERS 4.1 Back light Press and hold [ ] button for 2 seconds to turn on the back light, the back light will turn off automatically after 8 seconds. 4.2 Low battery indication A low battery icon [ ] is displayed on the top of the screen if the pager battery power is running low, and an audible alert is heard to remind you change the battery, the icon automatically resets after a new battery is installed. Always use Alkaline batteries.