1
LEXMARK ™ E120
CARTRIDGE REMANUFACTURING INSTRUCTIONS
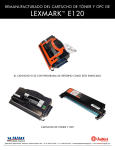
CARTRIDGE COVER
TONER CARTRIDGE
DRUM UNIT
3232 West El Segundo Blvd., Hawthorne, California 90250 USA • Ph +1 424 675 3300 • Fx +1 424 675 3400 • [email protected] • www.uninetimaging.com
© 2009 UniNet Imaging Inc. All trademark names and artwork are property of their respective owners. Product brand names mentioned are intended to show compatibility only. UniNet Imaging does not warrant downloaded information.
LEXMARK E120 • TONER CARTRIDGE REMANUFACTURING INSTRUCTIONS
REMANUFACTURING THE LEXMARK E120
TONER & DRUM CARTRIDGE
By Mike Josiah
The Lexmark E120 was introduced in February 2006. The E120 engine is a new low cost engine that in some ways is a bit strange,
but it works well, and will most likely sell well too. The new machines are based on a Lexmark 19ppm, 600 DPI engine. With a
retail price of around $149.00 USD (March 2006), these machines should be very popular. As with all Lexmark cartridges these
days, they do have a chip that shuts the cartridge down after use on the return versions. The code in this chip is new, and at the
time of this writing new replacement chips are actively being worked on. Check with you supplier for availability. There are also
different cartridges used for different regions of the world. It is too soon to say for certain, but as with other new Lexmark series,
I think it is a safe guess that it is the chips that are different.
There are two cartridges used for this engine, a toner and drum unit. The toner cartridge is rated for 2,000 pages and the drum
unit is rated for 25,000. No high yield cartridges are available at this time. These machines also have standard and Return
Program (Prebate) cartridges and all have chips. The “Return” chips must be replaced each cycle. The drum units are the same
wordwide. We have included the instructions for the drum cartridge as well as they are so simple to do. Testing is on-going so at
the time of this writing, we do not know if a drum or wiper blade will last another cycle. Preliminary test indicate they will, but not
enough tests have been run to say for certain. There are no chips on the drum units.
The drum units are installed and removed from the back of the printer, and the toner from the front. A little strange but as these
machines have such a small footprint, understandable. I just wonder what the customer reaction to that will be. New machines
ship with a 500-page starter cartridge, so new owners will be looking for cartridges fairly quickly.
CARTRIDGES FOR USE IN THE USA AND CANADA
Part#
Type
12026XW
Drum cartridge
12015SA
Return cartridge
12035SA
Standard cartridge
Yield
25,000
2,000
2,000
List Price
$40.00 USD*
$86.75 USD*
$66.75 USD*
CARTRIDGES FOR USE IN EUROPE, THE MIDDLE EAST AND AFRICA
Part#
Type
Yield
12026XW
Drum cartridge
25,000
12016SE
Return cartridge
2,000
12036SE
Standard cartridge
2,000
3232 West El Segundo Blvd., Hawthorne, California 90250 USA • Ph +1 424 675 3300 • Fx +1 424 675 3400 • [email protected] • www.uninetimaging.com
© 2009 UniNet Imaging Inc. All trademark names and artwork are property of their respective owners. Product brand names mentioned are intended to show compatibility only. UniNet Imaging does not warrant downloaded information.
LEXMARK E120 • TONER CARTRIDGE REMANUFACTURING INSTRUCTIONS
CARTRIDGES FOR USE IN THE ASIA PACIFIC REGION
Part#
Type
12026XW
Drum cartridge
12017SR
Return cartridge
12037SR
Standard cartridge
Yield
25,000
2,000
2,000
CARTRIDGES FOR USE IN LATIN AMERICA
Part#
Type
12026XW
Drum cartridge
12018SL
Return cartridge
12038SL
Standard cartridge
Yield
25,000
2,000
2,000
*(Pricing as of March 2006)
MACHINES BASED ON THIS ENGINE SO FAR ARE:
Lexmark E120
Lexmark E120n
How to take test prints as well as troubleshooting are covered at the end of the article.
TOOLS REQUIRED
1. Toner approved vacuum
2. A small common screw driver
3. A Phillips head screwdriver
4. Needle nose pliers
SUPPLIES REQUIRED
1. Lexmark E120 toner
2. Toner Magnet cloths
3. Lint-free synthetic cotton 4"x 4" pads
4. 99% pure Isopropyl Alcohol
5. Cotton Swabs
3232 West El Segundo Blvd., Hawthorne, California 90250 USA • Ph +1 424 675 3300 • Fx +1 424 675 3400 • [email protected] • www.uninetimaging.com
© 2009 UniNet Imaging Inc. All trademark names and artwork are property of their respective owners. Product brand names mentioned are intended to show compatibility only. UniNet Imaging does not warrant downloaded information.
LEXMARK E120 • TONER CARTRIDGE REMANUFACTURING INSTRUCTIONS
TONER CARTRIDGE
1. Remove the fill plug from the right side of the cartridge.
(Developer roller facing away from you). Dump out any remaining toner from the hopper.
2. On the left side, remove the two small screws and the gear
cover.
3. Remove the center screw on the developer roller cover.
3232 West El Segundo Blvd., Hawthorne, California 90250 USA • Ph +1 424 675 3300 • Fx +1 424 675 3400 • [email protected] • www.uninetimaging.com
© 2009 UniNet Imaging Inc. All trademark names and artwork are property of their respective owners. Product brand names mentioned are intended to show compatibility only. UniNet Imaging does not warrant downloaded information.
LEXMARK E120 • TONER CARTRIDGE REMANUFACTURING INSTRUCTIONS
4. Lift up the developer roller cover from the center, and remove. Be careful not to damage the plastic pins on the cover.
5. Remove the doctor blade spring.
3232 West El Segundo Blvd., Hawthorne, California 90250 USA • Ph +1 424 675 3300 • Fx +1 424 675 3400 • [email protected] • www.uninetimaging.com
© 2009 UniNet Imaging Inc. All trademark names and artwork are property of their respective owners. Product brand names mentioned are intended to show compatibility only. UniNet Imaging does not warrant downloaded information.
LEXMARK E120 • TONER CARTRIDGE REMANUFACTURING INSTRUCTIONS
6. The doctor blade is now loose. Carefully lift it out, watching the contact spring on the right side. Also, be careful not to damage
the retaining blade that is located under the doctor blade.
7. On the large black drive gear, there is a locking star washer pressed onto the shaft. With a small pair of wire cutters, cut the
old washer off, and remove. You can try to bend up the different legs of the washer, but that is very time consuming, and most
likely at least one leg will break anyway and the washer will still have to be replaced.
3232 West El Segundo Blvd., Hawthorne, California 90250 USA • Ph +1 424 675 3300 • Fx +1 424 675 3400 • [email protected] • www.uninetimaging.com
© 2009 UniNet Imaging Inc. All trademark names and artwork are property of their respective owners. Product brand names mentioned are intended to show compatibility only. UniNet Imaging does not warrant downloaded information.
LEXMARK E120 • TONER CARTRIDGE REMANUFACTURING INSTRUCTIONS
8. Remove the large black drive gear. Make sure you don’t
loose the small flat washer from under where the star washer
was.
9. On the white developer roller gear, take the tips of your small wire cutters, and place them into the two small holes. Spin the
gear so the metal shaft is in the slot on the opposite side of the gear. Remove the gear.
3232 West El Segundo Blvd., Hawthorne, California 90250 USA • Ph +1 424 675 3300 • Fx +1 424 675 3400 • [email protected] • www.uninetimaging.com
© 2009 UniNet Imaging Inc. All trademark names and artwork are property of their respective owners. Product brand names mentioned are intended to show compatibility only. UniNet Imaging does not warrant downloaded information.
LEXMARK E120 • TONER CARTRIDGE REMANUFACTURING INSTRUCTIONS
10. Remove all the gears.
11. Remove the three screws and gear alignment plate.
3232 West El Segundo Blvd., Hawthorne, California 90250 USA • Ph +1 424 675 3300 • Fx +1 424 675 3400 • [email protected] • www.uninetimaging.com
© 2009 UniNet Imaging Inc. All trademark names and artwork are property of their respective owners. Product brand names mentioned are intended to show compatibility only. UniNet Imaging does not warrant downloaded information.
LEXMARK E120 • TONER CARTRIDGE REMANUFACTURING INSTRUCTIONS
12. With a small flat head jeweler’s screwdriver, pry off the
metal lock from the developer roller bushing.
13. Turn the developer roller bushing so the plastic tab is facing up.
14. Lift the developer roller out of the cartridge. The bushing
will come off with the roller.
15. Clean out any remaining toner from the hopper. Make sure
the developer roller retaining blade does not get damaged!
Wipe the developer roller down with a clean lint free cloth.
Testing is ongoing, but for now, do not use any chemicals to
clean it.
3232 West El Segundo Blvd., Hawthorne, California 90250 USA • Ph +1 424 675 3300 • Fx +1 424 675 3400 • [email protected] • www.uninetimaging.com
© 2009 UniNet Imaging Inc. All trademark names and artwork are property of their respective owners. Product brand names mentioned are intended to show compatibility only. UniNet Imaging does not warrant downloaded information.
LEXMARK E120 • TONER CARTRIDGE REMANUFACTURING INSTRUCTIONS
16. Re-install the developer roller. Spin the plastic bushing so it is locked in place.
Install the metal locking bar, note that the left side fits into the small notch, and the right side is flush with the hub.
17. If the small metal plate fell off the bushing, replace it.
18. Install the gear axle plate and three screws.
3232 West El Segundo Blvd., Hawthorne, California 90250 USA • Ph +1 424 675 3300 • Fx +1 424 675 3400 • [email protected] • www.uninetimaging.com
© 2009 UniNet Imaging Inc. All trademark names and artwork are property of their respective owners. Product brand names mentioned are intended to show compatibility only. UniNet Imaging does not warrant downloaded information.
LEXMARK E120 • TONER CARTRIDGE REMANUFACTURING INSTRUCTIONS
19. Install the gears. The large gear with the long shaft fits onto the toner agitator bar inside the hopper. Spin it a few times and
listen to make sure it is engaged properly. On the large drive gear, make sure the flat washer is in place, and install a new star
lock washer. Make sure the lock washer is pressed down fully against the base of the gear.
20. Lastly on the developer roller drive gear, spin the gear by
the two small holes while holding the developer roller in place.
This will lock the gear on to the shaft.
21. Clean the doctor blade and install. Make sure the metal
tab on the right side fits into its slot.
3232 West El Segundo Blvd., Hawthorne, California 90250 USA • Ph +1 424 675 3300 • Fx +1 424 675 3400 • [email protected] • www.uninetimaging.com
© 2009 UniNet Imaging Inc. All trademark names and artwork are property of their respective owners. Product brand names mentioned are intended to show compatibility only. UniNet Imaging does not warrant downloaded information.
LEXMARK E120 • TONER CARTRIDGE REMANUFACTURING INSTRUCTIONS
22. Install the doctor blade spring.
23. Install the developer roller cover and screw.
24. Install the gear cover and two screws.
25. Fill hopper with E120 toner, replace the fill plug.
3232 West El Segundo Blvd., Hawthorne, California 90250 USA • Ph +1 424 675 3300 • Fx +1 424 675 3400 • [email protected] • www.uninetimaging.com
© 2009 UniNet Imaging Inc. All trademark names and artwork are property of their respective owners. Product brand names mentioned are intended to show compatibility only. UniNet Imaging does not warrant downloaded information.
LEXMARK E120 • TONER CARTRIDGE REMANUFACTURING INSTRUCTIONS
26. Replace the chip.
27. If the cartridge cover is available, wrap the cartridge as
indicated. This cover helps protect the developer roller from
damage. Aftermarket covers are in development.
DRUM CARTRIDGE
28. On the gear side of the drum unit, remove the E-ring from
the drum axle shaft.
29. Slide the drum axle out from the drum.
3232 West El Segundo Blvd., Hawthorne, California 90250 USA • Ph +1 424 675 3300 • Fx +1 424 675 3400 • [email protected] • www.uninetimaging.com
© 2009 UniNet Imaging Inc. All trademark names and artwork are property of their respective owners. Product brand names mentioned are intended to show compatibility only. UniNet Imaging does not warrant downloaded information.
LEXMARK E120 • TONER CARTRIDGE REMANUFACTURING INSTRUCTIONS
30. Remove the drum.
31. From the right (gear) side, remove the PCR assembly (the
spring loaded holder may come with it).
32. Remove the two screws from the wiper blade, remove the
blade. Clean out the waste toner.
33. Clean and coat the edge of the wiper blade with your preferred lubricant. Install the blade and two screws.
3232 West El Segundo Blvd., Hawthorne, California 90250 USA • Ph +1 424 675 3300 • Fx +1 424 675 3400 • [email protected] • www.uninetimaging.com
© 2009 UniNet Imaging Inc. All trademark names and artwork are property of their respective owners. Product brand names mentioned are intended to show compatibility only. UniNet Imaging does not warrant downloaded information.
LEXMARK E120 • TONER CARTRIDGE REMANUFACTURING INSTRUCTIONS
34. Clean the PCR and install. Make sure the black spacers
are orientated towards the back of the wiper blade as shown.
35. Coat the drum with your preferred lubricant, install the drum.
Make sure the small spring on the non-gear side fits into the slot in the plastic cartridge wall.
3232 West El Segundo Blvd., Hawthorne, California 90250 USA • Ph +1 424 675 3300 • Fx +1 424 675 3400 • [email protected] • www.uninetimaging.com
© 2009 UniNet Imaging Inc. All trademark names and artwork are property of their respective owners. Product brand names mentioned are intended to show compatibility only. UniNet Imaging does not warrant downloaded information.
LEXMARK E120 • TONER CARTRIDGE REMANUFACTURING INSTRUCTIONS
36. Install the drum axle shaft from the gear side of the drum.
Install the E-ring.
PRINTING TEST PAGES
1. With the printer at the READY state, press the CONTINUE button.
2. The printer will print the MENU SETTINGS page and NETWORK SETUP page if so configured.
REPETITIVE DEFECT CHART
Lower Fuser Roller (Printer)
Toner Feed Roller (Toner Cartridge)
PCR (Drum Cartridge)
Paper Pinch Roller (Printer)
Developer Roller (Toner Cartridge)
Fuser Exit Roller (Printer)
Transfer Roller (Printer)
Paper Feed Roller (Printer)
Upper Fuser Roller (Printer)
Drum (Drum Cartridge)
Paper Pickup Roller (Printer)
17.8 mm
18.7 mm
29.0 mm
30.4 mm
36.1 mm
37.9 mm
48.1 mm
56.2 mm
62.2 mm
74.1 mm
92.4 mm
3232 West El Segundo Blvd., Hawthorne, California 90250 USA • Ph +1 424 675 3300 • Fx +1 424 675 3400 • [email protected] • www.uninetimaging.com
© 2009 UniNet Imaging Inc. All trademark names and artwork are property of their respective owners. Product brand names mentioned are intended to show compatibility only. UniNet Imaging does not warrant downloaded information.
LEXMARK E120 • TONER CARTRIDGE REMANUFACTURING INSTRUCTIONS
PRINTER ERROR CODES (LIGHT SEQUENCES)
The E120 does not have an LCD display. It has a panel of lights to indicate problems. Some of the more common are listed below.
In some cases, the same sequence of one light on, and another blinking will have different meanings. The difference is the
amount of times the blinking light blinks.
The first four sequences listed will give you a good idea of what I mean:
ERROR light ON / READY light blinking (4x):
Cartridge region mismatch.
Wrong chip is installed on the cartridge.
ERROR light ON / READY light blinking (3x):
Missing/defective cartridge.
ERROR light ON / READY light blinking (1x):
Door open.
ERROR light ON / READY light blinking (8x):
Toner low.
ERROR light blinking / READY light blinking (1x):
Replace the Drum unit.
Some light sequences have a Primary and Secondary sequence. The Secondary sequence can be seen by pressing the
CONTINUE button twice quickly.
Here is an example of the Primary and Secondary sequence:
Primary:
TONER LOW light ON / ERROR light blinking
Secondary:
TONER LOW light ON / PAPER JAM blinking / ERROR light on:
Missing/defective cartridge.
Most of the others deal with various paper jams. All are listed in the user manual.
3232 West El Segundo Blvd., Hawthorne, California 90250 USA • Ph +1 424 675 3300 • Fx +1 424 675 3400 • [email protected] • www.uninetimaging.com
© 2009 UniNet Imaging Inc. All trademark names and artwork are property of their respective owners. Product brand names mentioned are intended to show compatibility only. UniNet Imaging does not warrant downloaded information.