1
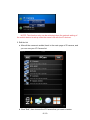
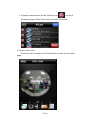
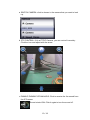
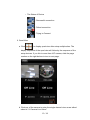
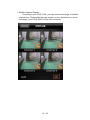
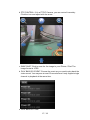
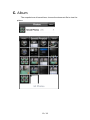
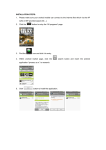
IProSecu M. V2
User Manual
CONTENT
III Preface
3
IIII Product Features
3
IIIIIInstallation
3
IIIIOperation Guide
4
AAAIPCam 4
BBBDVR / NVR Video Server
14
CCCAlbum
19
v1.1_120430
III Preface
IProSecu A.M. V2 is one of the mobile application which is published on Android
platform to monitor the live view within DVR, NVR, Hybrid DVR, IPCAM and Video
Server.
This application, iProSecu A.M. V2, not only could monitor the live view of
connected devices, but also could reveal the quad view in IPCAMs (i.e. more than 2
IPCAMs) or DVR, NVR and Hybrid DVR. Furthermore, playback the reserved data
among the connected devices is one of the other vital features in this application.
User can also snapshot the live view image and save as to the specified path.
IIII Product Features
•• New "LOOK and FEEL" on user interface.
•• Support IPCam, DVR , and NVR.
•• Auto discovery installed devices, including IPCam, NVR and DVR in LAN/WLAN.
•• Log/Image search by event type/time trigger.
•• Time shift recording and playing remotely
IIIIIInstallation
111Make sure that your iPhone or iPad are connected to Internet.
222Enter the icon "App Store"
,and search for "iProSecu M. V2".
333Aftter you found iProSecu M. V2, click to install it.
3 / 19
444If Installation successes, you see the icon
on the desktop.
IIIIOperation Guide
Click the App icon
entering the main manu.
AAAIPCam
Click the IPCam picture entering the IPCam page. You may see 4
buttons on the bottom of the page:
4 / 19
ICON
INSTRUCTION
RESPONSE ACTION / IMAGE
PRESENT
SEQUENCE
ADD DEVICE
SEARCH FOR
DEVICES
5 / 19
QUAD VIEW
111Add New IP Camera
aaaclick
••
••
••
••
button to add the new IPCAM site:
NAME: Please insert the name of the site
IP: Please setup the ip address of the device
PORT: Please setup the port of the device. The default value is 80
ACCOUNT: Please setup the username of the device
6 / 19
•• PASSWORD:Please setup the password of the device
bbbAfter finish the related setting, click "Add" to create the connection.
NOTE: If the connection device is not IPCAM, the warning dialog box will
pop-up to remind you.
222Search for IP Camera
aaaClick
to search all the IP camera within the same subnet:
bbbChoose the IP Camera you want to add.
7 / 19
NOTE: This function only can be activated when the network setting of
the mobile device is setup under the same LAN with the IP devices.
333Edit the list
aaaAfter all the camera is settled, back to the main page of IP camera, and
you can see your IP Camera list.
bbbClick "Edit", then choose the IP Camera that you want to revise.
8 / 19
cccTo delete a camera from the list, click the icon
in front of
the camera name. Click "Done" after you finish all the edit.
444Camera Live Video
Click one of the camera in the IP Camera list to enter the live video
page:
9 / 19
aaaSWITCH CAMERA: click to choose in the camera that you want to look
up.
bbbPTZ CONTROL: If it's a PTZ IP Camera, you can control it remotely.
Click the icon and adjust with the arrow.
cccENABLE/ DISABLE IPCAM AUDIO: Click to receive the live sound from
the IP Camera.
:Sound cointrol ON. Click it again to turn the sound off.
10 / 19
dddSNAP SHOT: Click to save the live image to your iPhone / iPad. The
image format is JPEG.
eeePLAY BACK: Choose the Date and Time as you need to play back the
video record.
NOTE: To use this fuction, SD card has to be installed into IPCAM
device, and the video format of record has to be Motion-JPEG. You may
adjust this setting on your IP camera.
555Rearrange the Sequence of Device
aaaAfter setup multi-site of the devices, press
device list as you need.
bbbIt can be switch between three choice:
11 / 19
to arrange the
(((( Sort by IP
((((( Sort by Name
(((((( Sort by Status
12 / 19
•• The Status of Device
: Successful connection
: Failed connection
: Trying to Connect
666Quad View
aaaClick
to display quad view after setup multiple sites. The
display sequence of the quad view will follow by the sequence of the
setup devices. If you link to more than 4 IP camera, slide the page
number on the right bottom to turn to next page.
bbbClick one of the camera to enter the single channel view as we talked
about in "4. Camera Live Video".
13 / 19
BBBDVR / NVR Video Server
Click the IPCam picture entering the DVR / NVR page. The icons you
see here have the same function as in IPCam page. (Please refer to p.5 the
IP camera paragraph)
Directly key in the information or automatically search for a New DVR /
NVR to your list. If you try adding a device which is not DVR / NVR, the
warning dialog box will pop-up to remind you.
After you complete the set-up, click one of the DVR / NVR to enter the
monitor view.
14 / 19
111Multiple Channel Display:
According to your DVR / NVR, you may see the live image of multiple
channel here. Please slide the page number on the right bottom to turn to
next page, if your DVR /NVR is more than 4 channel.
15 / 19
222Single Channel View
Click one of the channal in the multiple view to enter the single channel
view:
aaaSWITCH CAMERA: click to choose in the camera that you want to look
up.
16 / 19
bbbPTZ CONTROL: If it's a PTZ IP Camera, you can control it remotely.
Click the icon and adjust with the arrow.
cccSNAP SHOT: Click to save the live image to your iPhone / iPad. The
image format is JPEG
dddPLAY BACK BY EVENT: Choose the event as you need to play back the
video record. You may see at most 50 records here.It only support single
channel to playback at the same time.
eeePLAY BACK BY TIME:
17 / 19
(((( Choose the timepoint as you need to play back the video record.
((((( Slide the roll of date then click "Done" on the top right to start
playback. It only support single channel to playback at the same
time.
NOTE: In order to play back without error, it’s necessary to enable the
option “Mobile Record” on DVR / NVR. You may adjust this settings on your
DVR / NVR.
18 / 19
CCCAlbum
The snapshot are all saved here, choose the document file to view the
picture.
19 / 19