1
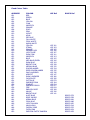
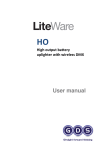
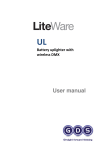
High Output
RGB Battery Uplighter
With Wireless DMX
Supplied Items
•
•
•
•
•
1 x LiteWare-HO Unit
Instruction Leaflet
Battery Charger (single unit only)
Mains Lead (single unit only)
Aerial
Introduction
LiteWare-HO with wireless DMX is a stand alone light source. The unit can be
controlled by DMX transmitted wirelessly and in stand alone operation using 50 preset
colours and 20 preset fade and snap sequences.
Features
•
•
•
•
•
•
•
Full RGB with 16 bit dimming curve
Wireless DMX Control
Up to 12 hour runtime from fully charged battery (5 hours full white)
50 preset colours
20 preset colour chases
Charging Cycle Approximately 8 hours
Wireless Firmware Update
Conformity
LiteWare-HO conforms to the following standards:
EN 61000-6-3
EN 61000-4-2
Light Industrial Emissions
Heavy Industrial Immunity
Further information can be obtained from [email protected]
Manufactured in the UK by Global Design Solutions
www.gds.uk.com [email protected]
Switching the Unit ON
To turn the unit ON or OFF, the TOP Button needs to be pressed and held for 1.5
Seconds, the button LED will illuminate to show the unit is awake.
When the battery voltage becomes too low, the unit will go to sleep and pulse the top
button LED. The unit can’t be switched back on until it has been recharged.
Address Settings
The address of the unit is set using 2 push buttons on the base. These are labelled UP
and DN. Pushing the UP button will increment the address, pushing the DN button will
decrement the address. If the unit is at 001 and you press the DN button, it will remain
at 001. If you hold one of the buttons the address will slowly increment/decrement
gradually speeding up. When the address reaches 510 it will stop at the boundary.
You must then release the button and push it once again to get to address 600. These
boundaries are intended to make the addressing easier to navigate. The boundaries
are: DMX Mode
1-510
Wireless DMX Mode Address
Stand Alone Mode
601-650
Fixed Colour Mode
651-660
Colour Fade Sequence
661-670
Colour Snap Sequence
The display will blank after 5 seconds of button inactivity.
Wireless DMX Mode (Address 1-510)
In WDMX Mode – the unit will simply respond to the DMX levels being received.
DMX channel allocations are as follows:
Start Address
Start Address +1
Start Address +2
Red Level
Green Level
Blue Level
In WDMX mode, the unit will hold the last DMX value upon loss of signal or DMX. The
unit will store this level when turned off so it can be resumed when it is powered back
up.
If the battery is disconnected, these values will be lost.
WDMX Linking
LiteWare-HO is automatically unlinked from the transmitter when plugged into the
charger. The link status is shown on the LED display on the base of the unit when
LiteWare-HO is powered on.
Please refer to your W-DMX transmitter user manual for further information about the
linking process.
In Stand Alone Mode
A short push of the TOP button will dim the unit, there are 7 output levels. When the
button is pushed for the 7th time, the unit will jump back up to full level.
Stand-Alone Mode (Address 600+)
601-650 FIXED COLOURS
Detailed in table on page 4
651-655 COLOUR FADE SEQUENCE 1
A colour fade sequence with 5 different speeds of transition
656-660 COLOUR FADE SEQUENCE 2
A colour fade sequence with 5 different speeds of transition
661-665 COLOUR SNAP SEQUENCE 1
A colour snap sequence with 5 different speeds of transition
666-670 COLOUR SNAP SEQUENCE 2
A colour snap sequence with 5 different speeds of transition
Charging System
There are two charging methods available for LiteWare-HO. Both charger options are
designed specifically for LiteWare-HO. Please DO NOT use any other charging system
as this can damage the unit.
Flight Case Charger System
Ensure that the flightcase is plugged into a mains supply with the supplied mains lead.
Place the LiteWare-HO into the flightcase and the unit will start charging. Whilst
charging, the button LED will be on constantly, it will flash when the battery is fully
charged and LiteWare is ready for use.
Upon disconnecting the mains to the flight case, all charged units will continue to flash
the button LED. This is normal. Briefly lifting the unit out of the case and replacing will
switch the button LED off.
Single Unit Charger
Simply plug the supplied charger into the base of LiteWare-HO. During charging, the
button LED will be on constantly and when the units are fully charged, the LED will
flash. Leaving the LiteWare-HO connected to the single charger without the
charger connected to the mains will flatten the battery.
Battery Care
The LiteWare-HO Uplighter contains a Sealed Lead-Acid battery. The battery should
not be left in a discharged state for long periods because it will reduce its capacity. We
recommend leaving LiteWare UL on charge permanently when not in use.
If removing the battery, please observe the correct polarity upon reconnection.
Fixed Colour Table
ADDRESS
601
602
603
604
605
606
607
608
609
610
611
612
613
614
615
616
617
618
619
620
621
622
623
624
625
626
627
628
629
630
631
632
633
634
635
636
637
638
639
640
641
642
643
644
645
646
647
648
649
650
COLOUR
RED
GREEN
BLUE
YELLOW
CYAN
MAGENTA
ORANGE
GOLD
PINK
VIOLET
AQUA
SKY BLUE
FULL WHITE
COOL WHITE
WARM WHITE
YELLOW
STRAW
ORANGE
PRIMARY RED
LIGHT ROSE
DARK PINK
MAGENTA
BLUE
MED BLUE GREEN
DARK BLUE
BRIGHT PINK
MEDIUM BLUE
GOLDEN AMBER
DEEP GOLDEN AMBER
PALE LAVENDER
APRICOT
DARK LAVENDER
CHOCOLATE
JUST BLUE
SURPRISE PINK
SCARLET
SURPRISE PEACH
FIRE
ENGLISH ROSE
MAUVE
BRIGHT BLUE
ALICE BLUE
ROSE INDIGO
URBAN BLUE
COOL BLUE
LIGHT SALMON
MAYAN SUN
CHERRY ROSE
FLESH PINK
SKELTON EXOTIC SANGRIA
LEE Ref
LEE
LEE
LEE
LEE
LEE
LEE
LEE
LEE
LEE
LEE
LEE
LEE
LEE
LEE
LEE
LEE
LEE
LEE
LEE
LEE
LEE
LEE
LEE
LEE
LEE
LEE
ROSCO Ref
101
103
105
106
107
111
113
115
116
119
128
132
134
135
136
147
180
156
079
194
024
017
019
108
126
141
ROSCO
ROSCO
ROSCO
ROSCO
ROSCO
ROSCO
ROSCO
ROSCO
ROSCO
378
358
081
066
030
318
332
034
039
Safety Information
Warning! Class 2M LED product. Do not look into the beam from a distance
of less than 40 cm (16 inches). Do not stare into the beam for extended
periods at a short distance. Do not view the beam directly with optical
instruments.
This product is for professional use only. It is not for household use.
This product presents risks of severe injury or death due to fire hazards,
electric shock and falls.
READ THIS MANUAL before installing, powering or servicing the fixture,
follow the safety precautions listed below and observe all warnings in this
manual and printed on the fixture. If you have questions about how to
operate the fixture safely, please contact
Global Design Solutions, www.gds.uk.com
PROTECTION FROM FIRE
•
Provide a minimum clearance of 0.1m (4”) around fans and air vents.
•
Do not modify the fixture or install other than genuine GDS parts.
•
Do not stick filters, masks or other materials directly onto LEDs.
•
Do not operate the fixture if the ambient temperature (Ta) exceeds
40°C (104° F).
PROTECTION FROM INJURY
The LED emission presents a hazard to eyesight at a distance of 4 - 40cm
(1.6 – 16”) when the eye is exposed to the beam for longer than 0.25
seconds.
•
•
Do not look at LEDs from a distance of less than 40cm (16”) without suitable
protective eyewear.
Do not look at LEDs with magnifiers or similar optical instruments that may
concentrate the light output.
DISPOSING OF THIS PRODUCT
Global Design Solutions products are supplied in compliance with Directive 2002/96/EC
of the European Parliament and of the Council of the European Union on WEEE (Waste
Electrical and Electronic Equipment), as amended by Directive 2003/108/EC, where
applicable.
Help preserve the environment! Ensure that this product is recycled at the end of its
life. Your supplier can give details of local arrangements for the disposal of Global
Design Solutions products.
INSTALLATION
Install fixtures on a level, stable surface where they do not present a hazard
of tripping or falling.