1
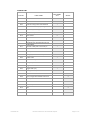
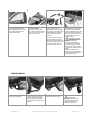
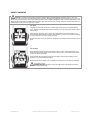
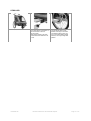
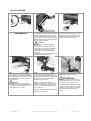
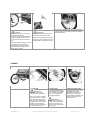
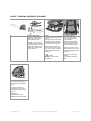
Manual ENGLISH NordicCab AS Instruction Manual for the NordicCab Explorer Page 1 of 15 NordicCab AS Instruction Manual for the NordicCab Explorer Page 2 of 15 USER MANUAL AND SAFETY INSTRUCTIONS Warning! Failure to carefully read and follow these instructions could result in serious injury or death. INTRODUCTION Congratulations! Your new Explorer promises to offer you years of outdoor enjoyment, whatever the season. Our Norwegian design team has spent over 20 years developing and perfecting each component to ensure your Explorer performs to the highest standard. Check the parts list for your model to make sure you have received all of the correct parts. Contact your authorized Explorer dealer immediately if any parts are missing. Practice assembling, opening, adjusting, fastening and collapsing your cab so that you are familiar with its safety and comfort features prior to use. Your cab is delivered as fully assembled as possible. Read the entire instruction manual carefully and be sure to try out the Explorer before pulling your child. Happy trails! Limited Lifetime Manufacturer Warranty This Limited lifetime warranty will last for a period of 10-years for the frame and 1-year for all other parts (except the tires) Explorer 1-year warranty covers factory defects or malfunctions on your new Explorer. Explorer distributer., or an authorized Explorer dealer, promises to repair or replace a defective plastic cab, aluminum frame, fabric canopy or any other part (except the tires) for one year following the original purchase. The one-year warranty, as stated above, applies only to factory defects and is valid only as long as the Explorer is used in a normal manner and in accordance with the instructions provided in the user manual. This warranty applies only to original Explorer owners who provide an original proof of sale (receipt) to an authorized Explorer dealer or the local Explorer distributer. This is the only warranty of the NordicCab Explorer bike trailer by Explorer distributer, the manufacturer - NordicCab AS Norway and its authorized dealers. No other oral agreement, warranty, conditions, loss of use coverage, consequential property coverage and liability, collateral or otherwise, shall apply to this agreement. This warranty does not apply if the Explorer is misused, modified, intentionally damaged, rented out or neglected. This warranty gives you specific legal rights, and you may also have other rights which vary from state to state. Key safety features of the NordicCab-Explorer Reflective fabric - used extensively on canopy and flag for excellent visibility LED light and highly visible flag included with each bike trailer Hard plastic cab protects and insulates Safety wire runs from bicycle, through bike fork, to cab High quality non-PVC windows protect from debris Sunshades on all windows protect from UV rays Safety strap is included Adjustable, firm, padded seat supports the spine Adjustable padded five point safety harness GENERAL SAFETY INSTRUCTIONS Bicycle Riding Before use, complete a safety check of your bicycle by a qualified bicycle mechanic. Please control that the bicycle brakes are in good condition and that the tires have the recommended air pressure. Allways check before each ride that Wheels, Bicycletowbar and Bicycle-hitch are properly secured to the trailer and bicycle. Maximum load in the trailer is 45kg (100lbs) Practice riding, accelerating, slowing and cornering with a 30-45 kg load to learn the difference in riding with a bike trailer in tow. The Explorer is 31 in or 79 cm wide from axle tip to axle tip with wheels mounted. Ensure minimum clearance of 20 in or 50 cm either side of your bike to avoid accidentally hitting obstacles with the bike trailer wheels. Always use a properly maintained bicycle with good brakes and proper tire inflation. Children below 1- year should not be transported in a bicycle trailer. Maximum speed with a bicycle trailer shall never exceed 24km/h NOTE: For your child’s comfort, it is best to inflate trailer tires close to the minimum PSI recommended. Check tire inflation for bike matches recommended pressure on tires each time you use the trailer. Always follow bike safety rules when riding. Your child’s safety harness should be properly fastened at all times. Always use the safety flag. Bike Helmets - Only passengers who are able to wear a helmet and sit upright, unassisted should ride in a child trailer in any mode. The child’s helmet must be correctly fitted and CPSC or CE approved. Consult a certified bicycle technician for advice on child helmets. The child’s neck must be strong enough to hold its head upright while sitting in the trailer. Please consult your physician to ensure your child is developmentally ready to wear a helmet and use this restraint device. Canopy Openings - Always ride with the canopy cover secured tightly under all side clips along the cab rim. Ride with the front plastic cover zipped closed, as flying debris could cause injury. NordicCab AS Instruction Manual for the NordicCab Explorer Page 3 of 15 Weather - Environmental conditions such as heat, cold, pollution and road damage may be a hazard when bike riding. Be aware of such conditions and prepare accordingly. Check ventilation regularly, dress appropriately for weather, carry water and avoid damaged roads. Maximum Load - Maximum total trailer load (children and cargo combined) is 100 lbs or 45 Kg. When placing children or cargo in the trailer, keep load centered or forward of the axle. Pack the load as low as possible and secure items so they cannot shift around. Explorer is recommended for children from age 1 to 4 ½. Check that the weight of Bicycle-towbar at Bicycle-hitch is greater than 1kg (2lbs), but does not exceed 9kg (20lbs) with fullyloaded trailer. If the weight exceeds that limit and the load is within the limit, please reorganize the load until its witin the requirement. Wheel Placement - Test wheel placement with children in seat, and bike fork on, to ensure that cab level is correct. Weight distribution may vary with size of children, chosen seat position and type of bicycle. Maintenance - Perform regular maintenance check of your bike trailer. Pay special attention to the bike hitch, the Snap-Lock bolt, the safety wire, and the canopy side panels. Immediately replace any part that could pose a hazard to your child’s safety. Starting and Stopping - Riding with a bicycle trailer is VERY different from regular cycling. The added weight makes it slower to start up and stop. Your vehicle is also much longer and wider, so you must allow more time to cross streets. Make wide turns to allow for the trailer’s width. Practice riding with your bike trailer, without children first, to get used to the feel. Do not TIP - Bicycle trailers can tip over if you are negligent. Do not pull your trailer over holes or obstacles. Instruct children not to bounce, rock, or lean, which can cause a shift of weight. Do not make high-speed turns or descents when pulling the trailer. Always corner with caution at 5 mph or 8 km/h or less. Maximum speed is 15 mph or 24 km/h. STROLLER SAFETY This product may become unstable if the recommended load of 100 lbs or 45 kg is exceeded. This product may become unstable if a parcel bag or rack is used when there is no provision for one. Care must be taken when folding and unfolding to prevent finger entrapment. GENERAL BIKE TRAILER RULES Warning! NEVER install a car seat or other seating device not approved by the manufacturer. Make no modifications to the trailer. Do not allow any of child’s body, clothing, shoelaces, or toys to come in contact with moving parts. Never leave a child unattended in the trailer. A reflector that complies with CPSC regulations shall be visible on rear of trailer. Before each ride, ensure attached trailer does not interfere with braking, pedaling, or steering of bicycle. Never ride a bicycle at night without adequate lighting. Obey all local legal requirements for lighting. Failure to comply with manufacturer’s instructions can lead to serious injury or death of passenger/rider. Do not use with children who exceed the weight or height limitations (max combined child and cargo load is 100 lbs or 45 kg total.) Child’s length from top of leg to top of head should not exceed 50 cm. Maximum load of Bicycle-towbar at Bicycle-hitch is greater than 1kg (2lbs), but does not exceed 9kg (20lbs) Do not use cleaning solvents. Clean only with mild soap and water. When used with only one occupant, the occupant should be seated in center seating position. When used with two occupants, the lighter occupant should sit on the left. (Opposite for left lane driving countries.) REMEMBER TO INSPECT BOTH BICYCLE AND BIKE TRAILER EACH TIME YOU RIDE! NordicCab AS Instruction Manual for the NordicCab Explorer Page 4 of 15 PARTS LIST Part.NR. EXPLORER 3-in1 SKI-KIT 5001 Plastic cab 1 5002 Red rear reflectors 2 5003 Aluminum canopy frame with handle bar 1 5004 Water resistant Denier poly canopy 1 5006 Seat with Styrofoam support block 1 5007 Five point safety harness 2 5010 Back cushion 2 5011 Head rest 2 5012 Flag and flag staff 1 5013 Cab wheels (20”) with fixed axle bolts and wheel reflector 2 5017 Bike fork + safety wire + 5047 Lock pin 1 5019 Bike hitch 1 5034 C-lock pin 4 5025 LED light (batteries not included) 1 5020 Stroller wheel 1 Stroller assembly-Kit 1 5022 Safety Strap 1 5023 Jogger fork 2 5024 Jogger wheel (16”) 1 5053 Parking break straps 2 5027 Bent aluminum tube – insert into cab 2 5028 Nylon pull grips with stainless swivel hook 2 5029 Telescopic aluminum connectors 2 5030 Harness 1 5035 Velcro-lock pin 4 5015 Skis 2 5049 Ski axle bolts 2 5016 Child ski holders 2 Kit NordicCab AS PART NAME Instruction Manual for the NordicCab Explorer Page 5 of 15 ASSEMBLE 1. Stroller-wheel bracket assembly Tools: a. Wrench b. Screwdriver (Phillips) 2. Insert the bracket 3. Fix the bracket 4. Maintenance Insert the stroller-wheel bracket with the plastic cap and the push button facing up, Into the center front of the aluminum frame on the trailer. Insert screw from inside the plastic box, and fix with the nut and washer on the underside. Tighten until there is no slack in the bracket. Be careful Take care if using power tools as to hard torque may cause damage to the parts or frame Parts: c. Wheel Bracket d. 2x Screw, washer and nut Check on regular basis if there is any slack in the bracket. Tighten screws if necessary. Slack in the bracket may cause noise and ware on the frame and structure. (attached to bracket in delivery) 1. Seat Slider Stand in front of cab. Insert seat sliders into back end of grooves in aluminum track along cab sides. Slide into desired position and release levers so that pins click into holes and seat locks in place. Seat recline may be readjusted by lifting up on levers and sliding seat to desired position. NB! Attachment straps must be loosened for recline position. 2. Warning Always make sure that the seat bottom slider pins are securely fastened in the track holes. 3. Canopy Frame Insert the four canopy frame posts into the holes in the cab’s corners. Shorter posts go in rear, where red reflectors are. After each post is inserted, slide a C-Lock pin through aligned holes. Repeat for all four posts. Secure the C-Lock over pin as shown in inset photo. When locked, it should not be possible to push the release buttons together. Stow release handle down under top flap. Be careful not to get finger inn between any folding or unfolding parts. . Warning Control that the frame is securely locked. Place Styrofoam support block under seat and affix with Velcro. NordicCab AS 4. Frame Pull front of aluminum frame up into hinge at top. Test frame is locked into place. Instruction Manual for the NordicCab Explorer Page 6 of 15 5. Seat Attachment Ensure upper seat attachment straps go over top cross bar in frame. Ensure lower seat attachment straps go under lower cross bar. WARNING Always use upright (TIGHT) position for bike trailer mode and for any speed greater than normal walking (4 km/h – 2.5 mph. 6. Canopy Zip side panel CLOSED. WARNING Failure to close side zippers could result in serious injury or death. Straps should almost form a triangle. Attach buckle, test and pull tight. 8. Secure front and back corner flaps with the velcro attachment. 9. Wheel Guard Place wheel guard over screws on side of cab as shown in photo. Push down and slide wheel guard backwards until it clicks into place. Use two hands to pull the center of the side panel down and under cab rim. Secure back Velcro flaps tightly around corners. Secure front Velcro flaps tightly around corners. Side panels are designed to be tight fitting at first. 10. LED Light 11. Rain Cover (accessory) The battery operated LED light attaches to the small loop on the back of the canopy. ALWAYS open back vent when using rain cover. Remember to purchase and insert batteries before use. Test to see that the wheel guard is immovable. Repeat for wheel guard on opposite side. NordicCab AS 7. Carefully pull back end of side panel down and under rim of cab. Pull front end of side panel down and under rim of cab. Instruction Manual for the NordicCab Explorer WARNING Check frequently for adequate ventilation in cab. Failure to do so could result in serious injury or death. Page 7 of 15 12. Side sunscreen Pull down and attach to the velcro attachment. Stow in the top pocket and secure with Velcro attachments. 13. Front sunscreen/ Meshnet/ Front window Pull zipper on both sides to open/ close window and meshnet. To stow, roll up and stow under the top pocket. 14. Handle Bar The handle bar may be adjusted to almost any height by pushing on the large round plastic buttons and rotating the handle to the desired position. Loop one end of the safety strap around the cab frame down where red reflectors are and loop the other end around your wrist. Fasten strap to handle bar when not in use. 15. Wheel Attachment Pushing with your thumb over the black tip of the axle bolt, insert into desired hole on side of cab. Release the bolt and push until you hear it click. Pull on the wheel to ensure it is locked in place. WARNING Axle bolts that are not correctly inserted pose a serious hazard to the trailer occupants. Failure to check axle bolts are locked in place could result in serious injury or death. TEST the position of the wheels with the children sitting in place and the cab loaded. Cab should be level. PARKING BREAK 1. Attach the parking break strap to the back frame. NordicCab AS 2. Adjust the length of the strap so that you are able to attach the hook to the wheel spokes. Tighten the strap to get minimum movement of the wheel 3. When not in use, secure to the plastic ring on the strap. Instruction Manual for the NordicCab Explorer 4. IMPORTANT The parking break should have good clearing to the ground and secured as showed in the picture. Page 8 of 15 FOLDING, UNFOLDING AND STORAGE FOLDING 1. Open the vertical zippers about half the way – one on each side 2. Lift the overlapping fabric flap at the top to expose the folding mechanism. Lift the safety handle and push together the knobs. . 3. Push the seat at same time as pushing the back frame under the front frame. 4. Warning Open and stow the front window to prevent damage to the material. Remove bicycle arm and stow beneath the seat. Remove wheels and stow on top of the seat. Be careful not to get finger inn between any folding or unfolding parts. Warning Prevent metal and hard parts to come in contact with fabric or plastic material as this can cause damage. UNFOLDING 1. Remove all external parts from inside the trailer. 2. Lift front frame and pull the back frame all the way out. The frame should the click in correct position. Make sure that the front and back frame is securely connected. 3. Control that the frame is locked before pushing down the safety handle. 4. Close zippers on both sides to complete the action. . NordicCab AS Instruction Manual for the NordicCab Explorer Page 9 of 15 SAFETY HARNESS WARNING - Children must be properly secured in restraint device provided whenever the Nordic Cab is in use. Only children who can support their neck independently may ride safely. Consult your physician before transporting your child in the Nordic Cab. Failure to properly secure your child could result in injury. Failure of occupants to wear a correctly fitted CPSC or CE approved helmet when trailer is towed behind a bicycle could result in serious injury or death. Failure to correctly attach seat and restraint device could result in serious injury or death. One Child Unbuckle each shoulder harness from the seat-back buckles. Stow one shoulder harness away. Remove one headrest and affix the remaining one to the center Velcro strips. Adjust to correct height. Attach between-leg buckle. Place child in cab. Adjust straps to the correct height for your child. Attach shoulder harness to the two center buckles on seat back. Push harness padding up over buckles for your child’s comfort and safety. Buckle the lap belt across your child’s lap and tighten. Use elastics to secure all straps up and away. Two Children Begin with both shoulder harnesses inserted in buckles on seat. Adjust headrests for each child. Attach between-leg buckle. Place children, side by side, in cab. Adjust shoulder straps to correct length for each child. Attach shoulder each shoulder harness above shoulders. Push harness padding up over buckles for your child’s comfort and safety. Buckle lap belt across children’s lap and tighten. Use elastics to secure straps up and away. WARNING : Whenever in bicycle mode children must always wear fitted CPSC or CE approved helmets. NordicCab AS Instruction Manual for the NordicCab Explorer Page 10 of 15 STROLLER ASSEMBELED NordicCab AS 1. STROLLER WHEEL Push and hold the small button on the mechanism to insert or remove wheel. Stow stroller wheel in the mesh pocket behind the seat when not in use. 2. WHEEL POSITION Test the wheel balance with children and cargo in the trailer. The balance/ tipping point may vary concerned children weight and size, and cargo weight and position. Instruction Manual for the NordicCab Explorer Page 11 of 15 BICYCLE TRAILER ASSEMBELED 1. Bicycle connector arm Open tightening clamp on left front corner of cab before inserting bike fork. Pull SnapLock bolt toward center of cab as you insert bike fork into hole. Push bike fork in gently. Release Snap-Lock bolt. Bolt will “find” the hole, and “snap” into place. 2. Stroller wheel Push and hold the small button on the mechanism to insert or remove wheel. Stow stroller wheel in the mesh pocket behind the seat when not in use. WARNING Check red tip of Snap-Lock bolt sticks about 4 mm (1/4 “) out from side of cab. Failure to correctly lock the bike fork into the trailer could result in serious injury or death. NB! Red line on bike fork should line up with clamp. Tighten and fasten the quick release clamp to stabilize and secure the arm. 3. Fixing the safety wire to trailer After inserting and securing the Bicycle arm correctly in the trailer, fix the karabiner hook attached to the red safety wire, to the red attachment point on the front side of the trailer frame. 4. Hitch to Bicycle Remove rear axle rod and spring from bicycle. (Watch small parts do not fall and go missing.) Insert bike hitch over axle rod (1) and replace rod into bike axle hole exactly as you removed it. Warning Before using, always control that the safety wire is securely fastened. Not using or incorrect use of the safety wire may cause serious injury or death. Tighten bicycle axle rod securely with handle. (If bolt type axle, remove nut with wrench, put bike hitch on and tighten nut over hitch.) Insert bike fork through large hole in bike hitch. LOCK the bike hitch onto the bike fork with the Bike U-Lock pin (2). NordicCab AS Instruction Manual for the NordicCab Explorer 5. Loop red safety wire around BIKE FRAME and clip back onto itself. WARNING Each time you ride, check bike hitch is securely fastened to bicycle and U-lock pin is secured over end of bike fork. Check NO STRAP or WIRE can come in contact with wheel. Failure to correctly secure U-Lock pin, safety wire and bike hitch could result in serious injury or death. Page 12 of 15 6. 7. Flag WARNING Make sure that no parts can come in conflict with bicycle tires. Each time you ride, check bike hitch is securely fastened to bicycle and Ulock pin is secured over end of bike fork. IMPORTANT The safety flag must be used at all times when in bike trailer mode. 8. Explorer is delivered with large 20“ wheels that can be fixed in three optional positions for optimal weight distribution. Connect the two flag parts and insert into the long narrow pocket sewn into the black fabric on left side of canopy. Check NO STRAP or WIRE can come in contact with wheel. Failure to correctly secure U-Lock pin, safety wire and bike hitch could result in serious injury or death. JOGGER Assembled 1. Jogger fork IMPORTANT The wheel must not be attached when assembling. Pull on one ”Snap Lock Bolt” and insert one arm of jogger fork. Pull other ”Snap Lock Bolt” and insert opposite arm of jogger fork. You will hear a ”SNAP” when the bolt has found the hole. Tighten clamp at left front corner of cab. NordicCab AS 2. Jogger wheel Insert wheel AFTER jogger fork is inserted. Loosen black tip of axle and insert wheel front on - into jogger fork. Close axle lever tight. 4. Adjust the wheel angle The jogger might pull to one side affected by weight distribution, air pressure or other causes. This can be compensated by adjusting the screw on the jogger fork in either direction. IMPORTANT Red tip of Snap-Lock bolts should stick out side of cab. Failure to lock Snap-Lock bolts into place could result in serious injury. Instruction Manual for the NordicCab Explorer Page 13 of 15 SKI-KIT / TREKKING (SEPERATE UPGRADE) Assembled 1. Aluminum pullers Insert in the trailer while pulling the snap-lock bolt. In the following order: Insert A in the front trailer. Insert B into A. Secure with velcro locking pins. Insert C into B. Secure with velcro locking pins. Attach C to Oring on harness. 2. Ski Insert axle bolt into the hole in the ski. Pushing with your thumb over the black tip of the axle bolt, insert the bolt into the middle hole on the side of the cab. 3. Person Harness Put on harness so the logo/symbol is between your shoulders. Adjust length of shoulder straps so that belt sits on hips and back cross rests between shoulder blades. Release the bolt when you here it clicks in place. Pull on the ski to ensure it is locked in place. Repeat above for the other ski. Adjust hip belt so it is snug. Secure straps up out of the way with the elastic holders on straps. VIKTIG Pull ski to secure proper attachment. Comes with water bottle holder! Ta på selen med logoen bak. Child Ski Holders It is easiest to insert these before securing side panels to cab. Insert plastic buckle up through slots in rim of cab. The buckle will rest on top of the slot. WARNING! Child ski holders must NEVER be used with wheels. NordicCab AS Instruction Manual for the NordicCab Explorer Page 14 of 15 DIMENSIONS B x L x H cm (inches/ Ibs) FOLDED (without wheels) 61 x 90 x 39 (24x35x15) ERECTED (with wheels) 79 x 90 x 97 (31x35x38) WEIGHT chassis only 14 kg / 30 lbs SEAT WIDTH 55 (22“) SHOULDER WIDTH 62 cm (24.5”) HEIGHT (seat bottom to top) 65 cm (25.6”) AGE 1 til 5 (consult your physician) MAINTENANCE AND CARE Your Explorer is virtually maintenance free. When the cab fills up with mud or cracker crumbs, just take off the canopy, slide out the seat and give it a good spray with a garden hose. Both seat cover and seat cushions may be removed and machine-washed on a gentle cycle. Practice the following simple maintenance tips and your cab will last for years. Before Use Complete a safety check of your bicycle by a qualified bicycle mechanic. Practice riding, accelerating, slowing and cornering with a 30-45 kg load to learn the difference in riding with a bike trailer in tow. Wheels Periodically clean and grease the axles and bolts. IMPORTANT - Always ensure correct tire pressure as indicated on the tires! Slightly less air in the tires will provide some suspension in the cab. Bike Hitch IMPORTANT - Inspect bike hitch, hydraulic tube and bike fork for wear and tear and replace immediately if any wear is noticed. Always check to ensure no straps or objects can get caught in the wheel. Canopy PU coated, water resistant Denier polyester fabric. Wash marks and stains by hand with soap and warm water and brush if necessary. NEVER use cleaning solvents on your Explorer. Ripped fabric may be a hazard and should be repaired immediately. For lengthy storage, keep out of direct sunlight and the elements. Fold down cab and store all components inside the cab with a waterproof cover over top if left outside. For extra waterproofing, the canopy may be sprayed with an environmentally friendly waterproofing spray. Skis Reduce friction on ski bottoms even more by spraying with glider wax. Be sure to choose the glider designed for the temperature and conditions you’ll be skiing in. Seat / Seat Cushions Wash marks and stains by hand with soap and warm water and brush if necessary. Do not use cleaning solvents. Cushion covers may be washed on a gentle cycle in cool water in the washing machine. Lie flat to dry. Do not use dryer. NordicCab AS Instruction Manual for the NordicCab Explorer Page 15 of 15