1
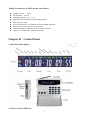
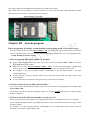
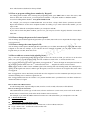
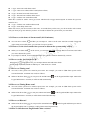
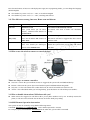
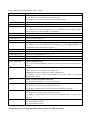
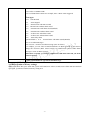
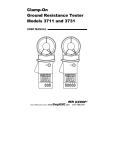
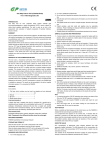
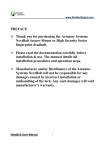
LCD Wireless Intelligent GSM Alarm System With LCD and Remote SMS Control Users’ Manual Model AK99 -1- To Users, Welcome to use GSM Alarm System. For a better understanding of GSM Alarm System, it is necessary for you to read Users’ Manual before starting to test it. Thanks. Our GSM Alarm System adopts the latest Wireless Mobile Communication Technology (WMCT) and related Digital Processing Technology (DPT). Unlike fixed phone-line Auto-dialing Alarms, GSM Alarm System does not need telephone line to dial up when wireless sensors are triggered Perfect structure, easy installation, user-friendly LCD instruction and Remote SMS control makes it outstanding and easy to use for new users. “Efficient, Reliable & professional” is our aim. Hope our professional work can benefit for the importers all over the world. Note; to make speakers plugged in ,before boot, not to alarm or hurt when the speaker into the host internal components! Chapter I Function & Technical Parameters 1. Imported GSM module for industrial use. (850/1900, quad band is optional) 2. Configuration, Adopts all-in-one color LCD clock display and keypad operation to do settings and inquiry 3. GSM Alarm Control panel can pre-set 5 groups of Cell phone number to send SMS alert when alarm is triggered. 4. GSM Alarm Control panel can pre-set 5 groups of Cell phone number or landline number to make phone calls to report alarm information when alarm is triggered. You can pick up the phone call to monitor the sound around the alarm. 5. SMS alert will send to you when system is alarm or disarmed to make sure you can get status anytime without any delay. 6. Out-arm, Home-arm & disarm can be done by Keypad, Remotes, SMS commands (including timing arm/disarm by SMS) 7. You can check its working status (such as Control panel’s ID, arm/disarm, pre-stored phone numbers, power supply) by sending SMS commands. 8. Learning code for adding new sensors makes it simple and easy. Do-it-yourself (DIY) makes everybody can add more sensors to meet different needs. 9. There are 99 Wireless Zone (for 99 sensors) that can be set as Out-arm, Home-arm, Alarm with sound, silent alarm, 24-hour defense zone, Time-delay arm and Time-delay alarm/trigger, Deleted zone and Disable zone. So you can know which zone is triggered and set it alarm with or without sound. 10. The alarm report can be edited by users from Zone 01 to Zone 99 (SMS Commands) 11. It will send SMS to you when external power is cut/disconnected and also when external power is resumed to work. 12. Rechargeable backup battery inside to make sure GSM alarm can continue to work after external power is cut or disconnected. 13. All are wireless communication (RF) which is suitable for basement, warehouse and those places where the telephone line is not easy to reach. 14. User’s PIN code (6-digital password)is required to access to the GSM Alarm System to ensure more security. -2- Technical Parameters of GSM Alarm Control Panel Standby currency: <45mA Rated Voltage: 9V-12V Working temperature: -10-----+55 GSM band: 900/1800mhz and Quad band (optional) Receiving code: ASK Receiving Frequency: 315/433MHZ. and 868/915MHz (optional) Remote control range: 100 meters (in open air) Maximum numbers of Wireless Sensors accepted: 99 units Chapter II Introduction of GSM Control Panel Chapter II Control Panel 2.1 Host Panel Description: 2.2 How to insert a SIM Card -3- Step 1 Buy a SIM Card with SMS function and do not use PIN code for login. Step 2 Make sure the control panel is powered off before you insert the SIM Card inside GSM Alarm control panel. Please do it carefully to avoid any mistake. See picture: Chapter III System program Before programing all settings, system should be in programing mode, refer to below steps: Press key button on the main unit: SET +123456 + OK, you will hear 2 beeps, which means password has passed verification, and you will see the cursor on LCD panel move to SMS. Now you are in programing mode NOTE: Default password is 123456 3.1 How to program SMS phone number by Keypad? Step 1: Enter into programing mode, when you see the cursor on LCD panel is SET + SMS, it is the time to set SMS alarm phone number. Step 2: You can input 1+First cell phone number + OK to save the first phone number for SMS alarm receiver. If you want to set the 2nd phone number, you need to input 2+2nd phone number+OK. For example, I want my cell phone number 13800138000 as the first SMS number, I can input 113800138000+OK. If your password is wrong, it will show FAIL on the screen and 3 beeps sound. You need to input correct password again. If you need to cancel or delete the wrong password, you can choose CLS button. 3.1.1 How to delete the preset SMS Alarm Number? If you want to delete the SMS alarm number you have pre-stored, enter into programing mode, and then input Series number+OK. For example, if you do not want the first phone number; you can input 1+OK. You also can save the new phone number to replace it. 3.1.2 How to check the SMS alarm Number you have pre-set? When LCD screen shows SET, SMS, you can input # and it will show you the phone list from 1 to 5 groups. If you want the first phone number to get SMS report when system is armed or disarmed, you can plus a * after the phone number. For example, if you the first phone number 13800138000 to receive SMS report when system is armed or disarmed, you can input 113800138000*+OK. -4- Note: This function is disabled as factory default. 3.2. How to program calling phone number by Keypad? Set Calling phone number: After entering into programing mode, press SET button to move the cursor, until there are SET, TEL on the screen, you can input Series number + Cell phone number or landline number. To set first Calling Phone Number: 1+1st phone number+OK For example, you can input 113800138000+OK. You can hear 2 beeps which shows operation successful. Repeat this method to set the last 4 telephone number for calling. If you want to delete this number, you can input 1+OK. If you want to delete the second phone number you can input 2 and OK. If you want to check the phone numbers you have set, you can press # on the keypad, when the screen shows SET, TEL. 3.3.1 How to change the password of control panel? You can change password through the keypad when you see SET, PAS on the screen. Input OK after input 6 digits as new password. 3.3.2 How to change the control panel’s ID You can change control panel’s ID through the keypad when you see SET, ID on the screen. Input OK after input 6 digitals as new ID. For example, if you want the ID to be changed to 100001, you can input 100001 on the keypad when you see SET, ID on the screen. 3.4 How to add new sensors in the alarm system? Step 1, enter into programming mode, then press SET to move the cursor to COM, you will see 01 on the LCD panel, now system is in code learning mode, it is time to add new sensor to the 1st wireless defense zone. Step 2, trigger the sensor you want to add. When you triggered the 1st sensor, the digit on main panel will turn to 02, means it is time to learn sensor to 2nd wireless defense zone. …. Altgether 99 sensors can be learned. Note: Trigger means to make sensors send RF signal. After entering into code learning mode, the control panel is waiting for the signal from sensors. When it gets the signal, it will save it so that it can recognize this sensor when it is triggered. How to trigger door sensor? Put battery inside and move the magnet to leave the transmitter part and you can see its LED is flashing once. It means its signal sent out How to trigger PIR sensor? Put its switch to ―on‖ position and then move your hand cross it so that it can detect a motion and send out a signal. How to delete the added sensors? In code learning mode, input 00 and press OK, wait for several seconds, all sensors will be deleted. How to set the type of each zone? This GSM alarm can set the type of each zone so that it can know it is inner zone (won’t work at the mode of Home-arm) or external zone (work in the mode of Home-arm or Out-arm) For example, if you want the FIRST ZONE to be Inner zone with silent alarm, you can input 1+*+3 + OK 1 means the first zone *is the command 3 means Inner zone with silence alarm There are 99 zones can be set as Inner zone, External zone, with or without sound, etc.: 0 type - Delete zone to delete the sensors in this zone. 1 type- Stop this zone -5- 2 Type –Inner zone with alarm sound 3. type-- Inner zone without alarm sound (silence alarm) 4 type---External zone with alarm sound. 5 type-- External zone without alarm sound. 6 type—24-hour zone with alarm sound Note: this is useful for smoke sensor, gas sensor which needs to trigger alarm anytime no matter the system is armed or not.) 7 type—24-hour zone without alarm sound 8 type—Time-delay alarm zone Note: You can set your door sensors in this zone, 30 seconds delay. In this case, you do not need to take remotes with you when you go out. Because you have 30 seconds to disarm the system when you come back. 3.5.1 How to set the times of alarm sound?( 01-99 minutes) You can move to SET, and then you can input 01 +OK to set the siren sound 60 seconds if triggered. After setting successfully done, you can hear 2 beeps to confirm. 3.5.2 How to set the siren sound when you arm or disarm the system with a remote. When you see SET and you arm or disarm the system. If you input 1# and Ok, it will sound alarm when the system is armed or disarmed by a remote. on the screen, you can input 0# + OK to finish. The siren will not sound when 3.6 How to set the clock on the LCD? When there is icon on the LCD, you can input 0901011200 and OK to finish. 090101 mean Year 2009, Month 01 and Day 01. 1200 means it is 12AM 3.7 How to set Timing arm? You can set the system to be armed at preset time. For example, you want to GSM alarm system can be activated/armed at 12:00AM. You can do as follows: When LCD shows SET, , you can press the LOCK button on the keypad and then input 1200 on the keypad. When time is 12:00am, it will be armed automatically. 3.8 How to set Timing Home-arm? You can ask the system to be armed at preset time. For example, you want to GSM alarm system can be activated/armed at 12:00AM. You can do as follows: When LCD shows SET, , you can press Home-arm button on the keypad and then input 1200 on the keypad. When time is 12:00am, it will be home-armed automatically. 3.9 How to set Disarm? When LCD shows SET, , you can press the UNLOCK button on the keypad and then input 1200 on the keypad. When time is 12:00am, it will be home-armed automatically. 3.10 How to shift between English and China versions? -6- Press the SET button, LCD screen will display SET signs (not in programing mode), you can change the language (default English) The number keys enter "39 # 0 #" + "OK", to switch into English The number keys enter "39 # 1 #" + "OK", switching into Chinese 3.11 The differences among Out-arm, Home-arm and disarm Working modes Function & performance Application (when to use) Out-arm All sensors work Note: you’d better put all Door Sensors, Infrared beam Sensors in External Zone Only inner zone works Note: Put all Indoor PIR Sensors in Inner Zone. You can use it when nobody at home All sensors will work to make sure absolutely security. Only 24-hour zone work Note: You should put Smoke/gas sensors in this 24-hour zone. Deactivate The System Disarm the system when you go home and unlock your door. Home–arm (Stay-arm) Disarm Use it when People at home. PIR Sensors will not be triggered but other sensors remain to work. 3.12 How to use the wireless remote to control the host There are 4 keys on remote controller: Out Arm - activate the system. When sensors are triggered, the system will send SMS and dial up. Disarm - deactivate the system. System will not dial up and send SMS in disarming mode. Stay arm - we also call it Home arm. Under this mode, all sensors in internal zone will not work. Alarm----also called SOS. When you need urgent help, press this button. It will call the preset numbers. 3.13 How to handle alarm when GSM alarm calls you? When sensors are triggered, it will dial out the 5 pre-set phone numbers one by one. If nobody answers the phone, it will call 3 times from the first to the last one before finally stop calling. 3.14 SMS Remote Operation instruction: This system can also be control by using SMS in following format: Command: password + # + command code (Note: Default password is 123456) For example, if you send command: 123456#1#1# to the main unit, system will be Out-armed. -7- Below table is the command code for various settings: Command Code 1#A# Explanation Meaning: used to arm/disarm/Home arm A=0 to disarm; A=1 for Out arm; A=2 for Home arm For example, you can send 123456#1#0# to disarm the system. 1## To check the working status of control panel. Control panel will reply you with SMS. 6## To check the status of power supply 11#First SMS User# Used to set the first SMS Receiver E.g. sending 123456#11#13807550001# to save fist SMS user 13807550001. When alarm is triggered, it will send SMS to 13807550001. 12#2nd SMS User# Used to set the 2nd SMS User 13#3rd SMS User# Used to set the 3rd SMS User 14#4th SMS User# Used to set the 4th SMS Use 15#5th SMS User# Used to set the 5th SMS User 16#First Calling User# Used to save the first Calling Receiver For example, if you send 123456#16#13807550002#, it means GSM alarm will call 13807550002 at first when alarm is triggered 17# 2nd Calling User# Used to save the 2nd Calling user. 18#3rd Calling User# Used to save the 3rd Calling User 19#4th Calling User# Used to save the 4th Calling user. 20#5th Calling User# Used to save the 5th Calling user. 10## To check the preset Calling users’ list 30#new password# Used to change password e.g. to send 123456#30#888888# means the system’s password has been changed to 888888 31#A#BBBB# Timing arm A=0 to disarm, A=1 to Out arm; A=2 to Home arm BBBB means the time of timing arm. It takes 4 digitals only For example, you can send 123456#1#1800# to ask the system to be armed automatically at 18:00 36#A# Used to set arm with sound or silent arm A=0 for silent arm (default); A=1 for arm with sound. 37#AA# Used to set time-delay arm Time from 00-99 seconds. System default 30 seconds e.g. sending 123456#37#30# to set the system to be armed fter 30 seconds. 38#AA# Used to set time-delay alarm Time from 00-99 seconds. System default 10 seconds e.g. sending 123456#37#10# to set the system to sound alarm after 10 seconds when triggered. 39#A# Used to change the language version A=0 means English version. A=1 means Chinese version 3.15 Settings for Zone type and SMS content. (Only for SMS operation) -8- 101#A#B# Used to set the wireless zone 01 A is Used to set ZONE TYPE. B is to set SMS alarm content. For example, Zone 1 Door sensor triggered. Zone type: A=0: Zone Deleted A=1 Zone Stopped A=2 Internal Zone with alarm sound A=3: Internal zone without alarm sound A=4 External Zone with alarm sound (Default) A=5 External Zone without alarm sound A=6 24-hour zone with alarm sound A=7 24-hour zone without alarm sound A=8 Time-delay alarm System default is A=4 External Zone with alarm sound (Default) How to set Alarm Message? You can set 0—60 letters for alarm message.(max: 60 letters.) For example, you can send 123456#103#4#Zone 03 Door Opened# if you want to change the 3rd Zone (Door sensors inside) as external Zone and its SMS Alarm message is: Zone 03 Door Opened. When door is opened, you will get a SMS from GSM alarm that tells you: Zone 03 Door Opened. 199#A#B# Used to set the 99th zone type and its alarm message. 3.15 Reset (return to factory setting): When LCD shows SET, press 9999+OK, system will sound twice after 5 seconds. Turn off the main unit and turn it on again, system has returned to factory setting now. -9-