1
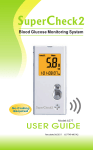
Thank you for using the Solo V2 Audible Glucose Management System. The Solo V2
owner’s manual contains important information about the function and use of the
meter. Please read the manual carefully before using the Solo V2.
1. Table of Contents.
Section 1. Table of Contents
Section 2. Introduction
Section 3. Appearance and Key Functions of the meter
Section 4. Alternate Site Testing
Section 5. Safety Information
Section 6. Quick Testing Instructions
Page 1.
Pages 2-3.
Page
4.
Pages 5-8.
Page 9.
Pages 10-11.
Preparing for Testing
Section 7. Installing the Battery
Section 8. Setting the Audio Voice and Language
Section 9. Settings (Date/Time/Alarm/Measuring Unit and
Memory Deletion ) and LCD Screen Introduction
Section 10. Running a Control Solution Test
Blood Testing
Section 11. Running a Blood Glucose Test
Section 12. Recalling the Memory and Viewing the Average
Section 13. Expected Values Reference
Section 14. Transmitting Results
Page 12.
Pages 13-14.
Pages 15-19.
Pages 20-21.
Pages
22-24.
Pages
25-28.
Page 28.
Page
29.
Meter Maintenance
Section 15. Maintenance of Your System
Section 16. Troubleshooting
Section 17. Customer Service
Section 18. Limitations
Important Additional Information
Section 19. Specifications
Section 20. Ordering Supplies
Section 21. Warranty Information
Page
30.
Page 31-34.
Page 34.
Page 35.
Page 36.
Page 37.
Page 38.
NOTE: For information about the name of the manufacturer of the lancing device
and the lancets, please refer to the package inserts that came with your starter kits.
2. Introduction.
The alternative site testing (AST) in this system can only be used during steady-state
blood glucose conditions.
This system contains a speaking function that provides an audible message of test
results for users with low vision.
Contents of the System.
This User Guide has been prepared to describe the proper use of Solo V2 Blood
Glucose Monitoring System. Please read this User Guide and the Package Insert that
is accompanied with the Solo V2 Glucose Test Strips before testing. The system is
available as a kit. You can purchase the system supplies from your system provider.
Please tell your system provider the 7 digit system reference number marked on the
packaging box when you purchase supplies.
Reference number 501001.
The starter kit of Solo V2 Blood Glucose Monitoring System includes the following
items.
1. Solo V2 Glucose Meter with (2) triple A batteries.
2. User Guide.
3. Log Book.
4. Carrying Case.
5. Solo V2 Glucose Test Strips.
6. Solo V2 Control Solution (Low).
7. Solo V2 Sterile Lancets.
8. Solo V2 Lancing Device.
9. Package Inserts for Test Strips, Control Solution, and Lancets/ Lancing Device.
A single level control solution (Low) is provided in the “Starter Kit”, and you may
purchase High or Low control solution that you need from your system provider.
The Solo V2 Glucose Meter uses Solo V2 Test Strips only. Neither the meter nor the
test strips will work when used with any other brand of glucose products.
3. Appearance and Key functions of the Meter.
1. Test strip insertion port. Located at the top of the meter and easily identified by a
notch. Meter will automatically turn on when a strip is inserted.
2. LCD Display. Guides the user through the test using symbols and simple messages.
3. Left Function Key. Located just below the LCD screen on the front of the meter are
two function buttons. The Left Function key will power ON/OFF, also for memory
recalling mode.
4. Right Function Key. Located just below the LCD screen and directly to the right of
the Left Function key. This key confirms settings, allows ability to view averages in
memory mode, and flags particular test results.
5. Speaker Slot. Located directly below the Left and Right Function keys on the front
of the meter and can be identified by the 3 vertical slots in the meter. Place where the
audible output is produced.
6. Up Button. Located towards the top of the right side of the meter. It is the first
button on the right side of the meter starting from the top of the meter going
downward. Increase the value of the current setting and increases the voice volume.
7. Down Button. Located on the right side of the meter directly below the Up button.
Decreases the value of the current setting and decreases the voice volume.
8. Language Selection Button. Located directly below the Down button on the right
side of the meter. This button does not protrude from the meter as much as the Up and
Down buttons and is a round button. It allows user to change between audible
languages.
9. Mini USB Port. Located directly below the Language Selection button on the right
side of the meter. This port is where you connect cable between meter and PC for data
transmitting.
10. Battery Compartment. Located on the opposite side of the meter as the LCD
screen and Left/Right Function keys, otherwise referred to as the back of the meter.
Place that holds batteries.
Methodology of Reagent.
When glucose reacts with the reagents on the test strips, an electrical current is
produced, which is proportional to the glucose concentration in the blood sample.
The glucose concentration is calculated by the meter type and the amount of electrical
current measured.
4. Alternate Site Testing (AST).
What is AST?
Sampling from anatomical sites (parts of the body) other than the fingertip (i.e.
forearm, upper arm, thigh, calf, palm) to check the blood glucose levels. This system
allows you to test on the forearm with the equivalent results to fingertip testing.
There are important limitations to AST. Please consult your healthcare professional
before you use AST.
What is the advantage?
Patients typically feel more pain when lancing their finger pads because they have
substantially more nerve endings than other testing sights. It is reported that other
testing sites cause less pain; however, there are other limitations. Please speak to your
healthcare provider before using this method.
Use Alternate Site Testing (AST) ONLY:
1. if it has been greater than 2 hours after taking insulin.
2. if it has been greater than 2 hours after a meal.
3. if it has been greater than 2 hours after exercise.
*Do not use AST if you are pregnant or if your blood sugars are not stable.
*Do not use AST if you think your blood glucose is low or if your AST results do not
match the way you feel.
Testing Procedure for AST.
1. Please unscrew the lancing device by turning the cap counter clockwise. A clear cap
will come with the package of a meter kit or a lancing device.
1a. Insert the clear cap that comes with your kit.
2. Insert a new lancet firmly into the lancet holder.
3. Twist off the protective top of the lancet.
4. Close the cap of the lancing device and grasp as shown. Slide into locking position.
If necessary, please set the lancing device for a deeper puncture.
5. Select a soft, fleshy, area on your forearm that is clean and dry. Make sure it is
away from bone and free of visible veins and hair.
6. Massage the selected area gently to increase blood flow to the puncture site.
Clean the test location with soap and water.
7. Open the test strip bottle and take one test strip out.
8. Insert the test strip while the meter is in the OFF position. The meter will turn on
with a blinking blood-drop icon on the LCD screen. You will hear: “Hello, Solo is
Ready. Apply blood now.”
9. Press and hold the loaded lancing device against the forearm for a few seconds, and
press the button.
10. Wait a few seconds until a blood drop forms. Make sure you have sufficient blood
to fill the small window of the test strip.
11. Apply your blood to the front edge (the tip) of the test strip. The meter will start
counting down from 6 seconds. Once complete you will hear: “Testing in process. The
glucose level is number/unit.”
12. Once you remove the used test strip, the meter will turn off automatically. You
will hear: “Goodbye.”, and the LCD screen will display “OFF”.
5. Safety Information.
Please use this device only for the intended uses described in this user guide.
Before using this system to test your blood glucose, please read instructions
thoroughly. Do a quality check on the system following the instructions and consult
with your healthcare professionals for questions or problems.
Be aware of the safety of young children or handicapped persons near you when you
conduct a glucose test using this system.
Solo V2 test strips can only be used with the Solo V2 meter.
Please keep the test strip bottle away from children. The test strips and bottle cap can
present a choking hazard.
Please be cautious when removing the lancet. Always place the protective cap back on
the exposed lancing device.
Never try to disassemble the meter in any circumstance. If your meter is not working
properly, or if you need the Technical Support, please contact your local distributor
for help.
6. Quick Testing Instructions.
Please read through all the detailed instructions before real testing to assure the
effectiveness of testing.
1. Wash hands with warm soapy water and dry thoroughly.
2. Remove test strip from bottle and recap the bottle immediately.
3. In the “OFF” position, insert a test strip into the test strip slot.
The meter will automatically turn on, and you will hear “Hello, Solo is Ready. Apply
blood now”.
4. Lance the appropriate finger and let a blood drop form.
4a. If you wish to flag the glucose test as a “Before-Meal” test:
Keep meter in the “OFF” position.
Insert NEW strip.
Listen for “Apply blood now”.
Press the “Right Function” button two times.
You are in the right mode when you hear, “ Ready for test Before-Meal”.
4b. If you wish to flag the glucose test as an “After-Meal” test:
Keep meter in the “OFF” position.
Insert NEW strip.
Listen for “Apply blood now”.
Press the “Right Function” button three times.
You are in the right mode when you hear, “ Ready for test After-Meal”.
4c. If you do not want to flag the test, simply insert the strip when it is in the “OFF”
position. After you hear “Apply blood now”, apply blood to the strip. Note: you will
have 5 minutes to apply the blood before the meter will automatically turn off.
5. After a 6 second countdown, the test result will appear on the screen. You
will hear: “ The glucose level is number/unit”. For those glucose tests that are flagged,
the screen will display an upper-case “A” on the right side of the reading as an
After-Meal test and a lower-case “b” as a Before-Meal test.
6. Remove the test strip and the meter will turn off automatically. You will hear
“Goodbye” and the LCD screen will display “OFF”.
Notes:
Voice volume can be adjusted by the Up and Down buttons on the upper right side of
the meter. The Volume can not be adjusted while a test strip is inserted into the meter.
To change languages of the meter, use the round button on right-hand side of the
meter below the up/down buttons.
7. Installing the Battery.
1. If the meter is on, turn the meter off by pressing and holding the
“Left Function ” button for two seconds.
2. Open the battery cover on the back of the meter by pulling the tab up and away
from the meter.
3. Remove used batteries if there are any and replace with two triple A alkaline
batteries. Put the battery cover back in place and snap it closed. You will hear a
“beep” sound if the battery is installed correctly.
Important:
1. It is suggested you replace the batteries when the battery icon appears empty. You
will get an Error 3 message when the batteries do not have enough power to perform a
test.
2. Replacing the batteries will not delete the stored testing results or any other meter
setting EXCEPT date and time. You will need to reset the date and time after the
batteries have been replaced.
3. Please dispose of used batteries according to your local ordinances.
8. Setting the Audio Voice Volume and Language.
On the right side of the meter, you will find two buttons, the “Up” button and the
“Down” button. The “Up” button increases volume and the “Down” button decreases
volume.
When the meter is in the “OFF” position, the voice volume of the meter can be
adjusted by pressing the “Up” or “Down” buttons. There are 8 different volume
settings ranging from OFF to a volume level of seven. When initially pushing the
volume buttons you must press and hold for a second before it will change the volume.
This feature prevents the meter from speaking when a button is accidentally touched.
To mute the volume, simply set the meter to setting “ 0 ”, and you will hear “Voice
Off ”. The speaker icon will disappear from the LCD screen.
On the right side of the meter you will find a small, round button.
To toggle between English and Spanish simply press the round button twice. The first
time you push the button, the meter will speak the current setting. If you push the
button a second time, you will switch to the alternate language. The screen will show
“E” or “S” and you will hear “English” or “Español”.
If you stop pressing this round button, the meter will automatically turn off in 2
seconds. An audible voice will say, “ Goodbye ” and the LCD screen will display
“OFF”.
9. Setting (Date/Time/Alarm/Measuring Unit and Memory Deletion) and
LCD Screen Introduction.
Press the “Left Function” button for 2 seconds to enter the “settings” mode. Once in
the “settings” mode the “Right Function” key will be used to toggle between the
different settings. The “Up/Down” on the right side of the meter will be used to
increase or decrease the value of current setting.
When the meter is off, the date, time, measurement unit, battery icon, and “OFF” will
be displayed on the LCD screen. If the voice is on or the alarm reminder is on, the
speaker icon and the alarm icon will be displayed as well.
To SET the meter:
1. With the meter in the “OFF” position, press the “Left Function” key and hold for 2
seconds. The first item to appear on the LCD screen is a flashing “09”. This represents
the last two digits of the current year. The meter is now in the “Setting” mode. You
will hear: “You are Now in Setting Mode. Please set the year.”
2. Set the Year - Press the “Up” or“Down” key on the right side of the meter until the
last two digits of the desired year are displayed. Each time you adjust the year, you
will hear “The year is xxx.” Press the “Right Function” key to confirm the correct
year and the meter will move to the next setting. You will hear “Please set the
month.”
3. Set the Month- Press the “Up” or“Down” key on the right side of the meter until the
desired month appears. Each time you adjust the month, you will hear “The month is
xxx.” Press “Right Function” key to confirm the correct month and the meter will
move to the next setting. You will hear: “Please set the day.”
4. Set the Day - Press the “Up” or“Down” key on the right side of the meter until the
desired day appears. Each time you adjust the day, you will hear “The day is the xxx”.
Press “Right Function” key to confirm the correct day and the meter will move to the
next setting. You will hear: “Please set the hour.”
5.Set the Hour - Press the “Up” or“Down” key on the right side of the meter until the
desired hour appears. Each time you adjust the hour, you will hear: “The hour is xx
A.M. or P.M.” Press “Right Function” key to confirm the correct hour and the meter
will move to the next setting. You will hear: “Please set the minute.”
6. Set the Minute - Press the “Up” or “Down” key until the desired minute appears.
Each time you adjust the minute, you will hear “The minute is xxx.” Press “Right
Function” key to confirm the correct minute and the meter will move to the next
setting. You will hear: “Please set the alarm.”
7. Set the Alarm Reminder - Press the “Up” or “Down” key to select the setting of
alarm reminder. You will see the alarm icon is flashing with an “AL” display on the
LCD screen. You will hear: “Set alarm reminder.” Press “Right Function” key to
confirm “Setting mode.”
The hour segment of“zero, zero, zero, zero” will be flashing on the screen. Press the
“Up” or “Down” key until the desired hour appears. Press the “Right Function ” key
to confirm the correct hour for the alarm setting. Then the minute segment of“zero,
zero, zero, zero” will be flashing on the screen. Press the “Up” or “Down” key until
the desired reminder minute appears on the screen. Press “Right Function” key to
confirm the setting and the meter confirm audibly what time the alarm is set for.
Note: Once the Alarm Reminder is SET, the meter will beep for 60 seconds
every day at the set Alarm Reminder time. To silence the alarm, press the “Right
Function” key once.
If you have set the alarm to 8:45 am, you will hear: “Alarm
Reminder is set to 8:45 A.M.”
If you decide NOT to set the alarm press the “Up” or “Down” key after you first
hear: “Please set the alarm.” Press the “Right Function” key to exit the alarm
setting. You will hear: “Please set the unit.”
8. Set the measurement unit - Press“Up” or “Down” key on the right side of the meter
until the desired measurement appears. The meter will display either “mg/dL” or
“mmol/L” when pressing “Up” or “Down” key. Each time you press “Up” or “Down”,
you will hear: “Measurement unit in milligrams per deciliter” or“Measurement unit in
millimole per liter.” Press “Right Function” key to confirm the selection and you will
hear: “Ready to delete memory records. Press the “Down” button to delete all records.
Warning: This meter can show results either in “mg/dL” or “mmol/L” units. Mg/dL is
the unit used in the U. S., please contact the manufacturer if your meter does not
display mg/dL when you turn it on. The factory set default for the meter is mg/dL, in
the event that the meter loses power or the batteries are changed, the factory set
default is mg/dL. It is very important to use the correct unit of measurement to
properly manage your diabetes. If you live in the United States, your results will never
have a decimal point. If you live outside the United States and use the metric system,
you should use mmol/L. Your results will always have a decimal point.
9. Delete Memory- You will hear: “Ready to delete memory records. Press the Down
button to delete all records”. Press the “Down” button to permanently delete all
memory records. You will receive a confirmation “Are you sure you want to delete all
records?” Press the “Down” button a second time to delete all records.
If you want to skip this memory deletion step, press the “Right Function” key after
you hear “Ready to delete memory records.” The meter will automatically power off
with an audible voice “Goodbye” and the LCD screen will display “OFF”.
10. Running a Control Solution Test.
IMPORTANT:
1. Press “Right Function” key for place the meter in “Control Solution” mode. If you
leave the meter in the standard mode, the control solution test result will be stored in
the memory and affect your average “AVG” results.
1. Insert a strip into the meter, and you will hear: “Hello, Solo is ready.” You will hear:
“Apply blood now.”
2. Press the “Right Function” key, and you will see a letter “C” on the in the right
corner of the LCD screen to indicate you are in control test mode. You will hear
“Apply control solution now.” The test result will not be stored in the memory.
3. Squeeze a small amount of control solution on a flat surface and apply to the front
edge of the test strip. You will hear: “Testing in process.”
4. Wait 6 seconds and the meter will display the result. You will hear: “The
glucose level is number/unit.”
5. Remove the used strip. The meter will power off with a display of “OFF” and you
will hear: “Goodbye”.
Note:
1. You must press the “Right Function” key only once to set the meter in the control
solution mode before running the test. Do not perform the blood test in control
solution mode if you want to save the test result in memory.
2. Use only Solo V2 control solution with the Solo V2 glucose meter only.
3. Solo V2 control solutions are used to confirm the accuracy of the meter and the test
strips.
4. Solo V2 control solution contains a known amount of glucose that reacts with test
strips. The Low and High level control solutions are intended to check the monitoring
system in different measurement ranges.
5. To ensure an accurate result, make sure you gently roll the control solution in the
palm of your hand. Discard the first drop.
6. Use for only 3 months after first opening. Record the open date on the control
solution bottle. Discard after 3 months.
7. Compare your control solution test results with the expected range printed on the
test strip bottle label. If your glucose control results fall outside the expected range,
repeat the test. Results that repeatedly fall outside the expected range may indicate:
(1) The control solution test may not be performed correctly.
(2) The control solution is expired or contaminated.
(3) The test strips are damaged or expired.
(4) The meter is malfunctioning.
11. Preparing the Lancing Device.
1. Unscrew the lancing device by turning the end counter clockwise.
2. Insert a new lancet firmly into the lancet holder.
3. Twist off the protective tip of the lancet.
4. Place the cap back on the end of the lancing device by turning clockwise.
5. Slide lancing device into locking position.
Important: If you do not obtain enough blood on the strip, you will receive an error
message. You will also hear, “Insufficient blood, Please test again.” This is critical for
your safety.
11a. Preparing to Test Blood Sugar.
1. Wash your hands with warm, soapy, water.
2. Open the test strip bottle and take out one new test strip.
3. Recap the bottle quickly and firmly.
4. Insert a test strip into the meter while the meter is in the “OFF” position. You will
hear: “Hello, Solo is ready”.
5. Retrieve the loaded lancing device or single-use lancet.
6. Apply blood to the front edge of the test strip after you hear: “Apply blood now.”
You will also see a blinking icon of a blood drop. If enough blood is obtained you will
hear: “Testing in process.”
7. To flag a Before-Meal test, press the “Right Function ” twice after you hear “Apply
blood now.” Apply blood to the edge of the strip. You will hear “Testing in process”.
8. To flag an After-Meal, press the “Right Function ” three times after you hear
“Apply blood now.” Apply blood to the edge of the strip. You will hear “Testing in
process”.
9. After a 6 second countdown you will hear: “The glucose level is number/unit”. For
those glucose tests that were flagged, the screen will display an “A” as an After-Meal
test and a “b” as a Before-Meal test.
10. Once you remove the used strip, the meter will turn off automatically and you will
hear: “Goodbye”. The LCD screen will display “OFF”.
12. Recalling the Memory and Viewing Different Averages.
Note: The meter will audibly read the latest 10 test results with DATE. You will
hear: “September 4th, 110 mg/dL.”
A. Using the Meter Memory.
The test results will be stored automatically. The meter can store up to 500 test results
at any single point in time. You can also view 7, 14, 28, 60, and 90 averages.
B. Recalling the Test Results from the Meter Memory.
1. In the “OFF” position, press “Left Function” key once and you will hear:
“Recalling the memory.” If no results are stored, “three dashes” will be displayed on
the screen and you will hear: “Zero memory.”
2. Press the “Down” key to retrieve the latest test first.
3. Press the “Up” key to retrieve the oldest test first.
C. Viewing the Averages (AVG) Stored in Memory.
Note: The average will have all test results including those flagged as Before-Meals,
After-Meals and those not flagged at all. When the meter displays “three dashes” on
the screen, it indicates there is no stored data. The meter will also say “no memory”.
1. Press “Right Function” key once and you will see “AVG” and the number “7”
flashing on the lower left corner. The number “7” represents the average of the test
results over the last seven days. For example: You will hear: “The average for seven
days is eighty-three milligrams per deciliter.”
2. Press “Right Function” key incrementally move between the different averages
(7,14, 28, 60, and 90 day averages).
D. Displaying Averages in Sequence.
1. Press the “Up” key to see the test averages in the sequence starting with
Before-Meal test results.
2. Press the “Down” key to see the test averages in the sequence starting with
After-Meal test results.
The screen will display the average reading with a “b” or “A”.
Note:
1. The out-of range HI/LO test results will not be stored in the memory.
2. Do not insert the strip into the meter when you want to recall the test results in
memory.
3. The average readings in the meter memory are calculated from the results obtained
during the 7, 14, 28, 60 and 90 calendar days preceding the current date and time
settings.
13. Expected Values Reference2.
Blood glucose levels are fluid and change all the time depending on food intake,
medication dosages, health, stress, and exercise. Consult your physician or healthcare
professional for your expected glucose levels. Expected plasma blood glucose values
for normal, non-diabetic, adults are as follows:
Expected Plasma Blood Glucose for Non-Diabetics
Before Eating (no food intake for 8 hours)
<110mg/dL.
Two hours after meals
<140mg/dL.
Consult your physician or healthcare professional for your appropriate range.
If you are experiencing symptoms that are not consistent with your blood glucose
results and you have followed all the instructions in this user guide, call your
healthcare professional. Never ignore symptoms or make significant changes to your
diabetes control programs without speaking to your healthcare professional.
Solo V2 meter gives plasma equivalent results.
14. Transmitting Results.
Note: Solo V2 Glucose Meter allows you to transfer the test results stored in its
memory to your personal computer. However, you will need to order software and a
Data Download Cable separately from your distributor. The software and its data
download procedure will come as a CD in the download cable box. You can also
check with your distributor for the software download option. The meter still keeps
the results in the memory after transmitting.
The data transmitting procedure is as follows:
1. Install software from the CD or Download the application from
www.SoloMeters.com onto your PC before running the data transmission.
2. Keep meter in the “OFF” position.
3. Connect the PC and the meter with the mini USB cable.
4. Hold the “Left Function” and “Right Function” keys down at the same time for 5
seconds until “PC”is displayed and you hear: “Ready to transmit data”.
3. Press the “Right Function” key to begin transmitting data from your meter to
your personal computer.
4. Press and hold the “Left Function” key for 2 seconds to exit the transmission
mode.
15. Maintenance of your System.
1. Store your test strips in the bottles provided.
1a. Keep in a clean, dry, place between 46 to 86 degrees Fahrenheit (8 to 30 degrees
Celsius).
2. Clean the meter after every use. Gently wipe and clean surface of the meter with a
soft cloth that has been slightly dampened with alcohol.
3. Handle with care and do not drop the meter.
4. Enforce infection control policies when being used by healthcare professionals.
We suggest you should periodically compare the test system to another test system
which is well maintained and monitored by a healthcare provider.
16. Troubleshooting.
Following is a summary of all Error Messages. These messages help to identify
certain problems, but do not appear in all cases when a problem has occurred.
Improper use may cause an inaccurate result without producing an error message or a
symbol. In the event of a problem, refer to the information in the table under Solution.
Error messages.
Message: E_1. Audible Message:
The temperature is too low. Possible Cause:
The meter is operating in an ambient temperature below 10 degrees Celsius or 50
degrees Fahrenheit which is the lowest range of operating temperature.
System
operation range is 10 degrees Celsius to 40 degrees Celsius (50 degrees Fahrenheit to
104 degrees Fahrenheit). Solution: Repeat the test when the temperature is within the
range.
Message: E_2. Audible Message: The temperature is too high. Possible Cause: The
meter is operating in an ambient temperature above 40 degrees Celsius or 104 degrees
Fahrenheit which is the cap of operating temperature. Solution: Repeat the test when
the temperature is within the range.
Message: E_3. Audible Message: Battery low.
Possible Cause: The battery is too
low to operate the meter. Solution: Replace the battery immediately.
Message: E_4. Audible Message:
No sufficient blood.
Possible Cause: The
blood sample is not sufficient.
Solution: Please re-test with a new strip and a new
blood sample.
Message: E_5. Audible Message: Strip is wet or used. Possible Cause: The inserted
test strip has been wet or used.
Solution: Re-test with a new test strip and a new
blood sample.
Message: E_6. Audible Message: Error in meter or strip.
Possible Cause: The meter is not working properly because of a defective meter or a
defective strip. Solution: Re-test with a new strip. If error message E_6 is still
displayed, contact your local distributor for technical support.
Message: E_7. Audible Message: Memory damaged. Possible Cause: The memory
chip of the meter could be damaged or malfunctioning.
Solution: Re-test with a
new strip. If error message E_7 is still displayed, contact your local distributor for
technical support.
Special Messages.
Message: LO. Audible Message: Test result is lower than 20 mg/dL (1.1 mmol/L).
Possible Cause: The test result is lower than the measure range of 20 mg/dL (1.1
mmol/L). Solution: Test again following the user guide for correct glucose
measurement process. If you see LO again, please call your medical doctor for advice
immediately.
Message: HI. Audible Message: Test result is higher than 600 mg/dL (33.3mmol/L).
Possible Cause: The test result is lower than the measure range of 600 mg/dL
(33.3 mmol/L).
Solution: Test again following the user guide for correct glucose
measurement process. If you see HI again, please call your medical doctor for advice
immediately.
Problem in Operation.
Problem: The meter will not turn on when a strip is inserted.
Possible Cause: 1)
The meter is defective or the battery is low.
2) The strip is not inserted properly or the strip is damaged. Solution: 1) Make sure
the arrow on the inserted strip is facing towards the meter, and the blood icon on the
strip is facing up.
2) Take a new strip and re-insert into the meter.
3) Check the battery power or replace them if necessary.
4) Call Customer Service.
Problem: The meter does not count down. Possible Cause: The meter is defective or
the battery is low. Solution: Replace the battery. If the meter fails to operate, call
Technical Support.
Problem: The meter display turns off abnormally. Possible Cause: The meter is
defective or the battery is low. Solution: Replace the battery. If the meter fails to
operate, call Technical Support.
Problem: The control test result is out of specified range. Possible Cause: The
control solution or test strip maybe outdated or defective. Solution: Verify if the
control solution or the test strip is expired. If they are not expired, please call
Customer Service.
Warning: Your meter can show results either in “mg/dL” or “mmol/L” units. Mg/dL is
the unit used in the U. S., please contact the manufacturer if your meter does not
display mg/dL when you turn it on. The factory set default for the meter is mg/dL, in
the event that the meter loses power or the batteries are changed, the factory set
default is mg/dL. It is very important to use the correct unit of measurement to
properly manage your diabetes. If you live in the U.S.A. you should use mg/dL. Your
results will never have a decimal point. If you live outside the United States and use
the metric system, you should use mmol/L. Your result will always have a decimal
point.
17. Customer Service/Technical Support.
If you need assistance with your Solo V2 Glucose Monitoring System, please contact:
BIOSENSE MEDICAL DEVICES, LLC.
6555 Sugarloaf Parkway,
Suite 307-168,
Duluth, GA 30097.
TEL: 877-592-3922.
FAX: 888-620-2345.
For questions related to your health condition, please call your doctor or healthcare
professional.
18. Limitations.
1. Do not use for neonatal blood glucose testing.
2. Hematocrits in the range of 32~56% do not affect the blood glucose results. If you
do not know your hematocrit level, consult your healthcare professional.
3. Hemoglobin levels of 500 mg/dL or below will not interfere with blood glucose test
results.
4. Cholesterol levels up to 500 mg/dL (12.9 mmol/L) and Triglycerides up to 1000
mg/dL has been shown not to affect glucose results.
5. Medications.
Interference was observed for therapeutic levels of L-Dopa. No interference was
shown for uric acid, acetaminophen, ascorbic acid and ibuprofen in normal
therapeutic levels.. However, higher concentrations in blood may cause incorrect
results:
Uric acid: >10.9 mg/dL; acetaminophen: >6.2 mg/dL;
ascorbic acid: >4.5 mg/dL; ibuprofen: >37.5 mg/dL.
6. The test strips may be used at altitudes up to 5,280 feet (1,609m) without an effect
on test results.
7. Persons suffering from severe dehydration should not be tested using a capillary
whole blood sample.
8. Test results below 70 mg/dL indicate low blood glucose (hypoglycemia). Test
results greater than 240 mg/dL indicate high blood glucose (hyperglycemia). If you
get results below 70 mg/dL or above 240 mg/dL, repeat the test, and if the results
are still below 70 mg/dL or above 240 mg/dL, please consult your healthcare
professional immediately. Reference 2.
9. Inaccurate results may occur in severely hypotensive individuals or patients in
shock. Inaccurate results may occur for individuals experiencing a
hyperglycemic-hyperosmolar state, with or without ketosis. Critically ill patients
should not be tested with a blood glucose meter.
19. Specifications.
Test: Glucose.
Sample: Whole Blood.
Principle of the test method: Amperometric, glucose oxidase.
Test sites : Fingertip, Forearm.
Measuring Range: 20 to 600 mg/dL (1.1 to 33.3 mmol/L).
Measuring Time: 6 seconds.
Code required: No code device.
Batteries: ALKALINE 24A LR03 triple A 1.5V X 2).
Operating Range: 10 to 40 degrees Celsius (50 to104 degrees Fahrenheit).
Humidity: 20 to 80 % RH.
Width: 55 mm.
Length: 100 mm.
Thickness: 18 mm.
Weight: approximately 75g.
Memory: 500 test results with date and time.
Power: Automatic shut-off after 5 minutes when a strip is inserted, or 20 seconds if no
strip is inserted.
NDC #: 8611-501001.
The device has certified to meet the following standard:
98/79/EC, EN 60601-1 + EN 60601-1-1
ISO 15197.
Note: Please refer to the package insert that came with your test strips. You will find
the information on how the system works.
20. Ordering Supplies.
BioSense Medical Devices is not a home health supplier. To order supplies please
contact a home health supplier or your local pharmacy. If you need assistance finding
a provider please contact:
BIOSENSE MEDICAL DEVICES, LLC.
6555 Sugarloaf Parkway,
Suite 307-168,
Duluth, GA 30097.
TEL: 877-592-3922.
FAX: 888-620-2345.
21. Warranty Information.
The Solo V2 Glucose Meter is warranted to be free from defects for five years from
date of purchase. For warranty assistance, please contact:
BIOSENSE MEDICAL DEVICES, LLC.
6555 Sugarloaf Parkway,
Suite 307-168,
Duluth, GA 30097.
TEL: 877-592-3922.
FAX: 888-620-2345.
Reference:
1. American Diabetes Association:Diabetes Care, January 2007, volume 30 (Suppl. 1)
S42-S47.
2. American Diabetes Association-Diabetes Forecast (website information
http://www.forecast. Diabetes.org/diabetes-101/hyperglycemia.
http://www.forecast.diabetes.org/diabetes-101/hypoglycemia.)