1
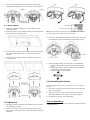
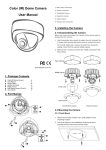
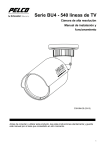
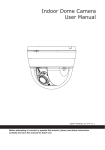
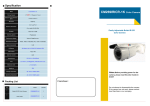
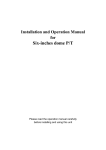
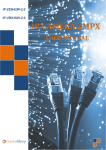
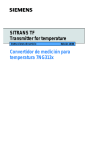
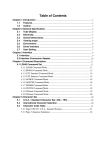
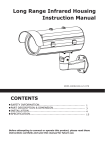
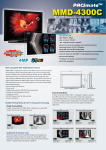
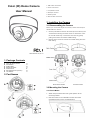
Color (IR) Dome Camera User Manual 1. BNC Video Connector 2. Power Connector 3. Tele/Wide Control 4. Near/Far Control 5. OSD Joystick 6. Monitor Out Connector 3. Installing the Camera 3.1 Disassembling the Camera Before you mount and adjust the camera, follow these steps to disassemble the camera. 1. Use the provided torx wrench to loosen (but not remove) the 3 screws that securing the dome cover to remove the cover. For non-IR model only: remove the inner liner by gently pulling it free from the camera middle casing. 2. Remove the 3 screws to remove the middle casing from the back casing. ZEIM-4000622G 418,437 A.2 1. Package Contents Color (IR) Dome Camera User Manual Guide Pattern Monitor Out Cable Plastic Anchor Self-Tapping Screw (TP4x31) Torx Wrench x1 x1 x2 x1 x3 x3 x1 2. Part Names Non-IR Dome Camera IR Dome Camera 3.2 Mounting the Camera 3.2.1 Flush Mount 1. Attach the provided "Indoor Use" guide pattern to the mounting location. 2. Drill three holes on the installation surface and insert provided anchors into the pre-drilled holes. 3. Secure the middle casing to the surface by inserting the supplied self-tapping TP4 x 31 mm screws into the anchors. 3.2.1 Surface Mount 1. Attach the provided "Outdoor Use" guide pattern to the mounting surface. 2. Drill three holes on the mounting surface and insert provided anchors into the pre-drilled holes. Note: For IR models, do not tilt the lens upward further when the marker aligns with the edge of the lens bracket. . 3. Loosen the Tele/Wide and Near/Far control screws and make the adjustment. After the adjustment, tighten the screws. 3. Secure the base casing to the mounting surface by inserting the supplied self-tapping TP4 x 31 mm screws into the anchors. 4. Then secure the middle casing to the base casing by the original screws. 4. Adjust the OSD settings as required by your applications. Press the OSD joystick control straight down to enter the OSD menu. Move the OSD joystick control UP, DOWN, LEFT and RIGHT to navigate through menus and options. Press the joystick to make a selection. 3.4 Assembling the Camera Once all adjustments are done, attach and secure the camera housing: 1. Use a soft, lint-free cloth to wipe the dome cover clean and remove fingerprints. 2. Attach the inner liner (for non-IR model only) to the tilt adjustment bracket. Push down until it clicks into place. 3. Put back the top cover and screw tightly. 3.3 Adjustment 1. Optionally connect a monitor to the “Monitor Out” connector for adjustment purpose. 2. Loosen the screws on the lens bracket and adjust the tilt angle. Make sure to tighten the screws when desired angle is achieved. Care on Operations To guarantee the performance, all maintenance shall be done by a qualified person. SPEED DELAY CNT ATW FRAME ENVIRONMENT 4. OSD Settings Use the OSD menu to set up the camera for optimum performance. LENS SHUTTER/AGC WHITE BAL BACKLIGHT PICT ADJUST MOTION DET ATR NEXT EXIT AUTO AUTO ATW OFF OFF OFF SAVE ALL PRIVACY DAY/NIGHT NR CAMERA ID SYNC LANGUAGE CAMERA RESET BACK EXIT OFF AUTO OFF INT ENGLISH SAVE ALL OSD Main Menu 4.1 Lens The LENS settings allow you to configure Lens and brightness. Options are AUTO (Auto Iris lens) and MANUAL. The default setting is AUTO. In the AUTO submenu, you can set the MODE as OPEN, CLOSE or AUTO. Then select SPEED to adjust the DC Iris Lens convergence speed. TYPE MODE SPEED DC OPEN 046 4.2 SHUTTER/AGC MANUAL: You can manually adjust the LEVEL from 15 to 69. USER1/USER2: You can adjust blue setting (B-GAIN) and red setting (R-GAIN) value from 0 to 255. PUSH: When selected in the appropriate position, the whole area will perform white balance. PUSH LOCK: When selected in the appropriate position, WHITE BALANCE will perform once. 4.4 BACKLIGHT Set Backlight compensation function. It controls the light level to overcome sever backlight conditions. Available options include OFF, BLC or HLC (Highlight Compensation) mode. The default is OFF. If HLC is selected, HLC is activated automatically when the camera detects high-luminance. 4.5 PICT ADJUST PICTURE ADJUST allows you to adjust picture settings for optimal image. In the PICT ADJUST submenu, you can adjust BRIGHTNESS, CONTRAST, SHARPNESS, HUE and GAIN value. In addition, you can set MIRROR to ON to reflect the image. You can set the SHUTTER/AGC as AUTO or MANUAL. The default setting is AUTO. MIRROR BRIGHTNESS CONTRAST SHARPNESS HUE GAIN When LENS is set to AUTO: It is recommended to set SHUTTER/AGC to AUTO mode. In the AUTO submenu, adjust HIGH LUMINANCE MODE according to your application: AUTO IRIS mode: Use this for normal condition application environments. The IRIS level will be controlled by camera brightness. SHUT+AUTO IRIS mode: Use this for high light application environments. The exposure will be controlled by AES or the DC Iris. The iris level will be controlled by camera brightness. AUTO IRIS 024 LOW LUMINANCE MODE BRIGHTNESS AGC x0.25 If SHUTTER/AGC is set to MANUAL, the submenu is shown as below. The shutter speed is a variable from 1/50(1/60)sec to 1/10000sec and the AGC is selectable depending on your environment condition. MODE SHUTTER AGC SHUT+AGC 1/50(1/60) 6.0 4.3 WHITE BAL WHITE BALANCE controls color on the screen. Options include ATW (Auto White Balance), PUSH, PUSH LOCK, USER1, USER2, ANTI CR (Anti Color Rolling Suppression) and MANUAL. The default is ATW. ATW: Select ATW when the scene illumination varies between indoor scenes and outdoor scene lighting. OFF 000 128 128 128 128 4.6 ATR* Set ATR (Adaptive Tone-curve Reproduction) function. You can select ON or OFF. The default is OFF. If selecting ON, you will enter the ATR submenu, where you can set LUMINACE and CONTRAST to optimize by image. LUMINANCE CONTRAST HIGH LUMINANCE MODE BRIGHTNESS 171 152 X0.50 INDOOR LOW LOW *Also known as Wide Dynamic Range. This function expands the video dynamic range of the camera and improves visibility of images even in high contrast environments. 4.7 MOTION DET MOTION DET allows to detect moving objects on the screen. The default is OFF. If selecting ON, you will enter the MOTION DET submenu. You can set up to 4 motion areas to detect moving objectives and adjust the motion detection sensitivity from 0 to 127. 4.8 PRIVACY PRIVACY function mask up to 8 privacy areas on the screen from video monitoring. The default setting is OFF. If selecting ON, you will enter the PRIVACY submenu. You can configure up to 8 privacy areas and set color and transparency of the privacy zones. In addition, you can enable MOISAIC function for the privacy zone. Note: If you enable MOTION DET function, then PRIVACY function will support 4 zones only. REA SEL TOP BOTTOM LEFT RIGHT COLOR TRANSP MOSAIC 1/8 000 000 000 000 1 0.00 OFF 5. Specifications Type Signal System Scanning System Effective pixels (HxV) DAY/NIGHT function allows you to set how the camera switches between color and black and white (B/W) mode. Options include AUTO, COLOR and B/W. The default setting is AUTO. AUTO: In the AUTO submenu, you can adjust BURST value and set: Day->NIGHT: Set the light level at which the camera switches to NIGHT mode. The higher the value, the darker the lighting must be there before the camera switches. NIGHT->DAY: Set the light level at which the camera switches to DAY mode. The lower the value, the brighter the lighting must be there before the camera switches. Lens COLOR: Force the camera to stay in DAY (COLOR) mode at all times. (Only for model without IR) B/W: Force the camera to stay in B/W (NIGHT) mode at all times. The B/W submenu allows you to set BURST to be ON or OFF. (Only for model without IR) PAL NTSC PAL 2:1 Interlace V:50 Hz, H:15.625KHz 2:1 Interlace V: 59.94 Hz, H:15.734KHz 2:1 Interlace V:50 Hz , H:15.625 KHz 976(H) × 494(V) 976(H) × 582(V) 976(H) × 494(V) 976(H) × 582 (V) NR allows you to configure the DNR (Digital Noise Reduction) settings to reduce noise on the screen. In the NR submenu, you can enable the NR MODE to the Y (BRIGHT) / C (COLOR), C LEVEL or Y LEVEL mode. According to your NR mode, you can adjust Y LEVEL or C LEVEL as required. Note: When the Y/C Level is higher, the noise in dark areas become lessened. Also, resolution will become lower. When it is lower, there are more noise in dark areas. 4.11 CAMERA ID CAMERA ID allow you to specify camera ID. Options are OFF (default) and ON. In the ON submenu, you can add a camera title up to 26 characters with 2 lines and also select where the title appears on the monitor screen. 4.12 SYNC Set the sync mode as INT (internal, the default) or LL (line lock) mode. The LL option only works with AC power. 4.13 LANGUAGE OSD supports 8 multiple languages. Options include ENGLISH (default), JAPANESE, GERMAN, FRENCH, RUSSIAN, PORTUGUESE, SPANISH and SIMPLIFIED CHINESE. 4.14 CAMERA RESET To restore factory defaults, select CAMERA RESET and then press the joystick control. 4.15 SAVE ALL SAVE ALL item allows you to save all settings and exit the OSD menu. f=3.3~12mm, F1.4 IR Corrected DC iris varifocal 700TVL 700TVL DC Iris Driver View Angle Horizontal:76.9°(wide) ~ 22.7°(tele), Vertical:56.8°(wide) ~ 17.1°(tele) Gamma Correction Min. Illumination 0.45 F 1.4, 0.03 lux@50 IRE, 0.015 lux@30 IRE 0 Lux (IR LED ON) IR LED --- 18 pcs IR Wavelength -- 850nm LED Life -- S/N Ratio More than 10,000 hours(50°C) More than 50dB (AGC off) Gain Control On / Off (selectable) White Balance ATW/ Manual/ User/ Push/ Push lock 1/60 sec 1/50 sec Flickerless BLC Day/Night Mode 1/60 sec Off / BLC / HLC (High Light Compensation) (selectable) Digital Day/Night Mechanical (ICR) Day/Night Yes Motion Detection Yes, 4 areas (max) Privacy Mask Yes, 8 zones (max) High Light Compensation Yes ATR* On / Off (selectable) OSD Multi Language 1/50 sec On / Off (selectable) DNR Yes English, Japanese, German, French, Russian, Portuguese, Spanish, Simplified Chinese 1Vpp composite output, 75 ohm Power Requirement AC 24V & DC 12V ± 10% AC 24V & DC 12V ± 10% Power Consumption 2.5W (max) 5W (max) Operating Temp. Operating Humidity Storage Temp. Storage Humidity Dimension(WxLxH) Weight Y/C 000 000 Internal/Line Lock Selectable f=3.7~12mm, F1.4 DC iris varifocal Iris Control Video Output 4.10 NR NR MODE Y LEVEL C LEVEL NTSC 2:1 Interlace V: 59.94 Hz, H: 5.734KHz TV lines Electric shutter OFF 100 100 100 Color Dome IR Camera 1/3” SONY Exview HAD CCD II Sync system 4.9 DAY/NIGHT BURST DELAY CNT DAY->NIGHT NIGHT->DAY Color Dome Camera Image Sensor Protection *ATR=Digital WDR -10°C ~ 50°C 90% MAX -20°C ~ 60°C 70% MAX 131x 132 x 112 mm (5.16" x 5.20" x 4.25") 750g approx. IK10 Vandal-resistant, IP67