Transcript
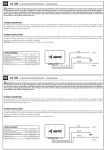
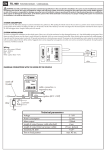
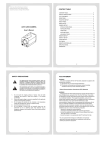
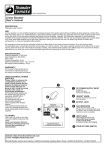
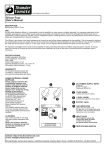
EN T SWITCH TEMPO
AUTOMATIC LIGHTS SWITCH
WARNING: Carefully read following instructions and technical specifications in this manual before installation. The system must be installed and used
only according to this manual. The system is designed for vehicles with 12V
power supply. It has to be connected to 12V output and to the ground. Neither
producer or seller of the system is responsible for damages caused by incorrect installation, using or operating of this product. Unprofessional operation
or modification of the system can damage the system alone, or the electric system of the vehicle and leads to warranty loss. For proper working of the system
we recommend the installation to be made by authorized service.
SYSTEM DESCRIPTION
TEMPO T SWITCH provides automatic lights switching (low beam and parking) after
starting the vehicle. Its advantages are simple construction, maintenance-free operation and easy installation into the vehicle. It is parallel connected to the vehicle lights
switch, which remains in the off position when are the lights automatically turn on.
TEMPO T SWITCH includes convenience function ”Coming Home“. Also includes
input to ensure automatic turns off the low beam lights when beam lights are switched
on (bulb type H4).
Coming home function: This feature provides automatic turn on of low beam
lights for 30 seconds to unlock / lock the car (connection with car alarm or central
locking vehicle is necessary). If you turn on the ignition before the expiration of this
period, the lights automatically turn off.
I. SYSTEM INSTALLATION
Remove plastic covers of car dashboard. Find cables for T SWITCH connection. Use
a digital multimeter to test the function of cables in vehicle, even if you’re sure which
function specific cable does have. After choosing the right cables, disconnect the
car battery and connect the cable harness of T SWICHT to those cables according
to the attached wiring schemes. Solder and isolate all connections. After finishing
the installation of T SWITCH, connect the car battery. Test correct functionality of the
T SWITCH and the electrical installation of the car (ignition, directional lights). Mount
the plastic covers back on to the dashboard.
POSITION OF CONTROL UNIT
Place the control unit from the inner side of protection plastics of the car dashboard.
Attach it using doublesided adhesive tape or cable ties.
II. WIRES CONNECTION
CONNECTOR CN1
White: Input cable to control the parking lights. For this wire bring voltage, which
controls parking lights. When the parking lights are controlled by a negative voltage
(-), can be used only gray wire of the connector CN2 as the output wire. When the
lights are controlled by positive voltage, you can use all three outputs for parking
light.
Wiring diagram
user manual
Green: Input to control the low beam lights. On this wire must be bring the same
voltage, which controls the low beam lights. If you want to use the feature ”Coming
Home”, is necessary to have permanent voltage on this wire even when the ignition
is turned off.
Blue: Relay output to control the low beam lights. The polarity of this output is
dependent on voltage on the green wire in the connector CN1.
connector CN2
White: Input to the activation of Coming Home. Input responds to (-) pulse
Violet:
Connect to the output of the alternator (G) or the output signal from oil
pressure sensor. TEMPO T SWITCH turns on the parking lights and low beam right
after the start. Responds to the input (+) pulse
Black:
Connect to the GND of vehicle.
Yellow: Connect to the ignition wire +12 V
Red:
Connect to battery +12 V
Orange: If you need to turn the low beam off when beam lights are switched on, connect the cable to the beam. Responds to the input (+) pulse. If is +12V on this
input, output for low beam will be turned off.
Grey:
Relay output to control the parking lights. The polarity of this output is dependent on voltage on the white wire in the connector CN1. Connect to the control
wires of the parking lights.
Brown: Output for parking lights. Connect to the control wires of the parking lights. This output can be used only when the parking lights are controlled by a positive voltages. If the parking lights are controlled by negative voltage, use the gray
wire for control.
Setting the switching VOLTAGE
TEMPO T Switch automatically turns on after starting the vehicle when the vehicle
electrical system voltage exceeds a preset value. This value is factory set to13V.
Value can be set for each vehicle individually to the required switching voltage according to schematic. If during engine running and automatically turning lights on
will voltage drop below the switching voltage, TEMPO T SWITCH remains turned
on until the ignition is turned off (the yellow wire is needed to connect the ignition).
Technical parameters
Power supply
Operational temperature
Current comsuption - stand-by
Max. current load - parking lights
Max. current load - low beam lights
12V +/- 20%
-40°C až 60°C
0 mA
3x10 A/12V
30A/12V