1
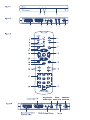
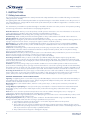
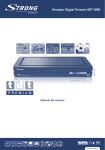
Picture similar
Digital Terrestrial Receiver SRT 5800
User Manual
A través de la TDT llega a su hogar una oferta de contenidos de calidad en
modalidad de pago gracias al nuevo sistema TDT Premium
Esta tarjeta es su llave para la TDT Premium, con ella podrá darse de alta a las distintas ofertas de TDT de
pago de forma independiente. Antes de contratar los servicios, debe tener en cuenta los siguientes pasos:
1 Instalar su receptor siguiendo las instrucciones del manual de instalación.
2 Busque el canal TDT Premium que le interesa en la lista de programas de TDT ya sintonizados de su
receptor. Si detecta el canal TDT Premium, su equipo ya está preparado. Recuerde que todavía no podrá
visualizar el canal dado que está codificado.
3 En caso de que no detecte el canal TDT Premium, resintonice su receptor. Si dispone de un receptor, al
finalizar la función de sintonización aparecerá en pantalla uno de los siguientes mensajes :
n “Servicios de pago disponibles” : Guarde la configuración. Su equipo ya está preparado.
n “Servicios de pago no disponibles” : Usted no recibe el canal TDT Premium. Póngase en contacto
con su instalador.
4 Introduzca la tarjeta en el receptor.
5 Ahora puede contratar las distintas ofertas de cada operador de forma independiente.
Para cualquier duda, consulte la web: www.tdtpremium.es
Registre su tarjeta Premium universal
Para obtener más información sobre como darse de alta a cualquiera de los canales de pago actualmente
vigentes simplemente llame al siguiente número de teléfono:
(
807 170 444
EL PRECIO MAXIMO DE ESTA LLAMADA ES DE 0.41 EUR/min SI LLAMA DESDE TELEFONO FIJO Y DE
0.75 EUR/min SI LLAMA DESDE UN TELEFONO MOVIL IMPUESTOS INCLUIDOS.
ESTE SERVICIO ESTA PRESTADO POR TELEQUEST.
PART 2 • English
1. INSTRUCTION
1.1 Safety Instructions
1.2 Storage
1.3 Equipment Set-up
1.4 Accessories
2. YOUR RECEIVER
2.1 PIN code default: 0000
2.2 Front panel
2.3 Rear panel
2.4 Remote Control
2.5 Installing the Batteries
2.6 Using the Remote Control
3.0 CONNECTIONS
4.0 FIRST TIME INSTALLATION
5.0 BASIC OPERATIONS
5.1 Change a channel
5.2 Volume control
5.3 Information banner
5.4 Teletext
5.5 Favourites list
5.6 Electronic Programme Guide (EPG)
6.0 BOX SETTINGS
6.1 Video Settings
6.2 Language Settings
6.3 Menu Settings
6.4 Channel Search Settings
6.5 Power Settings
6.6 Miscellaneous Settings
6.7 Restore Factory Settings
7.0 SEARCH FOR CHANNELS
8.0 SORT CHANNELS
8.1 Defining channels as favourites
8.2 Moving channels in the favourite list
8.3 Deleting channels in the favourite list
8.4 Filter channels
8.5 Lock channels
9.0 TECHNICAL INFORMATION
9.1 Channel information
9.2 System Information
9.3 Software Update
10.0 TIMER
11.0 SECURITY
11.1 Receiver Lock
11.2 Menu Lock
11.3 Channel Lock
11.4 Parental Control
11.5 Change Device-PIN
12.0 PAY TV DETAILS
A.1 TROUBLESHOOTING
A.2 SPECIFICATIONS
2
2
3
3
3
3
3
3
4
4
4
4
4
4
5
5
5
5
5
5
6
6
6
7
7
8
8
8
8
8
9
9
9
9
9
9
9
10
10
10
10
10
10
10
10
10
11
11
11
12
English
TABLE OF CONTENTS
STRONG declares that this item complies with the basic requirements and other relevant regulations
of directives CE 2004/108/EEC and 73/23EEC, RoHS 2002/95EEC
Subject to alterations. In consequence of continuous research and development technical
specifications, design and appearance of products may change. All product names are trademarks or
registered trademarks of their respective owners.
© STRONG 2009. All rights reserved. 10/2009
1
PART 2 • English
1. INSTRUCTION
1.1 Safety Instructions
This receiver has been manufactured to satisfy international safety standards. Please read the following recommended
safety precautions carefully.
The lightning flash with arrowhead symbol within an equilateral triangle is intended to alert the user to the presence of
not isolated dangerous voltage with the inside of the product that may be of sufficient magnitude to constitute a risk of
electric shock to persons.
The exclamation point within an equilateral triangle is intended to alert the user to the presence of important operating
and servicing instructions in the literature accompanying the appliance.
Read All Instructions - Before you use the product, read all operation instructions. For more information on accessories
such as the lithium ion battery, refer to the manuals provided with those products.
Save These Instructions- Save all safety and operating instructions for future reference.
Heat Warnings- Read carefully and follow all warning labels on the product and those described in the instructions.
Follow Instructions- Follow all instructions provided with this product.
Cleaning-Always unplug this product from the wall outlet before cleaning. Use only a damp cloth for cleaning. Never use
any type of liquid or aerosol cleaner, or any type of organic solvent to clean this product.
Attachments-For your safety, and to avoid damaging the product, use only accessories recommended by STRONG.
Water and Moisture- Never use this product around water (near a bathtub, kitchen sink, laundry tub, wet basement.
swimming pool or in the rain)
Location-To avoid damage to the product and prevent personal injury, never place this product on an unstable stand,
tripod, bracket, Follow the instructions that describe how to safely mount the product, and use only the mounting
devices recommended by the manufacturer.
Power Sources-Connect this product only to the power source described on the product label. If you are not sure about
the type of power supply in your home, consult your local power company.
Refer to instruction pages for information on using the product with a battery.
Grounding, Polarization- If this product is used with a specified AC adapter, the adapter may be equipped with a
polarized alternating current line plug (a plug with one blade wider than the other). This safety feature allows the plug
to fit into the power outlet only one way, If you cannot insert the plug into the wall outlet, pull it out, reverse it, and have
the receptacle replaced.
Ventilation- Slots and openings- They are provided for ventilation to ensure reliable operation of the receiver and to
protect it from overheating. These openings must not be blocked or covered. The openings should never be blocked by
placing the receiver on a bed, sofa, rug, or heat register. This receiver should not be placed in a built-in installation such
as a book case or rack, unless proper ventilation is provided. Ensure that free airflow is maintained around the receiver.
Protecting the Power Cord - The power supply cord should be placed so it will not be walked on. Never put a heavy
object on the power cord or wrap it around the leg of a table or chair. Keep the area around the power cord connection
points, at the power outlet, and at the product connection, free of all AC adapter or accessory power cords.
GENERAL PRECAUTIONS - SAFETY PRECAUTIONS
Lightning- If a lightning storm occurs while using a specified AC adapter, remove it from the wall outlet immediately. To
avoid damage from unexpected power surges, always unplug the AC adapter from the power outlet and disconnect it
from the receiver when the receiver is not in use.
Overloading-Never overload wall outlets, extension cords, power strips, or other power connection points with too
many plugs.
Foreign Objects, Liquid Spillage-To avoid personal injury caused by fire or electrical shock from contact with internal
high voltage points, never insert a metal object into the product. Avoid using the product where there is a danger
of spillage.
Heat-Never use or store this product near any heat source such as a radiator heat register, stove, or any type of
equipment or appliance that generates heat, including stereo amplifiers.
Servicing-Refer all servicing to qualified personnel. Attempting to remove the covers or disassemble the product, could
expose you to dangerous high voltage points.
Damage Requiring Service- If you notice any of the conditions described below while using a specified AC adapter
unplug it from the wall outlet and refer servicing to qualified service personnel:
1. Liquid has been spilled onto the product or some other object has fallen into the product.
2. The product has been exposed to water.
3. The product does not operate normally despite following operating instructions. Adjust only the controls
described in the operating instructions as improper adjustment of other controls could damage the product
and require extensive repair word by a qualified technician.
4. The product has been dropped or damaged in any way.
2
5. The product exhibits distinct change in performance.
Replacement Parts-When replacement parts are required, make sure that the authorized service centre uses only parts
with the same characteristics as the originals, as recommended by the manufacturer. Unauthorized substitution of parts
could result in fire, electrical shock, or create other hazards.
Safety Check-Upon completion of servicing or repairs, ask the service technician to perform safety checks to determine
that the product is in good working order.
Apparatus shall not be exposed to dripping or splashing and no objects filled with liquids, such as vases, shall be placed
on or next to the apparatus.
Where the mains plug or all-pole mains switch is used as the disconnect device, the disconnect device shall remain
readily operable.
Remote control transmits a directional infrared beam. Ensure to aim the remote control directly at the infrared sensor
of the unit during operation. If the sensor has been covered or there is a large object between the RCU and sensor or it
is exposed to direct sunlight or a strong artificial light (fluorescent or strobe light) the sensor may not be able to receive
the remote signal. In this case, change the direction of the light or reposition the unit.
1.2 Storage
Your receiver and its accessories are stored and delivered in a packaging designed to protect against electric shocks and
moisture. When unpacking it, make sure that all the parts are included and keep the packaging away from children.
When transporting the receiver from one place to another or if you are returning it under warranty make sure to repack
the receiver in its original packaging with its accessories. Failing to comply with such packaging procedures could void
your warranty.
1.3 Equipment Set-up
We recommend you consult a professional installer to set up your equipment. Otherwise, please follow these
instructions carefully:
n Refer to the user manual of your TV and your antenna.
n Make sure that the Audio/Video connectors and outdoor components of the antenna are in a good
condition and the Audio/Video connections are well shielded.
This manual provides complete instructions for installing and using this receiver.
The following symbols will serve as follow.
WARNING
Tips
MENU
Move to
Indicates a warning information.
Indicates any other additional important or helpful information.
Represents a button on the remote control. (Bold Character)
Represents a menu item within a window. (Italic Character)
1.4 Accessories
n
n
n
n
Note:
1 User Manual
1 Remote control unit
2x Batteries (AAA type)
Power supply 230 V AC/50 Hz to 12 V DC
The batteries supplied do not contain hazardous substances such as Mercury, Cadmium or Lead.
The batteries should not be recharged, disassembled, electrically short-circuited or be mixed or used
with other types of batteries. They must not be disposed with your household waste but to a local
collection system.
If rechargeable accumulators instead of batteries are going to be used, we recommend using (e.g.
NiMH) types with low self-discharge to ensure long time operation of remote control.
2. YOUR RECEIVER
2.1 PIN code default: 0000
2.2 Front panel
1 Power button:
2 Channel up/down:
3 Smart Card Slot
Fig. 1
To switch ON or into Standby without using the remote control
To change channels without using the remote control
3
English
PART 2 • English
PART 2 • English
2.3 Rear panel
1.
2.
3.
4.
5.
6.
7.
DVD/VCR SCART:
TV SCART:
Audio L / R:
S/PDIF Optical:
TO TV:
ANT IN:
12 V connector
Fig. 2
To connect to a Video or DVD recorder
To connect receiver with your TV set using a SCART cable
To connect receiver with an amplifier using A/V cinch cable
To connect your receiver to a digital audio amplifier
To connect a TV set or to connect an extra receiver
To connect an antenna for reception of broadcasting signal
To connect the 12 V power adaptor
2.4 Remote Control
Fig. 3
To open the main menu.
To turn the sound on or off.
To switch to on or standby
To return to the previous screen or menu.
To open teletext if available on current channel.
To select subtitles language out of available ones on current channel
Toggles between TV/Radio modes.
To call Electronic Programme Guide
To access your favourite channels. In CH list to switch between FAV and main list.
Navigates left/right.
Increases or decreases volume in live view mode
11. pq:
Navigates up/down
Selects the next or previous channel in live view mode
12. OK
Confirmation
13. COLOR KEYS (RED/GREEN/YELLOW/BLUE):
To operate different functions in menu screens or in teletext. BLUE in view mode calls Picture
and Audio settings. YELLOW in view mode functions as AUDIO button.
14. i
To display now and next event information
15. P +/Channel up/down
16. VOL +/- Increase/decrease volume (also during EPG and TXT mode)
17. 0-9
Numeric buttons
18. P
To switch between the last two viewed channels. In CH list to switch between FAV and main list.
19. AUDIO
To select audio mode
1. MENU
2. MUTE
3. STANDBY
4. ESC
5. TXT
6. SUBT
7. TV/RADIO:
8. EPG
9. FAV
10. tu:
2.5 Installing the Batteries
Remove the battery cover from the remote control and put 2x AAA size batteries inside the compartment.
Note:
The batteries should not be recharged, disassembled, electrically short-circuited, be mixed or used
with other types of batteries.
2.6 Using the Remote Control
To use the remote control, point it towards the front of the digital receiver. The remote control will not operate if its path
is blocked.
Note:
Sunlight or very bright light will decrease the sensitivity of the remote control.
3.0 CONNECTIONS
4.0 FIRST TIME INSTALLATION
Switch on the receiver by pressing the power button and wait until you see the welcome screen.
1. Use pq on your remote control to select the language of your preference and press OK.
2. The settings window is displayed.
3. Set the desired values by using tu to change the displayed values and by using pq to switch
between options.
4. By using the pq buttons go to OK field and press OK on remote control.
5. Use tu to modify the start and end frequency values, if desired.
6. Use tu to determine the channels to be searched for: All channels or Free-to-Air only.
4
Fig. 4
PART 2 • English
Note:
By pressing ESC button you can get back to the previous installation steps.
7. Go to the OK field by using the pq buttons next to Start scan. Press OK button on remote control to start
the scan mode. By pressing ESC button you can stop the scanning at any time.
As soon as the search is completed, a message is displayed. Confirm this and the next message by OK to proceed to the
TV replay.
Note:
To start a new initial installation, you need to reset the receiver to its default settings, see chapter
6.7.
English
5.0 BASIC OPERATIONS
5.1 Change a channel
You can change the channel by:
1. pressing the channel button P+ or P-.
2. pressing the arrow buttons pq.
3. pressing P to switch between the two last selected channels.
4. selecting the channel via the channel list (see chapter 5.5)
5. entering the channel number via the numerical keys in the channel list.
5.2 Volume control
Use VOL+ or VOL- or tu to increase/decrease the volume.
By pressing the MUTE button, the sound is turned off. The turn on the sound again, press
1. either MUTE again, or
2. one of the volume control buttons.
5.3 Information banner
The information banner is displayed every time you change the channel. To display the information banner without
changing the channel press INFO. You can define the display time of the information banner, please see also
chapter 6.3.1.
The information banner displays
n the selected channel number
n the channel name
n the current time
n the bar showing the elapsed/remaining programme time
n the current and the next programme and its broadcasting time.
Extended information banner
By pressing the INFO button again, while the information banner is displayed, an extended information banner with
further details to the current programme will be displayed. If the text is more extensive, it is displayed in several pages.
By repeatedly pressing OK or pq, you can browse the pages.
By pressing INFO or u, information to the next programme is displayed.
By pressing t, you return to the information on the current programme.
Press ESC to close the information banner.
5.4 Teletext
Press TXT to call up the teletext.
n Use the numerical buttons to enter a specific page.
n Use tu or the yellow or blue colour button to go to the next or previous page.
n Use the red or green colour button to go to the next or previous subpage (if available).
n By pressing P+ and P-, you’ll go 100 pages forwards/backwards to the next full hundreds (e. g. 462 -> 500 -> 600).
n Use pq to highlight a page number on the contents pages and press OK to go to the selected page.
If you press TXT again, the teletext will be transparent over the TV screen. By pressing it again, teletext will be completely
hided. Alternatively you can hide the teletext by pressing EXIT.
5.3 Favourites list
Press FAV to open the channel list. If no other window on the screen is opened, you can also call up the channel list by
5
PART 2 • English
pressing OK. This list contains all TV channels which were found and stored during automatic channel scanning. By
pressing FAV again, the favourites list is displayed indicating the channels you have “favoured” by an asterisk.
n By using pq, you highlight the next/previous channel in the list.
n Press OK to display the selected channel in the background.
n The channel list remains open for another several seconds. During this time, you can select another channel
by using the arrow buttons, or press OK to close the channel list.
If the receiver is switched to radio mode, you can also carry out the previously described actions for
the stored radio channels.
Note:
5.5 Electronic Programme Guide (EPG)
The electronic programme guide (EPG) offers information about programmes which will be broadcasted in the next
week on the current channel.
Note:
n
n
n
n
Not all channels offer an extensive EPG.
Many broadcasting services broadcast the current day programme but do not offer detailed descriptions.
There are broadcasting services which do not offer any EPG information.
Due to the progressive technical development, more and more broadcasting services will extend this offer in
the future.
Select the desired channel and press EPG. The following functions are offered to you:
n If you require more information on a programme, highlight it by using pq, and press INFO.
n Change to another day use u to return use t.
In order to switch between the programmes of the afternoon and evening, press the colour buttons
displayed in the EPG.
n By pressing the channel P+/P- you can view the EPG of another channel.
n If you want to adopt a programme into the timer list, highlight it and press blue for setting timer. Confirm
the following request by pressing OK.
Close the EPG by pressing ESC.
6.0 BOX SETTINGS
1. Press MENU to open the main menu. “Box settings” is highlighted by default.
2. Press OK.
3. By using pq highlight the desired option and press OK to open the submenu.
Selecting and altering the settings is effected as usual by means of the arrow keys pq tu; a window that is inserted
can be closed by pressing ESC.
6.1 Video Settings
The video displayed on the TV depends on the screen and picture format, as well as the broadcast content format setting.
Screen format:
Select screen format according to your TV in 4:3 or 16:9.
Picture format:
Specify what to do if format of transmitted picture is different to your TV screen.
6.1.1 Screen Format 16:9
If you have a 16:9 (Widescreen) screen, you can select one of the following options for 4:3-formatted pictures:
Stretched:
image in 4:3 format will be screen-filled by vertically compressing images to avoid cutting off the top
and bottom
Pillar box:
reduces a 4:3 picture to 16:9 format by inserting a black bar left and right
Zoom:
images in 4:3 format in a screen-filled by cutting off the top and bottom
6.1.2 Screen Format 4:3
With a standard screen you can select following options regarding 16:9 (Widescreen) pictures.
Letter box 16:9:
reduces pictures in 16:9 mode by inserting a black bar above and below
Pan Scan:
pictures will be screen-filled by cutting off pictures left and right
Letter box 14:9:
compromises between both settings by inserting small black bars and cutting off a bit left and right
6.1.3 TV Output Format
Formats RGB, Video (CVBS) and S-Video (Y/C) are provided. In most cases RGB is the correct selection.
6
PART 2 • English
6.1.4 VCR Output Format
It changes automatically according to TV Output Format settings
6.1.5 Automatic AFD
The broadcasted picture format may deviate from the picture format to be displayed. AFD recognizes and corrects it, if
“ON” is selected.
6.1.6 Teletext
English
You can choose if your receiver or your TV set displays teletext. If External (TV) is selected, then you can use the TEXT
button on your TV set remote control for displaying it.
6.1.7 Restore Default Settings
In this menu you can reset the configuration for the Video Settings to previous set default values.
6.2 Language Settings
6.2.1 Menu Language
Here you set the language of the OSD (on-screen display).
6.2.2 Audio Language
Select audio language for the programmes.
6.2.3 Second Audio Language
Select an optional audio language for the programmes. If the programme is not broadcasted in the language set under
„Audio language“, the „Second audio language“ is used.
6.2.4 Audio V.O.
Select if you like to automatically detect the original audio provided by the broadcaster
6.2.5 Audio Description Automatic
Enable or disable audio description provided by the broadcaster.
6.2.6 Subtitle Language
Select a language for the subtitle.
6.2.7 Second Subtitle Language
Select an optional subtitle language; see also „Second audio language“.
6.2.6 Subtitles Automatic
Set this option to “ON” if broadcasted subtitles should be shown automatically in the selected language (default: OFF).
6.3 Menu Settings
6.3.1 Info Banner Duration
Here you define how long the information banner has to be shown after changing a channel. If you want to completely
eliminate the information banner, select “None”.
6.3.2 Info Banner Automatic
At the start of a new programme, the information banner is automatically shown as default. If you do not want it, select “OFF”.
Note:
This option is only available if “Info banner duration” is set to at least “4 seconds”.
6.3.3 Menu Language
Set the language of the OSD.
This function is also available via „Language Settings“, see chapter 6.2.
6.3.4 Menu Transparency
Here you can set the transparency of the OSD. If you do not want it, select “None”.
7
PART 2 • English
6.3.5 Menu Transitions
Select the speed of the menu transitions between smooth, medium and fast.
6.3.6 Menu Background Effect
Here you can select between 6 different background effects.
6.4 Channel Search Settings
See chapter 7
6.5 Power Settings
Here you can select the time after which the box automatically switches into Standby. Default set to Off.
6.6 Miscellaneous Settings
6.6.1 Time Zone Adjustment
Select whether you want to have local time set to Greenwich time automatically or if you want to specify it manual.
6.6.2 Time Zone
Select the entry GMT +01:00 for Germany and Central Europe (plus 1 hour difference to Greenwich time).
6.6.3 Summer time
Set “Summer time” to Off or On depending on the current season. If you selected the setting “Automatic” in Time Zone
Adjustment above, then receiver obtains the information regarding summer time from the current selected channel
automatically.
6.6.4 Audio Format
To select audio output between Stereo and different Mono options.
6.6.5 Dolby Digital Automatic
Enable/Disable automatic detection of Dolby Digital audio channels.
Only enable this option when you have connected a Dolby Digital supported system.
6.7 Restore Factory Settings
You can reset the receiver to default settings.
The defined settings and CH lists will be deleted.
Note:
1.
2.
3.
4.
Press MENU to open the main menu.
Highlight Box settings by using pq and press OK.
Highlight Restore factory settings and press OK.
Set Yes by using u and press OK.
The receiver will reboot. It switches off and shortly afterwards switches on again and will start with First installation, see
chapter 4.
7.0 SEARCH FOR CHANNELS
In the Search for Channels menu you can choose between Automatic search and Manual search. If you are using an
Active Antenna you can select it to ON in Antenna Settings in order to get stronger signal.
After the first installation, see chapter 4, if you want to search again for channels, or to add specific channels that are
additionally broadcasted.
Channel search settings
Highlight the Channel search settings and press OK. Specify whether the channel list is to be automatically updated
(Automatic) or not (Off).
Automatic search
This scan mode is recommended due to its feature of automatically finding all receivable channels.
1. Highlight Automatic search and press OK.
2. Press OK to start automatic scanning.
8
PART 2 • English
Manual search
Manual search enables the specific search for an individual channel, e.g. if you want to scan for a specific channel and
you know the information on the channel and frequency.
1. Highlight Manual search and press OK and select the adjustable values by using pq.
2. Set the Frequency by using tu.
3. Or enter the Frequency (MHz) via the numerical buttons.
4. Choose whether you want to search for All channels or Free-to-Air channels.
5. Highlight OK and press OK to start manual search.
If channels were found, follow step 3 described in Automatic search, see above. If no channels were found, a message is
displayed. Press OK.
8.0 SORT CHANNELS
Possibly the channel list may appear too complex to you or contain channels that you are not interested in. Via the Main
menu, you can edit and create your favourite list.
1. Press the MENU button.
2. Select Sort channels by using pq and press OK.
3. After all desired changes are done, press ESC to close the window.
8.1 Defining channels as favourites
The favourites list contains all channels you have defined as favourites. To create a personalised channel list follow the steps:
1. Select the channel you want to indicate as a favourite by using pq.
2. Press OK to add the channel to the favourite list.
3. Repeat this process with all channels you want to add.
The same procedure applies for the radio channel list.
Press the TV/RADIO to call up the overview for the radio channels, to return to the TV channel list press the TV/
RADIO again.
8.2 Moving channels in the favourite list
You can individually set the sequence of the channels within the channel list.
1. Press P to highlight and edit the favourite list.
2. Highlight the channel you want to move by using pq.
3. Press OK to confirm.
4. Move the channel to the desired position by using pq.
5. Press OK to store the channel at the desired position.
8.3 Deleting channels in the favourite list
1. Highlight the channel you want to delete by using pq.
2. Press the red button.
3. To delete all the channels in the favourite list, press the yellow button.
8.4 Filter channels
Press Yellow button and use the arrow keys pq tu to filter and sort the channels after different features. Select OK
to store.
8.5 Lock channels
Here you can lock/unlock highlighted channel by pressing Green button.
Note:
In order the locking get active, Channel Lock has to be set to ON in Security menu (see chapter 11.3)
9.0 TECHNICAL INFORMATION
This menu consists of Channel and System information.
9
English
3. After the search is completed, use tu to choose whether
n the channels found are to be added to the old list (standard setting),
n the old channel list has to be overwritten,
n the new found channels are to be discarded.
4. Press OK.
PART 2 • English
9.1 Channel information
Channel Information solely serves to supply information on one channel. However, you can use it for adjusting your
antenna and for improving the television reception.
1. Press MENU to open the main menu.
2. Highlight Technical information by using pq, and press OK.
3. Select Channel information and press OK.
4. Adjust your antenna so Signal strength and Signal quality shows a high value.
Depending on your antenna, you can probably also carry out settings on the antenna.
Note:
9.2 System Information
1. After step 2 above select System information and press OK.
Here you find technical information of your receiver relevant for support.
2. Press 3 times EXIT to return to the TV programme.
9.3 Software Update
For this purpose, the device has to be set to standby operation. Every night between 1am and 5am, the device checks
whether a software update is available. In this case, you‘ll receive a message when the receiver is switching on the next
time and software update can be started.
You can also start the search process manually.
1. Press MENU and select “System information” in “Technical information”.
2. Highlight “Update Software” by using the arrow keys.
3. Press OK to start software update
10.0 TIMER
8 timer events can be programmed here. Press OK for Edit to enter desired parameters. Follow explanation in info
banner. Select OK for confirmation. By pressing Green button you get into Timer Settings menu. Here you can adjust
the display time of the Warning message, which appears before starting of an event. Also you can set the Default timer
type selecting between Reminder and Record.
Timer can also be set directly from EPG by pressing Blue button there. In this case the highlighted event will be directly
stored in Timer schedule table.
11.0 SECURITY
1. Press MENU and highlight “Security” by using the arrow keys
2. Press OK
3. Enter the PIN code and confirm with OK.
Note:
The default PIN code is set to 0000.
The displayed information will help you to select the correct settings.
n Selecting and altering the settings is carried out as usual with the arrow keys.
n The displayed window can be closed by pressing ESC.
11.1 Receiver Lock
Set this option to “ON” if you want to protect your receiver against unauthorized access.
When the receiver is switched on the next time, the PIN code will be requested (the default PIN code is 0000).
11.2 Menu Lock
Set this option to “ON” if you want to protect your menu against unauthorized access.
When the menu is called up the next time, the PIN code will be requested (the default PIN code is 0000).
11.3 Channel Lock
Set this option to “ON” if you want to protect defined channels against unauthorized access. After selecting to ON, the
option Lock/Unlock (Green button) will appear in Sort Channels menu, where you can then lock/unlock channels.
11.4 Parental Control
Here you can define a minimum age for specific programmes. These programmes are PIN code protected and can only
be unlocked with the PIN code.
10
PART 2 • English
11.5 Change Device-PIN
Here you can specify your personal PIN code.
1. Press OK and enter the current PIN code
2. Confirm by pressing OK
3. Enter your new PIN code and press OK
4. Enter new PIN code again and press OK
12.0 PAY TV DETAILS
A.1 TROUBLESHOOTING
There may be various reasons for the abnormal operation of the receiver. Check the receiver according to the procedures
shown below. If the receiver does not work properly after checking it, please contact the dealer. Do NOT open the
receiver cover. It may cause a dangerous situation and the warranty will get void.
Problem
No signal found
No picture or sound
Possible cause
Antenna is disconnected
Antenna is damaged/misaligned
Out of digital signal area
Active antenna requires to switch ON
antenna power/external feed
Scart/AV* is not selected on your TV
TV or VCR are not connected to main
What to do
Check Antenna lead
Check Antenna. Check with dealer
Switch receiver’s Antenna Power ON/
connect external feed
Switch to correct TV input
Check mains lead
Antenna poorly adjusted or defective
Check Antenna
Program is being broadcasted with altered
parameters
Do an automatic search (see chapter 7)
SCART connector not fully plugged in
Check SCART connector
Poor image quality or no
Wrong TV SCART out signal
Try changing from RGB to CVBS or vice
colours
versa
Inappropriate video type selected
Set video output according to TV set video
requirements
Cannot receive a channel that Channel is no longer broadcasted
None
you could receive before
Interference with „DECT" phones or
Move phone/wireless equipment away
wireless equipment
from the receiver to a location where
interference ceases
Channel is being broadcasted with altered Do an automatic channel scan.
parameters
Certain channels cannot be
These services are not transmitted 24
received from time to time
hours a day and are sometimes not
available. This is not a fault.
No response to remote control Receiver off
Plug in and turn on
unit (RCU)
RCU not aimed correctly
Aim RCU at front panel
Front panel obstructed
Check for obstructions
RCU batteries exhausted
Replace RCU batteries
Forgotten or lost PIN code
Contact local Service Hotline or send
email to our Support via www.strong.tv
After moving the receiver
The Antenna feed former new point may Try a direct feed from the antenna
to another room you are no
come through a distribution system which
longer able to receive digital
may reduce the digital signal now received
reception
by the receiver.
Sound but no picture
11
English
Showing Smart Card, Purchase history and Subscription information.
PART 2 • English
A.2 SPECIFICATIONS
General Data:
Supply Voltage: 100 - 240 V AC (SMPS), 50/60 Hz to 12 V DC
Power Consumption: typ. 5 W, max. 10 W
Power consumption in stand-by: < 3 W
Operating Temperature: 0°~ 40°C
Storage Temperature: -30°~ 80°C
Operating Humidity Range: 10~85%, RH, non-condensing
Size (WxDxH) in mm: 260 x 157 x 34
12