1
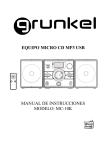
PRECAUCIONES RELATIVAS A LOS DISCOS MANIPULACIÓN DE LOS DISCOS ¾ No toque la cara grabada de los discos para conservar su limpieza. ¾ No fije papel o cinta adhesiva en el disco. ¾ Conserve los discos protegidos de la luz directa del sol y las fuentes de calor. ¾ Guarde el disco en su caja después de la lectura. LIMPIEZA DE LOS DISCOS ¾ Limpie el disco desde el centro hacia el exterior utilizando un paño limpio antes de leerlo. ¾ No utilice ningún tipo de disolvente. EMPLAZAMIENTO ¾ Coloque el aparato de modo que disponga de una ventilación adecuada, que impida que se sobrecaliente. ¾ Nunca lo exponga a la luz directa del sol y nunca lo coloque cerca de fuentes de calor. ¾ Coloque el aparato en posición horizontal y no le coloque ningún objeto pesado encima. ¾ Para proteger la cabeza de lectura, no coloque el aparato en un lugar polvoriento. Si la cabeza de lectura se ha cubierto de polvo, límpiela utilizando un disco de limpieza. ¾ Consulte el modo de empleo del disco de limpieza comprado. CONDENSACIÓN Se forma condensación en la lente del lector en los siguientes casos: ¾ El aparato es movido bruscamente de un cuarto frío a un cuarto caliente. ¾ El aparato se encuentra en un cuarto equipado con un radiador o un climatizador. ¾ El aparato es utilizado en un lugar húmedo. El aparato funciona mal en estas condiciones. Retire el disco y deje el aparato encendido durante aproximadamente una hora para que se evapore la condensación. LIMPIEZA ¾ Limpie la caja, el panel delantero y los botones utilizando un paño suave impregnado en un poco de detergente neutro. Nunca utilice papel abrasivo, detergente en polvo o disolventes tales como alcohol, gasolina, benceno, productos de limpieza comerciales o un producto antiestático en aerosol. ADVERTENCIA Sírvase respetar las siguientes consignas: Lea el modo de empleo antes de utilizar el aparato. Manipule con precaución los paneles de vidrio. Consulte a su revendedor o al técnico de reparación para toda pregunta relativa a la instalación, utilización o seguridad del aparato. QUÉ HAY QUE HACER ¾ ¾ ¾ Antes de la utilización, verifique que la tensión del aparato coincide con la tensión local. La utilización de una alimentación cuya tensión es incorrecta podría ocasionar un defecto de funcionamiento del aparato o un incendio. Asegúrese de que todas las conexiones eléctrica (incluso en los prolongadores eléctricos y los cordones de interconexión) son correctas. Apague la cadena de música antes de desconectarla de la alimentación. Proteja la cadena de música del polvo, la humedad, el agua y todo otro líquido. QUÉ NO HAY QUE HACER ¾ ¾ ¾ ¾ ¾ ¾ ¾ No la exponga a temperaturas superiores a 35°C. No la coloque cerca de radiadores o a la luz directa del sol. No la coloque en un lugar mal ventilado. No la coloque cerca de un televisor, altavoces u otros objetos que generan un campo magnético potente. No la limpie con productos químicos potentes. No aplique grasa y no aceite piezas, mecanismos, etc. El lector de CD no requiere mantenimiento. No intente reparar esta cadena de música usted mismo. Confíela más bien a un centro de reparación autorizado si es necesario realizar reparaciones. ¾ No utilice la cadena de música si no funciona normalmente o si se ha dañado de cualquier manera. Apague el aparato, desconéctelo de su fuente de alimentación y consulte a un técnico de reparación. ¾ No retire ninguna tapa fija. Aumentaría con esto el riesgo de electrocución. ¾ No deje la cadena de música sin vigilancia durante la utilización. ¾ No utilice el casco a volumen elevado. ¾ No obstruya las ranuras de ventilación del aparato. ¾ No introduzca objetos en los agujeros, ranuras o aberturas del aparato. ¾ No deje que los niños utilicen el aparato sin la vigilancia de un adulto. El funcionamiento de la cadena de música puede ser errático cuando ésta se encuentra en un cuarto iluminado por bombillas fluorescentes. PERO SOBRE TODO ¾ ¾ ¾ NUNCA deje que nadie, y en particular los niños, introduzcan nada en los agujeros, ranuras o cualquier otra abertura de la caja, dado que esto podría provocar una electrocución. NUNCA se exponga a riesgos con los aparatos eléctricos. ¡Más vale prevenir que curar! Observación: Si el cuarto en el cual se encuentra el aparato está iluminado por bombillas ahorradoras de energía (fluorescentes), es posible que éste funcione mal. ES - 1 MANDOS 1. 2. 3. 4. 5. 6. 7. 8. 9. 10. 11. 12. 13. 14. 15. 16. 17. 18. 19. 20. APERTURA/CIERRE DE LA TAPA DEL LECTOR DE CD PANTALLA DEL LECTOR DE CD INDICADOR LUMINOSO DE ALIMENTACIÓN BOTÓN PARADA BOTÓN BÚSQUEDA SENSOR DEL MANDO A DISTANCIA BOTÓN BÚSQUEDA + BOTÓN LECTURA/PAUSA BOTÓN VOLUMEN + SELECTOR DE FUNCIÓN BOTÓN PROG. BOTÓN CD/USB TOMA DEL CASCO TOMA USB BOTÓN DE SINTONIZACIÓN SELECTOR DE BANDA ANTENA FM TERMINALES DEL ALTAVOZ izquierdo CORDÓN DE ALIMENTACIÓN TERMINALES DEL ALTAVOZ derecho PLACA DE IDENTIFICACIÓN FUNCIONES DEL MANDO A DISTANCIA Preparación antes de la utilización z 1. 2. z 3. z z Instalación de las pilas en el MANDO A DISTANCIA. Retire la tapa en la parte trasera del MANDO A DISTANCIA. Inserte dos pilas "LR03 \ AAA \ UN-4". Sírvase insertar las pilas respetando las polaridades + y - indicadas en el compartimiento. Vuelva a colocar la tapa. Sustitución de las pilas. Cuando el MANDO A DISTANCIA funciona mal o su alcance disminuye, sustituya las pilas. Utilización del MANDO A DISTANCIA Para utilizar el MANDO A DISTANCIA, oriéntelo hacia su SENSOR y presione suave pero firmemente los botones . Éste funciona hasta una distancia de aproximadamente 6 m. Si embargo, esta distancia disminuye cuando el MANDO A DISTANCIA no está centrado con respecto al SENSOR. Póngase frente al sensor para disponer del alcance máximo. No exponga el SENSOR a las luces fuertes (luz directa del sol o iluminación artificial) elimine todo obstáculo entre el SENSOR y el MANDO A DISTANCIA. 1. 2. 3. 4. 5. 6. 7. 8. Botón CD/USB Botón LECTURA/PAUSA Botón BÚSQUEDA + Botón PARADA Botón PROG. Botón CARPETA UP Botón BÚSQUEDA Botón MODO ES - 2 CONEXIÓN DE LOS ALTAVOCES Conecte los altavoces en los terminales rojo y negro en la parte trasera del aparato de la siguiente manera. Conecte los terminales R en el altavoz derecho y los terminales L en el altavoz izquierdo. Baje la lengüeta roja o negra, inserte el cable del altavoz, y luego suelte la lengüeta para mantener el cable en su lugar. CONEXIÓN EN LA RED ELÉCTRICA Asegúrese de que todos los elementos y los altavoces están conectados correctamente. Verifique que la tensión de sus aparatos corresponde a la tensión local, es decir 230V - 50Hz. Conecte el aparato a la red eléctrica AURICULARES Asegúrese de que sus auriculares cuentan con una clavija estéreo de 3,5 mm y que tiene una impedancia de 8-32 ohmios. La difusión del sonido por los altavoces es cortada automáticamente cuando el auricular es conectado. UTILIZACIÓN DE LA RADIO Seleccione la función RADIO. Escoja la longitud de onda (AM, FM o FM ST) mediante el selector de BANDA. Busque la emisora de su preferencia mediante el botón de sintonización. Para apagar la radio, seleccione la función CD o pulse el botón ON/OFF. OBSERVACIÓN: Para una recepción óptima de la radio FM, despliegue el alambre de antena FM. En el caso de las emisoras AM, es una antena de ferrita integrada la que recibe las señales. Aumente la calidad de la recepción girando todo el aparato. Cuando las señales FM estéreo son demasiado débiles o el ruido de fondo es demasiado importante, se aconseja seleccionar la banda FM. LECTURA DE UN COMPACT DISC Seleccione la función CD. Pulse el botón de apertura del lector de CD, coloque un disco en el centro con la cara impresa hacia arriba y luego cierre suavemente la tapa. La pantalla indica el número total de pistas. Pulse el botón Lectura (PLAY) después de haber insertado un CD para iniciar la lectura en la primera pista. Para suspender la lectura en curso, pulse el botón LECTURA / PAUSA (PLAY / PAUSE). Para reanudarla, pulse nuevamente PLAY / PAUSE. Para detener la lectura del CD, pulse el botón PARADA (STOP). SELECCIÓN DE UNA PISTA EN EL MODO DE PARADA Pulse BÚSQUEDA + o – (SKIP / SEARCH Up o Down) hasta que aparezca el número de pista deseado. Pulse LECTURA / PAUSA para iniciar la lectura de la pista seleccionada. La pantalla LCD indica el número de pista seleccionado. Puede pasar a la pista siguiente pulsando el botón SKIP Up. La lectura avanza una pista con cada presión en el botón SKIP Up. Cuando pulsa el botón SKIP Down en el modo de lectura, usted regresa al comienzo de la pista actual. Si pulsa más de una vez esta botón, cada presión permite retroceder una pista. BÚSQUEDA DE UN FRAGMENTO Durante la lectura, mantenga presionada el botón SKIP Up/Down para escuchar la lectura acelerada hacia adelante o hacia atrás de la pista a fin de encontrar un fragmento preciso. La lectura es acelerada pero el volumen es reducido. Ésta regresa a su velocidad normal una vez que se suelta el botón SKIP Up/Down. PROGRAMACIÓN DE PISTAS Puede programar hasta 20 pistas en cualquier orden. Seleccione la función CD. Pulse el botón PROG. Pulse el botón SKIP Up/Down para seleccionar el número de pista que desea añadir a su programación. Una vez seleccionado el número de pista de su elección, pulse el botón PROG. Repita las etapas 2 a 4 para añadir otras pistas. Una vez que todas las pistas deseadas han sido programadas, pulse el botón PLAY/PAUSE para iniciar la lectura de la programación. La lectura se inicia al comienzo de la primera pista programada. La programación en la memoria se borra cuando usted selecciona la función Radio o apaga el aparato. BOTÓN MODO Para repetir una o todas las pistas, pulse el botón Modo antes o durante la lectura. Pulse una vez el botón MODO para repetir únicamente la pista que está siendo leída, pulse dos veces esta misma botón para repetir todo el CD, y tres veces para pasar al modo aleatorio. Pulse una vez más esta botón para regresar al modo normal. REPETICIÓN DE UNA PISTA REPETICIÓN DE TODO EL CD ES - 3 ALEATORIO LECTURA DE UN CD MP3 (MANDO A DISTANCIA) Seleccione la función CD/MP3/modo USB. La pantalla indica el número total de canciones. Pulse el botón PLAY para iniciar la lectura de la primera canción. Para suspender la lectura en curso, pulse el botón PLAY / PAUSE, y luego pulse nuevamente esta botón para regresar a la lectura normal. Para seleccionar la Carpeta, utilice el MANDO A DISTANCIA. Pulse el botón Carpeta |<< y >>| (FOLDER |<< / >>|)para seleccionar la carpeta siguiente. Para detener la lectura del CD, pulse el botón STOP. PROGRAMACIÓN DE CANCIONES Puede programar hasta 20 canciones en cualquier orden. Seleccione la función CD/MP3/modo USB. Pulse el botón Prog. Pulse el botón SKIP Up / Down o FOLDER |<< / >>| para seleccionar el número de canción o la carpeta que desea añadir a su programación. Una vez que el número de canción de su elección ha sido seleccionado, pulse el botón Prog. Repita los pasos anteriores para añadir otras canciones. Una vez que todas las canciones deseadas han sido programadas, pulse el botón PLAY / PAUSE para iniciar la lectura de la programación. La lectura se inicia al comienzo de la primera canción programada. La programación en la memoria se borra cuando usted selecciona la función Radio o apaga el aparato. BOTÓN MODO (MODOS USB Y MP3) Para repetir una o todas las canciones, pulse el botón Modo antes o durante la lectura. Pulse una vez el botón MODO para repetir únicamente la canción que está siendo leída, pulse dos veces esta misma botón para repetir todo el CD y tres veces para pasar al modo aleatorio. Pulse una vez más esta botón para regresar al modo normal. REPETICIÓN DE UNA PISTA REPETICIÓN DEL ÁLBUM REPETICIÓN DE TODO EL CD ALEATORIO FUNCIÓN USB Seleccione la función CD/MP3/modo USB Presione el botón de CD/USB para cambiar al modo del USB. La pantalla indica el número total de canciones presentes en el soporte conectado en USB. Presione el botón de CD/USB otra vez y cambie de nuevo a modo del CD. CONSERVACIÓN Y MANTENIMIENTO CONSERVACIÓN DE LOS CD DE AUDIO / CD MP3 ¾ ¾ ¾ ¾ ¾ ¾ ¾ Manipule el disco con cuidado. Sosténgalo por el borde. Nunca deje que sus dedos entren en contacto con la cara brillante, no impresa del disco. No fije cinta adhesiva, autoadhesivos, etc. en la cara impresa del disco. Límpielo con frecuencia utilizando un paño seco, suave y sin hilachas. Nunca utilice detergentes o disolventes para limpiar el disco. Si es necesario, utilice un kit de limpieza de CD. Si el disco salta, probablemente está sucio o dañado (rayado). Para limpiar el disco, límpielo desde el centro hacia el borde, siguiendo una línea recta. Nunca lo limpie utilizando un movimiento circular. Para retirar un disco de su caja, presione al centro de la caja, y luego saque el disco sujetándolo por el borde. Limpie cuidadosamente utilizando un paño suave todo rastro de dedo o polvo que haya en la superficie grabada del disco. Al contrario de los discos de vinilo, los CD no tienen surcos en los cuales se acumulan el polvo y los residuos microscópicos. Una limpieza ligera utilizando un paño suave debería por tanto ser suficiente para retirar la mayoría de partículas. LIMPIEZA DEL APARATO ¾ ¾ Para evitar todo riesgo de incendio o electrocución, desconecte el aparato de la red eléctrica cuando lo limpie. Si la caja del aparato o las cajas de los altavoces están polvorientas, límpielas utilizando un paño para desempolvar suave y seco. No utilice cera o aerosol. ¾ Si el panel delantero está sucio o tiene rastros de dedos, límpielo utilizando un paño suave embebido ligeramente en agua jabonosa. Nunca utilice un paño abrasivo o cera puesto que éstos dañarían el acabado del aparato. ATENCIÓN: Nunca deje que penetre agua o cualquier otro líquido en el aparato durante su limpieza. E-17 2 E-17 3 E-17 4 E-17 5 ES - 4 IMPORTADO POR: COINTER ELECTRONICA,S.L. CIF:B-41241381 PARQUE INDUSTRIAL PISA. C/ LONJA, N° 1 41927 – MAIRENA DEL ALJARAFE SEVILLA ES - 5 GUÍA DE SOLUCIÓN DE PROBLEMAS Si la cadena de música tiene un problema, verifique los siguientes puntos antes de confiarla a un técnico de reparación. Síntoma Causa posible Solución Radio Ruido o sonido distorsionado al escuchar una emisora AM o FM El indicador luminoso FM STEREO no se enciende. Ausencia de sonido en AM o FM Receptor mal sintonizado en la emisora en AM o Resintonice el receptor en la emisora de radio AM o FM FM FM : El alambre de antena FM no está desplegado. Despliegue el alambre de antena FM AM : La antena de ferrita integrada no está colocada correctamente. Cambie la posición de la cadena de música hasta la obtención de una mejor recepción. El selector de banda ajustado en FM. Ajuste el selector de BANDA en FM ESTÉREO. Ha seleccionado una emisora FM monoaural. Seleccione otra emisora FM. La señal de la emisora es demasiado débil. Seleccione otra emisora FM. Función RADIO no seleccionada. Ajuste el selector de FUNCIÓN en RADIO. Volumen ajustado en el mínimo. Aumente el volumen. Lector de CD El lector de CD no funciona. Le CD salta durante la lectura Función CD no seleccionada Ajuste el selector de FUNCIÓN en CD Ningún CD cargado o éste ha sido cargado incorrectamente. Cargue el CD, con la cara impresa hacia arriba. El disco está sucio o rayado. Límpielo utilizando un paño o utilice otro disco. Función CD no seleccionada. Ajuste el selector de FUNCIÓN en CD No hay ningún CD MP3 cargado o éste ha sido cargado incorrectamente. Cargue el CD MP3, con la cara impresa hacia arriba. El disco está sucio o rayado. Límpielo utilizando un paño o utilice otro disco. Lector de MP3 El lector de MP3 no funciona. El CD salta durante la lectura CARACTERÍSTICAS TÉCNICAS Alimentación: Bandas captadas: Gamas de frecuencias: Altavoces: Potencia de salida: Impedancia del casco: 230Vca - 50Hz AM, FM (estéreo) FM 88 – 108MHz AM 540 – 1600kHz 4 ohmios 3-5W x 2 2 x 2W RMS, 10 % DHT (2 x 4W musicales) 32 ohmios ES - 6 CARE RELATING TO DISCS HANDLING DISCS ¾ Never touch the recorded surface of the disc to preserve cleanliness. ¾ Never apply paper labels or tape to discs. ¾ Keep discs away from direct sunlight and heat sources. ¾ Return the disc to its case after use. CLEANING DISCS ¾ Wipe discs from the centre to the outside edge, using a clean dry cloth before playing. ¾ Never use any kind of solvent. LOCATION ¾ Locate the unit so that it has adequate ventilation to avoid overheating. ¾ Never expose the unit to direct sunlight and never locate it close to heat sources. ¾ Rest the unit horizontally and never place a heavy object on it. ¾ To protect the laser pickup, never place the unit in a dusty location. If the laser pickup becomes dusty, clean it using a cleaning disc. ¾ Refer to the instructions for use supplied with the cleaning disc purchased. CONDENSATION Condensation may form on the pickup lens in the following cases: ¾ When the unit is moved suddenly from a cold to a hot room. ¾ When the unit is located in a room equipped with a radiator or air-conditioner. ¾ When the unit is used in a damp location. The unit will not work well under these conditions. Remove the disc and leave the unit on for approximately one hour so that condensation can evaporate. CLEANING ¾ Clean the unit's case, front panel and control buttons using a soft cloth dampened with a little neutral detergent. Never use abrasive paper, abrasive cleaning powders or solvents like alcohol, petrol, benzene, off the shelf cleaning products or antistatic sprays. WARNING Always follow the instructions below: Read these instructions before using the unit. Handle glass panels with care. Refer to your retailer or service technician for any question on installation, use or safety of the unit. DO ¾ ¾ ¾ Before use, check that the rated voltage matches the local mains voltage. Using a power source with an incorrect voltage level could cause the unit to malfunction or cause a fire hazard. Always make sure that all of the electrical connections (including any extension and interconnection cords) are correct. Always switch the unit off before unplugging the power cord from the wall power outlet. Protect the unit from dust, damp, water and any other liquid. DO NOT ¾ ¾ ¾ ¾ ¾ ¾ ¾ ¾ Expose the unit to temperatures in excess of 35°C. Place it close to radiators or direct sunlight. Place it in an ill ventilated location. Place it close to a TV set, speakers or other objects that generate powerful magnetic fields. Clean it with strong chemical products. Apply grease or oil the unit's parts, mechanisms, etc. The CD player is maintenance-free. Attempt to service the unit yourself. Refer all servicing to an approved service centre when necessary. Use the unit if it does not operate correctly or if it has been damaged in any way. Switch off the unit, unplug it from the mains supply and refer to a service centre. ¾ Remove any fixed covers as this will increase the electrocution hazard. ¾ Leave the unit unattended during use. ¾ Use the headphones at high volume. ¾ Obstruct the air vents on the unit. ¾ Insert objects into holes, slots or openings on the unit's case. ¾ Let children use the appliance without adult supervision. The unit may operate erratically when it is located in a room lit with fluorescent lighting. ESPECIALLY ¾ ¾ ¾ NEVER let anyone, especially children, insert anything whatsoever into the unit's case holes, slots or openings for this could cause an electrocution hazard. NEVER take risks with electric appliances. Better safe than sorry! Remark: If the room where the unit is located is lit with energy saving (fluorescent) lights, it may not operate properly. GB - 1 CONTROLS 1. 2. 3. 4. 5. 6. 7. 8. 9. 10. 11. 12. 13. 14. 15. 16. 17. 18. 19. 20. OPEN CLOSE THE CD COVER CD PLAYER DISPLAY POWER INDICATOR STOP BUTTON SKIP - BUTTON REMOTE CONTROL SENSOR SKIP + BUTTON PLAY/PAUSE BUTTON VOLUME + - KNOB FUNCTION SELECTOR PROG. BUTTON CD/USB BUTTON HEADPHONE JACK USB PORT TUNING KNOB BAND SELECTOR FM ANTENNA SPEAKER TERMINALS - Left POWER CORD SPEAKER TERMINALS - Right RATING PLATE REMOTE CONTROL FUNCTIONS Preparation prior to use z 1. 2. z 3. z z Installing the batteries in the remote control Remove the cover from the back of the remote control. Insert two "LR03 \ AAA \ UN-4" batteries. Be sure to match the + andpolarities shown in the battery compartment. Refit the cover. Battery replacement When the remote control operates erratically or its range is reduced, replace the batteries. Using the remote control To use the remote control, point it towards the sensor and softly but firmly press the buttons. The remote control will operate up to a range of approximately six meters. This range is however reduced when the remote control is offset in relation to the sensor on the appliance. To enjoy maximum remote control range, place yourself in line with this sensor. Never expose the sensor to strong light (direct sunlight or artificial lighting) and eliminate all obstacles between the sensor and the remote control. 1. 2. 3. 4. 5. 6. 7. 8. CD/USB BUTTON PLAY/PAUSE button SKIP + button STOP button PROG. button FOLDER UP button SKIP - button MODE button GB - 2 CONNECTING THE SPEAKERS Connect the speakers to the red and black terminals on the back of the unit as described here. Connect the R terminals to the right hand speaker and the L terminals to the left hand speaker. Lower the red or black tab, insert the speaker cable, then release the tab to hold the cable in place. MAINS CONNECTION Make sure that all of the components and the speakers are connected correctly. Check that the voltage level required by your equipment matches the local mains supply, namely 230 VAC - 50 Hz. Plug the unit into the wall outlet. HEADPHONES Make sure that your headphones have a 3.5 mm stereo jack and an operating impedance of 8-32 ohms. The speakers are automatically switched off when headphones are connected. LISTENING TO THE RADIO Select the RADIO mode. Choose the radio ware band (AM, FM or FM ST) using the BAND selector. Search for the station of your choice using the Tuning knob. To switch off the radio, select the CD mode or press the On/Off button. NOTE: For optimum FM radio reception, extend the FM antenna wire. For AM radio reception, a ferrite antenna built into the unit is used. To improve reception quality, rotate the unit. When FM stereo signals are too weak or when the background noise level is too great, we recommend selecting the FM (mono) band. PLAYING A COMPACT DISC Select the CD mode. Press the CD player open button, place a disc in the centre of the tray, label side up, then slowly close the cover. The display shows the number of tracks. Press PLAY once the CD is inserted to start playing the first track. To pause play, press the PLAY/PAUSE button. To resume play, press the PLAY/PAUSE button again. To stop playing the CD, press the STOP button. Press SKIP/SEARCH Up or Down until the required track number is displayed. Press PLAY/PAUSE to start playing the selected track. The LCD display shows the selected track number. You can move to the next track by pressing the SKIP Up button. Play moves forward by one track every time the SKIP Up button is pressed. When you press the SKIP Down button in Play mode, you go back to the start of the current track. If you press this button more than once, every time you press it, you move back by a track. SELECTING A TRACK IN STOP MODE SEARCHING FOR A SPECIFIC PASSAGE During Play, hold the SKIP Up/Down button to fast forward or reverse the track until you reach a specific passage you wish to hear. Playback is speeded up and the volume reduced. Playback returns to normal once the SKIP Up/Down button is released. PROGRAMMING TRACKS You can program up to 20 tracks in any order. Select the CD function. Press the PROG button. Press the SKIP Up/Down button to select the track number you wish to add to your programming. Once you have selected the track number of your choice, press the PROG button. Repeat steps 2 to 4 to add more tracks. Once all of the tracks you wish to hear have been programmed, press the PLAY/PAUSE button to start playing the programmed selection. Play starts from the beginning of the first track programmed. The programming stored in memory is cleared when you select the Radio function or when you switch off the unit. MODE BUTTON (REMOTE CONTROL ONLY) To repeat one or all tracks, press the MODE button before or during play. Press the MODE button once to repeat only the track currently being played, press this same button twice to repeat the entire CD and three times to select the Random mode. Press this button once again to return to the normal mode. REPEAT ONE REPEAT ALL RANDOM GB - 3 PLAYING AN MP3 CD Select the CD/MP3/USB Mode function. The display shows the total number of tracks. Press the Play button to start playing the first track. To suspend play, press the PLAY/PAUSE button then press this button again to return to the normal play mode. To select the Folder, use the remote control. Press the Folder |<< and >>| buttons to select the next or previous folder. To stop playing the CD, press the STOP button. You can program up to 20 tracks in any order. Select the CD/MP3/USB Mode function. Press the PROG button. Press the SKIP Up/Down button or the FOLDER |<< / >>| buttons to select the track or folder number that you wish to add to your programming. Once you have selected the track of your choice, press the PROG button. Repeat steps 2 to 4 to add more tracks. Once all of the tracks you wish to hear have been programmed, press the PLAY/PAUSE button to start playing the programmed selection. Play starts from the beginning of the first track programmed. PROGRAMMING TRACKS The programming stored in memory is cleared when you select the Radio function or when you switch off the unit. MODE BUTTON (IN USB AND MP3 MODES) To repeat one or all tracks, press the MODE button before or during play. Press the MODE button once to repeat only the track currently being played, press this same button twice to repeat the entire CD and three times to select the Random mode. Press this button once again to return to the normal mode. REPEAT ONE REPEAT ALBUM REPEAT ALL RANDOM USB FUNCTION Select the CD/MP3/USB Mode function. Press the CD/USB button to change to the USB mode. The display shows the total number of tracks present on the media connected to the USB port. Press the CD/USB button again and change back to CD mode. CARE AND MAINTENANCE CLEANING AUDIO/MP3 CDs ¾ ¾ ¾ ¾ ¾ ¾ ¾ Handle the disc with care. Hold it by the edges. Never let your fingers tough the shiny, non printed side of the disc. Never apply tape, stickers, etc. to the printed side of the disc. Regularly clean discs using a dry, soft and lint-free cloth. Never use detergents or solvents to clean a disc. If necessary, use a CD cleaning kit. If the disc skips, it is probably dirty or damaged (scratched). To clean the disc, wipe it outwards from the centre to the edge, in a straight motion. Never wipe it using a circular motion. To remove a disc from its case, press on the case centre, then pull the disc out by holding it by the edges. Using a soft cloth, carefully wipe off any fingerprints or dust found on the recorded surface of the disc. Unlike vinyl records, CDs do not have grooves that can collect dust and microscopic debris. Lightly wiping a disc with a soft cloth should be enough to remove most particles. CLEANING THE SYSTEM ¾ ¾ To avoid any fire or electrocution hazard, always unplug the unit from the mains outlet when cleaning it. If the unit's case or speaker enclosures are dusty, wipe them using a soft dry dusting cloth. Never use wax or a spray cleaner on these components. ¾ If the front panel is dirty or shows fingerprints, clean it using a soft cloth slightly dampened with soapy water. Never use an abrasive cloth or wax for this may damage the unit's finish. CAUTION: Never let water or any other liquid enter the unit during cleaning. E-17 2 E-17 3 E-17 4 E-17 5 GB - 4 TROUBLESHOOTING GUIDE If you encounter a problem with your system, check the following points before returning your system for repairs. Symptom Possible cause Corrective action Radio Noise or sound distorted when listening to an AM or FM radio station The FM STEREO indicator does not come on Tuner not tuned properly to the AM or FM radio station Retune the tuner to the AM or FM radio station FM: The FM antenna wire is not extended Extend the FM antenna wire AM: The built in ferrite antenna is not correctly positioned Reposition the system until better reception is achieved The Band selector is set to FM Set the Band selector to FM STEREO You selected an FM mono station Select another FM station The station signal is too weak Select another FM station No sound in AM or FM radio mode The RADIO function cannot be selected Volume set to minimum Set the Function selector to RADIO Increase the volume CD Player The CD player does not work The CD skips during play The CD function is not selected Set the Function selector to CD No CD loaded or CD incorrectly loaded Load the CD, label side upwards The disc is dirty or scratched Wipe the CD using a dry cloth or try another disc The CD function is not selected Set the Function selector to CD No MP3 CD loaded or CD incorrectly loaded Load the MP3 CD, label side upwards The disc is dirty or scratched Wipe the CD using a dry cloth or try another disc MP3 player The MP3 player does not work The CD skips during play SPECIFICATIONS Mains supply: Radio bands: Frequency range: Speakers: Output power: Headphone impedance: 230V AC - 50Hz AM, FM (stereo) FM 88 – 108MHz AM 540 – 1600kHz 4 ohms 3-5W x 2 2 x 2W RMS, 10% THD (2 x 4W music) 32 ohms GB - 5