1
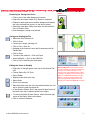
Removing the Background Color
Notes:
• Click on one of the white background corners.
• Right click and select Delete or hit Delete on keyboard.
• Repeat for each white corner and the background between
the owl’s ears and feet (zoom in to the feet to delete).
• Select the View Menu. Make sure there is a check mark in
front of Realistic Paint.
• Now the design is ready to be painted.
Saving and Sending the File
• Select the Slow Redraw icon.
• Click on Start.
• Preview your design “painting out”.
• Click on File > Save As.
• Navigate to the location to save the file and name the file,
Painted Owl.
• Click on Save.
• To send to the machine > Click on Export.
• Insert USB stick > Click on the USB stick.
• Click on OK in the dialog box that opens.
Editing the Colors to Simplify
• Right click on the light green color chip in the Brushes Pal-
ette.
• Choose Select By> Fill Color.
• Select Delete.
• Repeat for the white color chip.
• Select Undo.
Selection By Color is used when you want
to make a change to all the objects that have
the same color. When selected you can
change colors, apply different fill and outline
properties. The object can be selected by the
Fill color, by Pen color (outlines) or by the
Any color ( both Fill & Pen selected). The
menu will appear with a Right-click on the
desired color. Select the Select by sub menu.
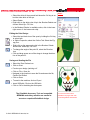
• Zoom In on the eyes.
• Select the black outer rim of the eye and hold down the Ctrl
key to select the other eye black rim.
• In the Brushes Palette, click in the upper left hand corner of
the black color chip to add an outline to the object.
• To remove the black fill from the eye, select the lower right
corner of the Empty/ None color square.
• Click on screen to deselect.
© 2013 BERNINA of America, Inc
.
2