1
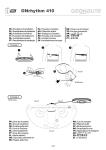
Kalenji Cardio
Connect user manual
Heart rate logger
+ Geonaute Software analysis tool.
Som
1. Introduction............................................................................................................ P.3
2. Overall view........................................................................................................... P.3
3. Start up................................................................................................................... P.4
4. Connection to the chest belt................................................................................. P.4
5. Recording data...................................................................................................... P.5
6. Connecting to your PC........................................................................................... P.6
7. Reset....................................................................................................................... P.6
8. Recommendations for use..................................................................................... P.6
9. Features.................................................................................................................. P.6
10. Battery.................................................................................................................... P.7
11. Troubleshooting...................................................................................................... P.7
12. Warranty................................................................................................................. P.8
13. Contact us.............................................................................................................. P.8
2
1. Introduction.
Thank you for choosing this Kalenji heart rate logger for your sport and exercise sessions. This product allows you
to record your heart rate using a compatible chest belt, to transfer this data to your PC and to consult, analyse
and save it using Geonaute Software.
Please keep this manual for future reference. It contains all the practical instructions, technical characteristics
and warnings to be taken into account.
2. Overall view.
1
Front side:
1 Electro-luminescent diode.
2 Button.
2
3
Back side:
3 Battery compartment.
4 Reset button.
5 Removable fastener clip.
6 USB port.
5
4
6
3
3. Start up.
Recording your training sessions:
1. Set up your heart rate monitor chest belt. To do this, please refer to the notice on your heart rate monitor.
2. P
ress the Cardio Connect BUTTON briefly to turn the unit on, and place it next to your chest
belt to enable it to connect. Refer to paragraph 4 below to check that the connection has
been established successfully.
3. Attach the device to the chest belt or clip
it to your belt. You can also detach the
removable clip and slip the heart rate
logger into your pocket.
Start your exercises.
4. To finish recording the data, press the BUTTON and hold it down for two seconds until the orange diode starts
to flash, then release.
Comment:
The unit has a range of 10cm (4 inches) during signal search and 80cm (31,5 inches) once a signal has been received.
4. Connection to the chest belt.
This product is compatible with heart rate chest belts transmitting analogue signals on 5.3 KHz supplied with the
following models:
CW Kalenji 100 and CW Kalenji 300 Heart Wear, only those models identified with the “Cardio Connect Compatible”
mark.
300 coded, 500 coded, 700 coded,
CW Aptonia F300, F500,
CW Géonaute T500, T500 codé, T700, T700 codé.
The unit will automatically search for the signal emitted by the belt whenever you turn it on. The electro-luminescent diode
will indicate the connection status.
GREEN flashes quickly
GREEN flashes for 3 seconds
GREEN flashes slowly
Connection being established
Connection made
Saving in progress
GREEN flashes quickly
ORANGE flashes for 3 seconds
Connection being established
Connection failure
4
Comment: If no signal is found after 10 seconds the unit will turn itself off.
Signal reception: If you change or reset your chest belt during a training session, it may be necessary to search for
the signal again.
To force a signal search: Press and hold the BUTTON for 4 seconds and release when unit is on.
NOTE: Signal interference present in the environment due to electromagnetic disturbances may cause unstable or inaccurate
heart rate readings. This is mostly due to proximity to high voltage power lines, traffic lights, overhead electric bus or tram
lines, televisions, motors, cars, some motor driven exercise equipment, mobile phones, computer screens, or when you walk
through electric security gates.
5. Recording data.
Every time the device receives a signal, it starts a new activity record and begins to store heart rate data.
The electro-luminescent diode will flash green every 3 seconds to indicate that data is being recorded.
As soon as the device stops recording data or is turned off, the activity record is ended.
To end an activity record / turn the device off:
1. Press and hold the BUTTON for 2 seconds. The diode will turn orange.
2. Release the BUTTON key to turn off the device.
Comment: The device will automatically turn itself off if no heart rate is detected in the space of 5 minutes. During this time the
green light will continue to flash. The device will also turn itself off if the battery is low or if the memory is full.
Memory: Recording capacity is 75 hours. Up to 99 activity records can be stored.
Signal from the diode
Meaning
Red flashes slowly during exercise
90% of memory full
RED steady for 2 seconds
Memory full, the unit will automatically turn off
Memory records can be deleted manually or by using the Geonaute Software supplied with this product. To delete
using your PC, please refer to the software notice.
To manually delete all activity records:
1. P
ress and hold BUTTON for 4 seconds (when unit is OFF). The diode will
flash orange.
2. Press again to clear memory.
3. The diode will turn green for 1 second to indicate records are deleted.
5
6. Connecting to your PC.
Install the Geonaute Software supplied on the CD (software notice also available on the CD).
To connect the device to your PC, insert the USB cable (connected to
the heart rate logger) into the USB port on your PC.
Comment: If connection is interrupted, please remove the USB cable from
your PC and re-insert.
7. Reset.
To reset, use a thin pointed object to press the reset button.
Bouton de réinitialisation.
A
A
8. Recommendations for use.
To reset, use a thin pointed object to press the reset button.
WARNING!!!
This equipment is designed for sports and leisure use. It is not a medical monitoring device.
The information provided by this device is for information only and should only be used to
monitor an illness following consultation and approval from your doctor. Finally, due to possible
disturbance caused by the radio transmission system, we would not advise individuals who
wear a heart simulator to use heart rate monitors employing this technology. Not observing
these precautions may put your life at risk.
This device is designed to give you years of satisfaction if you handle it carefully. Here
are a few precautions:
•D
o not subject the device to excessive force, shock, dust, changes in temperature or humidity, as this may result
in malfunction, shorter electronic life span, damaged battery and distorted parts.
• Do not immerse the device in water. If it does come into contact with water, dry it immediately with a soft cloth.
• Do not clean the device with abrasive or corrosive products. This could scratch plastic parts and corrode the
electric circuit.
9. Features.
Comment: The technical specifications for this product and the contents of the user manual are subject to change without
notice.
Feature
Description
Length x Width x Height
46 x 46 x 17 mm (1.8 x 1.8 x 0.7 inches)
Reception range
10 cm (4 inches) when searching for a signal
and 80 cm (31.5 inches) if a signal is found
Signal reception
5.3 kHz analogue, coded and non-coded
Memory
75 hours (at 5 second intervals) 99 activity records
Power supply
1 CR2032 battery
Autonomy
1 year
6
10. Battery.
This device is supplied with a CR2032 battery.
The electro-luminescent diode will flash red for 2 seconds before the unit turns off to indicate the battery is low.
1
1
2
2
3
4
3
Remove the belt clip from the unit.
Use a screwdriver to remove the cover from the compartment
housing the battery.
Insert the battery, matching the polarity (+/-) as shown.
Put the lid back into position.
4
This product and the batteries it contains may not be thrown away with household waste.
They are subject to a specific type of sorting. Take the batteries and unusable electronic
product to an authorised collection area for recycling. This treatment of your electronic
waste will protect the environment and your health.
11. Troubleshooting.
Problems
Solutions / Responses
Flashing RED for 3 seconds after being turned on
The battery is low, insert a new battery in the appropriate
compartment (Cf. chapter 10 “batteries”)
Flashing RED constantly during recording
90% of the memory is full, you should empty it
(Cf. chapter 5 “recording data”)
Light remains RED for 2 seconds, then the device
is automatically turned off
The memory is full, you should empty it (Cf. chapter 5
“recording data”) so that you can use your heart rate
logger again
Light remains ORANGE for 3 seconds, then the device is
automatically turned off
Failure to establish a connection with the belt.
(Cf. chapter 4 “recording data”) Move the logger closer
to your belt. Check that your belt is well positioned on
your chest (Cf. the notice on your heart rate monitor)
and that its sensors are moistened
7
12. Warranty.
OXYLANE guarantees the initial purchaser of this product that it is free from any material or manufacturing faults. This
product is guaranteed for 2 years counted from the purchase date. Please keep your receipt as proof of purchase.
The warranty does not cover:
•D
amage due to misuse, failure to adhere to the precautions of use or accident, nor to incorrect maintenance or use
of the product for commercial purposes.
• Damage caused by repairs carried out by individuals not authorised by OXYLANE.
• Batteries, cracked or broken casing or casing presenting signs of shock.
During the warranty period, the item will either be repaired free of charge by an authorised repair service or replaced
free of charge (depending on the distributor).
13. Contact us.
We are here to listen to any feedback or information you may have concerning the quality, functioning or use of our
products: www.kalenji.com. We shall reply as soon as possible. The “quick start-up guide” allows you to start using
your heart rate logger quickly and easily. To discover the characteristics and functions of your product in full detail
(memory and battery management, troubleshooting guide, etc), please refer to the notice supplied on the CD.
8