1
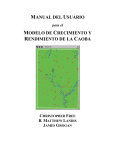
EN ONmove 200 GPS TABLE OF CONTENTS 1 SETTINGS ..............................................................................................................3 1.1 1.3 1.10 2 Intuitive guide............................................................................................................................................................3 6HWWLQJWKHGHYLFHIRUWKH¿UVWWLPH .........................................................................................................................3 Heart rate belt ............................................................................................................................................................4 $FFHVVWR6HWWLQJVPRGH .........................................................................................................................................5 *HQHUDOVHWWLQJV ........................................................................................................................................................6 8VHUSDUDPHWHUV........................................................................................................................................................8 7DUJHW]RQHSDUDPHWHUV............................................................................................................................................9 'LVSOD\SDUDPHWHUV .................................................................................................................................................10 6HWWLQJWKHKHDUWUDWHPRQLWRU................................................................................................................................11 About 12 USE 13 2.1 Charging ..................................................................................................................................................................13 :DWFKPRGH .............................................................................................................................................................13 $FWLYLW\PRGH ..........................................................................................................................................................13 6ZLWFKLQJRIIWKH21PRYH ..............................................................................................................................16 3 LOGBOOK ............................................................................................................17 4 MESSAGES ..........................................................................................................18 5 CHARGING THE BATTERY ..................................................................................21 6 TRANSFERRING AND VIEWING YOUR DATA ON MYGEONAUTE .......................21 7 TECHNICAL CHARACTERISTICS ........................................................................22 8 CONTACT US .......................................................................................................22 9 PRECAUTIONS FOR USE AND WARRANTY ........................................................23 6HVVLRQORJERRN .....................................................................................................................................................17 'HOHWLQJDVHVVLRQ ..................................................................................................................................................17 'HOHWLQJWKHPHPRU\ ..............................................................................................................................................18 0HPRU\VWDWXV.........................................................................................................................................................18 *36DQGRUKHDUWUDWHPRQLWRUVLJQDOORVW ............................................................................................................18 %DWWHU\OHYHO.............................................................................................................................................................19 0HPRU\IXOO ..............................................................................................................................................................20 7UDQVIHUIURPDFRPSXWHU ......................................................................................................................................21 7UDQVIHUIURPDVPDUWSKRQHRUWDEOHW ..................................................................................................................22 1 USB cable to: - Recharge the battery, - Transfer your activities to myGeonaute, +HDUWUDWHPRQLWRU )ODVKLQJ VHDUFKLQJ )L[HG VLJQDOGHWHFWHG $ODUPRQ 5HWXUQ6WRS 2 *36VLJQDO )ODVKLQJ VHDUFKLQJ )L[HG VLJQDOGHWHFWHG %DWWHU\OHYHO 6WDUW3DXVH Validation / Switch on / Switch off %DFNOLJKWLQJ 7LPH %RWWRPRU 7RSRU 1 SETTINGS 1.1 Intuitive guide $GMXVWPHQWPHWKRGIRUHDFKVHWWLQJ For every setting, use the C and D buttons to adjust the values 5HWXUQWRSUHYLRXV VFUHHQ A E C D *RWRWKHQH[WVWHSWR FRQ¿UP\RXUFKRLFH B %DFNOLJKWLQJ § The settings marked the E button ¨ allow fast scrolling through the values when pressing and holding icon. Certain settings or displays cause a beep represented by the 1.2 6HWWLQJWKHGHYLFHIRUWKHÀUVWWLPH E E C - V D + E C - Language E C - D + E C - Date format C - D + Year of birth D + C - D + Month of birth D + E C - Month E C - D + D + Day E C - 12/24 time format Minute E C - Year E Time E C - D + D + E D + Unit E C - D + Type E C - Day of birth D + $XWRV Recorded parameters 3 1.3 Heart rate belt Your ONmove 200 is compatible with the heart rate belts using the Bluetooth® Smart protocol. Installing the belt: 1. Moisten the electrodes on the belt to optimise the heart rate signal reception 2. Place the belt onto your torso &DUHIXOO\WLJKWHQWKHEHOWPDNLQJVXUHWKHHOHFWURGHVDUHSUHVVHG¿UPO\DJDLQVW\RXUWRUVR Signal detection: When your ONmove 200 is searching for the heart rate signal, make sure your ONmove 200 is within the transmission range of your belt: *118.08 inches 4 1.4 $FFHVVWR6HWWLQJVPRGH This menu gives you access to the different settings of your ONmove 200: - General settings. - User settings. - Target zones. - Screen customisation. - Activation of the heart rate monitor. In watch mode, press E to access the main menu. Browse the menus using the C (§) and D (¨) keys until you reach the "Settings" mode. Press E once again to enter the "Settings" menu. Press A to return to the previous menu. E E E *HQHUDOVHWWLQJV D (x3) C D § ¨ E 8VHUVHWWLQJV C D § ¨ E Target zone VHWWLQJV C D § ¨ A E 6FUHHQVHWWLQJV C D § ¨ E +HDUWUDWHPRQLWRU VHWWLQJV C D § ¨ E About C § D ¨ 5 1.5 *HQHUDOVHWWLQJV Note7KHGHIDXOWYDOXHVRIWKHGLIIHUHQWPHQXVDUHWKRVHGH¿QHGZKHQVHWWLQJWKHGHYLFHIRU WKH¿UVWWLPH 1.5.1 6HWWLQJWKHDODUP E E E C D D (§ ) (¨) (¨) E E C D C D (§) (¨) ( §) (¨) 1.5.2 6HWWLQJWKHWLPH E D x1 E E E C D C D ( §) (¨) (§ ) (¨) E 1.5.3 Setting the date E D x2 E E C ( §) 6 D E C (¨) (§) D E C (¨) (§) D E C (¨) (§) D (¨) 1.5.4 6HWWLQJWKHVRXQG Note: This setting does not concern the alarm sound. If it is set to "OFF", the alarm sound will remain active. E D x3 E E C D (§) (¨) 1.5.5 6HWWLQJWKHXQLWV E D x4 E E C D (§) (¨) 1.5.6 Setting the language E D x5 E E C D (§) (¨) 7 1.6 8VHUSDUDPHWHUV The user's personal parameters are also synchronised automatically when you log on to your myGeonaute account (see § 6). E E C D E C D (-) (+) E C D E C D (-) (+) E C D E C D (-) (+) E C D E C D (-) (+) E C D Height: min : 100cm/39inch max : 220cm/86inch Default value: 175 cm/69 inch Resting heart rate*: min : 30 max : 200 Default value: 65 Maximum heart 31-220 rate**: Default value: 220 - age E E C D C (-) (+) (-) E D Weight: min : 20kg/44lb max : 220 kg/485 lb Default value: 70 kg/154 lb D E C D (+) (-) (+) E C D (-) (+) * Note: This value represents your resting heart rate. It helps calculate your calories burned more accurately. To determine this value, stay lying down after waking up and measure your heart rate. You can also measure it at any time by lying down quietly for 5 minutes. ** Note: This value represents the highest heart rate you can reach during exercise. By default it is calculated in accordance with the following formula: 220 - age = max bpm 8 1.7 7DUJHW]RQHSDUDPHWHUV Setting a target zone helps you manage your effort by helping you stay within a determined effort zone. There is a beep every time you exit a zone. 3 types of target zone are available: speed, pace and heart rate monitor Note: The "Heart rate target" setting is only available if the heart rate monitor is activated (see § 1.8). When a target zone is activated, a 4th screen showing a graphic indication of your target zone is available during the activity. E E E E C D C D (-) (+) (-) (+) E 7DUJHW]RQH 6SHHGGHIDXOW Pace Heart rate E E C D C D C D (-) (+) (-) (+) (-) (+) E E E C D C D C D (-) (+) (-) (+) (-) (+) Pace Target Heart rate Target 6SHHG7DUJHW Settings values of the different target zones. 3DFHWDUJHW]RQH Min pace : 2’ 00"" to 60’ 00", (default value: 10’ 0") Max pace : 1’ 00"" to 59’ 00", (default value: 8’ 0") +HDUWUDWHWDUJHW]RQH Min heart rate : 30 to 200 bpm Max heart rate : 40 to 220 bpm 6SHHGWDUJHW]RQH Min speed : 1 to 98km/hr, (default value: 9 km/hr) Max speed : 2 to 99 km/hr, (default value: 12 km/hr) 9 1.8 'LVSOD\SDUDPHWHUV 7KLVFRQ¿JXUDWLRQKHOSVVHOHFWWKHLQIRUPDWLRQVKRZQGXULQJDQDFWLYLW\ (YHU\VFUHHQGLVSOD\VRQHRUWZRLQGLFDWLRQVGH¿QHGE\WKHXVHU Note: At least one value must be selected on the 3 screens. The size of the message adapts to the number of values selected. The display is therefore larger when a single value is selected per screen. Example: Screen 1: Stopwatch + Distance, Screen 2: Speed + Pace, Screen 3: Calories. E E E E C D C D C D (§ ) (¨) (§) (¨) (§) (¨) E E E C D C D C D (§) (¨) (§) (¨) (§) (¨) E E E C D C D C D (§) (¨) (§) (¨) (§) (¨) Note: This screen is only available if a target area has EHHQFRQ¿JXUHG and activated. (see § 1.6) /LVWRIDYDLODEOHYDOXHV Stopwatch Instantaneous speed Average speed Instantaneous pace Average pace Calories Heart rate Note: the heart rate monitor must be activated before selecting the heart rate value. (see § 1.8) 10 1.9 Setting the heart rate monitor 1.9.1 $FWLYDWLQJWKHKHDUWUDWHPRQLWRU OFF: (default value), the sensor will not be searched for when an activity starts. ON: the sensor will be automatically searched for when an activity start. E E E 15 s. C D (-) (+) 3 s. E C D (-) (+) :KHQDFWLYDWLQJWKHKHDUWUDWHPRQLWRUIRUWKH¿UVWWLPHWKHVHDUFKIRU\RXUEHOWLVODXQFKHG automatically. This search makes it possible to associate your belt with your ONmove 200; this action is referred to as "Pairing". Once the pairing has been completed, your belt is stored in the memory. 3DLULQJPXVWEHSHUIRUPHGZKHQ¿UVWXVLQJ\RXUEHOWZKHQ\RXFKDQJH\RXUEHOWRUDIWHU resetting your ONmove 200. 1.9.2 Pairing a belt E E 15 s. C D C D 11 1.10 About E E C D C D C D C D (-) (+) (-) (+) (-) (+) (-) (+) )DVW)L[ )LUPZDUH YHUVLRQ Microcontroller VHULDOQR 1.10.1 )DVW)L[ <RXU21PRYHQHHGVWRGHWHFWDWOHDVWVDWHOOLWHVLJQDOVWRGH¿QH\RXUSRVLWLRQ The FastFix system enables your ONmove 200 to predict the trajectory of the satellites for 7 days. Therefore your ONmove 200 knows the exact location of these satellites even before the search is launched. You can detect a signal within 30 seconds even if the signal is weak or if the area is partially covered. You can see whether or not your FastFix is up to date at any time in the "About" menu. To update your FastFix, simply synchronise your product with the ONconnect software. 1.10.2 )LUPZDUH Firmware is the internal software of your watch. It can be updated to provide your watch with patches or new functionalities. You are informed of the new updates when you synchronise your product with the ONconnect software. 0DNHVXUH\RXKDYHWKHODWHVWXSGDWHWREHQH¿WIURPWKHODWHVWSDWFKHV 1.10.3 MCU Serial Our customer service department may ask you for this number if there is a problem with your product. 1.10.4 5HVHW This function is to reset your watch. Warning: all your sessions, settings and personal parameters will be deleted. 12 2 USE 2.1 Charging :HUHFRPPHQGWKDW\RXIXOO\FKDUJHWKH21PRYHEHIRUHXVLQJLWIRUWKH¿UVWWLPH)XOO charging time is approximately 1 1/2 hours. A full charge will give you a 7 hour life span in GPS mode and 10 days in clock mode. The ONmove 200 can be charged simply by connecting it to a USB port on your computer or a 5 V-1A. USB adapter. 2.2 Watch mode The watch mode is permanently accessible when the watch is on. To switch on the watch, press the E button for 1 second. 1 s. E E C Auto return 3 s. 2.3 $FWLYLW\PRGH To access the activity mode, press E from the watch mode. Note: When the memory of your ONmove 200 is full, a beep can be heard and the screen dis plays "Memory full". You are then invited to: - free up memory space by deleting sessions. - or automatically overwrite the oldest training session. Select the Activity mode by pressing the E. button. The search for the GPS and/or heart rate monitor signal will launch automatically. During this search, the and LFRQVDUHÀDVKLQJ7KHVHDUFKIRUWKH*36VLJQDOFDQ take 15 seconds to 1 minute depending on the reception conditions. When the GPS signal has been found, there is a beep. Note7KHTXDOLW\RIWKHVDWHOOLWHVLJQDOUHFHSWLRQLVVLJQL¿FDQWO\DIIHFWHGE\WKHHQYLURQPHQW and movements. To facilitate reception, we recommend whenever possible that you: Position yourself in an open space, away from surrounding buildings and not under a tree. Do not move while the signal is being detected. To optimise the reception of the satellite signal, do not forget to update the FastFix by synchronising your product with the ONconnect software. (See§ 1.9.1) 13 5HDG\ $FWLYLW\VWDUWHG 50 s. E E E C D C D C D C D C D E Flashing while activity has not started C D E Once the GPS signal has been detected, your ONmove 200 automatically switches to "Activity" mode. Note: This screen is only available LIDWDUJHW]RQHKDVEHHQFRQ¿JXUHG and activated. (see § 1.6) C D E C D Press E to start the activity; a beep can be heard. During the activity, press C or DWRPRGLI\WKHVFUHHQGLVSOD\VGH¿QHGLQWKHGLVSOD\ parameters (see § 1.7). 2.3.1 *36RU+HDUWUDWHPRQLWRUQRWGHWHFWHG &DVH: GPS signal not found. &DVH: heart rate monitor not found. You can start the activity without a GPS. The "Speed", "Pace", "Distance" values You can start the activity without a heart rate monitor. The "BPM" and "Calories" values will no longer be displayed. The search for your heart rate monitor's signal will continue for 15 minutes and the LFRQZLOOÀDVK and the displayed. icon will no longer be If, after 15 minutes, no signal is detected, the search will stop automatically and the icon will no longer be displayed. E C 14 D 2.3.2 6WRSSLQJRUSDXVLQJWKHDFWLYLW\ This action allows the user to: Save the activity Quit the activity Access the product settings E Resuming the activity C D E E E E 3 s. C D C (-) D (+) E E C see § 1.7 C D E D E E E E C D D x2 E C D 15 2.3.3 YLHZLQJWKHDFWLYLW\DIWHUVDYLQJ E E E C D C D (-) (+) (-) (+) C D (-) (+) C D (-) (+) C D (-) (+) 2.4 Switching off the ONmove 200 7RVDYHEDWWHU\DQGZLWKWKHH[FHSWLRQRIVSHFL¿FFDVHVVHH$FWLYLW\0RGH\RXFDQVZLWFK off your ONmove 200 at any time. Press E (1 second) E (1 s.) 1 s. 16 3 LOGBOOK 3.1 6HVVLRQORJERRN E C E D C Activity time and distance E D C Average speed and average pace E E D C D Calories burned and average heart rate % of time spent within the target zone LIGH¿QHGLQWKHXVHU settings) A If no session has been saved 3.2 'HOHWLQJDVHVVLRQ E E E D E E C Auto 3 s. D After deleting a session, the display will return to the last session saved. Press A to return to the logbook menu. 17 3.3 'HOHWLQJWKHPHPRU\ E E E D C D (§ ) (¨ ) Auto 3 s. 3.4 0HPRU\VWDWXV E E A D x2 Recording time still available (hours and minutes) 4 MESSAGES 4.1 *36DQGRUKHDUWUDWHPRQLWRUVLJQDOORVW When the GPS or heart rate monitor connection is lost, a 30-second search starts automatically. In the meantime, the values displayed are blocked and the and LQGLFDWRUVDUHÀDVKLQJ If, after 30 seconds, the connection is not restored, the screen displays < - - - > instead of the "Speed" and "Pace" values, the "Distance" display remains blocked and a beep can be heard. The search will continue automatically and the the connection is restored. 30 s. and LQGLFDWRUVZLOONHHSÀDVKLQJXQWLO Connection restored ,QGLFDWRUVÀDVKLQJ Connection not restored 18 4.2 %DWWHU\OHYHO 4.2.1 21PRYHEDWWHU\ There are 3 alert levels: :KHQWKHEDWWHU\LVDWEHHSVFDQEHKHDUGDQGWKHLQGLFDWRUÀDVKHV When the battery is at 10%, 2 beeps can be heard. When the battery is at 5%, 3 beeps can be heard. the product switches off when the battery is completely discharged. If an activity is underway, it is automatically saved in the logbook before the ONmove 200 switches off Recharge the battery (see § 5) Flashing x2 x3 5 s. 1VW alert Battery = 15% 2nd alert Battery = 5% 3 s. Auto 4.2.2 +HDUWUDWHEHOWEDWWHU\ An indication appears when the battery of your heart rate belt is low. Don't forget to change the battery of your heart rate belt (refer to the user manual of your heart rate belt) 19 4.3 0HPRU\IXOO 4.3.1 0HPRU\IXOOEHIRUHWKHDFWLYLW\ E 3 s. C D (-) (+) 4.3.2 0HPRU\IXOOGXULQJWKHDFWLYLW\ X3 5 s. 20 3 s. 5 CHARGING THE BATTERY There are 2 ways to charge your product: Computer charge: When charging on a computer, the USB screen appears and the battery indicator is activated to show the charge level. You cannot access the different menus. Charging using the mains (adapter not included) or an autonomous battery: When charging using the mains, the battery screen is displayed to show the charge level. This charging method means the product can be used while charging. Charging using the mains, ONmove 200 switched off Charging using the mains, ONmove 200 switched on 6 TRANSFERRING AND VIEWING YOUR DATA 6 TRANSFERRING AND VIEWING YOUR DATA ON ON MYGEONAUTE MYGEONAUTE 6.1 7UDQVIHUIURPDFRPSXWHU 21PRYH &RPSXWHU Connect your ONmove 200 to your computer and go to the following website: support.geonaute.com Download and install the ONconnect software in accordance with the instructions. Launch the ONconnect software then create your account or log on if you already have one. Your sessions are displayed on the ONconnect application. Select the sessions you wish to transfer as well as the desired sport and click on "Send to myGeonaute". Once the sessions have been sent, go to your myGeonaute.com account to view them in detail. 21 6.2 7UDQVIHUIURPDVPDUWSKRQHRUWDEOHW Your ONmove 200 allows you to transfer your sessions very easily from a smart phone or tablet equipped with the Bluetooth® Smart technology. You can check your phone compatibility at support.geonaute.com/bluetooth Download the P\*HRQDXWHFRQQHFWapplication from the App StoreTM or Google PlayTM Activate Bluetooth® on your phone Launch the application and select 'detect a new product' Follow the application instructions to connect your product, transfer and view your sessions. 1RWH Bluetooth® Smart products such as the ONmove 200 do not appear in the list of the phone's Bluetooth® devices. The watch and the smart phone can only be linked (paired) from the myGeonaute connect application. 7 TECHNICAL CHARACTERISTICS 6SHFL¿FDWLRQV 8 Weight 51g/0.1lb/1.8oz %DWWHU\ Rechargeable, lithium ion :DWHUWLJKWQHVV IPX7 (resistant to splashes) Connection Micro USB Range 7 hours in GPS mode 6.5 hours in GPS and heart rate mode 10 days in watch mode &KDUJLQJWLPH 1.5 hours CONTACT US We would like your feedback on the quality, functionality and use of our products: http:// support.geonaute.com We will reply as soon as possible. 22 9 PRECAUTIONS FOR USE AND WARRANTY -10°C 60°C -50°F 140°F OXYLANE hereby declares that the ONmove 200 device complies with the essential requirements and other relevant provisions of the 1999/5/EC directive. The EC compliance declaration is available at the following web link: https://www.geonaute.com/fr/declaration-de-conformite This product and the battery it contains cannot be disposed of with household waste. They must be disposed of via selective waste sorting. Take the used battery and electronic product to an authorised collection point for recycling. Recycling your electronic waste protects the environment and your health. 23 0DGHLQ7DLZDQ )DEULFDGRHP7DLZDQ ̶͕͗͏͎͉͔͕͉̹͇͉͇͔͌͋͌͐͌ òPDOHGLOGLáL\HU7D\YDQ ♿䄍Ⓟ抯 咉䋲完抯 批厘ₙ䀆←₩丰䚕㦘棟⏻⚇ ₙ䀆ゑ㿵₫㠿◉枅榓恾⚆℣⻑₫∶ ,03257$'23$5$%5$6,/325,*8$63257/WGD&13- ̵̵̵̯͓͖͕͙͗͌͗m̵͙͕͈͚͑͒}̷͕͘͘͏̳͕͕͉͇͕͈͇͙̳͙ͦ͑͑ͦ͒ͣ͘͘͘͢͏͠͏͔͑͘͏̧͇͕͔̳̱̫͓͐͗͐͐͑ ̶̹̮m̧͙͚͉͕͒͛ͣ͌}͉͇͔͒͋͌͏͙͕͔͌͗͌͘͏͌ ♿䋲批◰⎑㦘棟⏻⚇♿䋲♿₼ゑ◦●⮶⬸◦恾壮嵽峱榊崀 785.632576SRU8U¾QOHUL6DQD\LYH7LFDUHW/WGĠWL2VPDQL\H0DKDOOHVLREDQ©HġPH.RġX\ROX%XOYDUó1R 0DUPDUD)RUXP*DUGHQ2ᚑFH%%ORN%DNóUN¸\,VWDQEXO785.(< OXYLANE 4 Boulevard de Mons – BP 299 59665 Villeneuve d’Ascq cedex – France