1
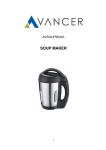
HOME
ICE CREAM MAKER
USER
INSTRUCTION
MANUAL
MODEL TS-009AS
TS-009AS Version 08/04
Page 1 of 8
Introduction
This instruction manual covers the operation of the Home Ice Cream Maker
Model TS-009AS. All versions of body colour and finish are covered by these
instructions.
Please read these instructions carefully prior to using the appliance for the
first time, especially the ‘Hints, Tips and Important Safeguards’ section later in
this manual. It is recommended that these instructions be retained for future
reference.
The appliance must be connected to a (nominally) 240V AC 50Hz. earthed
electrical supply and be protected with a 13 Amp. fuse. The Ice Cream Maker
has a mains electricity On/Off switch which is situated on the right lower rear
of the appliance, and a START/STOP button on the Control Panel.
The Home Ice Cream Maker can produce up to 1 litre, 35 fluid ounces, of ice
cream at a time. Ingredients used should be foodstuff grade edible
ingredients, and it is recommended that tried and tested recipes are used until
familiarity with appliance operation is gained. A list of typical ingredients is
given in the Hints, Tips and Important Safeguards section.
Parts Overview
Appliance Body
Control Panel/Display
Ice Cream Container
Paddle
Refrigeration Barrel
Top Assembly
D
E
TS-009AS Version 08/04
B
Page 2 of 8
Preparing the Appliance for Use
Unpack the appliance and place it on a sturdy level surface. It is
recommended that the packaging is retained for secure movement/transport.
The appliance operates at its optimum performance in a normal room
temperature of 20º C.
The refrigerant inside the appliance must have time to settle following
transportation and a minimum stabilisation period of three hours is
recommended prior to switching on the appliance.
There are several ventilation grilles in the appliance cover mainly in the lower
left hand and right hand sides. To ensure correct appliance operation these
grilles must not be obstructed. A gap of at least 20 cm. (8 inches) must be
maintained between the appliance sides, rear and top and other appliances or
walls.
As with all appliances used for the production of foodstuffs good basic
hygiene and cleanliness practices are essential. Before use the appliance
must be thoroughly cleaned in the following manner (items in BOLD are
shown in Parts Overview):
A. Carefully lift off the Top Assembly, remove the plastic Paddle by
gently but firmly pulling on the Paddle. Lay the Top Assembly where it
cannot be damaged or get wet.
B. Remove the Ice Cream Container from the Refrigeration Barrel
using the wire handle, the Container is a tight fit into the Barrel.
Immerse the Container and the Paddle in clean warm soapy water.
Wash both parts by hand and dry them. Appliance parts must not be
washed with scourers in a dishwasher.
C. Carefully wipe down the Top Assembly and the Appliance Body with
a damp cloth. Dry both assemblies. Do not immerse the Top Assembly
or the Appliance Body in water.
D. Wipe the inside of the Refrigeration Barrel with a damp cloth and dry.
E. Replace the Ice Cream Container in the Refrigeration Barrel. It is
important to replace the Ice Cream Container in the correct position.
The two lugs on the Container top rim to which the wire handle is fixed
must align with the two cut-outs in the clear seal around the edge of
the Refrigeration Barrel. The wire handle must also be folded towards
the front of the appliance otherwise the Top Assembly may not seat
correctly and the appliance may not work. (The two cut-outs in the seal
are at approximately ’ten minutes past the hour’ and ‘twenty minutes to
the hour’ when viewed from the front of the appliance.)
F. Attach the Paddle to the Top Assembly and replace the Top Assembly
onto the appliance.
The appliance is now ready for use.
TS-009AS Version 08/04
Page 3 of 8
Appliance Operation
It is recommended that the Ice Cream Container is filled with a maximum
volume of 1 litre (1000ml. or 35 fluid ounces) of, when possible, pre-mixed
ingredients. This volume comes to approximately 4 centimetres (1½ inches)
below the top edge of the Container.
There are three reasons for this. Firstly ‘pre-mixed ingredients’ because some
recipes may be written for different capacity appliances and simply adding a
complete list of ingredients one at a time could overfill the Ice Cream
Container causing it to overflow. Secondly pre-mixing ensures the ingredients
are thoroughly mixed. Finally some ingredients can increase in volume as
they freeze and leaving space for such expansion could avoid an overflow.
Some recipes require small ingredients to be added during the freezing cycle
and for such recipes a Small Ingredients Entry Cover is provided in the right
hand side of the clear Perspex top cover. These ingredients should be added
in accordance with recipe directions where given, or if no directions are given
the softer the ingredient being added the nearer the end of the cycle it should
be added to avoid it turning to mush. Care should be taken not to exceed the
one litre appliance capacity when adding ingredients in this way and that the
ingredients are chopped small enough to enter.
If the recipe being followed would provide in excess of 1 litre of mixed
ingredients then it should either be scaled down or any excess should be
discarded. The storage of pre-mixed ingredients is not recommended.
Remove the appliance Top Assembly and place carefully to one side.
Remove the Ice Cream Container and pour in up to 1 litre of pre-mixed
ingredients, this will fill the Container to approximately 4 cm. from its top rim.
Replace the Ice Cream Container into the Refrigeration Barrel ensuring that it
is fully inserted. The Ice Cream Container is a tight fit into the Refrigeration
Barrel and it may be necessary to push down evenly on the Container rim to
ensure it is fully inserted. It is important to replace the Ice Cream Container in
the correct orientation. The two lugs on the Ice Cream Container top rim to
which the wire handle is fixed must align with the two cut-outs in the clear
rubber seal around the edge of the Refrigeration Barrel. The wire handle
must also be folded towards the front of the appliance. (The two cut-outs in
the seal are at approximately ’ten minutes past the hour’ and ‘twenty minutes
to the hour’ when viewed from the front of the appliance.) If correct
orientation and handle position are not maintained electrical connection to the
paddle motor may not be made and the paddle might not turn.
Replace the Top Assembly ensuring it is pushed down and squarely seated,
and plug the appliance into a suitable electricity supply. Switch on the Mains
On/Off switch on the lower right rear of the appliance.
TS-009AS Version 08/04
Page 4 of 8
Appliance Operation (Continued)
The Timer will illuminate and will show a random time between 0 and 60
minutes. The cycle time is programmable and by pressing the TIMER SET
button the displayed time will count down from its switch on value to zero and
then reset to its maximum of 60 minutes and continue counting down. It is
suggested that a time of 25 minutes is used as an initial cycle time, unless it is
known that the particular recipe being used requires a longer time.
Press the START/STOP button keeping it depressed for a couple of seconds.
Release the START/STOP button, the appliance will bleep once, the paddle
will begin to turn and the ice cream making cycle will start. If the paddle does
not turn switch the appliance off at the START/STOP button then the mains
On/Off switch, lift the Top Assembly off, ensure the Container is correctly
orientated and its handle is folded forward and then replace the Top
Assembly. Switch the appliance on again at the mains On/Off switch and reprogramme the required cycle time if necessary. Re-start by pressing the
START/STOP button.
The appliance can be stopped and re-started in its cycle by using the
START/STOP button. Re-starting will reset the timer to its original start value.
At the end of the ice cream making cycle the appliance will buzz five times,
the paddle will continue turning and the freezing mode will be maintained so
that the ice cream remains cold. It is recommended that the ice cream is
removed as soon as possible after the end of the cycle. If the ice cream is not
removed and the appliance is left for an extended period there is a possibility
that the paddle could get frozen into the ice cream.
Some experimentation with timings may be necessary to obtain a product of
acceptable quality and consistency because variation in ingredients,
temperatures and timings can lead to variation in the finished product.
As soon as possible after the cycle has finished switch the mains switch off
and unplug the appliance from the mains.
Remove the Top Assembly and place carefully to one side.
Remove the Ice Cream Container from the Refrigeration Barrel and scoop out
the ice cream using a plastic or wooden spatula or spoon. Metal implements
must not be used as they will damage the Container finish.
If the ice cream is to be kept it should be placed into a suitable freezer
container and stored in a freezer, as with commercial product.
Clean and dry the appliance as in ‘Preparing the Appliance for Use’ section
and allow the appliance to rest for a minimum of 5 minutes before starting
another ice cream making cycle.
TS-009AS Version 08/04
Page 5 of 8
After Use
Disconnect from the electricity supply after use and clean and dry the
appliance as in the ‘Preparing the Appliance for Use’ section. Remember the
importance of hygiene and cleanliness.
If the appliance is not to be used for more than a few hours it should be
cleaned again immediately prior to making further batches of ice cream.
Hints, Tips and Important Safeguards
Do not place the appliance on its side or upside down. Pay particular attention
to this when the appliance is being moved.
During use ventilation grilles must not be obstructed.
Do not immerse the appliance in water or other liquids.
The appliance has internal moving parts. Take particular care to prevent
children from getting access to or playing with the appliance. The
Refrigeration Barrel is very cold and touching it could result in ice burns.
Orientation of the Ice Cream Container within the Refrigeration Barrel must be
correct. See the ‘Appliance Operation’ section.
The appliance is designed for indoor use only. Do not expose the appliance to
rain and do not use it or store it where it could get damp or wet.
Do not put the appliance or its mains lead near heat sources such as cookers,
hobs or ovens. Do not trail the lead over sharp corners or edges. In case of
damage to the appliance or its lead we advise not using the appliance and to
return it for authorised repair and parts replacement. Using parts not
recommended by the manufacturer can be dangerous.
Only use the appliance for its intended purpose, the production of ice cream.
There are no user accessible parts inside the appliance casing so entry must
not be attempted.
The refrigerant gas used in the appliance (R134a) is chemical waste. Disposal
of the appliance must be done in a proper environmentally friendly way.
Inquire about proper disposal with your municipal waste processing
department.
TS-009AS Version 08/04
Page 6 of 8
Hints, Tips and Important Safeguards (Continued)
Typical ingredients that can be used in the Ice Cream Maker are:Milk Heavy/Double Cream
Single Cream
Whipping Cream
Sugar
Egg/Egg Yolk
Vanilla Extract
Cocoa Powder
Chopped Fruit
Chopped Nuts
Fruit Purees
Grated Chocolate
Crushed Biscuits
Breadcrumbs
Fruit Syrup
This list is not meant to be exhaustive. Any foodstuff suitable for human
consumption can be used. Solid foodstuffs like fruit and vegetables should be
chopped small to avoid jamming and putting excessive strain on the paddle
and its motor drive.
A recipe booklet is supplied with this product which gives a range of tasty and
interesting ice cream recipes to enjoy. Additional delicious, and some unusual,
recipes can be found on www.ice-cream-recipes.com
Service and Parts Assistance
For advice or help on any matter please contact :-
TS-009AS Version 08/04
Page 7 of 8
Appliance Technical Data
Voltage:
Maximum Power:
Capacity:
Cycle Time:
Dimensions (mm):
Net Weight:
240V AC 50Hz.
160W
1 litre (35 fluid ounces) per cycle
0 to 60 minutes programmable
310H x 280W x 380D
14.2Kg.
Approvals:
CE. TÜV/GS. UL approval pending.
TS-009AS Version 08/04
Page 8 of 8