1
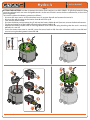
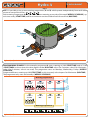
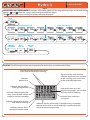
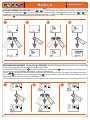
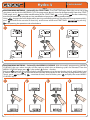
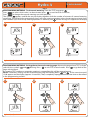
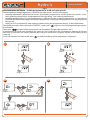
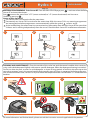
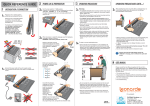
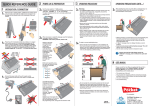
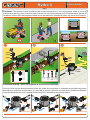
Hydro 4 User manual Page 1 Installation. The valve box is to be installed outside, buried at ground level (1-2) or resting on the surface (3), ensuring that the cover opening is free so that the valve inside the box can be programmed easily. If installed below ground, do not place it in areas which are frequently walked over or passed over by mechanical means (eg. ride-on lawn mowers). 1 2 3 90524* 91002* 91009* 91013* 91025* 16 mm 20 mm 16 mm 91013* 91256 91255 91254 91257 91258 * 8804* 8609* 9073* 90325* 20mm fil. 1/2’M 91227 91228 91229 20 mm 25 mm 16 mm 90320* 20mm fil. 3/4’ F 8609* * 90326* 90910* 8609* 8804* 16 mm 91013* Turbina Turbo-jet Colibrì Pop-up 91222 91225 91232 90474 90260 90262 90210 90019 90220 90020 90230 Installation drawing. * parts not supplied, to be purchased separately. Once the valve box has been positioned, make the hydraulic connections as indicated on the following pages: depending on individual requirements, it is possible to connect the valve box with pipes of different diameters using the specific fittings (not supplied). Below each link is referred to the example above. 16 mm 16 mm 2 1 16 mm Hydro 4 (cod.): 90829 1 25 mm 20 mm 2 3 4 2 20 mm 3 16 mm 1 click 3 Hydro 4 User manual Page 2 FITTING THE BATTERY. In order to operate the water timer requires two AAA (LR03)1.5V Alkaline batteries that must be replaced with two new charged batteries at the start of each season and are sufficient for, at least the entire irrigation. To install or replace the battery, proceed as follows: - Unscrew the two screws on the valve box cover 1, remove them 2 and remove the cover 3. - Unscrew the plastic cover on the water timer 4 and lift it up 5. - Take out the water time 6. - Unscrew the battery compartment plug 7, take out the battery-holder 8, and if present, remove the drained batteries. - Fit the new batteries in the holder, observing the correct polarity 9. - Replace the battery-holder into its housing 10 and screw down the plug checking that the seal is correctly placed in its seat 11. - Insert the water timer into its seat 12, screw the cover back on 13, close the valve box with its cover 14 and secure it using the designated screws 15-16. 1 2 4 3 15 7 BATTERY ONLY ALKALINE 6 + 8 12 + AA + 9 + 10 + Hydro 4 (cod.): 90829 BATTERY ONLY ALKALINE + 11 A 5 16 14 13 Hydro 4 User manual Page 3 USE. It is possible to set up two watering programmes, A and B, which operate independently from each other on one or more of the 4 lines 1 2 3 4. Each watering Programme, A or B, can be set to start watering on any day of the week (WEEKLY SCHEDULE), up to 4 times a day (START TIME) and for a maximum run time of 60 minutes for each line (RUN TIME). Line 2 Income Line Line 3 1 4 Line Hydro 4 (cod.): 90829 PROGRAMMING EXAMPLE. In the example, programme A starts watering at 5:00 (START TIME) and at 21:00 (START TIME2): at these times the valves open in order (RUN TIME: valve 1 for 5 minutes, valve 2 for 10 minutes, valve 3 for 5 minutes, valve 4 not used). The programme starts on Mondays, Wednesdays, Fridays (WEEKLY SCHEDULE). Programme B starts watering at 6:00 (START TIME): at this time only valve 4 opens for 20 minutes (RUN TIME). The programme only starts on Saturdays (WEEKLY SCHEDULE). 2 Start time 2 ore 21:00 ore 5:00 1 2 3 5 10 5 OFF 4 run time (min) 1 2 3 4 5 10 5 OFF 2 1 Start time 2 ore 6:00 2 3 4 Start time 4 OFF OFF run time (min) Start time 1 1 3 Start time 3 Run time (watering amount) 1 Start time 1 Start time (watering time) Watering programme A OFF 3 4 Start time 3 Start time 4 OFF OFF 4 run time (min) Watering programme B Sunday S Hydro 4 (cod.): 90829 Monday A Tuesday M T Wednesday A Thursday W T Friday F A Saturday S B Weekly schedule (watering days) OFF OFF OFF 20 Hydro 4 User manual Page 4 GUIDELINES ON PROGRAMMING. provides information about all the programming pages in the order they appear: and allow the user to scroll through the different pages. The key lets you access the EDITING of the parameter displayed. Clock S M T W T F S Start Time prog. A Run Time prog. A A A A A A LINE PROG LINE PROG LINE PROG LINE PROG PROG 1 2 3 4 A Run Time prog. B B LINE PROG B LINE PROG Weekly Schedule LINE PROG Rain Sensor 2 3 4 A 1 2 3 4 PROG A 1 2 3 4 1 2 3 4 PROG Start Time prog. B 1 B 1 PROG 2 3 4 1 B B B PROG LINE PROG PROG 2 3 4 1 2 3 B PROG 4 B PROG Manual Test A A A A A A A 14 B B B B B B B 15 S M T W T F S Hydro 4 (cod.): 90829 DISPLAY. The following functions are assigned to the various keys or combination of keys: Indicate the programmed start times (start time) for automatic watering Signals that the main number indicator represents the start time of the watering cycle (start time) of the selected programme Indicates battery level Indicates the line which is being programmed Indicate which programmes (only a, only b, both a and b neither a nor b) are enabled Indicates the page for testing and manual watering Indicates that we are in change parameter mode Hydro 4 (cod.): 90829 LOW BATT A B 1 2 3 4 % Indicate the time or, in the programming pages, the run time and start time of watering LINE PROG ERR A A A A A A A 14 B B B B B B B 15 OK S M T W T F S EXIT Indicates that watering is in progress Indicates the day of the week. in programming, it indicates the day of the week in which watering is required and with which of the two programmes. Hydro 4 User manual Page 5 HOW TO USE THE KEYPAD. Only three keys let you set all the parameters. The keys and let you scroll through the various pages in order to select the one desired. The key lets you access the EDITING of the parameter displayed. When is pressed, OK appears in the bottom left display. With OK, the and keys turn on and let you edit the value of the parameter displayed. If a key is not pressed for approximately 5 minutes, the water timer automatically returns to the date and hour page, without confirming the changes in progress. When the desired value is reached, exit from the changes by pressing the key, OK will appear on the lower right part of the display. It is now possible to go back to the page with the and keys, and change the values if needed. S M T W T F OK S Hydro 4 (cod.): 90829 SETTING CURRENT DAY AND TIME. When the batteries are first fitted the display shows the first page current TIME/DAY, indicating as default 12:00 and S Sunday. By pressing , the message OK appears and the days of the week disappear. Press or to increase or decrease the current time. By holding down the key, the time progresses more quickly until the required time setting is reached. To confirm the modified parameter press and move to the screen to set the current day. 1 2 S M T W T F S 3 OK OK OK OK 14 15 OK Hydro 4 (cod.): 90829 S Hydro 4 User manual Page 6 SETTING CURRENT DAY AND TIME. Press or to scroll through and select the current day. To confirm the modified parameter press and move to the screen to set the type of programme to use. Press or to enable the required programme A or B or both programmes or set them to OFF. To confirm the modified parameter press and exit programming and return to the time screen. 1 2 3 4 A B A B PROG 14 14 15 15 OK OK S PROG OK M A B OK A B PROG PROG 14 15 OK OK M OK S M T W T F S Hydro 4 (cod.): 90829 PROGRAMMING WATERING - Set/modify the RUN TIME. The RUN TIME page allows the user to set a watering run time for programme A and programme B for each LINE. From the RUN TIME page, press to enable modification ->the symbol OK flashes indicating that the parameters displayed can be modified and require a setting confirmation. Using changes the value displayed (by pressing and holding the keys, the value will change more quickly). Press to confirm the set value. By pressing the user moves to the RUN TIME setting of the next LINE up to a maximum of 4 lines to form a WATERING CYCLE). If a watering cycle does not include the use of a specific line, simply set the watering run time of that line to OFF. 1 A LINE PROG 2 A LINE PROG OK PROG OK Hydro 4 (cod.): 90829 A LINE LINE OK PROG OK A A LINE 3 PROG A LINE PROG Hydro 4 User manual Page 7 PROGRAMMING WATERING - Set/modify the START TIMES. The START TIME page allows the user to set up to start times per day for the WATERING CYCLE for programme A and 4 times for programme B. From the START TIME page, press to enable modification of the START TIME 1 -> the symbol OK flashes indicating that the parameters displayed can be modified and require a setting confirmation. Using changes the value displayed (by pressing and holding the keys, the value will change more quickly), press to confirm the set value. If necessary, set the times of the next START TIMES 2 3 4 by pressing and repeating the operations described above. 1 2 A 1 2 3 3 4 A PROG 1 A PROG PROG OK OK A 1 A 1 A 1 2 3 4 PROG PROG PROG 1 OK OK Hydro 4 (cod.): 90829 PROGRAMMING WATERING - Set/modify the WEEKLY SCHEDULE. With the weekly programming (WEEKLY SCHEDULE) the user selects the days of the week on which the set Watering cycles are activated. From the WEEKLY SCHEDULE page, press -> the symbol S flashes =Sunday. Each time is pressed, the screen displays which programme is to start on that day (only A, only B, both A and B, neither A nor B). Press to move on to the next days and proceed in the same way to programme the days. To exit, go to EXIT by pressing a number of times; when it flashes, press to display the screen WEEKLY SCHEDULE again. 1 2 A A A A A A A B B B B B B B S M T W T OK F 14 15 S OK A A A A A A A B B B B B B B 14 S M T W T EXIT F S 3 15 Hydro 4 (cod.): 90829 OK A A A A A A A B B B B B B B 14 S M T W T EXIT F S 15 OK A A A A A A A B B B B B B 14 S M T W T EXIT F 4 S 15 OK A A A A A A A B B B B B B 14 S M T W T F EXIT A A A B A A B B B S M T W T F S S OK 14 15 EXIT A A B 14 S M T W T F EXIT A A A B A 15 OK A A B B B A A B B B S M T W T F S S 15 14 15 Hydro 4 User manual Page 8 PROGRAMMING WATERING - Test/manual watering. From the TEST page press . Press to select which valve is to be activated, press to activate it for 5 minutes. Press to change the manual watering run time (optional). The symbol OK appears and flashes on the display together with the number of minutes of manual watering remaining. The solenoid valve automatically closes and stops watering operations when the set watering minutes have been reached. If you wish to stop watering operations in advance, press and the message OFF appears on the display. 1 2 3 LINE PROG LINE PROG EXIT LINE PROG LINE EXIT PROG PROG OK EXIT EXIT Hydro 4 (cod.): 90829 PROGRAMMING WATERING - Exiting the test/manual watering page. Move to the page where TEST is displayed with the symbols OK and EXIT flashing. Press to exit TEST/manual mode. Press to go back to the page with the clock. By entering TEST mode, any automatic watering is stopped but this will be restored on exit. Reset. The factory settings can be restored by pressing and holding down and at the same time until 12:00 appears on the display (approx. 10 seconds). Then, completely reprogramme the water timer as described in the programming sections. 1 2 OK 3 EXIT S Hydro 4 (cod.): 90829 M T W T F S S M T W T F S S M T W T F S Hydro 4 User manual Page 9 PROGRAMMING WATERING - Enabling programmes A and B and setting to off. Activating/deactivating programmes A and B of the water timer is useful in managing: - watering requirements based on the season: for example, programme A can be set for the summer - maximum watering requirements, and programme B for the spring - low watering requirements; - simplified programming: if just one programme is sufficient for your watering requirements, it is possible to eliminate the display of the pages of the other programme, simplifying setting operations for the programme being used. - setting to OFF: to temporarily stop watering without losing the programme settings, as described below. The display normally shows the current TIME/DAY screen; press to go into the time programming and press it twice more. Then press to select which programme is to be enabled. The possible selections are 4 If programmes A and B are assigned on the same day, this could cause the simultaneous opening of the two lines: the system does not have a sufficient flow rate, this could have a negative impact on the quality of the watering. Once the selection has been made, press to confirm enabling of the programme/s displayed. 1 2 S M T W T F S OK x2 1 LOW BATT A B 2 3 4 % LINE PROG OK 3 LOW BATT A B 4 1 2 3 4 % LINE PROG 1 LOW BATT A B 2 3 4 % LINE PROG ERR A A A A A A A 14 B B B B B B B 15 ERR A A A A A A A 14 B B B B B B B 15 OK OK S EXIT OK OK S LOW BATT A B M 1 T W 2 T F S 3 4 % LINE PROG LOW BATT A B M 1 T W 2 T F 3 S 4 EXIT % LINE PROG ERR A A A A A A A 14 B B B B B B B 15 ERR A A A A A A A 14 B B B B B B B 15 OK OK S EXIT OK OK S M T W T F S Hydro 4 (cod.): 90829 M T W T F S EXIT ERR A A A A A A A 14 B B B B B B B 15 OK OK S LOW BATT A B M T 1 W T 2 F EXIT S 3 4 % LINE PROG ERR A A A A A A A 14 B B B B B B B 15 OK OK S M T W T F S EXIT Hydro 4 User manual Page 10 WATERING PROGRAMMING - Rain Sensor RF. From the RAIN SENSOR page press -> activates when the Rain Sensor RF activates/deactivates.. Press to move the status from “” (sensor activated) to “” (sensor deactivated) and vice versa. Confirm by pressing . Status of Rain Sensor RF: Off: Sensor EMPTY or not active for the water timer. Permanently on: Sensor FULL or active for the water timer. With the sensor FULL any watering programmes are interrupted and other programmes start automatically while the symbol remains active. Active and flashing: the water timer has not received any information from the Rain Sensor RF for more than 24 hours and is working independently from the sensor. Check the Rain Sensor RF installation and batteries. 1 LOW BATT A B 1 2 3 4 % 2 LOW BATT A B LINE PROG 1 2 3 4 % 3 LOW BATT A B LINE PROG 1 2 3 4 % LINE PROG ERR A A A A A A A 14 B B B B B B B 15 ERR A A A A A A A 14 B B B B B B B 15 ERR A A A A A A A 14 B B B B B B B 15 OK S S EXIT OK S S EXIT OK OK S 4 % 4 % LOW BATT LOW BATT A B M 1 T W 2 T F 3 LOW BATT A B LINE PROG M 1 T W 2 T F 3 A B LINE PROG M 1 T W 2 T F 3 S EXIT 4 % LINE PROG ERR A A A A A A A 14 B B B B B B B 15 ERR A A A A A A A 14 B B B B B B B 15 ERR A A A A A A A 14 B B B B B B B 15 OK OK S EXIT OK OK S EXIT OK S M T W T F S M T W T F S M T W T F S EXIT Hydro 4 (cod.): 90829 CLEANING AND MAINTENANCE. Clean the outside of the valve box and the control module when necessary using a soft cloth dampened slightly with water or specific detergent: follow the detergent cleaning instructions. Do not use abrasive pads, scourers or acid detergents. n winter or long periods of inactivity close the tap or the gate valve upstream, access the control module and manually open all 4 lines in sequence to discharge the pressure, remove the water timer, store it in a dry area where the temperature does not fall below 3 °C and remove the batteries. 1 2 3 5 6 ONLY ALKALINE 4 BATTERY < 3°C + AA A + + + Hydro 4 (cod.): 90829 For more information and further details, please consult the instruction manual supplied with the product.