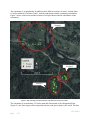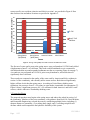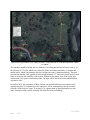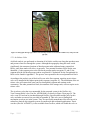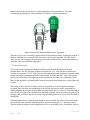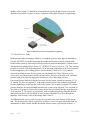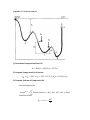
1
Aqueduct system for the community of Bajo Gavilan, Bocas del Toro, Panama Submitted by: Reasonable Engineering Megan Farrish Claira Hart Kevin Madson Erika Poli William Tillmans Submitted on: December 12, 2014 Michigan Technological University Department of Civil and Environmental Engineering Houghton, MI, USA Aqueduct system for the community of Bajo Gavilan, Bocas del Toro, Panama Submitted to: Dr. David Watkins, PE Mr. Mike Drewyor, PE, PS Ms. Christina Duell, PCV Submitted by: Reasonable Engineering Megan Farrish Claira Hart Kevin Madson Erika Poli William Tillmans Mission Statement The mission of Reasonable Engineering is to create sensible and functional designs to improve the quality of life of those living in disadvantaged areas of the underdeveloped world. The highest priority of Reasonable Engineering is to provide access to improved basic resources to people that place a personal and communal responsibility on the construction and maintenance of the systems created. Purpose Reasonable Engineering is a group of five undergraduate engineering students from Michigan Technological University’s International Senior Design (iDesign) program. In August 2014, these young innovators travelled to Bajo Gavilan, a small Ngäbe community in western Panama, to survey and collect data on a proposed aqueduct system. The proposed system will bring clean and affordable water to this community and increase their overall health and quality of life. Acknowledgements Reasonable Engineering is truly thankful to those that supported the team and this project in any way that they could, from preliminary trip planning to the completion of this report. Special thanks to: Dr. David Watkins, Course Advisor Mr. Mike Drewyor, Course Advisor Ms. Kelli Whelan, Course Mentor Ms. Christina Duell, PCV Bajo Gavilan Water Committee Mr. Guillermo, President Mr. Siderio, Vice President Mrs. China, Treasurer ii Disclaimer This report, titled “Aqueduct system for the community of Bajo Gavilan, Bocas del Toro, Panama,” represents the efforts of Reasonable Engineering, an International Senior Design group of undergraduate students in the Civil and Environmental Engineering Department of Michigan Technological University. Although the students worked under the supervision and guidance of associated faculty members, the contents of this report should not be considered professional engineering. iii Table of Contents Executive Summary ...................................................................................................................... vii 1.0 Introduction ............................................................................................................................... 1 2.0 Background ............................................................................................................................... 2 2.1 Site Description ..................................................................................................................... 2 2.2 Community Background ....................................................................................................... 4 2.2.1 Community Profile and Demographics ......................................................................... 5 2.2.2 Community Organization............................................................................................... 5 2.3 Problem Description ............................................................................................................. 6 2.4 Project Objectives ................................................................................................................. 6 3.0 Data Collection ......................................................................................................................... 7 3.1 Water Supply ........................................................................................................................ 7 3.1.1 Flow rate measurement .................................................................................................. 7 3.1.2 Water quality tests.......................................................................................................... 8 3.2 Aqueduct Route .................................................................................................................... 9 3.2.1 Survey Methods ........................................................................................................... 10 3.2.2 Survey Results ............................................................................................................. 10 3.3 Water Demand .................................................................................................................... 13 4.0 System Modeling .................................................................................................................... 14 4.1 EPANET ............................................................................................................................. 14 4.1.1 Methods........................................................................................................................ 14 4.1.2 Results .......................................................................................................................... 15 4.1.3 Discussion .................................................................................................................... 16 4.1.4 Limitations ................................................................................................................... 16 4.2 Neatwork ............................................................................................................................. 17 4.2.1 Methods........................................................................................................................ 17 4.2.2 Results .......................................................................................................................... 18 4.2.3 Limitations ................................................................................................................... 18 5.0 Proposed Design ..................................................................................................................... 19 5.1 Spring Box .......................................................................................................................... 20 5.2 Aqueduct Line ..................................................................................................................... 21 5.2.1 Air Release Valve ........................................................................................................ 23 5.2.2 Stream Crossings ......................................................................................................... 24 5.2.3 Break Pressure Tanks ................................................................................................... 25 iv 5.3 Waypoint 80 ........................................................................................................................ 27 5.3.1 In-line chlorinator ........................................................................................................ 27 5.3.2 Storage and Break Pressure Tank ................................................................................ 28 5.4 House Access ...................................................................................................................... 29 5.5 System Sustainability .......................................................................................................... 30 6.0 Cost Estimate and Construction Schedule .............................................................................. 31 6.1 Cost Estimate ...................................................................................................................... 31 6.2 Construction Schedule ........................................................................................................ 31 7.0 Conclusion .............................................................................................................................. 33 8.0 References ............................................................................................................................... 34 9.0 Appendices .............................................................................................................................. 35 Appendix A: Appendix B: Appendix C: Appendix D: Appendix E: E-1: E-2: E-3: Appendix F: F-1: F-2: Appendix G: Appendix H: Appendix I: Appendix J: Appendix K: Appendix L: Appendix M: Appendix N: Detailed Methods Flow rate data Water quality data Summary of survey data EPANET EPANET Inputs and Assumptions EPANET Outputs EPANET Supporting Calculations Neatwork Neatwork Inputs and Assumptions Neatwork Outputs Air Block Analysis Geoflow Air Release Valve Chlorination calculations Cost Estimate Construction Schedule Construction and Maintenance Manual Illustrations of components Engineering drawings v List of Figures Figure 1. Map of Panama that shows the location of Bajo Gavilan. .............................................. 2 Figure 2. Map of the area surrounding Almirante, including Bajo Gavilan and the Changuinola Dam. ............................................................................................................................... 2 Figure 3. Map of the Bajo Gavilan community, with homeowner names in section 1. ................. 3 Figure 4. Community characteristics and demographic data for Bajo Gavilan [6]. ....................... 5 Figure 5. Stream water collection methods (a and b) used by residents in section 1 [6]. ............... 6 Figure 6. Photographs of the (a) side and (b) top of the spring source. .......................................... 7 Figure 7. Photograph of the weir that was constructed to measure the flow rate of spring source. 8 Figure 8. Average water quality test results. TNTC is too numerous to count............................... 9 Figure 9. Map of the proposed aqueduct route with waypoints. ................................................... 11 Figure 10. Map of proposed aqueduct route through section 1 of the community. ...................... 12 Figure 11. Elevation profile of the proposed aqueduct path. ........................................................ 13 Figure 12. Pressure at nodes and flow in pipes at (a) 12:00AM and (b) 12:00PM during the 24hour analysis period. .................................................................................................... 15 Figure 13. Water elevation in storage tank over the 24-hour analyis period. ............................... 16 Figure 14. Tree view of the proposed aqueduct system in Neatwork. Blue boxes represent faucets and gray boxes represent nodes which are also survey waypoints. ............................. 17 Figure 15. Map with locations of system components and pipe diameters. ................................. 19 Figure 16. Summary of system components. S=source, SC=stream crossing, ARV=air release valve, BPT=break pressure tank, ILC=in-line chlorinator, and ST=storage tank........ 20 Figure 17. Low-profile spring box and spring capture zone schematic [9]. ................................. 21 Figure 18. System pipe diameters (from Table 3) in section 1. Not pictured is the rest of the main aqueduct line, which is 1.5” SDR 26. .......................................................................... 22 Figure 19. Photograph showing a pipe within a trench at Bajo Gavilan. The trench will be filled to bury and protect the pipe [10]. ................................................................................. 23 Figure 20. Geoflow Air Vent/Vacuum Relief valve ([11], Appendix H). .................................... 24 Figure 21. Schematic of stream crossing methods (Appendix M-2). ........................................... 25 Figure 22. Locations of break pressure tanks on system elevation profile. ................................. 26 Figure 23. (a) Isometric and (b) top views of the break pressure tank (Appendix M-3). ............. 26 Figure 24. Configuration of in-line chlorinator, storage tank, and break pressure tank at Waypoint 80 (Appendix M-4). ..................................................................................... 27 Figure 25. (a) Schematic and (b) photographs of MINSA in-line chlorinator [14]. ..................... 28 Figure 26. Two 4,200 L storage tanks located at the existing aqueduct. ...................................... 29 Figure 27. Tee fitting to branch off 1.5” mainline to tapstands. ................................................... 29 Figure 28. Tapstand built in section 3 of the community [10]...................................................... 30 List of Tables Table 1. Climate data for Bocas del Toro (1971-2000) [4]. ........................................................... 4 Table 2. Average flowrates measured at spring source. ................................................................. 8 Table 3. Optimized pipe diameters for the proposed aqueduct system.… ................................... 18 Table 4. Summary of cost estimate for proposed aqueduct.… ..................................................... 31 vi Executive Summary Reasonable Engineering is a team of five undergraduate engineering students participating in the International Senior Design Program at Michigan Technological University (MTU). The team travelled to Bajo Gavilan, an indigenous rural community in western Panama, in August 2014 to address concerns associated with water availability and quality. The team was hosted by Christina Duell, a Peace Corps Volunteer who has lived on-site since January 2014. The overall mission for this project was to improve the health and overall quality of life for community members by providing access to clean water in one section of the community. This mission was accomplished by performing a site assessment and then returning to MTU to model and design a sustainable gravity-fed water distribution system. The proposed PVC aqueduct system originates from a natural mountain spring source and will travel approximately 1.77 miles to the northwest section of the community, ending at a two-room schoolhouse. The site assessment was conducted by Reasonable Engineering and Christina Duell and involved collecting topographic, flow rate, and water quality data for the proposed aqueduct. The objectives of this project were: (1) to evaluate the feasibility of the spring source and proposed aqueduct route and (2) to model and design the proposed aqueduct system. Reasonable Engineering evaluated the hydraulic feasibility and modeled the behavior of the aqueduct using two programs, EPANET and Neatwork. EPANET was used to determine the diameter of pipe, locations of break pressure tanks, the location of the storage tank, as well as to simulate pressure at nodes and flows through pipes to predict system performance. Neatwork was used to optimize the diameter of the PVC pipe downstream of the storage tank, and simulate system performance. The design consists of a low-profile spring box, an aqueduct pipeline, one air release valve, stream crossing methods, five break pressure tanks, one storage tank, one in-line chlorinator, and nine tapstands. Recommendations for the system include: (1) burying the aqueduct, (2) installing an in-line chlorinator, break pressure tank, and storage tank at one location, and (3) testing for chlorine concentration to determine the optimum dosage of chlorine for the system. The total cost for this design is approximately $9,300. Construction of the system is expected to take approximately three months. The collected data, data analysis, and design recommendations provided in this report will provide essential information that can be considered in the request for funding to install this proposed system. This report and attached appendices can be consulted for recommendations and guidance on how to design, install, operate, and maintain the aqueduct system. vii 1.0 Introduction Reasonable Engineering is a team of five undergraduate students of various disciplines, including one civil engineer, one mechanical engineer, and three environmental engineers. The team participated in the International Senior Design (iDesign) program at MTU. In August 2014, the team travelled to Bajo Gavilan, a small indigenous community in western Panama. The team was hosted by Christina Duell, a Peace Corps Volunteer (PCV) that has lived on-site since January 2014. Duell has identified specific concerns for access to clean drinking water in one section of the community. This section currently collects drinking water from streams, which are prone to contamination from runoff. A more in-depth analysis of the community and the problem addressed by this project is provided in Section 2.0. Community members identified an existing mountain spring as a potential source for an aqueduct system prior to the team’s arrival. Reasonable Engineering and Christina Duell evaluated the feasibility of an aqueduct project by hiking to the source to measure flow rate and test the quality of water. Community members led the team through the jungle to establish and survey a proposed route for the aqueduct, from the source to the school located in the northwestern section of the community. The methods and results of data collection are included in Section 3.0. The collected data was then analyzed at MTU. The system was modeled in EPANET [1] and Neatwork [2], which were used to determine the location, quantities, and specifications of system components such as pipe diameters, and storage and break pressure tanks. A discussion on system modeling is provided in Section 4.0. Air block analysis was also performed to determine the locations of any necessary air release valves. The final design includes recommendations on system components, including a low-profile spring box, one air release valve, five break pressure tanks, a buried aqueduct line, one in-line chlorinator, one storage tank, and nine tapstands. These recommendations are provided in Section 5.0. Finally, a cost estimate and construction schedule are provided in Section 6.0. 12/12/2014 Page: 1/35 2.0 Background 2.1 Site Description Bajo Gavilan (9.271938N, -82.500984W) is a community located in the Changuinola District in the Bocas del Toro Province of Panama. The community lies along the Changuinola River and is about 15 miles southwest of Almirante, the nearest city (Population: 8,816 [3]). The location of the community within Panama is shown in Figure 1. A more regional perspective of the community’s location is provided in Figure 2. Bajo Gavilan Figure 1. Map of Panama that shows the location of Bajo Gavilan. Figure 2. Map of the area surrounding Almirante, including Bajo Gavilan and the Changuinola Dam. 12/12/2014 Page: 2/35 The community is geographically divided into three different sections. Section 1, located about 0.5 miles northwest of sections 2 and 3, includes eight homes and the community schoolhouse. Figure 3 shows each section and the locations of occupied houses and the schoolhouse in the community. Section 1 Section 2 Section 3 Figure 3. Map of the Bajo Gavilan community, with homeowner names in section 1. The community is located about 2.25 miles north and downstream of the Changuinola Dam (Figure 2), one of the largest roller-compacted concrete-arch gravity dams in the world. The dam 12/12/2014 Page: 3/35 is owned and operated by Applied Energy Services-Changuinola (AES-Changuinola), a subsidiary of AES (a United States electricity generation and distribution corporation). The construction of the dam began in 2007, and has been in operation since 2010. Construction of the dam also resulted in a paved two-lane road that passes through the community. Land cover in the area is predominantly dense rainforest, with some pasture and farmlands along the Changuinola River. The community sits in the Changuinola River valley, with mountains rising over 1,000 ft above mean sea level (AMSL) to the north and south of the community. According to the Köppen climate classification system, Bajo Gavilan features a tropical rainforest climate. The area averages 136.1 inches of annual rainfall and daily high temperatures hover around 88°F throughout the year. Climate data for Bocas del Toro, a city about 20 miles west of Bajo Gavilan, is provided in Table 1. Table 1. Climate data for Bocas del Toro, Panama (1971-2000) [4]. Month Average High (°F) Average Low (°F) Precip. (in.) Avg. Precip. days Jan Feb Mar Apr May Jun Jul Aug Sep Oct Nov Dec Year 87.4 87.3 87.8 88.5 89.4 89.6 88.7 89.2 89.4 89.1 88.9 87.8 88.59 68.7 68.4 68.9 70.5 4.9 16.6 72 72 71.1 71.2 71.6 71.6 71.2 69.1 70.53 10.5 3.3 14.5 7.0 10.1 16.5 17.4 12.3 6.0 11.5 22.2 136.1 14.6 14.8 15.2 16.7 17.9 20.9 18.4 15.8 16.4 17.0 20.0 204.3 2.2 Community Background Bajo Gavilan is a small Ngäbe community. Historically, the Ngäbe people lived in small family groups in flat and coastal regions of the country. However, Ngäbe communities were often displaced by other groups of people including Spanish conquistadors, Latino cattle ranchers, and large banana plantation corporations. The majority of Ngäbe people fled to the less desirable and mountainous areas of the country, where the Panamanian government granted them semiautonomy by establishing the Ngäbe-Buglé comarca in 1997 [5]. The first inhabitants of what is now considered Bajo Gavilan likely settled in the remote Changuinola River valley about 40 years ago. Most residents, however, did not arrive until the road to the Changuinola Dam was constructed. There are currently about 124 residents and 16 households in Bajo Gavilan [6]. Although Bajo Gavilan lies downstream of the dam and is unaffected by its operation, AESChanguinola constructed a school and an aqueduct system for sections 2 and 3 of the community as partial compensation to the local Ngäbe people. The construction of the school in 2006 serves as the official formation of the community. Christina Duell, an environmental health PCV, has been living in Bajo Gavilan since January 2014. Her work mainly focuses on water availability and quality concerns in the community. She successfully requested funding from WaterLines, an American non-governmental organization (NGO), for the rehabilitation and extension of the existing aqueduct built by AES-Changuinola. She is also involved with water quality education initiatives, creating the first water committee in 12/12/2014 Page: 4/35 the community and teaching residents about the relationship between clean water and human health. The funding for this proposed aqueduct is also expected to be provided by WaterLines. The maximum monetary award per grant from this organization is $8,000, which serves as the ideal cost ceiling for this project. If the cost of constructing the system exceeds this cost, the project will need to be split up into smaller pieces. 2.2.1 Community Profile and Demographics The residents of Bajo Gavilan are subsistence farmers, growing various crops including bananas, plantains, cacao, and a variety of root vegetables in addition to raising livestock such as chickens, cattle, and pigs. There is no electricity in the community aside from a few battery and solar-powered devices. Demographic data collected by Duell is provided in Figure 4. Figure 4. Community characteristics and demographic data for Bajo Gavilan [6]. 2.2.2 Community Organization Bajo Gavilan does not have an appointed leader, but various community members serve in leadership roles in groups within the community. Padres de Familia, which functions as a Parent-Teacher Association (PTA), has a large amount of influence due to its relationship to the school, the central feature of the community. The most relevant organization to this project is the water committee that was created by Duell, which consists of an executive board with a president, vice president, and treasurer. The committee has created a water access contract and has collectively decided that each household 12/12/2014 Page: 5/35 should individually provide labor for aqueduct construction, or else be charged a large connection fee. The water committee and its president, Guillermo, are expected to be the main determinants for the success of this project. 2.3 Problem Description Sections 2 and 3 of the community currently receive clean drinking water from an aqueduct built by AES-Changuinola in 2011. Section 1, the most populous section of the community, does not have access to this aqueduct. With no water distribution system available in section 1, residents collect water from pipes placed in nearby streams and creeks that are prone to contamination from runoff. Figure 5 illustrates the pipe-placement technique typically used by residents in this section. b) a) Figure 5. Stream water collection methods (a and b) used by residents in section 1 [6]. Extending the existing aqueduct from sections 2 and 3 in order to meet the needs of section 1 is not feasible according to water supply and demand calculations provided by Duell. A different spring source must be identified and a new aqueduct system designed and constructed in order to deliver water to the homes and the school in section 1 of the community. 2.4 Project Objectives Prior to Reasonable Engineering’s arrival, the water committee identified a new spring source in the highlands south of Bajo Gavilan that could potentially supply sufficient water to meet the needs for section 1 of the community. The objectives of this project were: (1) to evaluate the feasibility of the spring source and proposed aqueduct route, and (2) to model and design a sustainable aqueduct system. The completion of these objectives will provide Duell with more information for requesting a grant from WaterLines. The information and recommendations provided in this document can also be considered during the installation, operation, and maintenance of the aqueduct. 12/12/2014 Page: 6/35 3.0 Data Collection Reasonable Engineering collected data on the spring source and the proposed aqueduct route to determine the feasibility of the system. This included flow rate measurements and water quality tests at the source and a topographic survey of the proposed aqueduct route. The following section will briefly describe the methods and results of these measurements. A more detailed discussion on the methods used in the site assessment is provided in Appendix A. 3.1 Water Supply The proposed water source is a mountain spring located about one mile southwest of section 1. Figure 6 shows the spring source. a) b) Figure 6. Photographs of the (a) side and (b) top of the spring source. 3.1.1 Flow rate measurement Flow rate was measured using the volume-time method. A weir was built at the source in an attempt to funnel the water exiting the cave into a container with a known volume, shown in Figure 7 on page 8. 12/12/2014 Page: 7/35 Figure 7. Photograph of the weir that was constructed to measure the flow rate of spring source. Table 2 shows the average flow rate measurements for the spring source. Raw data for these measurements are available in Appendix B, which also includes the flow rate data for the existing aqueduct. One source of error during flow rate measurement was the construction of the weir. Water was observed flowing through and around the weir, so all measured flow rates are lower than the actual flow rate. This is still acceptable, as values remain conservative for the flow rate supplied by the spring. Table 2. Average flowrates measured at spring source. Location Date Average Flow Rate (gpm) 8/15/2014 7.9 Spring source for proposed aqueduct 8/19/2014 6.9 The measured flow rates are the only quantitative data available for this spring source. According to Duell’s qualitative observations of the spring during the dry season, the flow rate remains consistent in both the wet and dry seasons. All calculations included in this report, unless otherwise noted, use 6.9 gpm as the water supply flow rate. 3.1.2 Water quality tests The water quality of the proposed source and current stream sources used in section 1 were tested using 3M® Petrifilm E. Coli/Coliform Count Plates. Samples were incubated using an individual’s body heat for 24 hours before counts of E. Coli and non-E. Coli coliforms were performed. Average results for the water quality tests at the proposed spring source and stream 12/12/2014 Page: 8/35 sources used by two residents (America and Julia) in section 1 are provided in Figure 8. Raw data for these tests and others locations are provided in Appendix C. Average Coliforms Observed per 1mL sample 50 46.3 TNTC TNTC 45 40 35 E. Coli 30 25 20 Non-E. Coli Coliform 17.5 13 15 10 5 2 0.67 1.3 0 Spring Source (8/15/2014) Spring Source (8/19/2014) America's House Julia's House Source Figure 8. Average water quality test results. TNTC is too numerous to count. The first set of water quality tests at the spring source were performed on 8/15/2014 and yielded a high amount of non-E. coli coliforms. This result could be attributed to weir construction, which disturbed the area and suspended sediments near the cave opening (Figure 6a on page 7). A second test was performed on 8/19/2014, prior to any disturbances, and results showed significantly fewer coliforms. These results are compared to the quality of the water used by America and Julia, residents in section 1 of the community, who currently utilize stream sources. Both showed significantly higher coliform levels than the spring source. According to United States drinking water regulations, the presence of one E. coli colony in water makes it unsuitable for consumption [7]. Figure 8 shows a significant presence of E. coli coliforms for both America’s and Julia’s water sources, which is indicative of unhealthy drinking water. 3.2 Aqueduct Route The proposed aqueduct route begins at the spring source and ends at the school in section 1 of the community. Members of the water committee, with guidance from Duell, Dr. David Watkins, and Reasonable Engineering, selected the route by considering multiple factors, including: (1) shortest distance to community, (2) avoiding dense jungle, and (3) avoiding steep hills and declines which could compromise the hydraulic feasibility of the system. 12/12/2014 Page: 9/35 3.2.1 Survey Methods A survey of the proposed aqueduct route was performed to determine whether the system was hydraulically feasible. The team used a variety of surveying tools, including a Garmin eTrex 10 GPS unit, a Nikon Forestry Pro Laser Rangefinder, a CST Abney Level, and a 100-foot open reel measuring tape. The topography between two waypoints was determined with the rangefinder and a green folder functioning as a target. The horizontal distance, vertical distance, slope or actual distance, and the angle between points were recorded from the rangefinder. Foresight and backsight readings were performed and confirmed for each waypoint to ensure accuracy, and results were later averaged to define the elevation profile of the route. When waypoints were closer than the operating range of the rangefinder, the measuring tape was used to determine the actual or slope distance between waypoints and an Abney level was used to measure the angle between points. The latitude, longitude, and elevation of each waypoint were recorded using the GPS. Elevation data was not used in analysis for this project, with the exception of approximating the elevation at the spring source. Map processing was performed in ArcGIS® and converted to .kml (Google Earth®) files for viewing and printing. 3.2.2 Survey Results A total of 118 waypoints were created to survey the proposed aqueduct route. A summary of survey data, including GPS coordinates of waypoints, can be found in Appendix D. Figure 9 on page 11 shows the location of waypoints and the aqueduct route in relation to the community. Figure 10 on page 12 shows a more detailed view of the proposed aqueduct route and location of waypoints in section 1 of the community. The proposed route extends westward from Guillermo’s house before turning north to utilize an existing culvert that will allow the aqueduct to cross the road and reach the rest of section 1. 12/12/2014 Page: 10/35 Figure 9. Map of the proposed aqueduct route with waypoints. 12/12/2014 Page: 11/35 Figure 10. Map of proposed aqueduct route through section 1 of the community. Figure 11 on page 13 shows the elevation profile for the survey route from the spring source to the school. The elevation values are relative to the GPS-measured elevation at the source, 894 feet AMSL. The last point in the route and proposed aqueduct, the school, has an elevation of about 305 feet. This equates to a net decrease in elevation of 589 feet along the route. The total length of the route is about 1.77 miles, or 1.72 miles in horizontal distance from the source. 12/12/2014 Page: 12/35 900 800 Elevation AMSL (ft) 700 600 500 400 300 200 100 0 0 0.2 0.4 0.6 0.8 1 1.2 1.4 1.6 1.8 Horizontal Distance from Source (miles) Figure 11. Elevation profile of the proposed aqueduct path. The blue dots represent locations of waypoints. 3.3 Water Demand Duell conducted a survey of each house in Bajo Gavilan to determine the water demand of the community. Duell asked each household how much water they use each day (or would like to use, if they do not currently have access to water) in terms of five gallon buckets [8]. Residents reported an average use of roughly 35 gallons per person per day [8]. Water demand for the school is assumed to be 2.5 gallons per schoolchild per day, based on World Health Organization (WHO) ideal target uses [8]. There are currently 60 residents in section 1 of the community, and an estimated 33 schoolchildren in the three sections combined [8]. Using these numbers and the growth rate for Panama, the water demand for section 1 of Bajo Gavilan in 20 years is 2.05 gpm. This demand is well below the available flow rate of 6.9 gpm measured at the spring source, which would allow the spring to continue to supply the community with adequate water as the population increases in the future. 12/12/2014 Page: 13/35 4.0 System Modeling The proposed aqueduct system was modeled using two water distribution system software programs, EPANET [1] and Neatwork [2]. Both are available as a free download. EPANET is well-recognized among water distribution professionals. Neatwork is less recognized, and is mainly used by volunteers in the Peace Corps because it simplifies and optimizes rural gravityfed water distribution systems. The major system components between the spring source and storage tank are strictly based on the EPANET model, as Neatwork is not applicable for this section of the system. EPANET and Neatwork were used in tandem to optimize and simulate conditions in the portion of the system downstream of the storage tank. 4.1 EPANET EPANET was used to model the proposed aqueduct, from the spring source to the community and school. English units were used for all inputs and analysis, and the Hazen-Williams equation was selected for EPANET to use in energy loss calculations. The model was constructed using information gathered in the topographical survey. 4.1.1 Methods Latitude, longitude, and elevation data for each waypoint in the survey was inputted into EPANET as a junction in the water system. The actual distance between waypoints defined the length of pipe that connects junctions in the model. A reservoir was used to model the spring source at the first waypoint, and a flow control valve set at 6.9 gpm was included immediately downstream to ensure the flow out of the reservoir appropriately represented the flow rate of the spring source. A tank was added at waypoint 80, the location of the storage tank that was initially selected during this site assessment. Tapstands for all eight houses and the school were also included. The calculated future demand for the community was divided amongst the houses and the school according the number of people in each building. These demands were inputted into EPANET to model the demands of individual households in the community. A demand pattern was defined to predict the use of water throughout the day at each home, and a separate demand pattern was used to predict water use at the school. These demand patterns, along with all other model inputs, are shown in Appendix E-1. After initial analysis, the pipes upstream of the storage tank were adjusted to a diameter of 1.5” to make them appropriate for the required flow, and analysis of the complete system was used to determine the locations of break pressure tanks. Pipe sizes downstream of the storage tank were optimized using Neatwork. These pipe sizes were inputted into the EPANET model, and analysis was run to determine if there would be any issues with these pipe sizes. 12/12/2014 Page: 14/35 4.1.2 Results Results obtained are specific to system specifications of: (1) a pipe diameter of 1.5” between the spring and the storage tank and (2) a storage tank at waypoint 80. Break pressure tanks were determined to be necessary at waypoints 32, 39, 56, and 60. Pipe diameters varied downstream of the storage tank and were determined from Neatwork. The primary outputs obtained from the EPANET model are: (1) pressure at nodes and (2) flows through pipe segments. A complete set of outputs is provided in Appendix E-2. Figure 12 shows the system map with pressure and flow outputs from EPANET at two different times (12:00 AM and 12:00 PM) throughout the 24-hour analysis period. a) b) Figure 12. Pressure at nodes and flow in pipes at (a) 12:00AM and (b) 12:00PM during the 24-hour analysis period. Figure 13 on page 16 shows the water elevation in the storage tank. The tank is defined as empty at the start of the simulation, and is shown to quickly fill and stay almost completely full throughout the day. This demonstrates that the spring source will have adequate flow to meet the needs of the community for the foreseeable future. 12/12/2014 Page: 15/35 Figure 13. Water elevation in storage tank over the 24-hour analyis period. The EPANET model showed no cause for concern in the portion of the aqueduct downstream of the storage tank, and indicated the pipe sizes chosen by Neatwork would be sufficient. 4.1.3 Discussion The final model predicts negative pressures in a few locations along the system due to the assumptions inherent in EPANET’s analysis. The most common occurrence of these negative pressures is within the first few junctions downstream of break pressure tanks. These negative pressures can be interpreted as an indication that the pipe will not be flowing full because these sections all have steep downhill slopes. This is not a concern for this system, as these instances do not affect the ability of the water to continue to flow down the aqueduct. One instance of negative pressure, however, occurred immediately downstream of the reservoir and flow control valve used to model the spring source, between waypoint 2 and waypoint 12. After referencing the elevation profile, this portion of the system did not raise any concerns about the ability of the water to flow through this section. Calculations were performed to confirm that the available head is sufficient to push the water over the first peak at waypoint 11. These calculations can be found in Appendix E-3. There are also time periods that show a flow of 0 gpm through portions of the aqueduct upstream of the storage tank. The system is gravity-fed and the spring source does not stop flowing, so there is no reason for this zero-flow condition to occur. This is interpreted as another instance where the pipe would not flow full, and is considered a flaw in the model. 4.1.4 Limitations Despite its widespread use, EPANET’s analysis is not without limitations. Though EPANET’s modeling assumes the system is pressurized, with all pipes flowing full, this will not always be the case in a system like the one proposed, and results must be interpreted accordingly. In addition, the program does not allow for simple modeling of surface water sources, such as the 12/12/2014 Page: 16/35 spring that will be utilized for this system. For this reason, it was necessary to adapt the model to use a reservoir and flow control valve in order to model the spring source. This program also does not have a built-in option to model break pressure tanks. These tanks are modeled as standard tanks, sized according to the proposed design. Finally, EPANET models the system in equilibrium. This restricts the user’s ability to predict behavior immediately after construction, or after any changes in the system (including opening and closing of taps), and requires educated assumptions on how the system will respond to any abrupt changes. 4.2 Neatwork Neatwork was used to optimize and simulate the system downstream of the storage tank, located at waypoint 80. The program operates in two modules: topography and design. The metric system is used for all inputs, analysis, and outputs. The water distribution system is simplified into nodes and arcs in the topography module. A node is a location where the main line branches to a home, and an arc is the length between nodes (referred to as pipes in EPANET). 4.2.1 Methods The elevations of the nodes relative to the storage tank and arc lengths between nodes were inputted into the program. Figure 14 shows the tree view or conceptual model of the system from the topography file. Figure 14. Tree view of the proposed aqueduct system in Neatwork. Blue boxes represent faucets and gray boxes represent nodes which are also survey waypoint numbers. Next, the topography file was exported to the design module. The design includes various inputs including available hardware (e.g., locally available pipe diameters and diameters of orifices in flow reducers), model parameters (e.g., fraction of open faucets, service quality, target flow rate, water temperature, pipe lengths, orifice coefficient, and faucet coefficient), pipe diameter constraints for any arc lengths, and load factors. Refer to the Neatwork user’s guide ([2] and available on CD) for a thorough discussion on the definition and assumptions involved with these inputs. Appendix F-1 provides all inputs (topography and design) used in Neatwork. The topography (BajoGavilan.tpo) and design (BajoGavilan.dsg) files are also available on CD. Outputs from the Neatwork model include: (1) an optimization of pipe and orifice diameters and (2) a simulation environment. The simulation environment accepts inputs such as number of simulations, fraction of open faucets, critical flows (high and low), target flow, orifices in use (ideal or commercial), and type of simulation (Monte-Carlo sampling, individual faucets, or user-defined). Refer to the user’s guide [2] for a thorough discussion of the definitions and 12/12/2014 Page: 17/35 assumptions involved with these inputs. Simulation outputs include: (1) flows at faucets, (2) percentile flows at faucets, (3) speed in pipes, and (4) pressure at nodes. The minimum, maximum, and average flow rates at each tap are provided along with the variability of flow (standard deviation divided by mean) in flows at faucets. These values are provided based on the number of simulations. Flows at faucets also predicts the number of failures, or the number of no-flow occurrences at a tap. The percentile at faucets output provides more detailed information on the distribution of flow rates predicted in the simulation. 4.2.2 Results Multiple designs were created and simulated in Neatwork to optimize the pipe and orifice diameters in the system. The final optimized pipe diameters are shown in Table 3. All other outputs are provided in Appendix F-2. Table 3. Optimized pipe diameters for the proposed aqueduct system. Segments/Arcs PVC Pipe Waypoint 80 (storage tank) to 92 1.5” SDR 26* Waypoint 92 to 116 1” SDR 26 Waypoint 116 to 118 (school) 0.5” SDR 13.5 Main line to all tapstands 0.5” SDR 13.5 *The pipe diameter between Waypoint 80 and 92 was determined from EPANET. Simulation results of this design revealed that the average flow rate for all tapstands is 3.17 gpm. The smallest average flow rate was experienced at Rene’s house, with a flowrate of 3.04 gpm, and the largest average flow rate was experienced at Roza’s house, with a flow rate of 3.48 gpm. 4.2.3 Limitations Neatwork is designed specifically for cost and resource limited gravity-fed water distribution systems. The program fails to incorporate the conveyance line from the source to the tank and does not account for storage tank design or size. The program should primarily be used for branched systems, as loops are difficult to design and simulate. The program’s design module is mainly focused on reducing costs. However, this method can produce system designs which are difficult to construct and repair if pipe diameters vary from node to node. The design used for this project constrained the pipe diameter in the majority of arc lengths to avoid this issue. Another limitation to the program is the uncertainty of inputs such as fraction of open faucets, service quality, orifice coefficient, and faucet coefficient. These inputs are difficult to anticipate and/or require further scientific research in order to make educated guesses for their values. The majority of these inputs were left at the default values, which may or may not be representative of true system behavior. 12/12/2014 Page: 18/35 5.0 Proposed Design The proposed aqueduct system can be split into four major elements: (1) one low-profile spring box, (2) a buried aqueduct line, (3) waypoint 80, and (4) household access. The aqueduct line includes a buried PVC pipeline, one air release valve, two stream crossings, four break pressure tanks, and nine tapstands. Waypoint 80 is the location for the in-line chlorinator, one storage tank, and one break pressure tank. Figure 15 below and Figure 16 on page 20 show the locations of these components on the route map and elevation profile. Figure 15. Map with locations of system components and pipe diameters. 12/12/2014 Page: 19/35 900 800 BPT Elevation AMSL (ft) 700 ARV 600 ILC, ST, BPT S 500 400 300 SC 200 100 0 0 0.5 1 Horizontal Distance from Source (miles) 1.5 Figure 16. Summary of system components. S=source, SC=stream crossing, ARV=air release valve, BPT=break pressure tank, ILC=in-line chlorinator, and ST=storage tank. The following subsections describe the basic design recommendations for all components. Further recommendations on how these components should be constructed, installed, and maintained can be found in Appendix L (Construction and Maintenance Manual). Illustrations of components are provided in Appendix M. Detailed engineering drawings for each component are located in Appendix N. 5.1 Spring Box A spring box will be constructed at the spring source to collect water as it exits the hillside. A low-profile spring box is required due to stipulations mandated by WaterLines. Low-profile spring boxes are a relatively new approach to spring box construction, but are preferred because they enclose the area surrounding the source and reduce the risk of water contamination from runoff. Unlike traditional spring boxes, low-profile spring boxes are ideally installed to match the topography of the site. This ensures that the spring will be a long-term and sustainable water source for the community. Figure 17 on page 21 shows a schematic of a low-profile spring box. The spring box capture zone (a and b in Figure 17) extends back to the “spring eyes,” where the water exits the ground, to maximize water capture into the spring box (e in Figure 17). 12/12/2014 Page: 20/35 Figure 17. Low-profile spring box and spring capture zone schematic [9]. The team recommends complete excavation of the hillside from both the side and top spring entrances to develop the capture zone. This work will likely be done by hand with shovels, picks, and machetes due to limited resources. 5.2 Aqueduct Line The main aqueduct line will consist of several diameters of PVC pipe, including 1.5” SDR 26, 1” SDR 26, and 0.5” SDR 13.5 (Table 3 on page 18). It will convey water from the low-profile spring box to section 1 of the community, terminating at the school. The total length of this pipe is 1.77 miles, covering 1.72 miles in horizontal distance. The portions of the aqueduct from the spring box to the storage tank and from the storage tank to waypoint 92 will use 1.5” SDR 26 PVC. One inch SDR 26 PVC will be placed between waypoint 92 and waypoint 116, and 0.5” SDR 13.5 PVC from waypoint 116 to the school. Pipe diameters downstream of the storage tank were determined by designing, simulating, and optimizing the system in Neatwork. These diameters were deemed adequate with further analysis in EPANET. Figure 18 on page 22 depicts the diameter of all pipes used in the system. 12/12/2014 Page: 21/35 Figure 18. System pipe diameters (from Table 3) in section 1. Not pictured is the rest of the main aqueduct line, which is 1.5” SDR 26. The aqueduct should be buried due to a number of environmental and social factors such as: (1) the presence of UV light, which can weaken the plastic and reduce durability, (2) human and animal traffic, which could damage the line if stepped on, and (3) human tampering. The team recommends that the entire pipeline be buried approximately 1.5’ below the ground surface at all times to maximize the durability of the system. Similar to the capture zone of the spring box, construction will require excavation by hand. The pipe will be laid in the trench and backfilled with native soils. In October 2014, the community of Bajo Gavilan constructed and buried an extension to the existing aqueduct [10], and this previous experience will be instrumental in the success and efficiency of this project. Figure 19 on page 23 is a photo taken by Duell during the previous work, and shows what a trench with pipe will look like before backfilling. 12/12/2014 Page: 22/35 Figure 19. Photograph showing a pipe within a trench at Bajo Gavilan. The trench will be filled to bury and protect the pipe [10]. 5.2.1 Air Release Valve Air block analysis was performed to determine if air blocks could occur along the aqueduct route and prevent water flow through the system. Although the topography along the route varied significantly, the numerous locations of break pressure tanks addressed many potential air blocks, since these tanks will relieve air pressure. Two potential locations for air blocks were identified: (1) the segment prior to the first break pressure tank at waypoint 32, and (2) the segment after the last break pressure tank at waypoint 80. Calculations for the first potential air block can be found in Appendix G. The process was repeated for the second potential air block. According to the analysis, an air block will occur at the first segment, requiring an air release valve to be installed at the highest point in this segment (waypoint 11). The installation of the air release valve will ensure that water can flow through this segment and continue to the community. The other potential air block, downstream of the storage tank, will not require an air release valve. The air release valve that is recommended for the proposed system is the Geoflow Air Vent/Vacuum Relief valve (Part No. APVBK100m), as shown in Figure 20 on page 24. The valve costs $22 and can be purchased through Geoflow. Specifications and the price for this valve and other accessories are provided in Appendix H. This valve uses a floating ball mechanism to release air in the system. They are specifically manufactured for relieving air in subsurface (buried) drip irrigation systems in commercial and residential applications. An air vent box (Part No. AVBOX-6), is also available from Geoflow, which will enable the valve to 12/12/2014 Page: 23/35 remain buried and to protect the valve from tampering or other disturbances. The team recommends purchasing two valves and boxes, so there is a replacement option. Figure 20. Geoflow Air Vent/Vacuum Relief valve ([11], Appendix H). Since these valves are not locally available and must be purchased online, instructions on how to build an affordable do-it-yourself (DIY) air release valve are also included. The DIY release valve uses the same floating ball mechanism seen in the Geoflow valves. Instructions on how to create the valve are included in Appendix L. 5.2.2 Stream Crossings Two streams were encountered along the aqueduct route that warranted specific design considerations. The first crossing, located at waypoint 48, is 53’ wide and the second stream crossing, at waypoint 71, is 62’ wide. The team recommends that the aqueduct be buried beneath stream crossings for maximum reliability. Burial depth should be at least 2’ below the deepest point of the stream bed. Other concepts such as suspension crossings were considered, but the burial of the aqueduct is recommended to protect the system from falling trees or pipe failure due to stress. The design of these stream crossings is meant to be general so it can be applied at multiple crossings. Since the flow and morphology of the streams encountered in the assessment are similar, adapting the design to both or other crossings should not be a concern. The main purpose of the design is to protect the aqueduct from potential scouring, which can expose the pipe to fast flowing water and debris that can exert large and potentially destructive forces in the direction of stream flow. Scouring should not occur and the pipe should be protected from any forces in the stream if the pipe is buried at the specified depth. Regardless, galvanized iron pipe (1.5” diameter) will be used for stream crossings to protect against these forces, should they occur. In addition, concrete 12/12/2014 Page: 24/35 anchors will be buried 10’ inland from stream banks to prevent the pipe from moving in the direction of stream flow. Figure 21 shows a schematic of the general stream crossing design. Figure 21. Schematic of stream crossing methods (Appendix N). 5.2.3 Break Pressure Tanks Break pressure tanks prevent pipe failure by resetting the pressure in the pipes to atmospheric pressure. EPANET was used to determine the number and location of break pressure tanks needed in the system by observing modeled pressures at junctions throughout a 24-hour period. The maximum working pressure for the 1.5” SDR 26 PVC pipe is 160 psi at 73°F. This working pressure is reduced at elevated temperatures, so an operating temperature of 90°F was assumed. For this temperature, the working pressure was de-rated by a factor of 0.75 [12], and the maximum working pressure for this system was calculated to be 120 psi. However, to be conservative, any junction that reached a pressure above 100 psi was deemed a risk, and break pressure tanks were placed at appropriate locations to relieve these high pressures. Four break pressure tanks were deemed necessary for the system, located at waypoints 32, 39, 56, and 60. The first, at waypoint 32, reduces the pressure before it has a chance to build and prevents siphoning over the first few peaks in the system. The second, at waypoint 39, relieves pressure along the first steep downhill portion of the system, from waypoint 32 to waypoint 48. The third, at waypoint 56, reduces the pressure before the second steep decline, from waypoint 56 to waypoint 72. The fourth, at waypoint 60, relieves additional pressure along this decline, and is necessary due to the possibility of static pressure when there is no flow through the aqueduct, such as when a valve at the storage tank is closed. An additional break pressure tank is located at waypoint 80, the same location of the storage tank. This break pressure tank is required in case there is a need to bypass the storage tank, for maintenance or other reasons. Further discussion of this location is provided in Section 5.3. 12/12/2014 Page: 25/35 Figure 22 shows the locations of all five break pressure tanks. Break pressure tanks were placed at the least sloped portion of their respective declines to simplify the design and construction of the tanks. The design of break pressure tanks is relatively arbitrary, as there are no strict criteria that govern them. According to Niskanen [13], the dimensions of the tank are primarily influenced by the size of fittings within it. Fittings are not required for the proposed break pressure tanks in Bajo Gavilan, so the dimensions are flexible. The following design is recommended, as shown in Figure 23. 900 800 Elevation AMSL (ft) 700 600 500 400 300 200 100 0 0 0.2 0.4 0.6 0.8 1 1.2 1.4 1.6 1.8 Horizontal Distance from Source (miles) Figure 22. Locations of break pressure tanks on system elevation profile. Clean-out Overflow Outflow a) b) Inflow Figure 23. (a) Isometric and (b) top views of the break pressure tank (Appendix N). The break pressure tank can be constructed of cinder blocks, as shown in Figure 23. A baffle will be installed within the tank to promote sedimentation in the first chamber and to regulate flow 12/12/2014 Page: 26/35 into the second chamber. The inflow pipe is placed at the top of the tank, and an outflow pipe is placed at the bottom of the break pressure tank to allow water to continue through the system. The overflow pipe placed at the top of the break pressure tank will prevent pressurization and will be routed to transport excess flows away from the tank structure. A cleanout pipe will be placed on the inlet side of the tank to remove any sediment that may collect in the tank. 5.3 Waypoint 80 Waypoint 80 is a critical location for the aqueduct system because it will consist of the in-line chlorinator, the storage tank, and a break pressure tank. A reinforced concrete pad is recommended to serve as a foundation for these components. Figure 24 illustrates the recommended configuration of these components at this location. Figure 24. Configuration of in-line chlorinator, storage tank, and break pressure tank at Waypoint 80 (Appendix N). 5.3.1 In-line chlorinator The water quality of the proposed system can be ensured by chlorination treatment with an inline chlorinator. Reasonable Engineering recommends using the MINSA (Ministerio de Salud de la República de Panama) in-line chlorinator, which is locally available for $25 [14]. Treatment is initiated when a tablet of calcium hypochlorite is dropped into the cylinder; tablets are available for $2 each [14]. Figure 25 on page 28 shows a schematic and photographs of the chlorinator. Information regarding purchase, installation, and operation can be found in the User Field Guide for MINSA’s In-line Chlorinator ([14] and available on the CD). The in-line chlorinator is installed prior to the storage tank and water flow through the component must be stopped during installation and maintenance tasks (e.g., clean outs and addressing other problems that may arise). As a result, a bypass configuration is recommended and can be seen in Figure 24. 12/12/2014 Page: 27/35 a ) b ) Figure 25. (a) Schematic and (b) photographs of MINSA in-line chlorinator [14]. The effectiveness of chlorine treatment is determined by the C•t (Ct) method, where C is the free chlorine concentration and t is the total contact time [14]. Ct requirements for the destruction of various pathogens are provided in Yoakum [14]. The target Ct value should be equal to or greater than the largest Ct requirement for pathogens, or 35 mg Cl2⋅min/L (E. Histolytica). We recommend a more conservative value of 40 mg Cl2⋅min/L based on Yoakum [14]. Total contact time can be calculated using the step by step instructions in Yoakum [14]. Example calculations are provided in Appendix I. The determination of chlorine concentration in the water is performed by Hach color wheels, which are available from MINSA [14]. The Ct value is calculated by multiplying total contact time with free chlorine concentration. If the value is below the target value of 40 mg Cl2⋅min/L, the dosage of chlorine tablets must increase, and the process must be repeated until the target value is met without exceeding concentrations that are harmful to human health (concentration should be no more than 5 mg Cl2/L [14]). 5.3.2 Storage and Break Pressure Tank The team recommends using one of the two storage tanks located at the existing aqueduct for the proposed aqueduct in this project (Figure 26 on page 29). The storage tank is a 4,200 L plastic tank manufactured by EcoTank. During the site assessment, the second tank was not being utilized for its intended purpose of collecting overflow as the first tank was less than one-fifth full. Reasonable Engineering recommends that this second tank be disconnected from the existing aqueduct and relocated to waypoint 80. This location was selected during the site assessment, and its feasibility was confirmed by both EPANET and Neatwork. The transport of the tank will be challenging due to distance and terrain, and it is imperative that the tank not be damaged during this process. 12/12/2014 Page: 28/35 Figure 26. Two 4,200 L storage tanks located at the existing aqueduct. A reinforced concrete pad (9.7 x 15.9 x 0.5 ft) will be required at waypoint 80 to provide a level and sturdy foundation for the storage tank and break pressure tank. To ensure the durability of the large concrete pad, it will be reinforced with a steel rebar grid of square foot sections. The fifth break pressure tank will also be located at waypoint 80. The purpose of this tank is to provide an alternative container for water flow during maintenance tasks to protect the downstream system from potentially damaging water pressures. 5.4 House Access Water from the aqueduct will be distributed to all eight homes in section 1 via branching pipelines leading to tapstands with faucets. These pipes will be 0.5” SDR 13.5 PVC. A PVC tee fitting will be required at each branching location (node) of the main line, as shown in Figure 27 below. A shut-off valve will be installed between the mainline and tapstand so the water committee can restrict water access if monthly fees are not paid. Figure 27. Tee fitting to branch off 1.5” mainline to tapstands. 12/12/2014 Page: 29/35 Figure 28 is a photograph of a tapstand being built by Bajo Gavilan residents for the aqueduct extension in October 2014 [10]. The team recommends a similar tapstand design for the proposed aqueduct. Figure 28. Tapstand built in section 3 of the community [10]. 5.5 System Sustainability Reasonable Engineering designed a sustainable aqueduct system that is durable, affordable, easy to maintain, and enduring. These features are highlighted below. Durable – The system was designed with durability in mind to prevent potential failures. The aqueduct is buried to minimize damage from UV radiation and human and animal traffic, and stream crossings were buried instead of suspended to prevent damage from falling trees or large debris in streams. An existing culvert will be utilized for the road crossing instead of a suspended method to prevent damage from road vehicles. Affordable – The system was optimized to reduce costs. For example, EPANET and Neatwork were used in tandem to determine functional yet cost-effective diameters of PVC pipe needed in the system. Repairable/Ease of maintenance – All components were chosen and designed to be easily repaired. A construction and maintenance manual (Appendix L) has been provided to ensure that these components are properly constructed and cared for. Enduring – The water supply and demand rate was measured and calculated for section 1 of the community. The water supply rate measured during the site assessment (6.9 gpm) was similar to flow rates observed in the dry season by Duell. This is much larger than the demand rate of 2.05 gpm, a value that accounts for 20 years of population growth in section 1. 12/12/2014 Page: 30/35 6.0 Cost Estimate and Construction Schedule 6.1 Cost Estimate A summary of the cost estimate for the aqueduct system is shown in Table 4. Materials costs are based upon the prices found in Almirante by Duell. The estimated cost for materials and construction is $7,900 (this does not include the cost of labor, since the labor will be donated by the community). This estimate is just under $8,000, the largest amount WaterLines can allot in one grant to the community. However, it is necessary to include the design and estimate contingency in the cost estimate to account for potential cost increases, missing materials, or unforeseen issues during the construction of the aqueduct. Accounting for contingencies, the total cost estimate for the project is about $9,300. A more detailed cost estimate is provided in Appendix J. Despite the estimated total amounting to more than the $8,000 limit per grant, Reasonable Engineering is optimistic that the proposed aqueduct can be funded by WaterLines. This can be accomplished by splitting the project into multiple and smaller grants. Table 4. Summary of cost estimate for proposed aqueduct. Materials Estimate Main Aqueduct Line Piping $3,200 Air Release Valve $70 Low Profile Springbox $120 Break Pressure Tanks $1,800 Waypoint 80 $1,200 Tapstands $170 In-Line Chlorinator $100 Stream Crossings $500 Estimated Materials Total $7,300 Construction Estimate Labor $2,100 Community Contribution ($2,100) Transportation $600 Estimated Construction Subtotal $600 Total Cost Estimate Materials and Construction $7,900 Design Contingency $800 Estimate contingency $600 Total Cost Estimate $9,300 6.2 Construction Schedule The purchase and ordering of materials for the aqueduct system from stores in Almirante is scheduled to be completed in mid-February, to allow time for the shipping of any materials not readily available in town. It is imperative that the construction of major components (e.g., break pressure tanks, the concrete pad at waypoint 80, stream crossings, spring box) be completed 12/12/2014 Page: 31/35 during the month of March to capitalize on the low rainfall received during this month. This will allow for the proper setting of concrete pads and components and reduced erosion during excavation and construction of the system. Once all major components of the aqueduct line have been constructed by community members, the construction of the pipeline will begin. The community has previous experience in the construction and burial of PVC piping due to the recent work at the existing aqueduct, which will prove useful in the construction of the new aqueduct. It is expected that 20 people will work in shifts throughout a six-hour workday, with a workweek no longer than three days. This is due to the difficulty of the terrain and the limited time community members can dedicate to the aqueduct construction while maintaining their livelihoods. This amounts to approximately 260 crew-hours, or 5,200 man-hours. The complete construction of the aqueduct line is scheduled to be complete by the end of April, resulting in an overall construction period of approximately three months. A Gantt chart that illustrates the construction schedule in detail is provided in Appendix K. 12/12/2014 Page: 32/35 7.0 Conclusion The objectives of this project were: (1) to evaluate the feasibility of the spring source and proposed aqueduct route and (2) to model and design a sustainable aqueduct system. Based on the evaluation of collected data and modeling the system, the system was determined to be feasible. The following design recommendations were provided: Creating a low-profile spring box at the spring source Burying an aqueduct pipeline from spring source to community, including any stream crossings Installing one air release valve Constructing and installing five break pressure tanks Installing an in-line chlorinator Disconnecting one storage tank from the existing aqueduct and transporting it to and installing it at the proposed aqueduct Installing nine tapstands at all eight houses and the schoolhouse These design recommendations can be considered during the installation, construction, and operation of the aqueduct system. The following documents, attached as appendices, are intended to assist in ensuring the success of the project: Cost Estimate (Appendix J) - provides a cost estimate for grant requests and budgeting Construction Schedule (Appendix K) - provides an estimate of the time required to construct and install the aqueduct Construction and Maintenance Manual (Appendix L) - provides assistance for constructing and maintaining components of the aqueduct Illustrations of components (Appendix M) – provides a visual layout for each component that is easy to comprehend Engineering Drawings (Appendix N) - provides recommended dimensions and specifications for components Overall, this report will provide PCV Christina Duell and the community of Bajo Gavilan with essential information and analysis that can be considered in the request for funding to construct the proposed gravity-fed water distribution system. Once in operation, the system should be a solution to the water availability and quality concerns currently present in section 1 of the community. 12/12/2014 Page: 33/35 8.0 References [1] Rossman, L.A. 2000. EPANET 2: User Manual. EPA/600/R-00/057. Available on CD. [2] Agua Para la Vida (APV). Unknown Date. Neatwork: A user guide. Link: http://neatwork.ordecsys.com/dl/neatworkuserguide.pdf?q=neatwork/dl/neatworkusergui de.pdf. Accessed on 11/4/2014. Also available on CD. [3] Wikipedia. 2014. “Almirante, Bocas del Toro.” Link: http://en.wikipedia.org/wiki/Almirante,_Bocas_del_Toro. Accessed on 11/2/2014. [4] World Meteorological Organization (WMO). 2014. “Climate data for Bocas del Toro, Panama (1971-2000).” Link: http://worldweather.wmo.int/en/city.html?cityId=1245. Accessed on 11/2/2014. [5] Minority Rights Group International. 2008. Guaymi (Ngobe-Bugle). Link: http://www.minorityrights.org/4209/panama/guaymi-ngobebugle.html. Accessed on 11/3/2014. [6] Duell, C. 2014. “Community Analysis and Development Plan.” Received via Email communication. [7] United States Environmental Protection Agency (USEPA). 2014. National Primary Drinking Water Regulations. Link: http://water.epa.gov/drink/contaminants/. Accessed on 12/3/2014. [8] Duell, C. 2014. “WaterSTAR Report: Aqueduct Analysis for Bajo Gavilán, Panamá.” Received via Email communication. [9] Jones, E.K. 2014. Improvements in Sustainability of Gravity-Fed Water Systems in the Comarca Ngäbe-Buglé, Panama: Spring Captures and Circuit Rider Model, a master’s report. Michigan Technological University, Houghton, MI. Link: http://www.mtu.edu/peacecorps/programs/civil/pdfs/JONESE_MSReport.pdf. Available on CD. [10] Duell, C. 2014. Aqueduct Installation and Water Committee Seminars. Link: http://christinainpanama.blogspot.com/2014/09/aquduct-installation-and-water.html. Accessed on 11/4/2014. [11] Geoflow. 2011. Air Vent Valves. Link: http://www.geoflow.com/wastewater/w_pdfs2012products/AirVentValves.pdf. Accessed on 11/16/2014. [12] Georg Fischer Harvel. 2012. Product Specifications: PVC SDR Series Pipe. Link: http://www.harvel.com/sites/www.harvel.com/files/documents/SpecificationsPVC_SDR_Series.pdf. Accessed on 11/16/2014. [13] Niskanen, R.W. 2003. The Design, Construction, And Maintenance of a Gravity-Fed Water System In The Dominican Republic, a thesis report. Michigan Technological University, Houghton, MI. Link: http://www.mtu.edu/peacecorps/programs/civil/pdfs/matt-niskanenthesis-final.pdf. Also available on CD. [14] Yoakum, B. 2013. User Field Guide for MINSA’s In-Line Chlorinator. Link: http://usfmi.weebly.com/uploads/5/3/9/2/5392099/users_manual_for_minsa_inline_chlorinator.pdf. Also available on CD. 12/12/2014 Page: 34/35 9.0 Appendices Appendix A: Appendix B: Appendix C: Appendix D: Appendix E: E-1: E-2: E-3: Appendix F: F-1: F-2: Appendix G: Appendix H: Appendix I: Appendix J: Appendix K: Appendix L: Appendix M: Appendix N: Detailed Methods Flow rate data Water quality data Summary of survey data EPANET EPANET Inputs and Assumptions EPANET Outputs EPANET Supporting Calculations Neatwork Neatwork Inputs and Assumptions Neatwork Outputs Air Block Analysis Geoflow Air Release Valve Chlorination calculations Cost Estimate Construction Schedule Construction and Maintenance Manual Illustrations of components Engineering drawings 12/12/2014 Page: 35/35 Appendix A: Detailed methods Appendix A: Detailed methods Flow Rate Measurement Methods Flow rate was measured using the volume-time method. Using the weir constructed at the source, water was funneled into a container of known volume, and the time elapsed to fill the container was recorded. On 8/15/2014, a one-liter Nalgene bottle was used to measure the flow rate. Measurements were repeated on 8/19/2014 using a five-liter container. Multiple individuals timed the process and at least three trials were performed to improve accuracy. Water Quality Testing Methods The water quality of the source was tested using 3M Petrifilm E. Coli/Coliform Count Plates (St. Paul, MN, USA). Three samples were taken to increase the accuracy of the test. According to 3M guidelines, 1 mL of the sample water should be inoculated onto the plates which must be incubated for 24 +/- 2 hours at 35° C in a horizontal position before being enumerated. Inoculation of plates was performed using a 1 mL plastic dropper. Due to the lack of controlled conditions for incubation, plates were incubated by placing them next to an individual’s body (i.e., placing them in a pocket or between the body and waistband). Plates were placed between two pieces of cardboard, and no more than three plates were incubated at one time in order to maintain consistent temperatures among plates. After 24 hours of incubation, the plates were enumerated. E. coli colonies appear blue with gas bubbles, and non E. coli coliform colonies appear red with gas bubbles. Survey Methods A survey of the proposed aqueduct route was performed to determine whether the system was hydraulically feasible. The survey used relatively few tools, including a Garmin eTrex 10 GPS unit (Olathe, KS, USA), a Nikon Forestry Pro Laser Rangefinder (Melville, NY, USA), a CST Abney Level (Watseka, IL, USA), and a 100-foot open reel measuring tape. The survey began at the source and the GPS was used to mark the first waypoint. The next waypoint along the route was identified based on the availability of clear sight lines through vegetation and the distance between waypoints, which was limited to distances between 30 feet and 1,000 feet, the operating range of the rangefinder. The rangefinder was used to determine the horizontal distance, vertical distance, slope/actual distance, and the angle between the two waypoints. An example external display for this reading is shown below. All of the parameters provided in the external display were recorded in a field notebook. Example external display of Nikon Forestry Pro rangefinder where 1=units, 2=vertical distance, 3=slope or actual distance, 4=horizontal distance, and 5=angle. A bamboo stake with a green folder as a target was placed at the second waypoint to improve consistency and accuracy of the rangefinder data. Another stake (same target height) was placed at the original waypoint so the “shooter” could steady the rangefinder. Foresight and backsight readings were confirmed between all waypoints to ensure accuracy, and these values were later averaged to define the topography of the route. A measuring tape was used to determine the slope/actual distance between waypoints if it was less than 30 feet, and an Abney level was used to determine the angle between targets. Trigonometric functions were used to calculate horizontal distance given slope distance and angle. Similar to the rangefinder, a foresight and backsight was performed and later averaged. The GPS was used to record the latitude, longitude, and elevation at each waypoint. The waypoints were recorded using the waypoint averaging function. Each point reached 100% sample confidence before saving. Sample confidence can depend on a variety of environmental conditions, including cloud cover, precipitation, and foliage. Elevation data from the GPS was not used for any analysis for this project except to approximate the elevation of the spring source. Garmin BaseCamp software was used to export GPS location data to a .gpx file, which was converted to a .kml (Google Earth) file. A free online software tool called “Kml2Shp” [1] was used to convert .kml to .shp files for ArcMap processing. A free trial version of an ArcMap toolbar called “ET GeoWizards” [2] was used to create a line or track that connects the waypoints. “Shp2kml 2.0” [3] was used to convert .shp back into .kml files for easier viewing and printing options. Water Demand Calculations There are currently 60 residents in section 1 of the community, based on a separate survey by Duell. The number of schoolchildren in the community is estimated to be 33. Using these numbers, the daily water demand can be calculated as follows: [(60 residents * 35 gallons/person/day) + (33 schoolchildren * 2.5 gallons/schoolchild/day)] * (1 day/1440 minutes) = 1.516 gpm The demand is far below the flow measured at the source, and shows that the source should be able to provide adequate water to the community year round. The demand was recalculated to account for population growth in the next 20 years to ensure the aqueduct is sustainable. The growth rate is 1.503%, and this was assumed to be applicable to both the population and the number of schoolchildren. The population in Bajo Gavilan in 20 years can be calculated as follows: 60 residents * (1 + 0.01503)20 = 81 residents 33 schoolchildren * (1 + 0.01503)20 = 45 schoolchildren Based on these new values, the water demand for section 1 of Bajo Gavilan in 20 years can be calculated as follows: [(81 residents * 35 gallons/person/day) + (45 schoolchildren * 2.5 gallons/schoolchild/day)] * (1 day/1440 minutes) = 2.05 gpm This demand of 2.05 gpm is still well below the available flow of 6.9 gpm measured at the spring source, so the spring should continue to be able to supply the community with adequate water as the population increases. References [1] Zonum Solutions. 2010. Kml2Shp. Link: http://www.zonums.com/online/kml2shp.php. [2] Tchoukanski, Ianko. 2014. ET GeoWizards. Link: http://www.ianko.com/ET_GeoWizards/gw_main.htm. [3] Zonum Solutions. Unknown date. Shp2kml 2.0. Link: http://www.zonums.com/shp2kml.html. Appendix B: Flow rate data Appendix B: Flow rate data Location Date 8/15/2014 Proposed Spring Source Average: 8/19/2014 Average: Existing Aqueduct: Storage Tank 8/17/2014 Average: Time Volume Flow Rate Flow Rate s L L/s gpm 1.94 1 0.52 8.2 2.09 1 0.48 7.6 2.09 1 0.48 7.6 1.88 1 0.53 8.4 1.88 1 0.53 8.4 2.08 1 0.48 7.6 2.17 1 0.46 7.3 2.0 1.0 0.5 7.9 12.06 5 0.41 6.6 12.02 5 0.42 6.6 11.21 5 0.45 7.1 11.06 5 0.45 7.2 12.33 5 0.41 6.4 12.14 5 0.41 6.5 10.4 4.4 0.4 6.9 40.87 5 0.12 1.9 40.93 5 0.12 1.9 40.76 5 0.12 1.9 40.82 5 0.12 1.9 28.3 4.9 0.2 3.9 Appendix C: Water quality data Appendix C: Water quality data Amount Observed E. Coli Non E. Coli Coliform 4 41 Spring Source (8/15/14) 1 52 1 46 Average 2 46.3 0 1 Spring Source (8/19/14) 1 1 1 2 Average 0.67 1.3 0 6 Existing Aqueduct 0 2 0 4 0 4 Average 34 tntc Changuinola River 37 tntc Average 35.5 50 16 tntc America's House 19 tntc Average 17.5 50 16 tntc Julia's House 10 tntc Average 13 50 Location Appendix D: Summary of survey data Appendix D: Summary of survey data Waypoint(s) 1 2 3 4 5 6 7 8 9 10 11 12 13 14 15 16 17 18 19 20 21 22 23 24 25 26 27 28 29 30 31 32 33 34 35 36 37 38 39 Latitude Longitude N 9.260418 9.260436 9.260513 9.260514 9.260509 9.260491 9.260579 9.260671 9.260769 9.260936 9.261062 9.261096 9.261154 9.261259 9.261344 9.261375 9.261372 9.261438 9.261472 9.261531 9.261738 9.261831 9.262055 9.262133 9.262291 9.262325 9.262452 9.26253 9.262592 9.262769 9.262972 9.263006 9.263161 9.263273 9.263392 9.263434 9.2636 9.263788 9.263891 W -82.5071 -82.507 -82.5069 -82.5069 -82.5066 -82.5063 -82.5061 -82.5057 -82.5055 -82.5052 -82.5051 -82.505 -82.5049 -82.5048 -82.5046 -82.5046 -82.5046 -82.5045 -82.5044 -82.5042 -82.5042 -82.5042 -82.5043 -82.5043 -82.5041 -82.5041 -82.5039 -82.5038 -82.5037 -82.5036 -82.5035 -82.5035 -82.5034 -82.5033 -82.5031 -82.5031 -82.503 -82.5029 -82.5028 Segment 1 1 to 2 2 to 3 3 to 4 4 to 5 5 to 6 6 to 7 7 to 8 8 to 9 9 to 10 10 to 11 11 to 12 12 to 13 13 to 14 14 to 15 15 to 16 16 to 17 17 to 18 18 to 19 19 to 20 20 to 21 21 to 22 22 to 23 23 to 24 24 to 25 25 to 26 26 to 27 27 to 28 28 to 29 29 to 30 30 to 31 31 to 32 32 to 33 33 to 34 34 to 35 35 to 36 36 to 37 37 to 38 38 to 39 Average Average Cumulative Average Elevation Actual Distance Horizontal Distance Horizontal Distance Vertical Distance Angle AMSL ft ft miles ft (positive = up) * ft 32.5 49.5 32.5 51.0 146.5 129.0 98.5 80.0 83.0 69.0 46.5 57.5 52.0 46.5 50.5 33.0 33.0 43.0 57.0 69.0 99.0 57.5 33.0 66.0 52.5 68.0 33.0 50.5 81.0 70.0 25.2 60.0 55.0 63.0 32.0 79.0 90.0 51.0 32.5 48.0 32.5 51.0 145.5 129.0 98.0 80.0 83.0 67.5 45.5 52.5 45.0 39.0 41.3 31.5 33.0 37.5 54.0 69.0 98.5 57.0 31.5 65.5 51.5 62.5 32.5 50.5 81.0 69.0 2.5 59.5 49.8 61.0 30.0 74.0 89.0 51.0 0 0.01 0.02 0.02 0.03 0.06 0.08 0.10 0.12 0.13 0.15 0.15 0.16 0.17 0.18 0.19 0.19 0.20 0.21 0.22 0.23 0.25 0.26 0.27 0.28 0.29 0.30 0.31 0.32 0.33 0.34 0.34 0.36 0.36 0.38 0.38 0.40 0.41 0.42 -4.0 -12.5 -3.0 -3.0 -17.0 1.0 -7.8 1.0 3.5 14.0 -9.8 -23.0 -26.0 -25.5 -29.0 -10.0 3.5 21.0 18.8 -5.8 10.5 7.3 -9.3 -7.5 9.8 26.8 -4.5 4.5 -3.0 12.3 2.5 -9.0 -23.3 -15.8 -11.3 -28.5 -12.8 -2.0 6.8 14.7 5.2 6.7 6.7 0.2 4.5 0.7 2.4 11.4 12.3 23.6 29.9 33.1 35.3 17.8 5.7 29.2 19.1 4.6 6.1 7.2 16.3 6.5 10.7 23.6 8.0 5.1 2.1 10.0 5.8 8.6 25.2 14.5 21.7 21.0 8.2 2.2 894 890.0 877.5 874.5 871.5 854.5 855.5 847.8 848.8 852.3 866.3 856.5 833.5 807.5 782.0 753.0 743.0 746.5 767.5 786.3 780.5 791.0 798.3 789.0 781.5 791.3 818.0 813.5 818.0 815.0 827.3 829.8 820.8 797.5 781.8 770.5 742.0 729.3 727.3 Notes Begin survey on 8/15/2014 Last point for 8/15/2014 First point for 8/16/2014 Top of hill Abney Level Dropoff begins 40 41 42 43 44 45 46 47 48 49 50 51 52 53 54 55 56 57 58 59 60 61 62 63 64 65 66 67 68 69 70 71 72 73 74 75 76 77 78 79 80 81 82 83 84 9.264005 9.264158 9.264261 9.264261 9.264305 9.26434 9.264364 9.264473 9.264502 9.264552 9.264574 9.264721 9.264757 9.264884 9.264968 9.264999 9.265171 9.265442 9.26556 9.265874 9.266165 9.266276 9.26653 9.266921 9.267275 9.267502 9.267695 9.267807 9.267924 9.268072 9.268153 9.268516 9.268665 9.268674 9.268769 9.268897 9.269096 9.269312 9.269739 9.27 9.270089 9.270215 9.27035 9.270434 9.270561 -82.5028 -82.5027 -82.5026 -82.5025 -82.5024 -82.5022 -82.5021 -82.5021 -82.502 -82.502 -82.5019 -82.5018 -82.5017 -82.5015 -82.5015 -82.5014 -82.5011 -82.5009 -82.5009 -82.501 -82.5009 -82.5008 -82.5009 -82.5008 -82.5005 -82.5003 -82.5002 -82.5001 -82.4999 -82.4998 -82.4997 -82.4996 -82.4996 -82.4996 -82.4996 -82.4995 -82.4993 -82.4993 -82.4992 -82.4991 -82.4992 -82.4993 -82.4995 -82.4997 -82.5 39 to 40 40 to 41 41 to 42 42 to 43 43 to 44 44 to 45 45 to 46 46 to 47 47 to 48 48 to 49 49 to 50 50 to 51 51 to 52 52 to 53 53 to 54 54 to 55 55 to 56 56 to 57 57 to 58 58 to 59 59 to 60 60 to 61 61 to 62 62 to 63 63 to 64 64 to 65 65 to 66 66 to 67 67 to 68 68 to 69 69 to 70 70 to 71 71 to 72 72 to 73 73 to 74 74 to 75 75 to 76 76 to 77 77 to 78 78 to 79 79 to 80 80 to 81 81 to 82 82 to 83 83 to 84 56.5 71.0 58.0 33.5 45.5 72.5 35.5 56.5 33.0 34.0 46.0 75.0 40.0 71.5 60.5 56.0 105.5 70.0 68.0 129.0 124.0 52.5 87.0 125.5 181.0 116.5 73.0 59.0 82.0 75.0 40.0 119.0 32.0 30.3 56.0 61.5 106.5 65.0 157.5 96.5 47.0 53.0 92.5 88.0 106.5 56.5 64.8 57.0 32.5 41.0 57.8 31.5 50.5 30.5 32.8 46.0 75.0 35.5 71.0 60.5 56.0 105.5 70.0 64.5 117.8 119.0 52.5 86.5 122.8 178.0 114.0 68.5 53.5 81.5 74.5 40.0 118.0 30.5 2.4 52.5 58.0 103.0 64.5 155.0 93.5 46.5 53.0 91.0 87.3 106.5 0.43 0.45 0.46 0.46 0.47 0.48 0.49 0.50 0.50 0.51 0.52 0.53 0.54 0.55 0.56 0.57 0.59 0.61 0.62 0.64 0.66 0.67 0.69 0.71 0.75 0.77 0.78 0.79 0.81 0.82 0.83 0.85 0.86 0.86 0.87 0.88 0.90 0.91 0.94 0.96 0.97 0.98 0.99 1.01 1.03 -0.3 -29.0 -10.5 -9.0 -19.3 -44.0 -16.8 -25.3 -13.0 9.3 2.0 5.5 18.8 8.0 -5.0 -4.3 5.8 -4.3 -21.3 -53.0 -29.8 0.8 -9.5 -26.3 -33.0 -24.0 -25.3 -24.5 7.5 -6.3 -2.3 -16.0 -8.8 2.4 25.3 20.8 26.5 9.3 28.0 24.3 7.5 -1.3 -15.8 -11.5 -2.5 0.3 24.3 10.1 15.5 25.2 37.3 28.0 26.4 22.8 15.8 2.6 4.3 27.8 6.5 4.8 3.5 3.1 3.5 18.1 24.3 16.3 0.7 6.3 12.1 10.5 11.8 20.1 24.6 5.4 4.7 3.5 7.8 15.7 4.5 27.1 19.6 14.5 8.0 10.3 14.6 9.2 0.7 9.8 7.5 1.3 727.0 698.0 687.5 678.5 659.3 615.3 598.5 573.3 560.3 569.5 571.5 577.0 595.8 603.8 598.8 594.5 600.3 596.0 574.8 521.8 492.0 492.8 483.3 457.0 424.0 400.0 374.8 350.3 357.8 351.5 349.3 333.3 324.5 326.9 352.1 372.9 399.4 408.6 436.6 460.9 468.4 467.1 451.4 439.9 437.4 Trail intersecting steep dropoff, view over house to road Semira's house Begin stream crossing, 53' span Potential storage tank location, last point for 8/16/2014 First point for 8/17/2014 Potential location for break pressure tank Barbed wire fence Stream crossing, see field notes for diagram Abney Level Potential location for storage tanks 85 86 87 88 89 90 91 92 93 94 95 96 97 98 99 100 101 102 103 104 105 106 107 108 109 110 111 112 113 114 115 116 117 118 9.270679 9.270962 9.271143 9.271337 9.271507 9.271765 9.271824 9.271886 9.272036 9.272128 9.272251 9.272252 9.272317 9.272343 9.272308 9.272254 9.272171 9.271988 9.271791 9.271632 9.271639 9.271687 9.27167 9.271618 9.271541 9.271475 9.271438 9.271524 9.271703 9.271856 9.272225 9.272431 9.274053 -82.5002 -82.5004 -82.5005 -82.5006 -82.5007 -82.5009 -82.5012 -82.5013 -82.5013 -82.502 -82.5019 -82.5019 -82.5018 -82.5016 -82.5015 -82.5012 -82.501 -82.5007 -82.5005 -82.5004 -82.5003 -82.4999 -82.4998 -82.4995 -82.4993 -82.4992 -82.499 -82.4988 -82.4987 -82.4986 -82.4982 -82.4981 -82.498 9.27486 -82.49812 84 to 85 85 to 86 86 to 87 87 to 88 88 to 89 89 to 90 90 to 91 91 to 92 92 to 93 93 to 94 94 to 95 95 to 96 96 to 97 97 to 98 98 to 99 99 to 100 100 to 101 101 to 102 102 to 103 103 to 104 104 to 105 105 to 106 106 to 107 107 to 108 108 to 109 109 to 110 110 to 111 111 to 112 112 to 113 113 to 114 114 to 115 115 to 116 116 to 117 117 to 118 79.5 180.0 51.0 71.0 74.5 104.0 103.5 57.0 60.0 256.0 46.5 9.0 37.0 75.0 56.5 107.0 60.5 138.0 99.0 67.0 49.0 153.0 50.0 98.0 79.0 52.5 58.0 105.0 69.0 64.0 188.5 87.5 596.5 293 79.0 176.0 50.0 71.0 74.5 103.5 103.5 57.0 60.0 255.8 46.5 3.7 37.0 74.5 55.5 107.0 60.5 138.0 99.0 67.0 47.0 153.0 50.0 98.0 78.5 45.8 57.5 104.3 68.3 62.5 182.3 87.0 596.5 293 1.05 1.08 1.09 1.10 1.12 1.14 1.15 1.17 1.18 1.23 1.23 1.24 1.24 1.26 1.27 1.29 1.30 1.32 1.34 1.36 1.36 1.39 1.40 1.42 1.44 1.45 1.46 1.48 1.49 1.50 1.54 1.55 1.66 1.72 -6.8 -38.3 -10.8 -5.5 4.0 9.5 -0.8 0.3 -27.3 -12.5 1.5 -3.4 -3.0 -8.3 9.5 6.5 3.5 6.3 4.8 -3.0 13.0 4.0 3.8 0.5 -9.5 -25.8 7.0 11.5 10.0 -13.5 -45.5 -7.8 -5.5 -1 4.9 12.3 12.1 4.4 3.1 5.2 0.5 0.3 12.5 2.8 1.9 24.3 4.9 6.4 9.8 3.6 3.4 2.6 2.8 2.4 15.6 1.5 4.2 0.2 6.9 29.4 7.1 6.3 8.3 12.0 14.0 5.2 0.6 430.6 392.4 381.6 376.1 380.1 389.6 388.9 389.1 361.9 349.4 350.9 347.5 344.5 336.3 345.8 352.3 355.8 362.0 366.8 363.8 376.8 380.8 384.5 385.0 375.5 349.8 356.8 368.3 378.3 364.8 319.3 311.5 306.0 305 View over Christina's host family's house Next to road 20' to Guillermo's House, Last point for 8/17/2014 Road, First point for 8/18/2014 Culvert, 2.5' wide, need an elbow Abney Level End of culvert 71' to Bicholis Small ceek at Julia's house 30' to Julia's 20' to Janet's Small stream crossing 20' to Siderio's 133' to Rene's 40' to America's 10' to Roza's, Last point for 8/18/2014 School Appendix E: EPANET E-1: EPANET Inputs and Assumptions E-2: EPANET Outputs E-3: EPANET Supporting Calculations Appendix E: EPANET Appendix E-1: EPANET Inputs and Assumptions Project defaults Sample Inputs Reservoir (latitude, longitude, head): Node (latitude, longitude, elevation, demand/demand pattern if applicable): Pipe (length, diameter, roughness): System Pipe Diameters: Waypoints Reservoir to #92 #92 to #116 #116 to #118, all branches for individual homes Pipe Diameter 1.5in 1in 0.5in Base Flow Inputs House H1 - Guillermo H2 - Julia H3 - Bicholi H4 - Janet H5 - Siderio H6 - Renee H7 - America H8 - Roza Total Number of Residents 6 9 6 7 13 4 10 5 60 Percent of Total 0.100 0.150 0.100 0.117 0.217 0.067 0.167 0.083 1 Demand (gpm) 0.1969 0.2953 0.1969 0.2297 0.4266 0.1313 0.3281 0.1641 1.9688 School: (45 schoolchildren * 2.5 gallons/schoolchild/day)] * (1 day/1440 minutes) = 0.0781 gpm Demand Patterns Appendix E-2: EPANET Outputs Visual Output: node pressures and pipe flows Appendix E-3: EPANET Supporting Calculations To ensure the proposed aqueduct system is feasible, additional analysis is required to address modeling issues between the spring source and the first peak in the system at waypoint 11. To investigate whether this peak is too high for the water to flow over, the head loss between the spring and the peak will be calculated and compared to the available head in the same segment, or the change in elevation between the two points. There are no fittings in this portion of the system, and the pipe will likely not flow full immediately from the spring source, so the head loss calculation will be simplified to include only the head loss due to friction. This value can be calculated by the Darcy-Weisbach equation. 𝐿 𝑉2 ℎ𝑓 = 𝑓 𝐷 2𝑔 Where: 𝑓 = 𝐷𝑎𝑟𝑐𝑦 − 𝑊𝑒𝑖𝑠𝑏𝑎𝑐ℎ 𝑓𝑟𝑖𝑐𝑡𝑖𝑜𝑛 𝑓𝑎𝑐𝑡𝑜𝑟 𝐿 = 𝑙𝑒𝑛𝑔𝑡ℎ 𝑜𝑓 𝑝𝑖𝑝𝑒 = 736 𝑓𝑡 1 𝑓𝑡 𝐷 = 𝑝𝑖𝑝𝑒 𝑑𝑖𝑎𝑚𝑒𝑡𝑒𝑟 = 1.5 𝑖𝑛 ∗ = 0.125 𝑓𝑡 12 𝑖𝑛 𝑉 = 𝑓𝑙𝑜𝑤 𝑣𝑒𝑙𝑜𝑐𝑖𝑡𝑦 𝑔 = 𝑎𝑐𝑐𝑒𝑙𝑒𝑟𝑎𝑡𝑖𝑜𝑛 𝑑𝑢𝑒 𝑡𝑜 𝑔𝑟𝑎𝑣𝑖𝑡𝑦 = 32.2 𝑓𝑡/𝑠 2 The flow velocity, V, can be calculated using the flow rate in the pipe and the pipe area, both of which are known values. This calculation is shown below. 𝑉= 𝑄 𝐴 1 𝑓𝑡 3 1 𝑚𝑖𝑛 𝑓𝑡 3 ∗ = 0.015372 7.481 𝑔𝑎𝑙𝑙𝑜𝑛𝑠 60 𝑠 𝑠 2 2 (0.125 𝑓𝑡) 𝜋𝑑 𝐴 = 𝑎𝑟𝑒𝑎 𝑜𝑓 𝑝𝑖𝑝𝑒 = =𝜋∗ = 0.01227 𝑓𝑡 2 4 4 𝑓𝑡 3⁄ 0.015372 𝑠 𝑄 𝑓𝑡 𝑉= = = 1.253 ⁄𝑠 2 𝐴 0.01227𝑓𝑡 𝑄 = 𝑓𝑙𝑜𝑤 𝑟𝑎𝑡𝑒 = 6.9𝑔𝑝𝑚 ∗ The last unknown in the Darcy-Weisbach equation is f, the friction factor. This must be determined using a Moody diagram, shown below. To use the Moody diagram to find the friction factor, the Reynolds number and relative pipe roughness must be calculated. 𝑅𝑒 = Where: 𝜌𝑉𝐷𝐻 𝜇 µ = 𝑑𝑦𝑛𝑎𝑚𝑖𝑐 𝑣𝑖𝑠𝑐𝑜𝑠𝑖𝑡𝑦 𝑜𝑓 𝑤𝑎𝑡𝑒𝑟 𝜌 = 𝑑𝑒𝑛𝑠𝑖𝑡𝑦 𝑜𝑓 𝑤𝑎𝑡𝑒𝑟 𝑉 = 𝑓𝑙𝑜𝑤 𝑣𝑒𝑙𝑜𝑐𝑖𝑡𝑦 𝑖𝑛 𝑝𝑖𝑝𝑒 𝐷𝐻 = ℎ𝑦𝑑𝑟𝑎𝑢𝑙𝑖𝑐 𝑑𝑖𝑎𝑚𝑒𝑡𝑒𝑟 𝑜𝑓 𝑝𝑖𝑝𝑒 For a circular pipe, the hydraulic diameter is equal to the physical diameter. Dynamic viscosity and density can be related using kinematic viscosity, as shown below. µ 𝑓𝑡 2⁄ 𝑣 = 𝑘𝑖𝑛𝑒𝑚𝑎𝑡𝑖𝑐 𝑣𝑖𝑠𝑐𝑜𝑠𝑖𝑡𝑦 𝑜𝑓 𝑤𝑎𝑡𝑒𝑟 = = 1.05 ∗ 10−5 𝑠 𝜌 Using these relationships, the Reynolds number can be calculated as follows. 𝑅𝑒 = 𝑉𝑑 = 𝑣 (1.253 𝑓𝑡⁄ (0.125 𝑓𝑡) 𝑠) 1.05 ∗ 10−5 𝑓𝑡 2⁄ 𝑠 = 𝟏𝟒, 𝟗𝟏𝟒 To use the Moody diagram, the relative roughness of the pipe must also be calculated. 𝜀 𝑑 𝜀 = 𝑝𝑖𝑝𝑒 𝑟𝑜𝑢𝑔ℎ𝑛𝑒𝑠𝑠 𝑓𝑜𝑟 𝑃𝑉𝐶 = 0.00006 𝑖𝑛 = 0.000005 𝑓𝑡 𝑑 = 𝑝𝑖𝑝𝑒 𝑑𝑖𝑎𝑚𝑒𝑡𝑒𝑟 = 1.5 𝑖𝑛 = 0.125 𝑓𝑡 0.000005𝑓𝑡 𝑅𝑒𝑙𝑎𝑡𝑖𝑣𝑒 𝑟𝑜𝑢𝑔ℎ𝑛𝑒𝑠𝑠 = = 𝟒 ∗ 𝟏𝟎−𝟓 0.125𝑓𝑡 𝑅𝑒𝑙𝑎𝑡𝑖𝑣𝑒 𝑟𝑜𝑢𝑔ℎ𝑛𝑒𝑠𝑠 = The friction factor can now be determined. Referring back to the Moody diagram, the Darcy-Weisbach friction factor was determined to be 0.028. The head loss due to friction can now be calculated. 𝐿 𝑉2 ℎ𝑓 = 𝑓 𝐷 2𝑔 Where: 𝑓 = 𝐷𝑎𝑟𝑐𝑦 − 𝑊𝑒𝑖𝑠𝑏𝑎𝑐ℎ 𝑓𝑟𝑖𝑐𝑡𝑖𝑜𝑛 𝑓𝑎𝑐𝑡𝑜𝑟 = 0.028 𝐿 = 𝑙𝑒𝑛𝑔𝑡ℎ 𝑜𝑓 𝑝𝑖𝑝𝑒 = 736 𝑓𝑡 𝐷 = 𝑝𝑖𝑝𝑒 𝑑𝑖𝑎𝑚𝑒𝑡𝑒𝑟 = 0.125 𝑓𝑡 𝑉 = 𝑓𝑙𝑜𝑤 𝑣𝑒𝑙𝑜𝑐𝑖𝑡𝑦 = 1.253 𝑓𝑡/𝑠 𝑔 = 𝑎𝑐𝑐𝑒𝑙𝑒𝑟𝑎𝑡𝑖𝑜𝑛 𝑑𝑢𝑒 𝑡𝑜 𝑔𝑟𝑎𝑣𝑖𝑡𝑦 = 32.2 𝑓𝑡/𝑠 2 With these values, the head loss due to friction can calculated as: ℎ𝑓 = 𝑓 (736 𝑓𝑡) (1.253 𝑓𝑡/𝑠)2 𝐿 𝑉2 = 0.028 = 𝟒. 𝟎𝟐 𝒇𝒕 𝐷 2𝑔 0.125 𝑓𝑡 2 ∗ 32.2 𝑓𝑡/𝑠 2 To determine whether water will be able to flow over the first peak, this head loss is compared to the available head, or the elevation (z) difference between the spring and the first peak. 𝑧𝑠𝑝𝑟𝑖𝑛𝑔 − 𝑧𝑝𝑒𝑎𝑘 = 894 𝑓𝑡 − 866.25 𝑓𝑡 = 𝟐𝟕. 𝟕𝟓 𝒇𝒕 Since the available head, 27.75 ft, is greater than the head loss due to friction in this segment of the system, 4.02 ft, it is reasonable to conclude that the water will be able to flow over this peak in the system and the proposed route is feasible. Appendix F: Neatwork F-1: Neatwork Inputs F-2: Neatwork Outputs Appendix F: Neatwork Appendix F-1: Neatwork Inputs 1.0 Topography Module 2.0 Design Module 2.1 Hardware 2.1 Parameters 2.2 Constraints 2.3 Load Factors 3.0 Simulation Module Appendix F-2: Neatwork Outputs 1.0 Design Module: Pipe Diameter and Orifice Optimization 2.0 Simulation 2.1 Flows at faucets (in L/s) 2.2 Percentiles (of flow in L/s) 2.3 Speed in pipes (m/s) 2.4 Node pressures (m of head) Appendix G: Air block analysis Appendix G: Air block analysis 1) Determine Compression Head, Hc 𝐻𝑐 = 894𝑓𝑡 − 866.25𝑓𝑡 = 27.75𝑓𝑡 2) Compute Compressed Air Pressure 𝑝𝑩 = 𝑝𝐵′ = 33.9 + 𝐻𝐶 = 33.9 + 27.75 𝑓𝑡 𝐻2 0 = 61.65𝑓𝑡 𝐻2 0 3) Compute Volume of Compressed Air -First find length of B-C 𝐿𝑒𝑛𝑔𝑡ℎ𝐵−𝐶 = ∑ 𝐴𝑐𝑡𝑢𝑎𝑙 𝐷𝑖𝑠𝑡𝑎𝑛𝑐𝑒 = 80 + 83 + 69 + 46.5 = 286𝑓𝑡 -Calculate Volume 𝑉𝑜𝐵−𝐶 𝐵−𝐶 =𝐿 𝜋𝐷2 ∗ 4 2 𝑉𝑜𝐵−𝐶 = 286𝑓𝑡 ∗ 1𝑓𝑡 𝜋 ∗ (1.5𝑖𝑛 ∗ (12𝑖𝑛)) 4 = 3.5𝑓𝑡 3 -Boyle’s Law 𝑝𝑎𝑡𝑚 33.9 𝑉1𝐵−𝐵′ = 𝑉0𝐵−𝐶 ∗ ( ′ ) = 𝑣0𝐵−𝐶 ∗ = 3.5𝑓𝑡 𝑝𝐵 33.9 + 𝐻𝐶 ′ 𝑉1𝐵−𝐵 = 3.5𝑓𝑡 2 ∗ ( 33.9𝑓𝑡 ) = 1.93𝑓𝑡 3 33.9𝑓𝑡 + 27.75𝑓𝑡 4) Find elevation at B’ ′ 𝐵−𝐵′ 𝐿 𝐵−𝐵′ 𝐿 𝐵−𝐶 =𝐿 𝑉1𝐵−𝐵 ∗ 𝐵−𝐶 𝑉0 1.93𝑓𝑡 3 = 286𝑓𝑡 ∗ ( ) = 157𝑓𝑡 3.5𝑓𝑡 3 5) Pressure in next downstream air block 𝑝𝐵 + 𝐻𝐵 = 𝑝𝐷 + 𝐻𝐷 𝑝𝐷 = 𝑝𝐵 + 𝐻𝐵 − 𝐻𝐷 𝑝𝐷 = 27.75𝑓𝑡 + (866 − 753 − 27.75ft) − (798 − 753ft) = 68ft 6) Steps repeated for all air blocks 7) Compute “equivalent head” (He) of last air block 𝐻𝑒 = 𝑝𝐷′ − 𝑝𝑎𝑡𝑚 𝐻𝑒 = 68 − 33.9 𝑓𝑡 𝐻2 𝑂 = 34.1 𝑓𝑡 𝐻2 𝑂 8) Calculate final head 𝐻𝑓 = 𝐻𝑒 − ℎ𝐿 -Darcy-Weisbach equation ℎ𝐿 = 𝑓𝐷 ∗ 𝐿 𝑉2 ∗ 𝐷 2∗𝑔 𝑓𝑡 2 (0.73 1567.5𝑓𝑡 𝑠) ℎ𝐿 = 0.1 ∗ ( )∗ = 10.39 𝑓𝑡 𝐻2 𝑂 1𝑓𝑡 32.174𝑓𝑡 1.5𝑖𝑛 ∗ (12𝑖𝑛) 2∗ 𝑠2 𝐻𝑓 = 34.1 − 10.39 𝑓𝑡 𝐻2 𝑂 = 23.8 𝑓𝑡 𝐻2 𝑂 9) Final elevation 𝐹𝑖𝑛𝑎𝑙 𝑒𝑙𝑒𝑣𝑎𝑡𝑖𝑜𝑛 = 𝑧𝐷′ + 𝐻𝑓 = (798 − 68 𝑓𝑡 𝐻2 𝑂) + 23.8 = 754 𝑓𝑡 -If final elevation < downstream tank elevation, need an air release valve 𝐷𝑜𝑤𝑛𝑠𝑡𝑟𝑒𝑎𝑚 𝑡𝑎𝑛𝑘 𝑒𝑙𝑒𝑣𝑎𝑡𝑖𝑜𝑛 = 829 𝑓𝑡 > 𝐹𝑖𝑛𝑎𝑙 𝐸𝑙𝑒𝑣𝑎𝑡𝑖𝑜𝑛, 𝑖𝑛𝑠𝑡𝑎𝑙𝑙 𝑎𝑖𝑟 𝑟𝑒𝑙𝑒𝑎𝑠𝑒 𝑣𝑎𝑙𝑣𝑒 𝑎𝑡 𝑤𝑎𝑦𝑝𝑜𝑖𝑛𝑡 10 Appendix H: Geoflow air release valve Air Vent / Vacuum Relief Valve UPDATED Description Air release occurs when air escape the system at startup and vacuum relief allows air to enter during shutdown. The air vent vacuum breakers are installed at the highest points in the drip field to keep soil from being sucked into the emitters due to back siphoning and back pressure. This is an absolute necessity with underground drip systems. They are also used for proper drainage of the supply and return manifolds. Use one on the high point of the supply manifold and one on the high point of the return manifold and any high points of the system. Features Geoflow’s new kinetic air vacuum breakers have a twist off cap that is easy to take apart for cleaning. No need to remove the valve to maintain it. The large clear passageway allows lots of air to flow in and out easily. The protected mushroom cap is ideal for wastewater, directing spray downward. Part No. Inlet Max. Flow Rate Max Pressure Max Temp Height Weight APVBK75m 3/4” 30 gpm 80 psi/185 ft. 140 oF 5” 1 oz. APVBK100m 1” 80 psi/185 ft. 140 oF 5.5” 1.2 oz. Specification The Air Vacuum Breaker bady and ball shall be made of molded plastic. The ball shall be removable for easy cleaning. The Air Vacuum Breaker shall be part number APVBK75m or APVBK100m as supplied by Geoflow, Inc. Look for the Genuine Product Sheets-2011 AirVentVacuumRelief(ir) 11E05.indd Geoflow, Inc. Tel 415-927-6000 / 800-828-3388 Fax 415-927-0120 www.geoflow.com Geoflow stamp of quality ACCESSORIES C Part Description Number Min. Qty Weight Suggested (lbs.) List Price Air Vents w Ne APVBK100M 1” MPT kinetic air vacuum /relief valve For use in zone APVBK100L 1” MPT kinetic air vacuum /relief valve with elbow APVBK100M For use in zone APVBK0100L 1 0.3 22.00 1 0.3 22.00 1” MPT kinetic air/vacuum relief valve For use in zone 1 0.3 21.19 2” MPT kinetic air/vacuum relief valve For use in zone 1 2.5 75.00 1” MPT continuous airvent/vacuum relief valve For use upstream of subzone valve 1 2.5 85.00 2” MPT continuous airvent/vacuum relief valve 1 2.5 111.00 1 1 1.5 2.5 11.00 45.00 SVLVB-100 1” Solenoid valve. 24VAC, FPT, NC 1 SVLVB-100X 1” Solenoid valve, 24VAC, FPT, NC, External plumbing 1 SVLVB-150 1.5” Solenoid valve. 24VAC, FPT, NC 1 SVLVB-150X 1.5” Solenoid valve, 24VAC, FPT, NC, External plumbing 1 SVLVB-200 2” Solenoid valve. 24VAC, FPT, NC, External Plumbing 1 SVLVB-300 3” Solenoid valve. 24VAC, FPT, NC, External Plumbing. 1 Note: NC = Normally Closed valves. Normally open (NO) valves available upon request. Replacement coils and diaphragms available. Please call Geoflow directly. w 0.8 1.0 2.4 2.6 3.4 4.4 88.20 148.00 151.30 211.00 309.00 484.50 BVLVACT-100 1” slip motorized ball valve with 120VAC. Indicator light BVLVACT-150 1.5” slip motorized ball valve with 120VAC. Indicator light BVLVACT-200 2” slip motorized ball valve with 120VAC. Indicator light 3”, 4” and 6” valves as well as 24 VAC options available upon request 2.5 3.0 4.0 1000.00 1200.00 1240.00 APVBK1 APVBK-1 APVBK2 APVBK2 ARV100 ARV200 ARV100 / ARV200 For use upstream of subzone valve Air Vent Box AVBOX-6 AVBOX-10 6” round box - commercial grade 10” round box - commercial grade Solenoid Valves Ne Actuated Valves Geoflow Price List 2013 Tel: 800-828-3388 Fax: 415-927-0120 1 1 1 www.geoflow.com Appendix I: Chlorination calculations Appendix I: Chlorination calculations The following discussion and calculations are adapted from the “User Field Guide for MINSA’s In-Line Chlorinator” by Benjamin Yoakum, 2013. 1.0 Introduction Chlorine treatment in the proposed water system is a function of chlorine concentration and contact time. A simple method to predict and evaluate the effectiveness of chlorine treatment in a water system is by using the C*t or Ct method. In this method, C, the free chlorine concentration, and t, the total contact time. The Ct value is determined by multiplying C and t at multiple locations within the system. Calculated Ct values are compared to Ct values required to kill common water-borne pathogens. If the calculated Ct value is insufficient, C, t, or both C and t, must be increased. The following calculation is used to calculate Ct: 𝐶𝑡 = 𝐶 ∗ 𝑡 Where: C is the “free chlorine concentration” in units of (mg Cl2/L) t is the “total contact time” in units of (min) Ct is the “Ct value” in united of (min*mg Cl2 /L) Ct values for common water-borne pathogens may be found in Table 1. Table 1. Ct requirements for destruction of common pathogens. Pathogen Ct Requirement (min*mg Cl2/L) Salmonella typhi 1 Hepatitis A 0.41 Giardia lamblia 15 E. coli 0.25 E. Histolytica 35 Vibrio cholerae 0.5 Rotavirus 0.05 Temperature (C°) pH 20-25 25 25 23 27-30 20 4 7 8 7 7 7 7 7 As seen in Table 1, we need a Ct value of 35 min*mg Cl2/L to kill E. Histolytica. Thus, the target minimum Ct value to kill all pathogens will be conservatively set at 40 min*mg Cl2/L. In other words, Ct values throughout the system must be equal to or greater than 40 min*mg Cl2/L if chlorine treatment is effective. 2.0 Determining C, free chlorine concentration Free chlorine is the category of chlorine that is available to disinfect the water and kill pathogens. Thus, we are only interested in measuring the free chlorine concentration in the system. Currently, MINSA in the Ngäbe-Bugle Comarca uses Hach color wheels to determine the free chlorine concentrations. It is assumed that these color wheels can be purchased. Three values are important to consider when taking free chlorine measurements: 1. Maximum Total Chlorine Concentration at any Location: The World Health Organization (WHO) states that the maximum residual disinfectant level (MRDL) or the maximum level the concentration of “Total Chlorine” should reach is 5 mg Cl2/L. Drinking water with concentrations above this may cause health problems. However, in the Ct method, we are only sampling “Free Chlorine” concentrations. Therefore, a good rule of thumb is to limit the level of free chlorine to 3 mg Cl2/L. Samples to determine if you are exceeding the Maximum Total Chlorine Concentration at any Location should be taken from the influent pipe into the distribution tank. This water will have this highest chlorine concentration in the entire system. Residuals should be less than 1 mg Cl2/L to avoid taste and odor problems. 2. Minimum Free Chlorine Concentration: The minimum free chlorine concentration recommended is 0.2 mg Cl2/L at the last house receiving water in your distribution system. The last house is chosen to test for this value as it has the greatest chance of having the lowest free chlorine concentration value due to the chlorine being used up while sitting in the system. It is important to have some chlorine in all locations in your system so that if for example from a pipe is broken there will be some chlorine available to disinfect the water at that location. Again samples to determine the Minimum Free Chlorine Residual should be taken from the faucet of the last house in the system. 3. Free Chlorine Concentration to Meet the Required Ct Value: Finally, you need a free chlorine concentration value that is large enough to give you a Ct value that is sufficient to disinfect the water in your system. Samples to determine the Free Chlorine Concentration to Meet the Required Ct Value should be taken from the cleanout valve of the distribution tank. By sampling water from the clean out valve you have the best estimate of the concentration of “Free Chlorine” leaving your storage tank. However, it is advised that you leave the exit valve open for 3 minutes before taking a sample so that dirt does not enter your sample. 3.0 Determining t, contact time The total contact time in the water system is the sum of the contact time in the storage tank and in the pipes between the storage tank and the first faucet, or home. 3.1 Contact time for storage tank The equation for determining the contact time in the storage tank is: 𝐶𝑜𝑛𝑡𝑎𝑐𝑡 𝑡𝑖𝑚𝑒 𝑖𝑛 𝑠𝑡𝑜𝑟𝑎𝑔𝑒 𝑡𝑎𝑛𝑘 (𝑚𝑖𝑛) = Tank Volume (L) 𝐿 𝐼𝑛𝑓𝑙𝑢𝑒𝑛𝑡 𝐹𝑙𝑜𝑤𝑟𝑎𝑡𝑒 (𝑚𝑖𝑛) ∗ 0.3 The value 0.3 is the tank’s “baffling factor,” which accounts for incomplete mixing of chlorinated water into the tank. 3.2 Contact time for piped system The contact time for the water in pipes between the storage tank and first faucet depends on the volume of pipe. The equation for determining the volume in a pipe is: 28.31𝐿 2 𝑃𝑖𝑝𝑒 𝐷𝑖𝑎𝑚𝑒𝑡𝑒𝑟 (𝑖𝑛) 𝑓𝑡 3 𝑉𝑜𝑙𝑢𝑚𝑒 (𝐿) = 𝐿𝑒𝑛𝑔𝑡ℎ 𝑜𝑓 𝑝𝑖𝑝𝑒 (𝑓𝑡) ∗ 𝜋 ∗ ( ) ∗( ) 144 𝑖𝑛2 2 𝑓𝑡 2 This equation needs to be used multiple times if the pipe diameter changes. Thus: 𝑇𝑜𝑡𝑎𝑙 𝑣𝑜𝑙𝑢𝑚𝑒 𝑖𝑛 𝑝𝑖𝑝𝑒𝑑 𝑠𝑦𝑠𝑡𝑒𝑚 (𝐿) = 𝑉𝑜𝑙𝑢𝑚𝑒 𝑖𝑛 𝑃𝑖𝑝𝑒 1 + 𝑉𝑜𝑙𝑢𝑚𝑒 𝑖𝑛 𝑃𝑖𝑝𝑒 2 + ⋯ 𝑉𝑜𝑙𝑢𝑚𝑒 𝑖𝑛 𝑃𝑖𝑝𝑒 𝑛 The contact time in pipes is: 𝐶𝑜𝑛𝑡𝑎𝑐𝑡 𝑡𝑖𝑚𝑒 𝑖𝑛 𝑝𝑖𝑝𝑒𝑠 (min) = Total volume in piped system (L) 𝐿 𝐼𝑛𝑓𝑙𝑢𝑒𝑛𝑡 𝑓𝑙𝑜𝑤𝑟𝑎𝑡𝑒 (𝑚𝑖𝑛) 3.3 Total contact time Total contact time is the sum of contact time in the storage tank and pipes. 4.0 Determining Ct Ct should be calculated at three locations within the community based on the three values discussed above: (1) influent – water entering the storage tank, (2) effluent – water exiting the storage tank or cleanout valve, and (3) at the last faucet. Also, it is especially important to measure concentration on Day 1 (2 hours after chlorine tablet(s) have been inserted), Day 2 (24 hours after chlorine tablet(s) have been inserted), Day 6, and Day 7. However, more measurements are favored. The Ct value for each location is calculated using the total contact time and free chlorine concentration in the first equation provided in this Appendix. 5.0 Determining number of chlorine tablets The number of chlorine tablets is based on an iterative approach to satisfy the various requirements described above. Figure 1 illustrates this approach. Figure 1. Flowchart - how to determine the correct number of tablets for the MINSA in-line chlorinator. The flowchart starts with a recommendation from a MINSA technician. If such a recommendation is not given, it is recommended that the first iteration start with one chlorine tablet. 6.0 Example Problem Assume the following concentrations were measured in the proposed water system at Bajo Gavilan: Time of Sample Hour 2 Day 1 Day 2 Day 3 Day 4 Day 5 Day 6 Day 7 Free Chlorine Concentration (mg Cl2/L) Influent Effluent Last House 0.30 0.20 0.01 0.15 0.03 0.02 0.15 0.09 0.15 0.34 0.06 0.03 0.30 0.11 0.08 0.17 0.09 0.10 0.10 0.04 0.01 0.06 0.02 0.00 We need to calculate Ct values for each sample. We are missing total contact time. First, the contact time in the storage tank will be calculated: 𝐶𝑜𝑛𝑡𝑎𝑐𝑡 𝑡𝑖𝑚𝑒 𝑖𝑛 𝑠𝑡𝑜𝑟𝑎𝑔𝑒 𝑡𝑎𝑛𝑘 (𝑚𝑖𝑛) = Tank Volume (L) 𝐿 𝐼𝑛𝑓𝑙𝑢𝑒𝑛𝑡 𝐹𝑙𝑜𝑤𝑟𝑎𝑡𝑒 (𝑚𝑖𝑛) 𝐶𝑜𝑛𝑡𝑎𝑐𝑡 𝑡𝑖𝑚𝑒 𝑖𝑛 𝑠𝑡𝑜𝑟𝑎𝑔𝑒 𝑡𝑎𝑛𝑘 (𝑚𝑖𝑛) = ∗ 0.3 4200 L ∗ 0.3 = 52.5 𝑚𝑖𝑛 0.4𝐿 60𝑠 ∗ 𝑠 1𝑚𝑖𝑛 Next, the contact time in pipes to the first faucet or Guillermo’s house. This depends on the volume of the pipes: 𝑇𝑜𝑡𝑎𝑙 𝑣𝑜𝑙𝑢𝑚𝑒 𝑖𝑛 𝑝𝑖𝑝𝑒𝑑 𝑠𝑦𝑠𝑡𝑒𝑚 (𝐿) = 𝑉𝑜𝑙𝑢𝑚𝑒 𝑖𝑛 𝑃𝑖𝑝𝑒 1 + 𝑉𝑜𝑙𝑢𝑚𝑒 𝑖𝑛 𝑃𝑖𝑝𝑒 2 + ⋯ 𝑉𝑜𝑙𝑢𝑚𝑒 𝑖𝑛 𝑃𝑖𝑝𝑒 𝑛 where the volume is: 28.31𝐿 2 𝑃𝑖𝑝𝑒 𝐷𝑖𝑎𝑚𝑒𝑡𝑒𝑟 (𝑖𝑛) 𝑓𝑡 3 𝑉𝑜𝑙𝑢𝑚𝑒 (𝐿) = 𝐿𝑒𝑛𝑔𝑡ℎ 𝑜𝑓 𝑝𝑖𝑝𝑒 (𝑓𝑡) ∗ 𝜋 ∗ ( ) ∗( ) 144 𝑖𝑛2 2 𝑓𝑡 2 Pipe 1 (main line from storage tank (#80) to Guillermo’s node (#92)): 28.31𝐿 1.5" 2 𝑓𝑡 3 𝑉𝑜𝑙𝑢𝑚𝑒 (𝐿) = 1059𝑓𝑡 ∗ 𝜋 ∗ ( ) ∗( ) = 367.9𝐿 144 𝑖𝑛2 2 𝑓𝑡 2 Pipe 2 (from node (#92) to Guillermo’s tapstand): 28.31𝐿 0.5" 𝑓𝑡 3 𝑉𝑜𝑙𝑢𝑚𝑒 (𝐿) = 20𝑓𝑡 ∗ 𝜋 ∗ ( ) ∗( ) = 0.77𝐿 144 𝑖𝑛2 2 𝑓𝑡 2 2 Total volume: 𝑇𝑜𝑡𝑎𝑙 𝑣𝑜𝑙𝑢𝑚𝑒 𝑖𝑛 𝑝𝑖𝑝𝑒𝑑 𝑠𝑦𝑠𝑡𝑒𝑚 (𝐿) = 367.9 + 0.77 = 368.7 𝐿 The contact time in pipes: 𝐶𝑜𝑛𝑡𝑎𝑐𝑡 𝑡𝑖𝑚𝑒 𝑖𝑛 𝑝𝑖𝑝𝑒𝑠 (min) = Total volume in piped system (L) 𝐿 𝐼𝑛𝑓𝑙𝑢𝑒𝑛𝑡 𝑓𝑙𝑜𝑤𝑟𝑎𝑡𝑒 (𝑚𝑖𝑛) 𝐶𝑜𝑛𝑡𝑎𝑐𝑡 𝑡𝑖𝑚𝑒 𝑖𝑛 𝑝𝑖𝑝𝑒𝑠 (min) = 368.7 L = 15.4 𝑚𝑖𝑛 0.4𝐿 60𝑠 𝑠 ∗ 1𝑚𝑖𝑛 The total contact time in the system is: 𝑇𝑜𝑡𝑎𝑙 𝑐𝑜𝑛𝑡𝑎𝑐𝑡 𝑡𝑖𝑚𝑒(𝑚𝑖𝑛) = 52.5 min + 15.4 𝑚𝑖𝑛 = 67.9 𝑚𝑖𝑛 With total contact time known, this can be multiplied by the free chlorine concentration measurement for each effluent sample to produce the following table: Time of Sample Hour 2 Day 1 Day 2 Day 3 Day 4 Day 5 Day 6 Day 7 Effluent Chlorine Concentration (mg/L) 0.20 0.03 0.09 0.06 0.11 0.09 0.04 0.02 Total Chlorine Contact time (min) 67.9 67.9 67.9 67.9 67.9 67.9 67.9 67.9 Ct (min*mg Cl2 /L) 13.58 2.04 6.11 4.07 7.47 6.11 2.72 1.36 As seen in the table above, none of the Ct values equals or exceeds our target Ct value of 40 min*mg Cl2/L. Thus, ½ more of a chlorine tablet should be added (1.5 tablets total) and sampling should be repeated. This process continues until all effluent Ct values are greater than 40 min*mg Cl2/L AND all influent and last house concentrations satisfy the requirements shown in section 2.0. Appendix J: Cost estimate REASONABLE ENGINEERING PROPOSED New Aqueduct and Distribution System in Bajo Gavilan, PANAMA 12/10/2014 Preliminary Opinion Of Probable Costs PROJECT ESTIMATE SUMMARY SYSTEMS FORMAT Materials Estimate Main Aqueduct Line Piping $3,225 Air Release Valve $68 Low Profile Springbox $126 Break Pressure Tanks $1,834 Waypoint 80 $1,225 Tapstands $170 In-Line Chlorinator $101 Stream Crossings $534 Materials Subtotal $7,281 Construction Estimate Labor $2,080 Transportation Community Contribution $600 Labor ($2,080) Construction Subtotal $600 Materials and Construction Estimate Total $7,881 Design Contingency Estimate contingency 10% 8% Estimated Total Final Cost Estimate $788.11 $630.49 $9,300 1/3 12/10/2014 REASONABLE ENGINEERING PROPOSED New Aqueduct and Distribution System in Bajo Gavilan, PANAMA 12/10/2014 Preliminary Opinion Of Probable Costs ITEM Main Aqueduct Line Piping Air Release Valve Low Profile Springbox Break Pressure Tanks Waypoint 80 Tapstands In-Line Chlorinator Stream Crossings ELEMENT SYSTEMS FORMAT QUANTITY UNITS UNIT COST 46 105 325 10 25 2 10 6m pipe 6m pipe 6m pipe elbow elbow roll bottle $2.15 $3.85 $8.00 $1.98 $1.28 $5.00 $6.00 $98.90 $404.25 $2,600.00 $19.80 $32.00 $10.00 $60.00 $3,224.95 Tee PVC 1.5" Geoflow AirVent Box Geoflow Air Vent/ Vacuum Relief Valve 1 2 2 tee box valve $1.60 $11.00 $22.00 $1.60 $22.00 $44.00 $67.60 Concrete PVC SDR 26 1.5" Gravel Sand Waterproofing Admixture Reinforcing Bar Steel 7 2 20 20 2 30 50lb bag 6m pipe bag bag gallon foot $10.50 $8.00 $0.33 $0.17 $10.00 $0.20 $73.50 $16.00 $6.67 $3.33 $20.00 $6.00 $125.50 Concrete PVC SDR 26 1.5" Elbow PVC 1.5" Reinforcing Bar Steel Cinderblocks 100 10 25 360 300 50lb bag 6m pipe elbow foot block $10.50 $8.00 $1.28 $0.20 $2.00 $1,050.00 $80.00 $32.00 $72.00 $600.00 $1,834.00 Concrete PVC SDR 26 1.5" Elbow PVC 1.5" Reinforcing Bar Steel Tee PVC 1.5" Forms (cut boards and nails) 100 6 12 300 2 80 50lb bag 6m pipe elbow foot tee feet $10.50 $8.00 $1.28 $0.20 $1.60 $0.60 $1,050.00 $48.00 $15.36 $60.00 $3.20 $48.00 $1,224.56 Shutoff Valve 0.5" Plastic Faucets Tee PVC 1.5" Elbow PVC 0.5" PVC SDR 13.5 0.5" PVC Glue 10 25 25 45 25 1 valve faucet tee elbow 6m pipe bottle $1.28 $2.00 $1.60 $0.16 $2.15 $6.00 $12.80 $50.00 $40.00 $7.20 $53.75 $6.00 $169.75 Shutoff Valve PVC 1.5" Tee PVC 1.5" Elbow PVC 1.5" PVC SDR 26 1.5" MINSA In-Line Chlorinator System Calcium Hypochlorite Tablet 2 2 2 3 1 20 valve tee elbow 6m pipe system tablet $3.24 $1.60 $1.28 $8.00 $25.00 $2.00 $6.48 $3.20 $2.56 $24.00 $25.00 $40.00 $101.24 Gravel Concrete Reinforcing Bar Steel Forms (cut boards, nails) Galvanized Steel Pipe 1.5" 60 15 10 40 22 bag 50lb bag foot foot 10 ft pipe $0.33 $10.50 $0.20 $0.60 $15.00 $20.00 $157.50 $2.00 $24.00 $330.00 $533.50 PVC SDR 13.5 0.5" PVC SDR 26 1" PVC SDR 26 1.5" Elbow PVC 1" Elbow PVC 1.5" Staking Ribbon PVC Glue Materials Subtotal Final Cost Estimate COST SUBTOTALS $7,281.10 2/3 12/10/2014 12/10/2014 REASONABLE ENGINEERING PROPOSED New Aqueduct and Distribution System in Bajo Gavilan, PANAMA Preliminary Opinion Of Probable Costs ITEM Labor Transportation Community Contribution ELEMENT SYSTEMS FORMAT QUANTITY UNITS Preliminary Construction Site Preparation Springbox Construction Storage Tank Relocation and Waypoint 80 Pad Stream Crossing Construction Break Pressure Tank Consturction Pipeline and Tapstand Construction and Burial 16 6 25 16 50 75 72 Crew-Hours Crew-Hours Crew-Hours Crew-Hours Crew-Hours Crew-Hours Crew-Hours $8.00 $8.00 $8.00 $8.00 $8.00 $8.00 $8.00 $128.00 $48.00 $200.00 $128.00 $400.00 $600.00 $576.00 $2,080.00 Truck from Almirante Shipping of Additional Supplies 20 10 Trip Trip $25.00 $10.00 $500.00 $100.00 $600.00 Labor COST SUBTOTALS ($2,080.00) Construction Subtotal $600.00 Materials and Construction Subtotal Design Contingency Estimate contingency 10% 8% Estimated Total Final Cost Estimate UNIT COST $7,881.10 $788.11 $630.49 $9,299.70 3/3 12/10/2014 Appendix K: Construction schedule neneeneneeeeeegeeeeeeeneeeee neeeeegeeee ss sssssssss sssssssss 0 1 2 3 4 5 6 7 8 9 10 11 12 13 14 15 16 17 18 19 20 21 22 23 24 25 26 27 28 29 30 31 32 33 ssssssss nnnnnnnnnnnnnnnnnnnnnnnnnnnnnnnnnnnnnnn snnnnsnnnnsnsnnsn 5nnnnnnnnsnnn5nnn tnnnnnsnnnnnnntnnn5nnnnnnnnnnnnntnnnssnnn eeeeeeeeeeeeeeeeeeeeeeeeeeeeeeeeee neeeeeeeeeeeeneneeneneeee tnnnnnnntnnn5nnnnnnnnnnnnntnnnssnnn eeeeeeeeeeeeeeeeee eeeeeeeeeneeeeeeeeeeeeeeee neeeeeeeeeeeeneneeneneeee snnnnsnnnnnng egeeeeeeeeeeeegeeeeeee snngnngngnsnnnssnnnnnnnnnnnnnnnnnnnnngnnnnnnnng eeeeeegege5eegeeeeeeeeeeeeeeee eeeegeeeeeeegeenee5eegeee neeegeeeeeeeeeeneegegeeeeeeee5eegeee eeeeeeegeeeeeeee5eegeeeeeeeeeeeeeeee eeeeeeeeneegeeeeeeeegeee geeeeeeeyeeeegeee nnnnnnnnnnnnnnnnnnnnn nnnngnsnnnnnnnn5nngnnnnn geeeeeeeeeseeeeeeseeee 5egeeeeeeeeeeeeeeeeeeeeegee eeeeeeeeeeeeeeseeeeeeeeeeeeegee eeeeseeeeeee snnnngnn5nngnsnnn5nns geeeeeeeeeseeeeeeseeee neeeeeeeeeseeeeeeeeeeeeeeeeeeeeeeeeee 5egeeeeeeeee eeeeeeeeeeeee eeeeseeeeeee snnnnsnnnnnnnngnnnn5nnn geeeeeeeeeseeeeeeseeee 5egeeeeeeeeeeeeeeeeeeeeegee sssysssnsnsyssnsks1ss ssssns4sss12110114 sssss ssssss ssssssssssss ssnnnsn 5nnn55s55ss 5nnn55555ss snnnsn snnnsn 5nnnsn yeeey 5eeeye snnnsn yeeey 5eeeye yeeey 5nnnsn seeeye 5nnnsn yeeey yeeey 5eeeye 5eeeye 5eeeye 5eeeye 5nnnsn 5nnnsn yeeey yeeey yeeey 5eeeye 5nnnsn yeeey yeeey yeeey yeeey 5eeeye 5nnnsn yeeey yeeey 5nnn55s55ss 5nnn55s55ss 5nnn55s55ss 5eee55y55y5 5eee55y55y5 5nnn55s55ss 5eee55y55y5 5eee55y55y5 5eee55555y5 5nnn55s55ss neee55y55y5 5nnn55s55ss neee55y55y5 5eee55y55y5 5eee55y55y5 5eee55y55y5 neee55y55y5 neee55y55y5 5nnn55555ss 5nnn55555ss 5eee55555y5 5eee55555y5 5eee55555y5 5eee55555y5 5nnn55555ss 5eee55555y5 neee555s5y5 neee555s5y5 neee555s5y5 neee555s5y5 5nnn55555ss 5eee55555y5 5eee55555y5 55nn55555ss 5nnn55555ss 5nnn55s55ss 5eee55y55y5 neee55y55y5 5nnn55555ss 5eee55y55y5 5eee55555y5 5eee55555y5 5nnn55555ss 5eee55555y5 5nnn55555ss neee55y55y5 5eee55y55y5 neee55y55y5 neee55y55y5 5eee55555y5 5eee55555y5 55nn55555ss 5nnn55555ss 5eee55555y5 5eee55555y5 5eee55555y5 neee555s5y5 55nn55555ss 5eee55555y5 neee555s5y5 neee555s5y5 neee555s5y5 neee55555y5 5nnn55555ss 5eee55555y5 5eee55555y5 ss1ssss1s1 211 2115 ssssss1 311 3115 4112 ss1s1 4126 7777 5 557y5 ssss sssyssssssssss1 sssss1sssss sssssyss11 ssss1sss s11ss sssssskssssss ssssssssyss11 ssssssyss11 ssssssss ss1ssssss sssssskssss1ssssss sssss1sssssss1sps11s1 sssssss1ssssss sssss1sssssssss ssssss1 sssssskssssssss1 sssss1sssssss1 sssssss1sss1ssssss sssss1 11ss1s1 3129 5110 1ssss1 5124 neneeneneeeeeegeeeeeeeneeeee neeeeegeeee ss sssssssss sssssssss 34 35 36 37 38 39 40 41 42 43 44 45 46 47 48 49 50 51 52 53 54 55 56 57 58 59 60 61 62 63 64 65 66 67 ssssssss eeeeeeeeeeeeeeseeeeeeeeeeeeegee eeeeseeeeeee ssnnngnnnnnnnnnnnnnnnnn ngeeeeeeeeneeeeeeeeeeeee geeeeeeeeseeeeeeeeeeeeeee geeeeeeeeegeeneeeee 5eeeeeneneeeeee neeeeeeeeeeeeeeeeeeeegeeeeeeeeeee ssnnngnnnnnnnsnnnng neeeeeeeeeeeeeeeeeeeeeeeeeeeeeee eeeeeeeeeeeeege eeeeeeeeeeeeege eeeeneenee neee5eeeeneeeee eeeegeeeeeeeeeeenegee 5egeeeeeeeee geeeeeeeeeseeeeeeeeeeegege5eee eeeeeeeeeeegegeseeeeeeeeeeeeee eeeeseeeeeee snnnngnn5nng snnnngnn5nngn5nnnnsnnnnnnnn neeeeeeseeeengeeeeeeeegeeeeee 5egeeeeeeeeeeeeyeeeeeeese5eneeeee geeeeegeeeeeeeeseeeengeeeeeeegeeeeeeeeeeeeeseeeee geeeseeeeeeeeeeeeeeeee neeeeeeeeeeeeeeeeeeeeg eeeeeeeeeeeeeeeeeeg rnrnnnnnn5nnnnnnnnn eeeeeeeeeeeeeeeeeeeeeeeeeeeeeeeeeegeee meeeeeeeeeeeeesememeeeeeeeeeeeeeeeeeeyeeee snnnnsnnnnnnnngnnnnnnnnnnnnn snnnnsnnnnnnnng8n8nssnnnnn858 5eeeeeeegeeeeeee eeeeeee5eeeeeneneeeeee sssysssnsnsyssnsks1ss ssssns4sss12110114 yeeey 5eeeye 5nnnsn yeeey 5eeeye 5eeeye 5eeeye 5eeeye snnns yeeey yeeey yeeey yeeey 5eeeye yeeey yeeey yeeey yeeey 5eeeye 5nnnsn 5nnnsn yeeey 5eeeye 5eeeye 5eeeye yeeey yeeey snnns yeeey yeeey s5nnnsn snnnsn yeeey yeeey sssss ssssss 5eee55555y5 5eee55555y5 5nnn5555ss 5eee5555y5 5eee5555y5 neee5555y5 5eee5555y5 5eee5555y5 55nn55s5ss neee5555y5 neee5555y5 neee5555y5 neee5555y5 neee5555y5 5eee5555y5 5eee5555y5 5eee5555y5 5eee5555y5 5eee5555y5 5nnn55s5ss 5nnn55s5ss 5eee5555y5 5eee5555y5 5eee5555y5 5eee55yy5y5 neee55y55y5 neee55y55y5 5nnn55s55ss 5eee55y55y5 5eee55y55y5 5nnn55s55ss 5nnn55s55ss 5eee55y55y5 5eee55y55y5 ssssssssssss 5eee55555y5 neee555s5y5 5nnn55s5ss 5eee5555y5 neee5555y5 neee5555y5 5eee5555y5 5eee55s5y5 55nn55s5ss neee5555y5 neee5555y5 neee5555y5 neee5555y5 5eee5555y5 5eee5555y5 5eee5555y5 5eee5555y5 5eee5555y5 5eee5555y5 5nnn55s55ss 55nn55s55ss 5eee5555y5 neee55y55y5 neee55y55y5 neee55y55y5 neee55y55y5 neee55y55y5 5nnn55s55ss 5eee55y55y5 5eee55y55y5 5nnn55555ss 5nnn55555ss 5eee55y55y5 5eee55y55y5 ss1ssss1s1 211 2115 ssssss1 311 3115 55 s5 s5 55 55 ssss sssyssssssssss1 sssss1sssss sssssyss11 ssss1sss s11ss sssssskssssss ssssssssyss11 ssssssyss11 ssssssss ss1ssssss sssssskssss1ssssss sssss1sssssss1sps11s1 sssssss1ssssss sssss1sssssssss ssssss1 sssssskssssssss1 sssss1sssssss1 sssssss1sss1ssssss sssss2 11ss1s1 3129 4112 ss1s1 4126 5110 1ssss1 5124 neneeneneeeeeegeeeeeeeneeeee neeeeegeeee ss sssssssss sssssssss 68 69 70 71 72 73 74 75 76 77 78 79 80 81 82 83 84 85 86 87 88 89 90 91 92 93 94 95 96 97 98 99 100 101 ssssssss neeeeeeengeeneeeeseeeeeeeeeeeeeeeeeeeeeeeeee eeeeeeeeeeeeeeeeeeeeeeeeeeeeeeee)eeeeeeegeey) neeeeeeengeeneeeeeeeegegee eeeeeey5seeeeeeeeeeeseeeeneeeeeeeeeee geneeeseeeeeeeeeeeeeeeeeeeeee neeyeeeeeeeeeeeeeeee snnnnsnnnnnnnng8n8nssnnnnn85s 5eeeeeeegeeeeeee eeeeeee5eeeeeneneeeeee neeeeeeengeeneeeeseeeeeeeeeeeeeeeeeeeeeeeeee eeeeeeeeeeeeeeeeeeeeeeeeeeeeeeee)eeeeeeegeey) neeeeeeengeeneeeeeeeegegee eeeeeey5seeeeeeeeeeeseeeeneeeeeeeeeee geneeeseeeeeeeeeeeeeeeeeeeeee neeyeeeeeeeeeeeeeeee snnnnnnnnnnnngn5nngnnnnnnnnnnnnn snnnnnnnnnnnngn5nngnnnnnnnnnnnnn8n8nssnnnnn885 5eeeeeeeeneeeeeeeeeeeeeeeeeeeee 5egeeeegeeeee7e5eeeee7eeeeeeeeeeeeegegeeeeeeeegg neegegeeeeeeeeeee eeeeeeeeneeee snnnnnnnnnnnngn5nngnnnnnnnnnnnnn8n8nssnnnnn855 5eeeeeeeeneeeeeeeeeeeeeeeeeeeee 5egeeeegeeeee7e5eeeee7eeeeeeeeeeeeegegeeeeeeeegg neegegeeeeeeeeeee eeeeeeeeneeee snnnnnnnnnnnngn5nngnnnnnnnnnnnnn8n8nssnnnnn85s 5eeeeeeeeneeeeeeeeeeeeeeeeeeeee 5egeeeegeeeee7e5eeeee7eeeeeeeeeeeeegegeeeeeeeegg neegegeeeeeeeeeee eeeeeeeeneeee snnnnnnnnnnnngn5nngnnnnnnnnnnnn8n8nssnnnnn8s5 5eeeeeeeeneeeeeeeeeeeeeeeeeeeee 5egeeeegeeeee7e5eeeee7eeeeeeeeeeeeegegeeeeeeeegg sssysssnsnsyssnsks1ss ssssns4sss12110114 5eeeye yeeey seeeye seeeye seeeye seeeye snnnsn yeeey yeeey? 5eeeye yeeey? seeeye seeeye seeeye seeeye ssnnnsn 5nnnsn yeeey yeeey 5eeeye seeeye snnnsn 5eeeye 5eeeye 5eeeye 5eeeye snnnsn 5eeeye 5eeeye 5eeeye 5eeeye snnnsn 5eeeye 5eeeye sssss ssssss 5eee55y55y5 neee55y55y5 neee55y55y5 neee55y55y5 neee55y55y5 neee55y55y5 5nnn55555ss 5eee55555y5 5eee55555y5 5eee55555y5 neee555s5y5 neee555s5y5 neee555s5y5 neee555s5y5 neee555s5y5 5nnn55555ss 5nnn55555ss 5eee55555y5 5eee55555y5 5eee55555y5 5eee55555y5 8nnn55s5ss 5eees5y5y5 5eees5y5y5 5eees5y5y5 5eees555y5 5nnn5555ss 5eees555y5 5eees555y5 5eees555y5 5eees555y5 8nnn5585ss 5eees555y5 5eees555y5 ssssssssssss neee55y55y5 neee55y55y5 5eee55555y5 5eee55555y5 5eee55555y5 5eee55555y5 5nnn55555ss 5eee55555y5 5eee55555y5 neee555s5y5 neee555s5y5 5eee55555y5 5eee55555y5 5eee55555y5 5eee55555y5 5nnn55s55ss 55nn5555ss 5eee55555y5 5eee55555y5 neee555y5y5 neees555y5 5nnn5555ss neees555y5 neees555y5 5eees555y5 neees555y5 5nnn55s55ss neees555y5 neees555y5 5eees555y5 5eees5y55y5 5nnn55s55ss neees555y5 neees555y5 ss1ssss1s1 211 2115 ssssss1 311 3115 55 55 55 55 55 55 55 55 85 85 55 85 ssss sssyssssssssss1 sssss1sssss sssssyss11 ssss1sss s11ss sssssskssssss ssssssssyss11 ssssssyss11 ssssssss ss1ssssss sssssskssss1ssssss sssss1sssssss1sps11s1 sssssss1ssssss sssss1sssssssss ssssss1 sssssskssssssss1 sssss1sssssss1 sssssss1sss1ssssss sssss3 11ss1s1 3129 4112 ss1s1 4126 5110 1ssss1 5124 neneeneneeeeeegeeeeeeeneeeee neeeeegeeee ss 102 103 104 105 106 107 108 109 110 111 sssssssss sssssssss ssssssss neegegeeeeeeeeeee eeeeeeeeneeee snnnnnnnnnnnngn5nngnnnnnnnnnnnn8n8nssnnnnn855 5eeeeeeeeneeeeeeeeeeeeeeeeeeeee 5egeeeegeeeee7e5eeeee7eeeeeeeeeeeeegegeeeeeeeegg neegegeeeeeeeeeee eeeeeeeeneeee nnnnnnnnnnngnnnnnnnnsnngnsennsnsnnnnn 5nnsn8nssnnnnn8snnnn8s5 eeeeeeeegeeeeeeegeeneeeeeeeeeeeeeeneenegeeee5eyeeeeee1yy 112 113 114 115 116 117 118 119 120 121 122 123 124 125 126 127 128 sssysssnsnsyssnsks1ss ssssns4sss12110114 5nnsn8nssnnnnn8s5nnnn855 geeeeeeeeeeneeegeeeeeeeeeeneegeeee5eyeeeeee155 5nnsn8nssnnnnn855nnnn85s geeeeeeeeeeneeegeeeeeeeeeeneegeeee5eyeeeeee155 5nnsn8nssnnnnn85snnnn8s5 geeeeeeeeeeeeeeeeegeeeeeeeeeee5eyeeeeee1s5 geeeeeeeeeeneeegeeeeeeeeeeneegeeee5eyeeeeee155 5nnsn8nssnnnnn8s5nnnn85s geeeeeeeeeeneeegeeeeeeeeeeneegeeee5eyeeeeee155 5nnsn8nssnnnnn85snnnn85s geeeeeeeeeeeeeeeeegeeeeeeeeeee5eyeeeeee15y 5nnsn8nssnnnnn85snnnn885 geeeeeeeeeeeeeeeeeeeneeegeeeeeeeeeeneeg7eeeeeeeeeneeg7eeeee memgeeeegeeeeeeeeee nnssnnnnsnsnsnnnnnnnnnn5nsnnnnnnnnnnnnnnnnnn 5eeee5eyeeeeee155eeee155 5eeee5eyeeeeee15seeee1y55 5eeee5eyeeeeee1y55eeee1yy5 sssss ssssss ssssssssssss 5eeeye 5eeeye snnnsn 5eeeye 5eeeye 5eeeye 5eeeye s5nnnsn snnns yeeey 5eees555y5 5eees5y55y5 5nnn55s55ss 5eees5y55y5 5eees5y55y5 5eees5y55y5 5eees5y55y5 5nnn5555ss 5nnn5555ss 5eees555y5 5eees5y55y5 neees5ys5y5 5nnn55s55ss neees5ys5y5 neees5ys5y5 5eees5y55y5 5eees5y55y5 5nnn55555ss 5nnn5555ss 5eees555y5 snnns yeeey snnns yeeey snnns yeeey yeeey snnns yeeey snnns yeeey snnns yeeey 5nnn5555ss neees555y5 8nnn5585ss 5eees555y5 5nnn55s55ss 5eees5y55y5 5eees5y55y5 5nnn55s55ss neees5ys5y5 8nnn55ss5ss 5eees5y55y5 5nnn55555ss 5eees5555y5 5nnn5555ss neees555y5 8nnn5585ss 5eees555y5 5nnn55s55ss 5eees5y55y5 5eees5y55y5 5nnn55s55ss neees5ys5y5 8nnn55ss5ss 5eees5y55y5 5nnn55555ss 5eees5555y5 ss58sss snnnsn yeeey yeeey yeeey 5nnn555s5ss neees55y5y5 5eees5555y5 5eees5555y5 5nnn55555ss neees55y5y5 5eees5555y5 5eees5555y5 s55 y5s7y55 y55 y55 ss1ssss1s1 211 2115 ssssss1 311 3115 y5y 85 y55 ss58ss5 sss8ss5 ss58ss88ss5 sss8s55 s5s8s55 ssss sssyssssssssss1 sssss1sssss sssssyss11 ssss1sss s11ss sssssskssssss ssssssssyss11 ssssssyss11 ssssssss ss1ssssss sssssskssss1ssssss sssss1sssssss1sps11s1 sssssss1ssssss sssss1sssssssss ssssss1 sssssskssssssss1 sssss1sssssss1 sssssss1sss1ssssss sssss4 11ss1s1 3129 4112 ss1s1 4126 5110 1ssss1 5124 Appendix L: User manual Appendix L: Construction and Maintenance Manual 1.0 Introduction This document is intended to provide the PCV in Bajo Gavilan with general construction guidance for the components designed in this project. It is important to note that these are guidelines and not rules. Steps for construction should be carefully reviewed, revised, developed, and discussed with community members prior to the commencement of work. Visual representations of all components are located in Appendix M and N. Illustrations for each component can be found in Appendix M; constructions drawings are found in Appendix N. 2.0 Spring Box Construction The following steps are adapted from Jones, 2014 (Available on CD). Consult Jones, 2014 for more information on lowprofile spring boxes. ● The first step in construction is the development the capture zone. This concept is new to the community, so proper planning by prior to beginning the project will be important. ● Material must be removed from the flow path of the spring. The main goal is to remove the soft soil above the impermeable rock layer, exposing the spring. ● Once this soil layer is excavated, the area should be filled first with a base layer of large rocks, likely collected during the initial excavation process, followed by a layer of small rocks, and finally a layer of purchased gravel. This entire capture zone is capped with mortar. ● The spring box must be constructed at the base of the spring capture system, with dimensions that suit the location the best. The design can be based on the two other spring boxes the community has built previously, but the cap over the capture zone must extend fully through the capture zone for a complete seal. ● Screened ventilation tubes (also present in existing spring boxes in the community) should be installed to allow air to escape and promote water flow. Maintenance ● The spring box should be inspected monthly or when a problem arises ● Inspections should include checking for sediment buildup ● If sediment exists, access the box through the cleanout pipe and remove the sediment 3.0 Aqueduct Line Construction ● The aqueduct route should be cleared prior to trenching ● Locations of all system components should be marked ● All pipe is to be buried at least 1.5’ below the ground surface ○ Trenching and construction methods used in the existing aqueduct should be followed Maintenance ● The aqueduct line should be inspected annually or when a problem arises ● Inspections should include walking along the line to check for any issues or potential issues. 3.1 Geoflow Air Release Valve Construction ● One air release valve shall be installed at Waypoint 11 ● Installation should be quick and easy; follow the directions provided with the valve ● An air vent box will be placed over the buried air release valve to protect it from being stepped on. The top of the box will be flush with the ground and will have a green top for visibility. Maintenance ● The twist off cap on the valve should be removed every 3 months for cleaning. If there is no debris after 3 months of operation, cleaning can occur less frequently ● The replacement valve can be installed if the first valve is damaged or fails ● If both valves do not work at all, alternatives include: (1) creating a DIY air release valve (Section 6.0) and (2) drill or punch holes through the PVC at this location. 3.2 Stream Crossings Construction ● Construction will involve the creation of two concrete anchors which will be placed 10’ from each bank of the stream. ○ These anchors should be level in relation to each other across the stream bed, as the pipe will extend from one anchor to the other. ○ The anchors will be 2’ wide, 2’ high, and 1’ deep ○ Rebar Ushaped loops will be inserted at a depth of at least 4”. The loops should be placed 2” away from each other to allow the galvanized pipe to be dropped between the loops (not threaded through). ○ When the pipe is placed between the rebar loops, the pipe should be tied down with wire or other material suitable to keep the galvanized pipe down. ● Next, the pipe will need to be assembled on land in sections to prepare for installation. ● Excavation of a trench across the stream perpendicular to stream flow will be required to bury the pipe. ○ The trench will likely be able to be dug across the stream without diverting the flow of the stream. ● However, a dam may be required to divert water away from the construction zone to improve working conditions. ○ In this case, it is recommended that crossings are constructed in the dry season when stream flows are low. ● Finally, the pipe shall be placed into the trench and appropriately connected to the anchors. ● The trench will be filled (from bottom to top) with well graded boulders, rocks, gravel, and stream sediments. Maintenance ● Stream crossings should be checked for scouring and/or movement during the annual aqueduct inspection. 3.4 Break Pressure Tanks For more details on construction, please consult pages 6983 in Niskanen, 2003 (available on CD). While the description in Niskanen is for a storage tank, he used the same procedure to construct break pressure tanks at a rural community in the Dominican Republic. Construction ● Wooden forms will need to be assembled for the perimeter of the base of each of the break pressure tanks, and the area around each tank location will need to be cleared, marked, and excavated. ● The tank should be constructed on a flat area of ground. If this is not available near the waypoint location, the concrete footing will need to be adjusted accordingly. ● Before the pouring of the concrete pad, install a line of No. 3 rebar stands vertically. The rebar stands will later be threaded through the cinder block cavities to give the structure more strength. Although measurements are given in the engineering drawings, this may need to be adjusted for local cinderblock. ● Once the rebar has been placed around the perimeter of the break pressure tank, the concrete may be mixed and poured, and the foundation may be allowed to set with vertical rebar. ● Next, the cinder blocks should be laid and stacked, threading the No. 3 rebar through the cinder block cavities. ● All cavities should be filled with a concrete mix and allowed to set ● All pipes (inflow, outflow, cleanout, and overflow) will need to be cut and installed; this may be done during the stacking of cinder blocks ● Wooden forms and placed curved rebar will also be needed to construct the break pressure tank lids. This can be done in the village at transported to the site. Once cut to dimensions and nailed together, the forms may be reused for multiple lids. The curved rebar will be place approximately 5 inches from the edge of the lid, placed vertically for use as a handle, then the concrete may be poured and allowed time to set. ● The overflow pipe should be directed a safe distance away from the tank to eliminate the possibility of erosion near the components. The outflow from this pipe should be directed onto riprap to reduce erosion. Maintenance ● Three concrete covers on the top of the break pressure tank offer community members various configurations on how to remove the roof and inspect the tank ● Tanks should be visually inspected every 3 months to track the buildup of sediment in the tank ● When sediment builds up, the tank should be cleaned out via the cleanout pipe on the inlet side of the tank, allowing inflow to flush the tank of sediment 4.0 Waypoint 80 4.1 Concrete Pad Construction ● The area of the concrete pad will be cleared and staked to the proper dimensions, and then excavated for concrete. ● Lay edge boards to form the perimeter of the pad wall. Arrange ⅜” diameter rebar in grid pattern to form 12” x 12” mesh, suspended 4” above the ground. ● Through mesh, fill pad area with 6” of concrete using a mix of ½ gravel, ⅓ sand, and ⅙ cement by volume. Allow slab to cure for 7 days before removing molds. 4.2 Inline chlorinator See Appendix I and Yoakum, 2013 (Available on CD) for construction and maintenance instructions. 4.3 Storage Tank Construction ● In the existing aqueduct, one of the 4,200 liter storage tanks is not being used. This tank should be transported from its current position to the concrete pad at waypoint 80. ● The community can use the same method they used to move the tank to its current location to move it to the concrete pad at waypoint 80. ○ The tank is large and fragile; workers should move slow and deliberately. ● The overflow pipe should be directed a safe distance away from the concrete pad to eliminate the possibility of erosion near the components of waypoint 80. The outflow from this pipe should be directed onto riprap to reduce erosion. Maintenance ● The tank should be visually inspected routinely to gauge the necessity of maintenance tasks for the tank. Suggested inspection intervals: ○ Every 3 months for the first year ○ Every 6 months after that ● During inspection, look for sediment build up (there should not be enough to cause problems), leaks, and any other causes for concern ● Should the tank need maintenance of any kind, water should be routed through the break pressure tank to allow the storage tank to be worked on without disrupting the water supply to the community. 4.4 Break Pressure Tank Same as section 3.4, but the tank will be built on the concrete pad. 5.0 House access 5.1 Tapstands Construction The construction of tapstands at the proposed aqueduct should be similar, if not identical, to tapstand construction at the existing aqueduct. ● The branching PVC pipe should also be buried ● Order of installation: ○ Install a wooden post (a 2x4 or similar size) at desired location ○ Install a tee at the main line, which reduces the pipe diameter to 0.5” SDR 13.5 PVC ○ Install a shutoff valve between the tee and the faucet ○ Install the faucet at a convenient height ○ A small piece of fabric may be placed at the end of the faucet to filter any coarse materials prior to use 6.0 Other 6.1 DIY Air release valve In the instance that the air release valves suggested have failed and there are no available replacements, follow the directions below to make an air release valve from likely available materials. Materials: ● ¾” male PVC slip adapter (2), preferably with a small ledge on the inside that the oring can set ● ¾” PVC tubing ● ¾” acrylic ball ● Rubber Oring ● Nail ● PVC cement Construction 1. On the PVC tubing, mark ⅝ inch from the base and drill a small hole all the way through the pipe. Put the nail through the hole and secure both sides of the nail to the PVC pipe, making sure that excess metal is removed from the nail and it is flush on both sides. 2. Prime the adapter with PVC cement and place the oring and adapter. 3. Prime the PVC tubing from the previous step with cement and place it into the adapter. On the other side add the other adapter piece with cement and secure both ends. allowing for cement to cure. 4. Be sure to test the airrelease valve before it is placed in the line to ensure a tight seal when water is in the line. 7.0 References Jones, E.K. 2014. Improvements in Sustainability of GravityFed Water Systems in the Comarca NgäbeBuglé, Panama: Spring Captures and Circuit Rider Model, a master’s report. Michigan Technological University, Houghton, MI. Link: http://www.mtu.edu/peacecorps/programs/civil/pdfs/JONESE_MSReport.pdf. Available on CD. Niskanen, R.W. 2003. The Design, Construction, And Maintenance of a GravityFed Water System In The Dominican Republic, a thesis report. Michigan Technological University, Houghton, MI. Link: http://www.mtu.edu/peacecorps/programs/civil/pdfs/mattniskanenthesisfinal.pdf. Also available on CD. Yoakum, B. 2013. User Field Guide for MINSA’s InLine Chlorinator. Link: http://usfmi.weebly.com/uploads/5/3/9/2/5392099/users_manual_for_minsa_inline_chlorinator. pdf. Also available on CD. Appendix M: Illustrations of components Appendix M: Illustrations of components Break Pressure tanks Overview: Top: Isometric (without cover): Isometric (with covers): Waypoint 80: Isometric: Front: Side: Top: Chlorinator Exploded: Isometric: Tapstands Isometric: DIY Air release valve Exploded: Isometric: Wire: Appendix N: Engineering Drawings Sheet Index Sheet 1 Stream Crossing: Overall View Sheet 2 Stream Crossing: Ground Section View Sheet 3 Stream Crossing: Concrete Anchor Sheet 4 Break Pressure Tank Sheet 5 Waypoint 80: Top View Sheet 6 Waypoint 80: Side View Sheet 7 Waypoint 80: Storage Tank Sheet 8 Tapstand Sheet 9 DIY Air Release Valve 8 7 6 5 4 3 2 1 D D Stream Bank C C B B 1.5" I.D. Galv. Pipe Place Anchors 10' from stream banks A Reasonable Engineering TITLE: A Stream Crossing: Overall View SIZE DWG. NO. REV B 8 5 7 4 63 5 2 4 1 3 2 SHEET 1 OF 9 1 8 6 7 5 4 2 3 1 D D 10.5" 2" 24" C C ~5" B B 4" max Min. depth of 4" Construction Notes: -Use 0.5" Rebar 12" -Secure pipe between both loops using wire or a weatherproof equivalent -Ensure each end of the rebar is embedded in at least 4" of concrete A -One anchor will be required at each end of the stream 24" Reasonable Engineering TITLE: SIZE DWG. NO. REV B SHEET 2 OF 9 Scale: 1:6 8 5 7 4 63 5 2 4 1 3 2 A Stream Crossing: Concrete Anchor 1 8 7 6 5 4 3 2 1 D D Stream C C 6" Sand 18" Graded Fill B B 1.5" I.D. Galv. Pipe Concrete Anchor Reasonable Engineering TITLE: A Stream Corssing: Ground Section View SIZE DWG. NO. REV B 8 7 6 5 4 3 2 SHEET 3 OF 9 1 Side View Top View Megan Farrish Break Pressure Tank Front View SHEET 4 OF 9 Megan Farrish Waypoint 80: Top View SHEET 5 OF 9 Megan Farrish Waypoint 80: Front View SHEET 6 OF 9 Side View Top View Front View 11/14/14 Megan Farrish Waypoint 80: Storage Tank SHEET 7 OF 9 Top View Side View Megan Farrish Front View Tapstand SHEET 8 OF 9 Side View Top View Megan Farrish DIY Air Release Valve Front View SHEET 9 OF 9