1
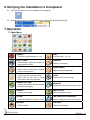
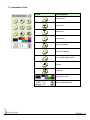
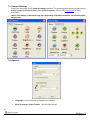
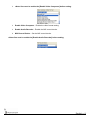
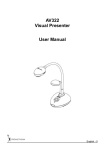
ActiView
Visual Presenter Image Software
User Manual
Date: 2009/06/16
English - 0
Contents
1.
Introduction .....................................................................2
2.
System requirement ........................................................2
3.
Before install....................................................................2
4.
Install ActiView in Windows XP .......................................3
5.
Install ActiView in Windows Vista ....................................5
6.
Verifying the Installation is Completed ............................6
7.
Operation ........................................................................6
7.1 Main Menu ......................................................................6
7.2 Annotation Tools..............................................................7
7.3 Camera Settings .............................................................8
7.4 Options ............................................................................8
English - 1
1. Introduction
ActiView PC and USB driver which support WIA and TWAIN standards.
After installing the USB driver and ActiView application, you can use the software to:
¾
Control the AV322.
¾
Capture and record images.
¾
Annotate images, highlight important details and save them for later use.
2. System requirement
Windows XP
MAC OS X
v10.4.10, v10.5
Windows Vista
z CPU: P4 2.8 GHz and above
z CPU: P4 2.8 GHz and above
z Memory: 512MB
z Memory: 1GB
z Support Direct X 9
z Support Direct X 9
z Resolution: 1024x768
z Resolution: 1024x768
z
z Minimum Hard Disc Space
z Minimum Hard Disc Space
z
Required: 100MB
z CPU: PowerPC G4 866MHz
Required: 100MB
z
z
or Intel Pentium® 1.83GHz
Intel Core 2 Duo processor
Memory: 512MB
1,024x768 screen resolution
and 24-bit color display
Minimum Hard Disc Space
Required: 1GB
QuickTime 7.4.5 above
3. Before install
3.1. Connect the power cord of the Visual Presenter.
3.2. Turn on the Visual Presenter.
3.3. Connect USB cable to the Visual Presenter and your computer. Then, as shown below, the computer
will automatically detect new hardware.
3.4. Press Cancel to skip the [Found New Hardware]
English - 2
4. Install ActiView in Windows XP
4.1. Click the [Setup.exe] to start the installation wizard of ActiView.
4.2. Follow the screen instructions and press [Next].
4.3. Press [Yes] to create a ActiView shortcut at your desktop.
English - 3
4.4. Follow the screen instructions and press [Next].
4.5. Please select [Continue].
4.6. Once the installation is completed, press [Finish] to reboot the system.
English - 4
5. Install ActiView in Windows Vista
5.1. Click the [Setup.exe] to start the installation wizard of ActiView.
5.2. Follow the screen instructions and press [Next].
5.3. Press [Yes] to create a ActiView shortcut at your desktop.
5.4. Please click the [Finish] button then reboot the system.
English - 5
6. Verifying the Installation is Completed
6.1. Find the ActiView icon on the desktop of the computer.
6.2. Double click on the icon or select [Program] / [Start] / [Programs] / [ActiView].
7. Operation
7.1 Main Menu
POWER:
Turn the visual presenter on / off
AUTO TUNE:
Automatically adjust the image for
best possible quality.
OPTIONS:
Select video compression method
and the audio source.
MAIN:
Launch the main functions menu
Right click on this icon to show
information about the ActiView.
CAMERA SETTING:
Launch the Camera Setting window
to adjust live images
FREEZE:
Freeze a live image
CLOSE:
Close the advanced functions menu
RECORD:
Record videos
LAMP:
Turn the lamp
on / off
PREVIEW:
Display live images
BRIGHTNESS:
Adjust image brightness
ZOOM:
Zoom in/out from the image
ADVANCE:
Launch the advanced functions menu
ANNOTATION:
Display annotation tools
TIME LAPSE PHOTOGRAPHY:
Capture images at a pre-set intervals
CAPTURE:
Capture still images
English - 6
7.2 Annotation Tools
ICON
Description
Pointer tool
Laser tool
Insert text
Draw a line
Draw an ellipse
Draw a rectangle
Free-hand drawing tool
Eraser
Clear all
Select pen color
Select line thickness
English - 7
7.3 Camera Settings
Control the live image via the Camera Settings interface. The operating procedure is the same as the
remote control and control panel of the Visual Presenter. Refer to the user manual for more
information.
<Note> The display of the button may vary depending on product functions. An inactive button
will grey out.
7.4 Options
¾
Language:Set the Chinese or English user interface.
¾
Video Compress Codec Format:Set the video format.
English - 8
¾
<Note>You need to enable the [Enable Video Compress] before setting.
¾
Enable Video Compress:Enable the video format setting.
¾
Enable Audio Recorder:Enable the MIC record device.
¾
MIC Record Device:Set the MIC record device.
<Note>You need to enable the [Enable Audio Recorder] before setting.
English - 9