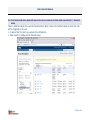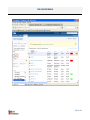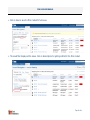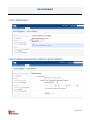
1
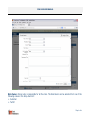
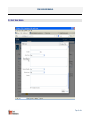
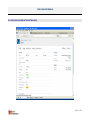
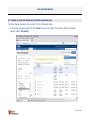
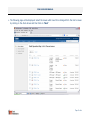
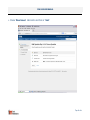
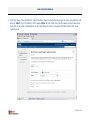
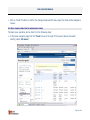
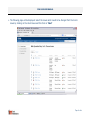
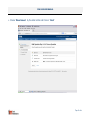
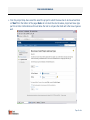
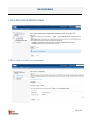
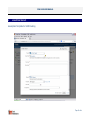
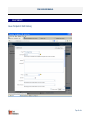
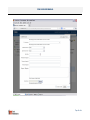
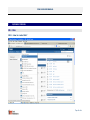
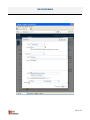
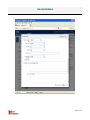
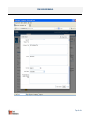
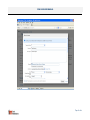
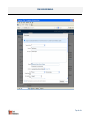
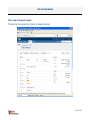
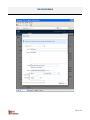
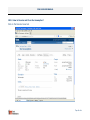
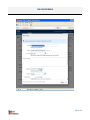
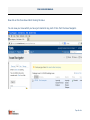
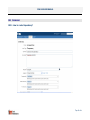
JIRA RAID User Manual JIRA RAID USER MANUAL CONTENTS 1 OBJECTIVE .......................................................................................................................................................................................................................... 3 2 INTRODUCTION .................................................................................................................................................................................................................. 4 3 RISK ISSUE TYPE TEMPLATE ................................................................................................................................................................................................ 4 3.1 3.2 3.3 3.4 3.5 3.6 3.7 3.8 CREATE ISSUE SCREEN ................................................................................................................................................................................................................. 4 VIEW ISSUE SCREEN AFTER REQUIREMENTS CAPTURED AND ISSUE CREATED.......................................................................................................................................... 13 EDIT ISSUE SCREEN................................................................................................................................................................................................................... 15 VIEW ISSUE SCREEN AFTER EDITING ISSUE...................................................................................................................................................................................... 17 CUSTOMIZING OF ISSUE NAVIGATOR ............................................................................................................................................................................................ 19 FOR CONFIGURING AUTO-GENERATED MAILS FROM JIRA ON VARIOUS TRIGGERS BASED ON USER ENTRY / BUSINESS RULES ............................................................................ 22 CHANGE OF ISSUE TYPE FROM RISK TO ISSUES BY USING BULK MOVE ................................................................................................................................................... 26 BULK CHANGE OPERATION FOR MOVING BULK ISSUES ...................................................................................................................................................................... 30 4 ASSUMPTION TEMPLATE.................................................................................................................................................................................................. 35 5 ISSUES TEMPLATE ............................................................................................................................................................................................................ 36 6 DEPENDENCY TEMPLATE .................................................................................................................................................................................................. 37 7 QUICK WALK THROUGH ................................................................................................................................................................................................... 39 10.1 RISK ...................................................................................................................................................................................................................................... 39 10.1.1 How to create Risk? .................................................................................................................................................................................................... 39 10.1.2 How to create the subtask? ........................................................................................................................................................................................ 43 10.1.3 How to Modify/Update the Risk?................................................................................................................................................................................ 45 10.1.4 How to Resolve the Issue?........................................................................................................................................................................................... 46 10.1.5 How to Close the issue? .............................................................................................................................................................................................. 48 10.1.6 How to Reopen the issue? ........................................................................................................................................................................................... 50 10.1.7 How to Quickly Search your issue from the Issue Navigator? ..................................................................................................................................... 52 10.2 ASSUMPTION .......................................................................................................................................................................................................................... 54 10.2.1 How to create Assumption? ........................................................................................................................................................................................ 54 10.2.2 How to Comment in an Issue? .................................................................................................................................................................................... 55 Page 2 of 64 JIRA RAID USER MANUAL 10.2.3 How to Resolve and Close the Assumption? ............................................................................................................................................................... 56 10.3 DEPENDENCY .......................................................................................................................................................................................................................... 59 10.3.1 How to create Dependency? ....................................................................................................................................................................................... 59 10.3.2 How to Resolve and Close the Issue? .......................................................................................................................................................................... 62 10.3.3 How to view your issues? ............................................................................................................................................................................................ 64 1 OBJECTIVE The objective of this document is provide users with a ready reference for the Risk, Assumption, Issue & Dependency templates in JIRA and how the same can be used. Page 3 of 64 JIRA RAID USER MANUAL 2 INTRODUCTION Risks, Assumptions, Issues & Dependencies within a project are normally tracked using spreadsheets. We have implemented the RAID template in JIRA so that Project and Risk Managers can use this template as a dynamic tool to effectively record, analyze, monitor, manage and report project risks, assumptions, issues and dependencies. 3 RISK ISSUE TYPE TEMPLATE A Risk is any specific event which might occur and thus have a negative impact on a project or program. The description of the various fields in the Risk Template is as follows: 3.1 CREATE ISSUE SCREEN Page 4 of 64 JIRA RAID USER MANUAL Threshold Value: This field determines the risk exposure thresholds that indicate when a risk becomes unacceptable and triggers the execution of a risk mitigation plan or a contingency plan. User will have to select the Threshold Value from the drop-down list. Summary: Summary of the Risk reported. Page 5 of 64 JIRA RAID USER MANUAL Description: Clearly articulate the risk with the condition and the consequence. Reporter: Person responsible for tracking and addressing the risk. By default the Username of the user who logs a risk will be populated in this field. Assignee: Person responsible for resolving the risk. The Assignee can be selected from the drop-down list which includes names of all members of the project. If the Assignee name does not exist in the dropdown, then a request should be raised for adding the user in the project. Risk Category/ Risk Impacted Area: This field give the mapping of risk categories with the risk sources. This is field is a cascaded select list. The following table illustrates a high-level classification of the risk categories and the risk sources it can be mapped to. RISK-CATEGORY RISK-SOURCE People Customers, End-users, Sponsors, Politics, Morale, Communication Process Deployment, Support, Mission and Goals, Decision Making, Project Characteristics, Budget Cost Schedule, Requirements, Design, Building, Testing Technology Security, Development/Test/Operational/Environment, Tools, Deployment, Support, Availability, Infrastructure Environmental Legal, Regulatory, Competition, Economic, Technology, Business, Organizational, Politics External Sub-Contractors/ Suppliers, Regulatory, Market, Weather, Customer Stakeholders, Personnel, Organization, Skills, Page 6 of 64 JIRA RAID USER MANUAL Risk Identification Date: Date when the risk was identified. Page 7 of 64 JIRA RAID USER MANUAL Risk Owner: Person who is responsible for all the risks. The Risk Owner can be selected from one of the following values in the drop-down list: Customer TechM Page 8 of 64 JIRA RAID USER MANUAL Probability: How likely the risk event or condition is to occur. The Probability can be selected from one of the following values from the drop-down list: High Medium Low Impact: Extent of what would happen if the risk materialized. The Impact can be selected from one of the following values from the drop-down list: High Medium Low Rank: Rank of the risk based on risk exposure rating. This should be manually entered on each risk issue after the sorting of the risk exposure values in the issue navigator page. E.g. the risk with the highest value for risk exposure will have the rank 1. Risk Handling Approach: This field describes the approach followed for handling the risk. The Risk Handling Approach can be selected from one of the following values from the drop-down list: Avoid : Changing the scope while still meeting the user‟s needs so that the risk is avoided Transfer : Minimize the impact of the risk by transferring it to another project, team, organization or individual Mitigate : Mention the specific action plan to reduce the probability of occurrence of the risk and/or the impact of the risk; Risk mitigation plans are developed and implemented as needed to proactively reduce risks before they become issues Accept: Live with the consequences if the risk were actually to occur. We accept the risk and take no further action. Page 9 of 64 JIRA RAID USER MANUAL Mitigation Plan: Provide Mitigation Plan in this field if risk handling approach is mitigation. This field is to be enabled only if the Risk Handling Approach value is “Mitigate”. Contingency Plan: Provide Contingency plan if risk handling approach is mitigation or accept. Contingency Plan is mandatory if Risk Exposure value is greater than Threshold. Action: Mention the action to be taken based on the risk handling approach e.g. mitigation actions, contingency planning actions. Due Date: The date by which the Issue should be resolved. Due Date should be greater than the Risk Created date. Page 10 of 64 JIRA RAID USER MANUAL Action Status: This field indicates the status of the action taken. The Action Status can be one of the following values from the drop-down list: Page 11 of 64 JIRA RAID USER MANUAL To Be Started In Progress Completed Risk Status: This is determined by the workflow steps. Planned Effort/Cost needed to Mitigate Risk: Effort (in terms of Hours spent)/cost needed to mitigate specified risk. Page 12 of 64 JIRA RAID USER MANUAL 3.2 VIEW ISSUE SCREEN AFTER REQUIREMENTS CAPTURED AND ISSUE CREATED Risk Exposure: This is a calculated and non-editable field which will be displayed on the screen once the Risk issue type is created. This calculated field is based on the values selected for the Probability and Impact fields. The risk Page 13 of 64 JIRA RAID USER MANUAL exposure values can be viewed in the Issue Navigator by adding a new column in the Issue Navigator and can be arranged in the descending order for assigning the rank. Click on Edit to enter the Residual Probability and the Residual Impact. Page 14 of 64 JIRA RAID USER MANUAL 3.3 EDIT ISSUE SCREEN Page 15 of 64 JIRA RAID USER MANUAL In Addition to the fields present in the Create Issue screen (Excluding Probability and Impact), the following fields need to be populated in the Edit Issue screen once the issue is created: Residual Probability: This filed indicates the Risk Probability after implementing the identified risk action plan. This is a drop-down field which is editable and can be changed during the progress of the issue. This field will not be present at the time of the issue creation. The user should manually change the values after the issue is created by editing the issue. This value can be changed during the workflow cycle as well. Residual Risk Impact: This field indicates the Risk Impact after implementing the identified risk action plan. This is a drop-down field which is editable and can be change during the progress of the issue. This field will not be present at the time of the issue creation. The user should manually change the values after the issue is created by editing the issue. This value can be changed during the workflow cycle as well. Page 16 of 64 JIRA RAID USER MANUAL 3.4 VIEW ISSUE SCREEN AFTER EDITING ISSUE Page 17 of 64 JIRA RAID USER MANUAL Residual Risk Exposure: This is a non-editable field whose value is calculated based on the values for the Residual Probability and Residual Impact fields. The Residual Risk Exposure values can be viewed in the view issue screen after the issue is edited. It can also be viewed in the issue navigator by adding the column in the issue navigator. Page 18 of 64 JIRA RAID USER MANUAL 3.5 CUSTOMIZING OF ISSUE NAVIGATOR You can customize your Issue Navigator by choosing: which columns (i.e. issue fields) to display and how many rows (i.e. issues) to display. To customize the issue navigator: In the issue navigator page from the 'Tools' menu at the right of the screen (above the search results), select 'Configure Columns'. The following page will be displayed. Page 19 of 64 JIRA RAID USER MANUAL To add a column to the list: Select the issue field name from the drop-down box titled ‘Add New Column’ and click the 'Add' button. The column will appear as the right-most column in the list. Page 20 of 64 JIRA RAID USER MANUAL You can then position the column where desired by using the arrow icons (In our case select Risk Exposure and Residual Risk Exposure) After configuring the issue navigator columns and selecting the Filter from the dashboard, the issues will be displayed. Click on the Risk Exposure field as highlighted to set the risks in the descending order for Ranking the issues. Once the Issues have been sorted, edit the issues to enter the rank into each issue. Page 21 of 64 JIRA RAID USER MANUAL 3.6 FOR CONFIGURING AUTO-GENERATED MAILS FROM JIRA ON VARIOUS TRIGGERS BASED ON USER ENTRY / BUSINESS RULES There is RSS feed which the user should subscribe to after creation of the filter based on which the mail will be triggered to the user. Create a filter for which you require the notifications. Enter search to display all the filtered issues. Page 22 of 64 JIRA RAID USER MANUAL Page 23 of 64 JIRA RAID USER MANUAL Click on Save to save the filter created for future use. The saved filter displays all the issues. Click on Subscriptions for getting notified for the filter created. Page 24 of 64 JIRA RAID USER MANUAL Click on Add Subscriptions. Enter the details as required and Click on Subscribe to get mail notifications. Page 25 of 64 JIRA RAID USER MANUAL 3.7 CHANGE OF ISSUE TYPE FROM RISK TO ISSUES BY USING BULK MOVE The bulk change operation can be done from the following steps: In the issue navigator page from the 'Tools' menu at the right of the screen (above the search results), select 'all issues’ Page 26 of 64 JIRA RAID USER MANUAL The following page will be displayed. Select the issues which need to be changed from the risk to issues by clicking on the check boxes and then Click on ‘Next’ Page 27 of 64 JIRA RAID USER MANUAL Choose „Move Issues’ radio button and Click on „ Next‟ Page 28 of 64 JIRA RAID USER MANUAL From the Issue Type drop down, select the issue type to which the issue type is to be converted to and click on ‘Next’ from the bottom of the page. Note: do not check the Use the above project and issue type pair for all other combinations as this will allow the tool to compare the fields with other issue types as well. Page 29 of 64 JIRA RAID USER MANUAL Click on „Confirm‟ button to confirm the changes made and the Issue type from Risk will be changed to „Issues‟. 3.8 BULK CHANGE OPERATION FOR MOVING BULK ISSUES The bulk move operation can be done from the following steps: In the issue navigator page from the 'Tools' menu at the right of the screen (above the search results), select 'all issues’ Page 30 of 64 JIRA RAID USER MANUAL The following page will be displayed. Select the issues which needs to be changed from the risk to issues by clicking on the check boxes and the Click on ‘Next’ Page 31 of 64 JIRA RAID USER MANUAL Choose „Move Issues’ by the radio button and Click on „ Next‟ Page 32 of 64 JIRA RAID USER MANUAL From the project drop down select the select the project to which the issue has to be moved and click on ‘Next’ from the bottom of the page. Note: do not check the Use the above project and issue type pair for all other combinations as this will allow the tool to compare the fields with other issue types as well. Page 33 of 64 JIRA RAID USER MANUAL Click on „Next‟ since all the fields will be retained. Click on „Confirm‟ to confirm the move operation. Page 34 of 64 JIRA RAID USER MANUAL 4 ASSUMPTION TEMPLATE Assumption Template for RAID tracking Page 35 of 64 JIRA RAID USER MANUAL 5 ISSUES TEMPLATE Issues Template for RAID tracking Page 36 of 64 JIRA RAID USER MANUAL 6 DEPENDENCY TEMPLATE Dependency Template for RAID tracking Page 37 of 64 JIRA RAID USER MANUAL Page 38 of 64 JIRA RAID USER MANUAL 7 QUICK WALK THROUGH 10.1 RISK 10.1.1 How to create Risk? Page 39 of 64 JIRA RAID USER MANUAL Page 40 of 64 JIRA RAID USER MANUAL Page 41 of 64 JIRA RAID USER MANUAL Page 42 of 64 JIRA RAID USER MANUAL 10.1.2 How to create the subtask? After the Risk has been created, sub-task can be created by clicking on More Actions tab and selecting Create Sub-Task option. Page 43 of 64 JIRA RAID USER MANUAL Page 44 of 64 JIRA RAID USER MANUAL 10.1.3 How to Modify/Update the Risk? After the Risk has been created, it can be edited by clicking on Edit tab. Page 45 of 64 JIRA RAID USER MANUAL 10.1.4 How to Resolve the Issue? The Issue can be resolve by clicking on Resolve Issue tab. Page 46 of 64 JIRA RAID USER MANUAL Page 47 of 64 JIRA RAID USER MANUAL 10.1.5 How to Close the issue? The Issue can be closed by clicking on Close Issue tab. Page 48 of 64 JIRA RAID USER MANUAL Page 49 of 64 JIRA RAID USER MANUAL 10.1.6 How to Reopen the issue? The Issue can be re-opened by clicking on Reopen Issue tab. Page 50 of 64 JIRA RAID USER MANUAL Page 51 of 64 JIRA RAID USER MANUAL 10.1.7 How to Quickly Search your issue from the Issue Navigator? You can quickly search your issues by clicking on Quick Search and type the project key. Page 52 of 64 JIRA RAID USER MANUAL Page 53 of 64 JIRA RAID USER MANUAL 10.2 ASSUMPTION 10.2.1 How to create Assumption? Page 54 of 64 JIRA RAID USER MANUAL 10.2.2 How to Comment in an Issue? To comment on an issue, click on the Comment tab and write the comment. Then click on ADD. Page 55 of 64 JIRA RAID USER MANUAL 10.2.3 How to Resolve and Close the Assumption? Click on the Resolve Issue tab. Page 56 of 64 JIRA RAID USER MANUAL Page 57 of 64 JIRA RAID USER MANUAL Now click on the Close Issue tab for closing the issue. You can view your issue which you have just created at any point of time from the Issue Navigator. Page 58 of 64 JIRA RAID USER MANUAL 10.3 DEPENDENCY 10.3.1 How to create Dependency? Page 59 of 64 JIRA RAID USER MANUAL Page 60 of 64 JIRA RAID USER MANUAL You can view the following page after the Dependency is created. Page 61 of 64 JIRA RAID USER MANUAL 10.3.2 How to Resolve and Close the Issue? Click on the Resolve Issue tab for resolving the issue. Page 62 of 64 JIRA RAID USER MANUAL Click on the Close Issue tab for closing the Dependency once completed. Page 63 of 64 JIRA RAID USER MANUAL 10.3.3 How to view your issues? You can view your issue in the Issue Navigator as shown below: END OF DOCUMENT Page 64 of 64