1
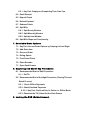
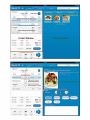
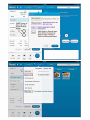
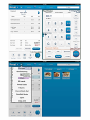
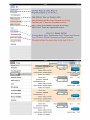
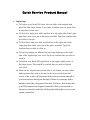
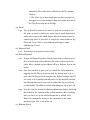
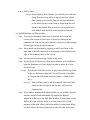
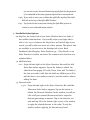
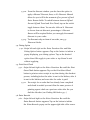
Quick Service User Manual Build 1507 Revel Systems Author: Josh Clawson Date: May 27, 2014 Revel Quick Service Table of Contents Build: 1507 1. Login Page 2. Menu Window: Taking Orders 3. Order Window 3.1. Send Orders 3.1.1. Key Fact: Coursing 3.2. Cancel Order 3.3. Hold Order and Finding Held Orders 3.3.1. Key Fact: Held Order Sorting 3.3.2. Key Fact: Searching Held Orders 3.4. Finding Closed Orders 3.4.1. Key Fact: Timeline for Modifying Payments on Closed Orders 4. Order Window Options: Modifying Orders 4.1. Deleting Products from an Order 4.2. Voiding Sent Products from an Order 5. Product Modifications Window 5.1. Change Product Quantity 5.1.1. Key Fact: Ways to Change Quantity 5.2. Edit Modifier 5.3. Dining Option (Per Product) 5.4. Discount Item (Per Product) 5.5. Remove Tax (Per Product) 5.6. Copy Product 5.7. Inventory Lookup 5.8. Special Request 6. Payment Window 6.1. Balance Due 6.2. Payment Options 6.3. Tip Amount 6.3.1. Key Fact: Employees Completing Their Own Tips 6.4. Email Receipt 6.5. Reprint Check 6.6. Refund Payment 6.7. Redeem Points 6.8. Split Bills 6.8.1. Split Evenly Window 6.8.2. Split Manually Window 6.8.3. Split by Item Window 6.9. Split Bills Steps and Functionality 7. Scrollable Order Options 7.1. Key Fact: Access Order Options by Swiping Left and Right 7.2. Add Extra Item 7.3. Discount Order 7.4. Dining Option 7.5. Print Guest Check 7.6. Enter Barcode 7.7. Open Cash Drawer 8. Beginning and End of Day Procedures 8.1. Recommended Start of Shift Procedure 8.1.1. Set Till 8.2. Recommended End of the Night Procedure (Closing Tills and Batch Process) 8.2.1. Check Offline Payments 8.2.2. Check Declined Payments 8.2.2.1. Key Fact: Declined Card in Online vs. Offline Mode 8.2.3. Checkout the Till (Close Out the Cash Drawer 9. Locking the POS (Guided Access) Quick Service Product Manual 1. Login Page 1.1. To Login to your Revel POS, enter the four-digit code assigned and press the blue Login button. If you make a mistake you can press Clear at any time to start over. 1.2. To Clock In to begin your shift, tap Clock In on the right side of the Login page then enter your pin in the space provided. Tap Yes to confirm that you wish to clock in. 1.3. To Clock Out to end your shift, tap Clock Out on the right side of the Login page then enter your pin in the space provided. Tap Yes to confirm that you wish to clock in. 1.4. To Login by swiping an Admin Card, tap Login by Swipe on the right side of the Login swipe your card. Tap Yes to confirm that you wish to clock in. 1.5. To Refresh your Revel POS, tap Refresh on the upper-right corner of the login screen. Then tap OK to confirm that you wish to Refresh your POS. 1.6. When on the Login Screen you are able to see if there are any orders and payments that need to be sent to the server on the lower-left corner of the screen. All Payments Sent to Server means that all of your transactions have gone through. If there is a message with a number-value like 3 Payments Not Sent To Server, this means that your POS temporarily dropped connection from your network or Internet connection and they will be pushed through as soon as you regain connection. 2. Menu Window: Taking Orders 2.1. After Logging in (see 1.1 – Login Page), the first screen you see will be your Revel Main Screen which consists of your Order Window on the left and your Menu Window in blue on the right.Inside your Order Window you should see your products (if they are not there or you only see Test Product, refer to Making Your Menu in the Revel Dashboard Manual). 2.2. You will notice a Top Menu button at the top of the Menu screen, with your square-shaped categories below. This Top Menu tab is the first of three navigable tabs that will appear as you navigate your menu. Once you tap into a category, you will see your subcategories appear, as well as the category that you are in added to the right of the Top Menu tab. Likewise, when a subcategory is tapped on, you will see your products, and the subcategory tab will be added to the right of the category tab and top menu tab. 2.2.1. You can return to your Top Menu at any time by tapping on the Top Menu tab while in the Menu Window. You can also return to the previous category and subcategory you visited by tapping on the corresponding tabs next to the Top Menu tab. 2.2.2. Once in a subcategory (Top Menu+ Subcategory Tab), you will see your products. Tap on a product to add it to your order. You will see the product, quantity, product price, total price, and Balance Due appear in your Order Window. 2.2.2.1. If you have assigned modifiers to the product, the modifier pop-up screen will appear before t h e product is attached to your order. (for help read Assigning Modifiers, pg....). 2.3. You can search through your entire menu at any time by using the Search bar on the upper-right side. This search functionality can recognize any organization of characters. For example, if searching for Pinot Grigio, the search will recognize be able to recognize “Gri”, “Gio”, and “Not”, thus giving you Pinot Grigio as an option. 3. Order Window 3.1. Send Orders 3.1.1. Tap Send Order to send your chosen items to your kitchen printer or kitchen display if available. ***Key Fact: If you wish to send items to the kitchen at different times, add the items you wish to send first, send those to the kitchen, then tap Hold Order. When you are ready to add more items to send to the kitchen, find the correct Order (See 3.3 – Finding Held Orders) then add the items to the previously held order. Press Send Order again to send the remaining items to the kitchen. 3.2. Cancel Order 3.2.1. An order can be canceled by tapping on Cancel Order before the items are sent to the kitchen or paid for. After the items are sent to the kitchen by tapping Send Order, the items must be voided if you wish to take them off of the order (See Voiding Items and Orders, pg....) 3.3. Hold Order and Finding Held Orders 3.3.1. If you wish to exit the order you are currently in, with the intention of being able to return to it later, tap Hold Order. Tapping Hold Order will save that specific order in the Held Orders window which is found in the Orders tab. ***Key Fact: These orders are organized with the most recent Held Order placed at the top, but you can tap on any of the headers (ie. Order#, Customer Name, Date Opened, Dining Type, Employee Name, Total) to sort by those fields. ***Key Fact: After sorting by a header you will see an up or down arrow next to the header. If facing down, this means that the most recent, greatest value, greatest value, or first alphabetically will be first in the list. ***Key Fact: Held Orders are also searchable by Order ID, Customer Name, or the Employee Name associated with the order. The list will auto-populate as you type and is not search by the first character but rather any character (ie. You can search by a customer or employees last name or 3 digits in the middle of an Order #). 3.4. Finding Closed Orders 3.4.1. Tap on the Orders tab, then tap on Today’s Orders. Once in the Todays Orders window your orders will be organized in the same fashion as the Held Orders window, with the same sorting or searching features. ***Key Fact: Products and Payments on closed orders are only modifiable 24 hours after they are closed. Closed orders can be viewed and have checks printed as far back as the installation of the Revel POS. ***Deleting and Re-installing the Revel POS will reset your saved orders. Be sure to capture any important order information before updating or deleting the application. 4. Order Window Options: Modifying Orders ***Key Fact: If a product is highlighted in grey, that means that the product is in an unmodifiable state and must either be paid for or voided. This is because it has been either sent to the kitchen to be made or paid for. The most recently added product that is still modifiable will be highlighted in blue and the previous still modifiable products will be highlighted in white. 4.1. Deleting Products From Order 4.1.1. In order to delete a single product from a new order, swiftly swipe the product you wish to delete to the left (see Fig 3a). This can only be completed with products that have not been sent to the kitchen or paid for, so if a product is highlighted in grey then you can not delete or modify the product without voiding (see Voiding Products, pg....) 4.2. Voiding Sent Products from an Order 4.2.1. If a product in your Order Window is highlighted in grey, then it has been sent to the kitchen and must be voided to be taken off the order. Tap on the grey product in your Order Window which will bring up the Product Action Window. Tap Void, then OK, choose between Void Selected Item and Void Several Items, then OK. Enter a void reason which will be associated with the void in your Voids and Discounts Report on your Revel Dashboard. If you chose Void Several Items, then you can either tap Select All, or select which products you would like to void then tap OK. 5. Product Modifications Window To initiate the Product Modifications Window tap on any product in your Order Window that is highlighted in either white or blue. You will see the Product Modification Window slide in from the right. You can close the Product Modification Window by pressing Back or by pressing on the grey handle next to Quantity and sliding it to the right. 5.1. Change Product Quantity 5.1.1. To change the product quantity before Send Order has been pressed, press directly on the product you wish to change the quantity of and a ( +) will appear. The (-) will decrease the quantity of that product and the (-) will increase the quantity of that product. 5.1.1.1. If the item quantity is at 1 and you press t h e (-) then the item will be deleted. 5.1.1.2. Key Fact: There are 2 sets of (- +), one on the product itself in the Order Window, and another on the right side of the screen on the blue Product Modification Window. Both sets will serve the same function. 5.1.1.3. Key Fact: After a product is sent to the kitchen the quantity can be modified by tapping on the grey product which will bring up the Product Actions Window. Tap Add Quantity to change the quantity from the available options ranging from 110, then OK. 5.2. Edit Modifiers 5.2.1. Tap Edit Modifiers to initiate the Modifier Window for that item (see Assigning Modifiers). 5.3. Dining Option (per product) 5.3.1. Tap Dining Option to choose the dining option that you would like to assign to that product. 5.3.1.1. This assignment is independent of the dining option of the order. For example, the order can be set to Eat-In then one product be To-Go. After choosing you will see a subscript beneath the product name showing the dining option of that product. 5.4. Discount Item (Per Product) 5.4.1. Tap Discount Item to initiate the Discount Window to choose a discount to apply to that item only. After applying a discount by selecting the desired discount and tapping OK, you will see a subscript beneath the price showing the discount name and discount applied. 5.5. Remove Tax 5.5.1. Tap Remove Tax to remove the tax from the specific item. Tap Add Tax to add the tax back on. 5.5.2. Removing the tax on the Product Modification Window will not remove the tax from the entire order like pressing Remove Tax from the Scrollable Order Options will do. 5.6. Copy Product 5.6.1. Tap Copy to copy that product in your order creating a clone of that product. 5.7. Inventory Lookup 5.7.1. Tap Inventory Lookup to check how much of that product is accounted for in your inventory. 5.8. Special Request 5.8.1. The white field at the bottom of the Product Modification Window is a reserved space for you to enter Special Requests, which will print to the kitchen printer and be included beneath each respective item. 6. Payment Window 6.1. Balance Due 6.1.1. In bold red font on the bottom–right side of your Order Window is the Balance Due on that order. On the Pay Window the Balance Due is located on the top-left in blue if the ticket is paid for entirely on the Pay Window, this amount of money will be collected via the Payment Option designated. 6.1.1.1. Along with the Balance Due, the order’s Total, Tax, Surcharge, Sub-Total, and Discounts are visible in the middle region of you Order Window. 6.2. Payment Options: 6.2.1. On the bottom right side of the Pay Window are your payment options. Typical options are Cash, Credit, PayPal, Credit +, and PayPal (If you do not see the payment option you desire please reference Changing Payment Options, pg….). 6.3. Tip Amount 6.3.1. Tap on Tip Amount to add a tip to a completed payment. Press OK to add the tip amount to that transaction or Cancel to exit without adding the tip. If a tip has already been added, you can edit the tip by going back into the Tip Amount window and adding a dollar amount to be added to the tip, or subtract from the tip by adding a negative amount (ie -2.00) if you wish to subtract two dollars from the tip. ***Key Fact: This is one of the two ways to set have employees enter in their own tips. The payment must be completed first, then the closed order found, then the tip amount for that order can be edited from the Tip Amount window. ***The other way to have employees set their own tips is to be logged in as a non-manager, then set the tips amounts in the Tips Processing tab of Settings 6.4. Email 6.4.1. Tap on Email to enter in an email to send the receipt to. On the pop up email window are some typical email domains to make enter ring in the email faster. After the correct email is entered tap Send. If you wish to retype the email address tap Clear and if you wish to exit without entering an email address tap Cancel. 6.5. Reprint Check 6.5.1. Tap on Reprint to print an extra receipt 6.6. Refund Payment 6.6.1. Tap on the Refund Payments button if you wish to refund some or all of a transaction without deleting the order or the items in the order. After a refund is given there will be a Balance Due on the order. 6.6.2. Once the window is open you can refund the full amount by tapping on the Charge Amount with the arrow next to it to push the full Charged Amount into the Refund Amount field. If you wish to do a partial refund, enter in the desired amount into Refund Amount. If you wish to refund the tip as well, tap on the Refund Tip slider to switch refunding the tip on and off. 6.6.3. You can view the tentative Amount Remaining before finishing the refund at the bottom of the refund window. After checking that you have set up the desired amount to refund, click Refund to return the money to the customer in the same payment type that it was given in. 6.7. Redeem Points 6.7.1. Tap on Redeem Points to apply points from a Rewards Card to an order (For help setting up and adding points to Rewards Cards, see Creating and Redeeming Rewards Cards, pg…). 6.8. Split Bills Tap on Split Bills to initiate the Split Bills process.You will first be prompted with the option to Split Evenly, Split Manually, and Split by Item. If Split Evenly or Split Manually are chosen you will be prompted with a window requiring the number of persons that the check will be split between. If Split by Item is chosen you will be taken straight to the Split Bills Window. 6.8.1. Split Evenly Window 6.8.1.1. After choosing how many people to split the bill between, you will see that number of checks with the Balance Due split in even amounts automatically for you. 6.8.2. Split Manually Window 6.8.2.1. First you will enter how many people the check will be split between, then you will be prompted with the amount the amount you would like on each check. For example, if you choose four people to split a $20 bill, you will be prompted for three amounts, which after entered will each become the Balance Due for the respective bills, and the remainder after the three amounts you entered will be automatically populated into the fourth bill. 6.8.2.2.If you add a new check on the Split Manually Window, you will first change the total of the bill you would like to decrease the Balance Due of. Enter in the desired amount for that check, then on the bottom check which has a Total of zero, you can tap the blue arrow to automatically add the remainder of the bill to the last check. The amount that needs to be added to the bills is shown as Needed Adjustment. Tap Add New from this window if you’d like to add more bills to the Adjust Bills Window. 6.8.3. Split by Item 6.8.3.1. On the Split by Item Window you will first start with one check. Your first step will be to tap on Add New Check. Once you have two checks, then you will tap Add Items on the blank check in order to move items from the first check to the second. This process is to be repeated with each added check until the items are split as desired. 6.9. Split Bills Steps and Functionality 6.9.1. You can see Summary Tabs of each check on the bottom-left corner of the screen and view each of them by clicking on the summary tab. You can also swipe between checks by swiftly swiping left and right on the checks themselves. 6.9.2. More checks can be added by tapping on Add New Check on the right side of the full-sized check or by tapping on New Check to the right of the summary tabs on the bottom. 6.9.3. You can print checks and pay checks in any order. 6.9.4. Tap the Print all Checks tab, then choose whether you would like to print the Summary or Guest checks, in order to print all of your checks at once. 6.9.4.1. You can pay all checks at once, or pay some and then tap Hold Order on the bottom right side. You will then have the ability to bring up the Held Order from the Orders -> Held Orders tab.3 6.9.4.1.1. After a check is paid, it will be stamped with a red PAID stamp on the top-right of the check as well as on the summary tab. 6.9.5. If you make a mistake while splitting bills you can refund a specific amount on each check individually by tapping the Refund Payments at the top of the Split Bills Window. You will then see the Refund Window with the ability to refund some or all of each payment of the split bills as well as the ability to refund tips. When you have chosen the desired amount to refund to each check and you see the correct Amount Remaining tap Refund for the payment to be refunded in the same payment option that it was tendered. 6.9.6. If you wish to start over or delete the split bills, tap the Clear Split Bills tab at the top of the Split Bills Window. 6.9.7. Tap Order Screen at any time during the Split Bills process to return to your order and menu window. 7. Scrollable Order Options 7.1. Key Fact: the bottom left of your Order Window there is a slider of four visible extra functions. If you swiftly swipe your finger side to side i n t h e s p a c e between the Pay button and the left edge of your screen you will be able view more sets of four options. The options that are available to you are set on the Settings tab of your Revel Dashboard (See Changing Extra Functions pg ....) Tap directly on an Extra Function to initiate an action. The common extra functions are explained below. 7.2. Add Extra Item 7.2.1. Swipe left and right on the Extra Functions Bar until the Add Extra Item button appears. Tap on the button to initiate the Add Extra Item popup. Fill in the Name, Price, and Tax fields of the item you wish to add. After the fields are filled in press OK to add the item to your order or cancel to exit the window without adding the item. 7.3. Discount Order 7.3.1.1. Swipe left and right on the Extra Functions Bar until the Discount Order button appears. Tap on the button to initiate the Discount Window. In this window you will see a list of all your created discounts and their respective discount percentage or amount. Tap on the discount you wish and tap OK on the bottom right corner of the window to apply the selected discount to the order. To exit the window without applying the discount tap Cancel. 7.3.1.2. From the discount window you also have the option to apply a Manual Discount, Scan, or No Discount. Manual allows for you to fill in the amount off or percent off and Enter Reason fields. To switch between Amount Off and Percent Off and Taxed and Non-Taxed, tap on the switch toggle between them. You can also click on % Discount to choose from set discount percentages. A Discount Reason will be required before you can apply the manual discount to your order. 7.3.1.3. To discount only an item of an order, see 5.3Discount Order 7.4. Dining Option 7.4.1. Swipe left and right on the Extra Functions Bar until the Dining Option button appears. Tap on the button to initiate a popup displaying your dining options. Tap on the desired option then OK to apply to your order or tap Cancel to exit without applying. 7.5. Print Guest Check 7.5.1. Swipe left and right on the Extra Functions Bar until the Print Guest Check button appears. Tap on the Print Guest Check button to print an extra receipt at any time during the checkout process, including before the order is sent to the kitchen, after it is sent to the kitchen, and even after the order is paid. 7.5.1.1. If a receipt for an order that has already been completed and closed is needed you can follow the same process of printing a guest check on a previous order after the you find the old order (see Finding Old Orders pg ...) 7.6. Enter Barcode 7.6.1. Swipe left and right on the Extra Functions Bar until the Enter Barcode button appears. Tap on the button to initiate the Enter Barcode popup on the upper-right side of the screen. From this screen you can type in a barcode, or scan a barcode with a scanner. 7.7. Open Cash Drawer 7.7.1. Swipe left and right on the Extra Functions Bar until the Open Cash Drawer button appears. Tap on the Open Cash Drawer button to open the cash drawer. 8. Beginning and End of Day Procedures 8.1. Recommended Start of Shift Procedure The recommended beginning and end of day procedure for your Revel POS includes the following steps, which will be covered in detail in this section. It is mandatory that the steps be completed in this order: 8.1.1.1. Clock In, Log In, Set Till (Set Cash Drawer), then take orders. 8.1.2. Set Till 8.1.2.1. At the beginning of your day, you'll need to login with a Manager pin. After you login as a Manager, click on the Settings gear at the top left corner of your Revel POS after logging in. On the Settings drop down menu, click on the Tills tab. Once in the Tills tab., you are able to open your cash drawer by tapping the Open Cash Drawer button on the right-hand side. After inserting the desired amount of cash into your cash drawer, tap into the field labeled "Dollars" and enter in the amount of cash entered into the cash drawer. Then tap Set to finalize the till. It will be time stamped and the user that set the till will be recorded. Press Dismiss to exit the Tills Window and begin taking orders on you Menu Window. 8.2. Recommended End of the Night Procedure (Closing Tills and Batch Process) The recommended end of day procedure for your Revel POS includes the following steps, which will be covered in detail in this section. It is mandatory that the steps be completed in this order. Login as a manager, check Offline Payments, Declined Payments, enter tips into your Batch Process, capture your credit payments from the Batch Process, Checkout your till, Logout, then Clock Out. These steps will be covered in detail below. 8.2.1. Check Offline Payments 8.2.1.1. After Logging In with a manager pin, tap on the Settings gear on the top left corner of the screen. Tap on the first option, Manager, to view the Manager Settings options. When in Manager Settings, first choose Offline Payments. If a connectivity issue occurred during a transaction, then the order and payment info is cached here for you to be able to tap Force on the upper right side to force the payments through to the server when you gain connectivity to the correct network. 8.2.2. Check Declined Payments: 8.2.2.1. After checking Offline Payments, tap on Declined Payments from the Manager Settings on the left side. If you had any declined credit card transactions w h i l e offline, then they would appear in this screen. To retry the declined cards at a later time tap Retry All on the upper right side of the Declined Payments screen ***Key Fact: If online and a card is declined you will get an immediate pop-up declaring that the payment could not be processed and you will not be allowed to continue without an accepted tender. Transactions will only appear in the Declined Payments window if they were completed when Offline. 8.2.3. Checkout the Till (Close Out the Cash Drawer) 8.2.3.1. To checkout the till (close your cash drawer) at the end of the night, tap on the Settings Gear, then Tills. Once in the Tills Window tap the Checkout button. If you use an alternate currency, indicate that here. You can enter in your till values in two ways: by Bill Type and By Amount. Bill Type allows users to enter the number of bills for each denomination in the till and Revel automatically calculates the total. By Amount allows users to simply count the drawer and enter that value in the box provided. After making your selection and filling in the fields using the number pad on the right, tap the Done button in the bottom right. 8.2.3.2. Cash Log 8.2.3.2.1. From the Tills Window, press Cash Log to print a summary of your Cash Log for the day. The Cash Log includes the date and time, starting cash in the drawer, cash total in the drawer, and expected cash in your Till. Remember that the log only accounts for the amount of cash in the drawer of that specific Revel POS, not every Revel POS. 8.2.4. Payouts 8.2.4.1. From the Tills menu, tap Payout to start a payout. You'll usually do this for paying out tips at the end of the night. Indicate the amount to be paid out with the number pad on the left and then enter a payout reason by tapping the grey screen on the right. Tap the keyboard icon in the bottom right of the screen when done, then tap the Done button. 8.2.5. Open Cash Drawer: 8.2.5.1. From the Tills menu, tap Open Cash Drawer to open the cash drawer. 9. Locking the POS (Guided Access) 9.1. Guided Access is an Apple iOS feature that enables the iPad to be l ocked into an application and require a four-digit passcode to exit. 9.2. To Enable Guided Access: 9.2.1. Return to your iPad home screen by pressing the iPad Home Button at the bottom of your iPad as shown 9.2.2. Find the Settings app on your iPad home screen. 9.2.3. From the Settings app, click on the General tab on the left side, then on Accessibility on the option on the right side when in the General Settings tab. 9.2.4. From the Accessibility tab, click on Guided Access. 9.2.4.1. Once in the Guided Access options, slide the option to turn on Guided Access, then tap on Set Passcode. 9.2.4.2. Enter a unique four-digit passcode for the Guided Access feature and confirm by entering it in a second time. 9.2.4.3. Open the Revel POS application. Once it is open, TripleClick the Home Button, then tap Start on the upper right side of the Guided Access menu. 9.2.4.4. Test that Guided Access is enabled by clicking the iPad Home Button. You should see a pop-up message at the top of the screen that states: "Guided Access is enabled. Triple-Click the e Home button to exit." After verifying that this message has appeared, then Guided Access has been enabled and your previously set passcode will be required to exit the Revel POS and access the iPad Home Screen and all other applications.