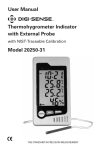
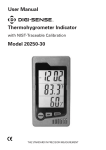
1
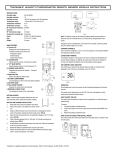
Specifications
Timing Capacity: 99 hours, 59 minutes, 59 seconds
Timing Accuracy: ±0.01%
Timing Channels: 2 independent timing channels
Countdown Memory: 1 per channel
Alarm Volume:
High, Low, or Mute
VISUAL LED ALERT
For each channel, during countdown timing, the LED
around the corresponding T1 / T2 button will flash
green every 4 seconds when time remaining is
greater than 60 seconds, every 2 seconds when time
remaining is less than 60 seconds, but greater than
10 seconds, and every second when time remaining
is less than 10 seconds.
During countdown timing, when the display reaches
zero for a channel, the LED around the corresponding
T1 / T2 button will flash red for up to sixty (60)
seconds, or until the S/S button is pressed.
The visual LED alert is not affected by the alarm volume.
ALARM VOLUME
Slide the alarm volume switch, located on the right side
of the timer, to the desired position. HI (high alarm
volume), LO (low alarm volume) or MUTE (no alarm
audible sound). The alarm volume may be changed
at any time without affecting the timing operation. The
visual LED alert is not affected by the alarm volume.
CLEARING THE DISPLAY TO ZERO
Select the desired channel by pressing the T1 / T2
button. Press the HR and MIN buttons simultaneously
to clear the display to zero. To clear the display to zero
when time is running on the selected channel, stop the
timing by pressing the S/S button, then press the HR
and MIN buttons simultaneously. The timer will only
clear when time is stopped for the selected channel.
Countdown Alarm Timing
1. Select the desired channel by pressing the T1 / T2
button.
2. Clear the display to zero.
3. Press the HR (hours), MIN (minutes) and SEC
(seconds) buttons to advance the display to the
desired countdown time.
4. Once the desired time is on the display, press the
S/S button to begin countdown timing.
5. When the timing channel reaches zero, the alarm
will start (audible and visual or visual only
depending on the alarm volume setting) and the
timing channel will begin counting up.
The alarm will continue for one minute and then turn
off automatically to preserve battery life while the
timing channel continues counting up.
While a channel is alarming, once the channel is
selected by pressing the T1 / T2 button, pressing
the S/S button will stop the alarm, stop the count-up
timing, and recall the last programmed countdown
time. After one minute, pressing the S/S button for
the selected channel will stop the count-up timing.
Both timing channels may be used simultaneously.
SETTING COUNTDOWN Memory
For timing repetitive intervals, the countdown memory
function allows up to two (2) distinct countdown times
(one per timing channel) to be set into memory and
recalled with the press of a button.
1. Select the desired channel by pressing the T1 / T2
button.
2. Clear the display to zero.
3. Press and hold the M (memory) button for three (3)
seconds (the display will flash zero).
4. Press the HR (hours), MIN (minutes) and SEC
(seconds) buttons to advance the display to the
desired countdown time.
5. With the desired countdown time on the display,
press the M (memory) button to confirm the entry
(the display will no longer flash).
Countdown MEMORY Timing
1. Select the desired channel by pressing the T1 / T2
button.
2. Clear the display to zero.
3. Press the M (memory) button to recall the
countdown memory time for the selected channel.
4. Press the S/S button to begin countdown timing.
5. When the timing channel reaches zero, the alarm
will start (audible and visual or visual only
depending on the alarm volume setting) and the
timing channel will begin counting up.
The alarm will continue for one minute and then turn
off automatically to preserve battery life while the
timing channel continues counting up.
While a channel is alarming, once the channel is
selected by pressing the T1 / T2 button, pressing
the S/S button will stop the alarm, stop the count-up
timing, and recall the programmed countdown time.
After one minute, pressing the S/S button for the
selected channel will stop the count-up timing. To
recall the programmed time, press the M button.
Both timing channels may be used simultaneously.
Clearing COUNTDOWN Memory
1. Select the desired channel by pressing the T1 / T2
button.
2. Clear the display to zero.
3. Press and hold the M (memory) button for three (3)
seconds (the display will flash zero).
4. With the display flashing zero, press the M
(memory) button to confirm the entry (the display
will no longer flash).
Stopwatch (Count-Up) Timing
1. Select the desired channel by pressing the T1 / T2
button.
2. Clear the display to zero.
3. Press the S/S button to begin count-up timing.
4. Press the S/S button to stop count-up timing.
Once timing is complete and the timer has
been stopped, press the HR and MIN buttons
simultaneously to clear the display to zero.
Both timing channels may be used simultaneously for
countdown or count-up timing.
Timeout
A timing channel may be stopped during any running
time (countdown or count-up) by selecting the channel
and pressing the S/S button. Timing may be resumed
by pressing the S/S button a second time.
convert a Timeout to a countdown time
A timing channel may be stopped during any running
time (countdown or count-up) by selecting the channel
and pressing the S/S button. Once the timing has
been stopped, pressing the HR, MIN and SEC buttons
will increment the display from the point that it was
stopped and will set the timer into countdown mode.
Once the desired time is on the display, press the S/S
button to begin countdown timing.
All Operational Difficulties
If this timer does not function properly for any reason,
replace the batteries with new high quality batteries
(see the “Battery Replacement” section). Low
battery power can occasionally cause any number
of “apparent” operational difficulties. Replacing the
batteries with new fresh batteries will solve most
difficulties.
Battery Replacement
An incorrect display, no display or operational difficulties
indicate that the batteries should be replaced. Slide
open the battery cover on the back of the timer. Insert
two (2) new AAA alkaline batteries. Make certain to
note the proper polarity as indicated by the diagram in
the battery compartment. Replace the battery cover.
Warranty, Service, or Calibration
For warranty, service, or calibration contact:
Control Company
4455 Rex Road
Friendswood, Texas 77546 USA
Ph. 281 482-1714 • Fax 281 482-9448
www.control3.com • [email protected]
Control Company is ISO 9001 Quality-Certified by DNV and
ISO 17025 accredited as a Calibration Laboratory by A2LA
Control Company Cat. No. 5017
Traceable® is a registered trademark of
© 2010
Control Company.
Control Company. 92-5017-00 Rev. 1 093010
TRACEABLE®
FLASHING
LED ALERT
BIG-DIGIT
DUAL CHANNEL
ALARM TIMER
INSTRUCTIONS