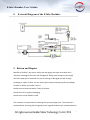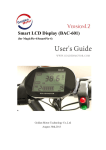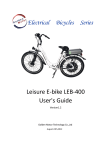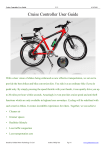
1
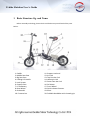
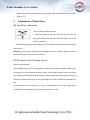
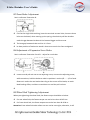
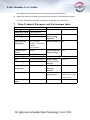
E-bike Shrinker PRECAUTIONS Thank you for buying E-bike Shrinker.We hope it brings you many hours of enjoyment and safe riding. For safe and compact shipping, some parts have been detached from E-bike Shrinker.Some Shrinker assembly is required before you can begin riding. Please follow these instructions carefully, including assembly instructions and operating guidance. If you do not feel confident to assemble the bike yourself, we recommend you visit your local cycle store for professional help and advice. Your safety is our first priority. TABLE OF CONTENTS 1 BASIC STRUCTURE FIG. AND NAME 1 2 OPERATION-PROCESS 2 2.1 Folding process 2 2.2 Unfolding process 3 3 BATTERY CHARGER 3 4 ATTENTION DETAILS DURING YOUR RIDING 4 5 ADJUSTMENT OF MAIN PARTS 5 5.1 Handlebar Adjustment 5 5.2 LE-throttle Grip Working Process 5 5.3 Front Brake Adjustment 6 5.4 Adjustment of Expansion Servo Brake 6 5.5 Wheel Hub Tightening Adjustment 6 5.6 Adjustment of Chain 7 5.7 Assembly of the Pedal 7 6 CARE AND MAINTENANCE 8 7 MAIN TECHNICAL PARAMETER AND PERFORMANCE INDEX 9 8 E-CIRCUIT DIAGRAM OF THE E-BIKE SHRINKER 10 9 RETURN AND REPAIRS 10 10 WARRANTY 11 10.1 How the warranty applies 11 10.2 How the warranty does not apply 11 10.3 How the warranty works 12 E-bike Shrinker User’s Guide 1 Basic Structure fig. and Name Before assembly and riding ,please check and familiarize yourself with all the parts below: 1: Saddle 2: Middle Seat Post 3: Big Seat Post 4: Folding Lift Handle 5: Lock System 6: Support Post 7: Li-ion Battery 8: Rear Wheel 9: Kickstand 1 10: E-control set 11: Support Lock end 12: Arc Link 13: Top Four-bar link 14: telescopic Link 15: Down Four-bar Link 16: DC Motor 17: Front Wheel 18: Quick-release Fastener 19: Stem 20: Foldable Handlebar with throttle grip 1 E-bike Shrinker User’s Guide 2 Operation-process 2.1 Folding process Hold ③ and⑥ together by one hand, after they are in touch closer fold state, ② will slid down to the bottom automatically,and then lift ④ up quickly,by your hearing the sound of “click”, it means that⑤ is in locked status. Folding process is finished.see pictures as follows: 2 E-bike Shrinker User’s Guide 2.2 Unfolding process Lift the saddle①, let ③and ⑥ rise back in their right place,and then kick ⑨ back softly, the frame of the Shrinker will be pulled open quickly. Keep attention: Before riding, you must check whether ⑥ has been opened to its right position. 3 Battery Charger (the charger indicator: red is as the symbol of charging now, green is as the symbol of battery is full). Be sure to do the fully charging battery work, before the first use. The charge time for the first initial 3 use should be 12 hours. The Li-ion battery can be stored with full charge content. If you do not riding far distance, it’s not necessary to charge the batteries frequently. If your Shrinker will be kept a long time stopped without riding, you should take off the battery box, and be kept with in more than 50% of its content volume, and do re-charge full in every 3 months. During the battery charging process, always keep the battery and the charger far from the place where the children can reach. Do not try to disassemble or modify the battery charger, in which it do have a high-voltage e-circuit. The charger you got are only for our li-ion battery use, we do not keep any warranty for the other brand or model charger using, which are not supplied by us. Do not try to use this battery charger for charging the other batteries, which are not supplied by us. Battery balance content volume can be shown at the indicator of the battery, which can be read once you turn on the e-power switch key. During your charging the battery process, first plug the connector between the charger and the battery, then plug the charger to the e-power source, the LED on 3 E-bike Shrinker User’s Guide the charger will shows red, that means the charger is on working. When the LED becomes green, it means the battery is fully charged. When you finished the charge work, please first take off the charger’s plug from the e-power source, and then depart the connector between the battery and the charger. Please do not work on the opposite process. During the charging work, the charger and the battery should be placed in a stable place. The working temperature for the battery ranges between 0 and 45℃。The optimum working temperature ranges between 20℃and 25℃。Do not place any cover on the battery or the charger in order to keep the battery ventilation or cooling surrounding. Ensure that no liquids or metal filings diffuse into the charger; if the battery box surface is founded too hot (higher than 60℃), during the charging, that might suggest a malfunction. The e-power should be cut off at once and the battery should be repaired in appointed service station. 4 Attention Details During Your Riding During the pedal assistant riding, no need to turn off the power switch, keep the switch on, you will feel free as just riding a normal bicycle. Before riding, you can loose quick release ②, adjust up and down the saddle height for fitting your well riding, and then lock the quick release fastener ②. Attention: No need to loose Quick-release fastener ① for adjusting the saddle height. The safety line on the seat post must be inserted inside to the middle seat post. Attention: Minimum depth of the inserted for the seat post should be that, you can not see the safety line in the middle seat post. When you adjust the seat post height for your well riding, please pull out the middle seat post for adjusting its height first, if the height is still not enough, 4 E-bike Shrinker User’s Guide please pull out the seat post for its right height, after that lock the quick-release fastener ①. 5 Adjustment of Main Parts 5.1 Handlebar Adjustment See in reference illustration A: · Insertion depth of the stem can not be less than the Minimum depth, to make sure that the safety line on the stem are invisible. ·The fastening torque of the handle bar screw and clamp screw bolt can not be less than 18 N.m. Attention:During your adjusting the handlebar stem up or down, please do not let the connect plug of electrical parts loosed. 5.2 LE-throttle Grip Working Process (Non for Euro Market) (As parts○ 20 shown) the E-throttle grip is installed on the right handlebar; during you turning over in anti-clockwise direction slowly ,the E-power switch will be turned on, the working E-current will be going larger, and the E-throttle opens larger as well, the maximum rotate top position can be at 90 degree, as the E-throttle to opened to it’s top. As you release the E-throttle grip, it can be returned back to its beginning position automatically, accordingly the E-power switch will be cut off. 5 E-bike Shrinker User’s Guide 5.3 Front Brake Adjustment See in reference illustration B: First let the single side touching, loose the terminal screw a little, there are three holes on the board, when moving up the spring, the elasticity will be raised to make the gap between brake and rim become bigger and vice versa. The best gap between brake and rim is 1.5mm. he best position of brake wire stand is that not to touch the front mudguard. 5.4 Adjustment of Expansion Servo Brake See in reference illustration C and D,adjust for rear brake: Loose nut and pull-rod nut of the adjusting screw, unscrew the adjusting screw, while meantime, hold the brake to make its position is on the1/3——1/2 of total distance in order the rear brake shoe cling to the center of the brake, to reach ideal braking effect, and then screw down nut and the pull-rod nut. 5.5 Wheel Hub Tightening Adjustment When you tightening the wheel hub, the fasten torque should be as below: For rear wheel hub, the fasten torque can not be less than 40-45 N.m For front wheel hub, the fasten torque can not be less than 18-20 N.m Attention: Front wheel hub axle collets nut can not be over-tight, otherwise, it will 6 E-bike Shrinker User’s Guide cause the front wheel can not be smoothly round. 5.6 Adjustment of Chain See in reference illustration E: The chain maybe become loose after long-time riding, when you found this problem, you can unscrew the nut of rear hub axle; adjust the chain adjustor to tighten the chain. Pull the chain down 10-15mm to its best tension. Hold the pedal and rotate on anti-clockwise, the chain should be in normal state: rotation well, without abnormality, without noise. 5.7 Assembly of the Pedal The screw thread direction of the Right Pedal is right-hand thread; its lock direction is shown as photo F. The screw thread direction of left Pedal is left-hand thread; its lock direction is shown as photo G. ▲ Please carefully read the manual before riding your E-bike Shrinker; please do not lend out your Shrinker to the persons who does not know the details. * Note: 1)Your Shrinker has been equipped with brake switch-off device, left and right brake levers are installed with brake power switch. No matter you brake left or right one during your riding, the power will be cut off in order to make your riding safety. 2)When the battery output voltage is reached the bottom index, Shrinker electronic control system will cut off the power automatically for protect the battery cycle lifetime. When the battery reaches its bottom voltage, you can just riding your bike by the pedal. And the battery should be recharge full for the next cycling work. 3) Please let your Shrinker powers switch off during your parking. 4) Let your Shrinker parking stable and locked the kickstand as well. 7 E-bike Shrinker User’s Guide 5) During your Shrinker parking steady, please do not turn on the right switch throttle grip purposeless, it can cause a large start e-current, that may damage your Shrinker battery. If somebody often steadily starts your Shrinker e-bike like the above, it may limit the battery cycle lifetimes. 6) Your Shrinker e-bike once full charge riding ranges more or less are subjected to the following facts like: road condition, loading weight or wind direction etc. We suggested that you try to pedal more during your start riding、climbing or against the wind direction. If you do riding like these, that can limited the Shrinker working e-current and raise a long range or long life of the working motor & battery. 7) Always try more hard pedaling during your riding on the muddy or rough road. 8) During your start on the rampway for the climbing, please first ride by pedaling, then start the power switch for the e-motor working. 9) During cleaning of your Shrinker, wiping by the cloth or wet cloth, never using water squirt gun for the cleaning work. 10) Prohibit putting the oil on the front brake shoes. 11) Big seat post ③ and middle seat post ② should be cleaned, or put a little sewing-machine oil for lubricate if necessary. 6 Care and Maintenance To ensure your Shrinker e-bike in the best status, please keep the regular maintenance, cleaning or examination,ect. Check the tires/tubes regularly to ensure that they are inflated to the correct air pressure. Make sure all the fixing accessories are attached and all quick release fasteners, nuts and bolts have been tightened securely. After a period of riding, check whether the spokes’ tension is normal. Make adjustments in cases of any loose. The frame and other components are made of aluminum alloy. Avoid the friction or collision and clean them regularly. We stay in the guarantee for maintain of the motor、battery、controller set, ect. during the warranty time. Please do not disassemble by yourself, but take the Shrinker to the service center for repairing if necessary. Never wash the Shrinker with high-pressure water and the tap water, avoiding 8 E-bike Shrinker User’s Guide the accident by the water dip into the electric parts and spare wire. Apply lubrication periodically (once per three months) in the following sections as: chain, freewheel,rear brake, head parts, kickstand, etc. if necessary. 7 Main Technical Parameter and Performance Index 1.12’’ E-bike Shrinker fig. Mini Size:L*W*H 1255*490*1090mm Folding Size:L*W*H 640*280*810mm N.W:(KG) 2. Li-ion Battery fig. Type: Li-ion Battery 16KG Battery Content 6.75Ah/9Ah Max Speed:Km/h 20Km/h Capacity(Ah): (optional) Battery Once Full Charge Range: By net E-power: Nominal Voltage(v): 36V F/R wheel center distance 980mm Once Full Recharge Needing Time(h): 3-5h Max. Loading: <110Kg 30-40km,With Pedal assistant riding:50-60km 3. DC Motor fig. 4. E-controller set fig. Type: DC Brushless with gear Bottom-voltage limited protection index(V): 28.5±1V Output Rating(W): 180W/200W Rating Rotating Speed(r/min): 235 r/min E-current limiting protection index(A): 11±1.5A Rating Voltage (V) 36V Riding Power Resource Type: Riding by li-ion battery power, or with pedal assistant Output Rating Torque: 6 N.m Climbing Capacity: ≤7° 9 E-bike Shrinker User’s Guide 8 E-circuit Diagram of the E-bike Shrinker 9 Return and Repairs We offer a flexible 7 day return policy and are happy to accept items back for a refund or exchange if the items are damaged or faulty upon receipt or you simply don't like what you've ordered. If a part is missing or damaged, we will arrange exchange or repair. If there are any issues upon receipt and opening of the package: Contact us before you make a return. Goods must be returned within 7 days of receipt. Goods must be in original packaging. Goods must not be fitted or used. The customer is responsible for meeting the return postage costs. The customer is responsible for ensuring that the goods arrive in good condition (we recommend that 10 E-bike Shrinker User’s Guide return shipment be insured). 10 Warranty 10.1 How the warranty applies As the makers, we warranty against possible material or construction defects, provided the following conditions are satisfied : Proof of purchase. The warranty starts on the date of purchase. Only the first owner is entitled to the warranty. 2 years for the frame, fork, all mechanical and electrical parts, except normal wear and tear items. 1 year for the battery up to 70% depth of discharge from its original rated capacity. This can be verified by the dealer where the bike was purchased. 10.2 How the warranty does not apply Inadequate maintenance. Unauthorized alteration, modification or misuse. Damage through abuse, neglect or accident. Assembly in disregard of instructions in this manual. Repairs by persons other than Golden Motor Authorized Dealers. (If you need local repair and a Golden Motor dealer is not nearby, contact us for assistance in authorizing repair). When the bicycle is used negligently or has damage resulting from a traffic accident. Normal wear and tear. Poor maintenance or modifications that no longer comply with regulations or original specifications. Damage due to external causes. The bicycle is used for rental. 11 E-bike Shrinker User’s Guide The battery pack is used incorrectly or damaged. This also applies to improper charging. Compensatory costs arising from damages or accidents, or cost incurred by loss of the bicycle’s usage. This warranty does not cover use for commercial purposes. 10.3 How the warranty works Original defective parts that are sent or returned to the dealer for assessment will be replaced by the same or equal value part. Labor and transportation charges are not included. Caution : Unauthorized changes/modification or tampering with any part of this product, or operation in any way other than as detailed in this User Manual, will render manufacturer’s warranty void. This motorized bicycle complies with the equipment and manufacturing requirements for bicycles adopted by the Consumer Product Safety Commission (16 Code of Federal Regulations C.F.R. 1512). YOUR INSURANCE POLICIES MAY NOT PROVIDE COVERAGE FOR ACCIDENTS INVOLVING THE USE OF THIS BICYCLE. TO DETERMINE IF COVERAGE IS PROVIDED YOU SHOULD CONTACT YOUR INSURANCE COMPANY OR AGENT. 12 E-bike Shrinker User’s Guide Golden Motor Technology Co.,Ltd www.goldenmotor.com [email protected] Mobile:86 519 81004118 13