1
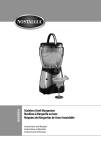
User Manual
BLENDERS
OSTER® REVERSING MOTOR BLENDER
The Ultimate Chopping and Blending Solution
Recipes Included in Instruction Manual.
Visit us at www.oster.com
P.N. 126477-001-000
IMPORTANT SAFEGUARDS
When using your blender, you should always follow basic safety precautions,
including the following:
• Read all instructions before use.
• To protect against electrical hazards, do not immerse the cord, plug or motor base in
water or other liquids.
• A lways use the product on a clean, flat, hard, dry surface. There should be no
material such as a tablecloth or plastic between the unit and surface.
• Avoid contact with moving parts.
• Keep hands and utensils out of jar while blending to reduce the risk of:
– Severe personal injury.
– Damage to the blender.
• If scraping is necessary, turn the power OFF and use a rubber spatula only.
• Do not use the appliance:
– With a damaged cord or plug.
– After the unit fails to work correctly.
– After you drop or damage the product in any way.
Call our toll-free, automated phone line to find the Service Center nearest to you.
Return the product to your nearest Authorized Oster® Appliance Service Center for a
safety check, adjustment or repair.
• The 6 Point Star Blade is sharp. Handle it carefully.
• To reduce the risk of injury:
– Do not leave the multi-functional blade sitting out or exposed.
– Always completely assemble the blade to the jar before putting on the base.
• Always put the lid on the jar before operating the blender.
• W hen blending hot liquids beware of steam. Remove the Filler Cap from the Jar Lid
to allow steam to escape.
• Do not use outdoors.
• Do not allow the cord to touch hot surfaces or hang over the edge of
a table or counter.
• Unplug the blender when it is not in use, before taking off or putting on parts,
and before cleaning.
• Never leave the appliance unattended while it is running.
• You risk personal injury, fire or electric shock if you use attachments, jars
or parts other than those recommended by Jarden Consumer Solutions.
• Supervise children closely when they use or are nearby appliances.
• Do not blend boiling liquids in the blender.
• The use of attachments, including canning or ordinary jar and processing assembly
parts, is not recommended by Jarden Consumer Solutions and may cause risk or
injury to persons.
2
SAVE THESE INSTRUCTIONS
This product is for household use only.
• T
he maximum rating marked on the product is based on the attachment that draws
the greatest load. Other attachments may draw less power.
Power Cord Instructions:
Please follow the instructions below to ensure the safe use of the power cord.
• T
his appliance is equipped with a polarized plug. This type of plug has one blade
that is wider than the other. This plug will fit in a polarized outlet only one way.
This is a safety feature intended to help reduce the risk of electrical shock. If you are
unable to insert the plug into the outlet, contact a qualified electrician to replace the
obsolete outlet. Do not attempt to defeat the safety purpose of the polarized plug by
modifying the plug in any way.
• Try to position the blender near the power source to reduce the hazards
associated with power cords (stuck as becoming entangled or tripping over
a long power cord).
• Do not pull, twist or otherwise abuse the power cord.
• Do not wrap the power cord around the main body of the blender during
or after use.
• Do not use an extension cord with this product.
T his symbol has been placed in specific areas of the User Guide portion of
this book. Its purpose is to help you easily identify instructions that require
your special attention.
3
Table of Contents
Learning About Your Product ......................................................................................... 5
Using Your Product ......................................................................................................... 6
Using the Pre-Programmed Settings ................................................................................ 6
Frozen Drinks button . ................................................................................................ 6
Food Chop button . ..................................................................................................... 6
Using the Manual Controls ............................................................................................. 7
Using the Stop button ...................................................................................................... 7
Using the On/Off button . ............................................................................................... 7
Caring for Your Product................................................................................................... 7
Cleaning . .................................................................................................................... 7
Storing ........................................................................................................................ 7
Servicing ..................................................................................................................... 7
Blending Tips .................................................................................................................. 8
Recipes............................................................................................................................. 8.
Frozen Drinks . ................................................................................................................ 8
Smoothies and Shakes ................................................................................................10
Salsas . ........................................................................................................................11
Soups and Foods ....................................................................................................... 12
One-Year Limited Warranty .......................................................................................... 15
How to Obtain Warranty Service ............................................................................. 15
4
Welcome
Congratulations on your purchase of an Oster ® Blender. If you have any
comments, questions or inquiries about this revolutionary
product, please call 1-800-334-0759.
1
Learning About Your Product
5
3
4
5
6
7
8
E
F
G
1. Filler Cap – 2oz. Filler cap doubles as a measuring cup.
Remove from lid to add ingredients while blending, or
to allow steam to escape when blending hot foods.
2. Jar Lid – Seals the Blender Jar.
3. Jar – 6 cup capacity jar is dishwasher safe and tested to
withstand extreme temperature changes.
4. Sealing Ring – Seals the jar for leak-proof operation.
5. 6 Point Star Blade – Moves forward and backward
when the Pre-Programmed settings are in use.
6. Threaded Jar Bottom Cap
7. Sturdy Stylish Base – Contains a powerful, variable
speed motor.
8. Control Panel
A.Pre-Programmed Settings – Use to select
“Frozen Drinks” or “Food Chop” settings for easy
one-touch operation. Blender automatically shuts off
when cycle is finished.
B.High Manual Control – Use “High (Ice Crush)”
button to create snowy ice in seconds.
C.Medium Manual Control – for medium
blending speed.
D.Low Manual Control – for low blending speed.
E.High Pulse Button – Press and hold to Pulse at
the highest speed. Release the button to stop.
A
(Pulse button will not light up.)
B
F.Low Pulse Button – Press and hold to Pulse
at the lowest speed. Release the button to stop. C
(Pulse button will not light up.)
D
G.Power Button (On/Off button)
– Turns the product On and Off.
H.Stop Button – Use to Stop the product.
(Stop button will not light up.)
2
H
Using Your Product
Before you use the product for the first time, separate the Jar Lid, Filler Cap
and Blade from the jar. Wash in warm, soapy water or use the top rack in the
dishwasher for smaller parts. Blender jar is safe for bottom rack cleaning. Rinse
and dry well.
Assembly
1. Install the Sealing Ring over the 6 Point Star Blade.
Blade is sharp. Handle with care.
2. Turn the jar upside down so the small opening is at the top.
3. Turn the 6 Point Star Blade with Sealing Ring upside down and place into the
bottom of the jar.
4. Position the open end of the Threaded Jar Bottom Cap over
the jar and Sealing Ring. Turn clockwise to tighten.
Be sure the Threaded Jar Bottom Cap is securely
tightened onto the jar before using.
5. Slide the jar onto the base.
6. Plug the power cord into a standard household
120/127-volt, 60 hz. AC outlet.
Using the Pre-Programmed Settings
1. Press the ON/OFF power button to turn the product on.
The power light will blink, meaning the product is active
and ready to use.
2. Choose a recipe from the recipe section of this
manual or use one of your own.
3. Put the ingredients into the jar.
4. Secure the Filler Cap and Jar Lid.
5. Press one of the two Pre-Programmed Setting buttons
appropriate for your recipe (“Frozen Drinks” or “Food Chop”.)
6. To change your selection, press Stop followed by another Pre-Programmed
Setting button (“Frozen Drinks” or “Food Chop”.)
7. Once the program is finished, the product automatically stops. Please note:
You may press the “Stop” button to cancel the program at any time. The
blinking red light indicates that the blender is ready.
8. Press the ON/OFF power button to turn the product off. This product is
pre-programmed to turn off automatically if not used for a period of several
minutes. All lights will turn off when the unit automatically powers down.
6
Using the Manual Controls
Use these buttons for personal recipes or to continue mixing
after a Pre-Programmed Setting is finished.
1.Press the ON/OFF power button to turn the product on.
The power light will blink, meaning the product is active
and ready to use.
2.Choose a recipe from the recipe section of
this manual or use one of your own.
3.Put the ingredients into the jar.
4.Secure the Jar Lid with Filler Cap onto the Blender Jar.
5. Press the manual control button of your choice based
on your recipe or blending needs.
6. Press the “Stop” button to cancel the operation
at any time.
7. Press the ON/OFF power button to turn the
product off.
Caring for Your Product
Cleaning
Unplug the blender. Release the 6 Point Star Blade from the Threaded Jar
Bottom Cap by turning the Cap counterclockwise. ALWAYS USE CAUTION
WHEN REMOVING THE BLADE ASSEMBLY. Use the top rack of the
dishwasher for the Jar Lid, Filler Cap and 6 Point Star Blade. Place Sealing Ring
into bottom basket of dishwasher and the Blender Jar in the bottom rack.
You can also wash the parts in warm, soapy water. Rinse well and dry. Wipe the
base with a soft, damp cloth to clean. Never submerge the blender base in any
liquids.
Check the parts as you put them back together.
Storing
Reassemble the blender for storage. Leave the lid open slightly so no odors
are retained.
WARNING: Never put the jar, or any other parts, in a microwave
oven. Never store foods or drinks in the jar.
Servicing
Call our toll-fee, automated phone line to find the Service Center nearest
to you. If repairs are needed, send your appliance only to an authorized
Oster® Appliance Service Center. Use only replacement parts from
Jarden Consumer Solutions.
See How to Obtain Warranty Service on page 15.
7
Blending Tips
Liquids
Put liquids into the jar first, unless the recipe says otherwise.
Using the Jar Lid Filler Cap Opening
Do not remove the lid while in use. Food may splatter if you do. Instead, open
the Filler Cap to add smaller ingredients.
Working with Hot Foods or Liquids
ARNING: When you work with HOT FOODS, remove the Filler Cap to
W
vent steam. Keep hands and other exposed skin away from the lid opening
to prevent possible burns.
hen you work with HOT LIQUIDS, remove the Filler Cap and start at a
W
low speed, and then gradually increase to a faster speed. Do not add liquid
over the 4 cup (1L) level. Always keep hands away from steam.
Ingredients Quantities
Use only the amount of food suggested in the recipes. If you want greater
amounts, prepare in batches. Using larger amounts may overload and strain
the motor. You might also get different results from those described.
Recipes
These recipes have been optimized for the Pre-Programmed Settings.
When experimenting with your own recipes you may choose to stop the
Pre-Programmed Setting at any time by hitting the Stop button or you
may run the cycle more than once if a different consistency is desired.
Frozen Drinks:
Frozen Margarita
Makes 4 servings
4 oz. gold tequila
2 oz. orange and cognac liqueur
2 Tbsp. fresh lime juice
¼ cup sugar
3 cups ice
Garnish: Extra lime juice and salt for coating glass rims
1. In jar, place ingredients in order given above.
2. Cover jar with lid. Press “On/Off” button, then press
“Frozen Drinks” button.
3. Dip rim of stemmed glasses in lime juice then in salt; pour drink into glasses.
8
Creative Cook’s Note: If desired, granulated sugar can be used in place of salt.
Note: If needed, use the high pulse button 3 to 4 times after the frozen drink
cycle is complete.
Strawberry Daiquiri
Makes 4 servings
1 can (6 oz.) frozen limeade concentrate
5 oz. rum
1 cup whole strawberries with stems removed
1 Tbsp. sugar
3 ½ cups ice
Garnish: Small whole strawberries and lime slices
1. In jar, place ingredients in order given above.
2. Cover jar with lid. Press “On/Off” button, then press
“Frozen Drinks” button.
3. Pour into stemmed glasses.
4. Garnish, if desired, with strawberry and lime slice.
Creative Cook’s Note: For variety, substitute fresh raspberries, blackberries
or cubed mango in equal amounts for the strawberries.
Note: If needed, use the high pulse button 3 to 4 times after the frozen drink
cycle is complete.
Piña Colada
Makes 4 servings
1 cup pineapple juice
6 oz. golden rum
2/3 cup cream of coconut
1 tsp. lemon juice
4 cups ice
Garnish: Pineapple slices, maraschino cherries
1. In jar, place ingredients in order given above.
2. Cover jar with lid. Press “On/Off” button, then press
“Frozen Drinks” button.
3. Pour into tall glasses.
4. Garnish, if desired, with pineapple slice and cherry.
Note: If needed, use the high pulse button 3 to 4 times after the frozen drink
cycle is complete.
9
Smoothies and Shakes:
Strawberry Shake
Makes 2 servings
1 cup fresh, ripe strawberries with stems removed (8 to 10 medium berries)
1 cup milk
2 cups strawberry ice cream
1. In jar, place ingredients in order given above. Put berries in first!
2. Cover jar with lid. Press “On/Off” button, then press
“Frozen Drinks” button.
3. Pour into tall glasses.
Choco-Peanut Butter Shake
Makes 2 Servings
1 cup milk
2 cups chocolate ice cream
¼ cup peanut butter
¼ tsp. vanilla
1. In jar, place ingredients in order given above.
2. Cover jar with lid. Press “On/Off” button, then press
“Frozen Drinks” button.
3. Pour into tall glasses.
Honey-Vanilla Blast
Makes 1 serving
1 cup fat free milk
1 cup (8 oz.) fat free vanilla yogurt
3 chunks frozen banana, about 1 medium
¼ cup protein powder
2 Tbsp. honey
1. In jar, place ingredients in order given above.
2. Cover jar with lid. Press “On/Off” button, then press
“Frozen Drinks” button.
3. Pour into tall glass to serve.
Morning Mocha Smoothie
Makes 1 serving
½ cup fat-free milk
1 cup (8 oz.) low-fat coffee yogurt
2 Tbsp. chocolate syrup
6 ice cubes
10
1. In jar, place ingredients in order given above.
2. Cover jar with lid. Press “On/Off” button, then press
“Frozen Drinks” button.
3. Pour into tall glass to serve.
Very Berry Smoothie
Makes 1 serving
1 cup orange juice
½ cup vanilla low-fat yogurt
1 cup frozen mixed berries
2 frozen banana chunks, about 1 small
2 Tbsp. honey
1. In jar, place ingredients in order given above.
2. Cover jar with lid. Press “On/Off” button, then press
“Frozen Drinks” button.
3. Pour into tall glass to serve.
Salsas:
Garden Fresh Salsa
Makes 2 cups
½ small onion, cut into 4 pieces
¼ green pepper, cut into 4 pieces
½ cucumber, cut into quarters
1 large garlic clove
12 oz. (4-5) plum tomatoes, cut each into eighths.
3 Tbsp. red wine vinegar
1 tsp. Worcestershire sauce
1/8 tsp. hot pepper sauce
Salt and Pepper to taste
Tortilla chips for serving
1. In jar, place ingredients, except tortilla chips, in order given above.
2. Cover jar with lid. Press “On/Off” button, then press
“Food Chop” button.
3. Pour into bowl; serve with tortilla chips.
Fiery Red Salsa
Makes 3 cups
2 large garlic cloves
1 can (15 oz.) whole tomatoes, drained
1 medium onion, cut into quarters
½ cup cilantro leaves
1-4 jalapeno peppers, quartered
½-1 tsp. sugar
11
Salt to taste
1 Tbsp. lime juice
1 can (15 oz each) whole tomatoes, drained
Tortilla chips for serving
1. In jar, place ingredients, except tortilla chips, in order given above. (Note:
Place one can of tomatoes in after garlic cloves and second can after rest of
ingredients are added. Also, place onion in middle of jar to avoid blockage.)
2. Cover jar with lid. Press“On/Off” button, then press
“Food Chop” button.
3. Pour into bowl; serve with tortilla chips.
Creative Cook’s Note: When handling hot peppers, such as jalapeños, use rubber
gloves and keep hands away from your eyes.
Soups and Foods:
Cream of Tomato Soup
Makes 4 servings
4-5 medium ripe tomatoes, cut in quarters
1 small onion, cut in quarters
3-4 fresh basil leaves
2 Tbsp. butter
½ tsp. salt
1 cup half-and-half or milk
1. Place tomatoes, onion and basil in the jar.
2. Cover jar with lid. Press“On/Off” button, then press “Food Chop” button.
3. Pour processed mixture into 3 qt. saucepan. Add butter, salt and half-and-half.
4. Stir while gently heating to 145°F; do not let soup boil.
Cuban Black Bean Soup
Makes 4 servings
2 cans (15-19 oz. each) black beans
½ small red onion, halved
4 or 5 sprigs cilantro stems discarded
1 small onion, halved
2 garlic cloves
2 Tbsp. olive oil
1 cup water
½ cup sofrito*
1 Tbsp. cilantro leaves
1 cup sour cream
1. Rinse and drain beans; set aside.
2. Place red onion and cilantro leaves in the jar. Cover jar and press “On/Off”
button and then press “Food Chop” button.
12
3. Remove mixture from jar and set aside (no need to rinse jar for next step).
4. Place onion and garlic in jar. Cover jar and press “On/Off” button and then
press “Food Chop” button.
5. In a 4-quart saucepan cook onion and garlic in olive oil until tender.
6. In jar, place 3 cups of beans with liquid and cilantro leaves. Cover jar with
lid. Press “On/Off” button and then press “Medium” button. Press “Stop”
button when desired consistency is reached. (Change to whatever the sequence
will be on the final product.)
7. Stir bean mixture into soup remaining in saucepan; reheat as desired.
8. Serve, if desired, with sour cream and onion chive mixture.
*Sofrito is a popular condiment in Latin American cooking. It can be found
in the Latin American or International foods section of most supermarkets.
Creative Cook’s Note: If a less chunky soup is preferred, repeat step #3
with remaining beans and liquid.
Peachy Applesauce
Makes 1 ¼ cups
1 large apple, pared, cored and quartered
1 large peach, pitted, peeled and quartered (If out of season, use 2 canned
peach halves.)
2 Tbsp. water
1. In small saucepan, cook fruits in water 5-8 minutes or until very tender.
2. In jar, place fruits and liquid.
3. Cover jar with lid. Press “On/Off” button, then press “Low Pulse”
button 3 or 4 times, then “High Pulse” button until smooth.
4. Remove from jar; place in covered containers.
5. Chill or freeze at once.
Green Pea Baby Food
Makes 1 ½ cups
1 pkg. (10 oz.) frozen baby green peas
¾ cup water
1. In small saucepan, cook peas in water 10-15 minutes or until very tender.
2. In jar, place peas and liquid.
3. Cover jar with lid. Press “On/Off” button, then press “Frozen Drinks” button.
4. Remove from jar. Place in covered containers.
5. Chill or freeze at once.
Honey-Wheat Pancakes
Makes 12 pancakes
1 1/3 cups low fat buttermilk
2 eggs
2 Tbsp. honey
13
1 ½ cups reduced-fat buttermilk baking mix
½ cup whole-wheat flour
¼ cup honey-crunch wheat germ
1 tsp. baking powder
Butter and syrup for serving
1. In jar, place ingredients in order given above.
2. Cover jar with lid. Press “On/Off” button, then press “High Pulse” button
8-10 times. When done, scrape jar and stir in the batter lightly.
3. For each pancake, pour about ¼ cup batter onto preheated griddle; cook until
tops begin to bubble; turn over and continue to cook until golden.
4. Serve hot with butter and syrup.
Chocolate Cream Pie
Makes 8 servings
1 cup slivered almonds
3
20 chocolate wafer cookies
¼ cup melted butter
2 pkg. (3.4 oz. each) instant chocolate pudding and pie filling
3 ½ cups milk
½ tsp. almond extract
1 ½ cups heavy cream
1
3 cup chocolate syrup
Garnish: White chocolate curls
Pie Crust
1. In jar, place almonds. Then break cookies into jar.
2. Cover jar with lid. Press “On/Off” button, then press “Food Chop” button.
(Note: Press “Stop” button if it is done to your liking before cycle ends.)
3. Spray a 9” pie plate with nonstick cooking spray; add crumbs and butter;
mix well then press into bottom and up side; chill.
Pie Filling
4. Prepare pie filling with milk as package directs; using medium blender setting;
stir in extract; chill
5. In blender jar, place cream and chocolate syrup; blend until soft peaks form.
6. Pour chilled pie filling into crust; spread chocolate whipped cream over filling.
7. Garnish with chocolate curls.
8. Chill several hours.
14
1 Year Limited Warranty
Sunbeam Products, Inc. doing business as Jarden Consumer Solutions or if in Canada, Sunbeam Corporation
(Canada) Limited doing business as Jarden Consumer Solutions (collectively “JCS”) warrants that for a period
of one year from the date of purchase, this product will be free from defects in material and workmanship. JCS,
at its option, will repair or replace this product or any component of the product found to be defective during
the warranty period. Replacement will be made with a new or remanufactured product or component. If the
product is no longer available, replacement may be made with a similar product of equal or greater value. This
is your exclusive warranty. Do NOT attempt to repair or adjust any electrical or mechanical functions on this
product. Doing so will void this warranty.
This warranty is valid for the original retail purchaser from the date of initial retail purchase and is not
transferable. Keep the original sales receipt. Proof of purchase is required to obtain warranty performance. JCS
dealers, service centers, or retail stores selling JCS products do not have the right to alter, modify or any way
change the terms and conditions of this warranty.
This warranty does not cover normal wear of parts or damage resulting from any of the following: negligent
use or misuse of the product, use on improper voltage or current, use contrary to the operating instructions,
disassembly, repair or alteration by anyone other than JCS or an authorized JCS service center. Further, the
warranty does not cover: Acts of God, such as fire, flood, hurricanes and tornadoes.
What are the limits on JCS’s Liability?
JCS shall not be liable for any incidental or consequential damages caused by the breach of any express, implied
or statutory warranty or condition.
Except to the extent prohibited by applicable law, any implied warranty or condition of merchantability or fitness
for a particular purpose is limited in duration to the duration of the above warranty.
JCS disclaims all other warranties, conditions or representations, express, implied, statutory or otherwise.
JCS shall not be liable for any damages of any kind resulting from the purchase, use or misuse of, or inability to
use the product including incidental, special, consequential or similar damages or loss of profits, or for any breach
of contract, fundamental or otherwise, or for any claim brought against purchaser by any other party.
Some provinces, states or jurisdictions do not allow the exclusion or limitation of incidental or consequential
damages or limitations on how long an implied warranty lasts, so the above limitations or exclusion may not
apply to you. This warranty gives you specific legal rights, and you may also have other rights that vary from province to
province, state to state or jurisdiction to jurisdiction.
How to Obtain Warranty Service
In the U.S.A.
If you have any question regarding this warranty or would like to obtain warranty service, please call
1-800-334-0759 and a convenient service center address will be provided to you.
In the U.S.A., this warranty is offered by Sunbeam Products, Inc. doing business as Jarden Consumer Solutions
located in Boca Raton, Florida 33431. If you have any other problem or claim in connection with this product,
please write our Consumer Service Department.
PLEASE DO NOT RETURN THIS PRODUCT TO ANY OF
THESE ADDRESSES OR TO THE PLACE OF PURCHASE.
Printed in U.S.A.
15
For product questions contact:
Sunbeam Consumer Service
USA: 1.800.334.0759
www.oster.com
©2008 Sunbeam Products, Inc., doing business as
Jarden Consumer Solutions. All rights reserved.
In the U.S., distributed by Sunbeam, Products, Inc.,
doing business as Jarden Consumer Solutions, Boca Raton, FL 33431
YMI120808
Printed in U.S.A.
U.S. Patent Number 6609821