1
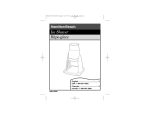
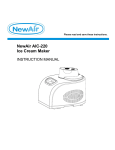
LIMITED ONE YEAR WARRANTY
OWNER’S MANUAL
Model No. ICM15
Warranty Coverage: This product is warranted to be free from defects in materials or workmanship for a period of one (1) year from the original purchase date. This product warranty
is extended only to the original consumer purchaser of the product and is not transferable.
For a period of one (1) year from the date of original purchase of the product, our Repair
Center will, at its option, either (1) repair the product or (2) replace the product with a reconditioned comparable model. These remedies are the purchaser's exclusive remedies under
this warranty.
Warranty Service: To obtain warranty service, you must call our warranty service number at
1-800-233-9054 for return instructions on how to deliver the product, in either the original
packaging or packaging affording an equal degree of protection to the Repair Center specified below. You must enclose a copy of your sales receipt or other proof of purchase to
demonstrate eligibility for warranty coverage.
To return the appliance, ship to:
To contact us, please write to, call, or email:
ATTN: Repair Center
708 South Missouri Street
Macon, MO 63552 USA
Consumer Relations Department
PO Box 7366
Columbia MO 65205-7366 USA
1-800-233-9054
E-mail:
[email protected]
What Is Not Covered: This warranty does not cover damage resulting from misuse, accident, commercial use, improper service or any other damage caused by anything other than
defects in material or workmanship during ordinary consumer use. This warranty is invalid
if the serial number has been altered or removed from the product. This warranty is valid
only in the United States and Canada.
LIMITATION ON DAMAGES: THERE SHALL BE NO LIABILITY FOR ANY INCIDENTAL
OR CONSEQUENTIAL DAMAGES FOR BREACH OF ANY EXPRESS OR IMPLIED WARRANTY OR CONDITION ON THIS PRODUCT.
DURATION OF IMPLIED WARRANTIES: EXCEPT TO THE EXTENT PROHIBITED BY
APPLICABLE LAW, ALL IMPLIED WARRANTIES AND CONDITIONS, INCLUDING, WITHOUT LIMITATION, IMPLIED WARRANTIES AND CONDITIONS OF MERCHANTABILITY
AND FITNESS FOR A PARTICULAR PURPOSE OR USE ON THIS PRODUCT ARE LIMITED IN DURATION TO THE DURATION OF THIS WARRANTY.
Some jurisdictions do not allow the exclusion or limitation of incidental or consequential
damages, or allow limitations on how long an implied warranty lasts, so the above limitations or exclusions may not apply to you. This warranty gives you specific legal rights and
you may have other rights under the laws of your jurisdiction.
For more information on our products, visit our website: www.maxim-toastmaster.com.
Made in China
Salton® Big Chill™
FROZEN DESSERT MAKER
TABLE OF CONTENTS
Important Safeguards . . . . . . . . . . . . . . . . . . . . . . . . . . . . 3
Additional Important Safeguards . . . . . . . . . . . . . . . . . . . . 4
Introduction . . . . . . . . . . . . . . . . . . . . . . . . . . . . . . . . . . . . 6
Getting to Know Your Big Chill™ Frozen Dessert Maker . 7
Before Using for the First Time . . . . . . . . . . . . . . . . . . . . . 8
Operating Instructions . . . . . . . . . . . . . . . . . . . . . . . . . . . 10
User Maintenance Instructions . . . . . . . . . . . . . . . . . . . . 14
Helpful Hints . . . . . . . . . . . . . . . . . . . . . . . . . . . . . . . . . . 14
Troubleshooting . . . . . . . . . . . . . . . . . . . . . . . . . . . . . . . . 16
Recipes . . . . . . . . . . . . . . . . . . . . . . . . . . . . . . . . . . . . . . 17
Warranty/Consumer Relations . . . . . . . . . . . . . . back cover
IMPORTANT SAFEGUARDS
When using electrical appliances, basic safety precautions
should always be followed including the following:
1. Read all instructions.
2. To protect against risk of electrical shock do not put
cord, plugs, or appliance in water or other liquid.
3. Close supervision is necessary when any appliance is
used by or near children.
4. Unplug from outlet when not in use, before putting on or
taking off parts, and before cleaning.
5. Do not operate any appliance with a damaged cord or
plug or after the appliance malfunctions, or is dropped
or damaged in any manner. Contact Consumer Service
for examination, repair or electrical or mechanical
adjustment.
6. The use of attachments not recommended or sold by
the manufacturer may cause fire, electric shock or
injury.
7. Do not use outdoors.
8. Do not let cord hang over edge of table or counter.
9. Do not let cord contact hot surface, including the stove.
10. The Frozen Dessert Maker must NEVER be laid on its
side or turned upside down.
11. Use the Frozen Dessert Maker away from heat sources.
Keep it at a distance of at least 3/4 inch from walls or
other objects that could obstruct free air circulation.
12. Avoid contact with moving parts. Keep hands and
utensils out of Mixing Cylinder while in use to reduce
risk of injury to persons or the Frozen Dessert Maker.
Do not use sharp objects or utensils inside the
Mixing Cylinder! Sharp objects will scratch and
damage the inside of the cylinder. The included Plastic
Mixing Knife may be used when the unit is OFF.
SAVE THESE INSTRUCTIONS
For Household Use Only
2
3
ADDITIONAL IMPORTANT SAFEGUARDS
GROUNDED 3-CONDUCTOR PLUG
1. All users of this appliance must read and understand this
Owner’s Manual before operating or cleaning this appliance.
2. The cord to this appliance should be plugged into a 120V AC
electrical outlet only.
3. Do not leave this appliance unattended during use.
4. If this appliance begins to malfunction during use,
immediately turn the unit OFF and unplug the cord. Do not
use or attempt to repair the malfunctioning appliance.
5. If this appliance falls or accidentally becomes immersed in
water, unplug it immediately. Do not reach into the water! Do
not use this appliance after it has fallen into or becomes
immersed in water.
6. To reduce the risk of injury to persons or property, never use
this appliance in an unstable position.
7. Do not use this appliance for other than its intended use.
8. The maximum continuous operation time of the Dasher Motor
is 50 minutes. A 60 minute rest interval is required between
50 minute operating intervals of the Dasher Motor.
IMPORTANT: This unit contains a compressor for chilling
purposes. During transportation and handling it is possible that
the unit was turned on its side or upside down. The Refrigerant
and Oil in the compressor must separate again before using.
Allow the unit to sit correctly for 12 hours before using. This must
be done anytime the unit has been on its side or upside down.
WARNING: To reduce the risk of personal injury, always unplug
Frozen Treat Maker’s Dasher Motor before inserting or removing
Dasher.
This appliance is equipped with a grounded-type 3-wire cord
(3-prong plug). This plug will only fit into an electrical outlet made
for a 3-prong plug. This is a safety feature. If the plug should fail
to fit the outlet, contact an electrician to replace the obsolete
outlet. Do not attempt to defeat this safety feature.
4
SHORT CORD INSTRUCTIONS
A short power-supply cord is provided to reduce the risk resulting
from becoming entangled in or tripping over a longer cord.
Do not use an extension cord with this product.
ELECTRIC POWER
If the electrical circuit is overloaded with other appliances, your
appliance may not operate properly. It should be operated on a
separate electrical circuit from other appliances.
PLASTICIZER WARNING
CAUTION: To prevent Plasticizers from migrating from the finish
of the countertop or tabletop or other furniture, place
NON-PLASTIC coasters or placemats between the appliance
and the finish of the countertop or tabletop.
Failure to do so may cause the finish to darken, permanent
blemishes may occur or stains can appear.
5
INTRODUCTION
®
Congratulations on the purchase of your Salton BIG CHILL™
Frozen Dessert Maker!
Now with the BIG CHILL™ you can enjoy the freshest ice
creams, sherbets, sorbets, frozen yogurts, slushies and frozen
bar drinks unlike any you have ever enjoyed. Since you are
preparing quantities that will be enjoyed soon after mixing you
don't need to prepare the ingredients the same way as
commercially made products. For instance, fruits can be used
without cooking them and loosing their fresh picked flavor. No
preservatives are needed either.
Getting to Know Your
BIG CHILL™ Frozen Dessert Maker
The box containing your Salton® Big Chill™ Frozen Dessert
Maker should include the following parts. If any of the following
are missing, contact consumer service:
PRODUCT MAY VARY SLIGHTLY FROM ILLUSTRATION
A.
B.
C.
D.
The BIG CHILL™ produces ice cream and other frozen desserts
utilizing its own compressor to chill your ingredients to the
perfect temperature without the need or mess of salt and ice that
most ice cream machines need. The Dasher Motor turns the
ingredients effortlessly and the Electronic Timer lets you know
when your desserts are ready to enjoy.
O.
E.
F.
G.
H.
I.
J.
The BIG CHILL™ is designed with ease of use and easy cleanup
so that making your own ice cream and frozen desserts is as
much fun as eating them.
The following pages in this manual will familiarize you with the
operation of the BIG CHILL™ Frozen Dessert Maker. Following
the operating instructions you will find many recipes to get you
started using the BIG CHILL™ to prepare some of your classic
favorites and some new tastes to explore. After getting used to
the BIG CHILL™ try your own recipes or look for many more that
are available on the internet or in book stores.
N.
L.
K.
M.
A. Dasher Motor (P/N 71129)
B. Start/Stop Button for Dasher
Motor
C. Connection Plug of Dasher
Motor
J. Dasher Motor Socket
Connection Plug
K. Fixed Stainless Steel Chilling
Cylinder
D. Transparent Cover (P/N 71130)
L. Electronic Timer LED and
Controls
E. Removable Dasher (P/N 71131)
M.3-Prong Power Cord
F. Removable Mixing Cylinder
(P/N 71132)
N. Plastic Mixing Knife (P/N 71133)
G. Chilling System Indicator Light
P. Locknut (P/N 71135)
(Not Shown, See Figure 2)
H. Chilling System On/Off Switch
O. Measuring Cup (P/N 71134)
I. Dasher Motor Release Button
6
7
BEFORE USING FOR THE FIRST TIME
Carefully unpack and remove any packing materials and literature.
Before use, thoroughly wash all parts that will come into contact
with the ice cream (including the Removable Cylinder, Dasher and
Transparent Cover) with warm soapy water, rinse, and wipe dry
with soft cloth. You may wipe the Fixed Stainless Steel Cylinder
with a damp cloth but make sure it is completely dried before use.
Never immerse Motor Housing or Dasher Motor in water or any
other liquid.
IMPORTANT: Place the Frozen Dessert Maker upright on a flat
surface for at least 12 hours before using it for the first time, to
allow the oil contained in the compressor to return to the
compressor reservoir. Failure to do so before operation could
cause permanent damage to the unit.
This procedure must be followed whenever the Frozen Dessert
Maker has been placed in a non-upright position for any reason.
When your Frozen Dessert Maker is first used, you may
experience an odor. This is normal. After the first few uses, this
should no longer occur.
PREPARING THE FROZEN DESSERT
MAKER
Before assembling the Frozen Dessert Maker, make sure the
Start/Stop Button of the Dasher Motor is in the Stop position and
the electric power cord is unplugged.
1. ADDING THE REMOVABLE CYLINDER
Insert the Removable Cylinder to the Fixed Stainless Steel
Cylinder of the Frozen Dessert Maker’s housing, until the
Removable Cylinder is completely seated into position. (See Figure 1)
Figure 1
8
NOTE: The Removable Cylinder should NEVER be used in a
conventional oven, microwave oven, on top of the range or on
any other heated surface. If the Removable Cylinder is scratched
or chipped or dented do not use. Do not add hot liquids to the
Removable Cylinder.
2. ATTACHING THE TRANSPARENT COVER
Place the Transparent Cover into the bottom of the Dasher Motor
and secure with the supplied locknut. (See Figure 2)
Figure 2
3. INSERTING THE DASHER
Make sure the Start/Stop Button of the Dasher Motor is in the
Stop Position. When the button is depressed it is in the Start
Position and when it is not it is in the Stop Position. Insert the
Dasher into the Dasher Motor Socket, until the Dasher snaps
into position. (See Figure 3)
WARNING: To reduce the risk of personal injury, always unplug
Frozen Treat Maker’s Dasher Motor before inserting or removing
Dasher.
NOTE: It is important that the Dasher be inserted properly into
the Dasher Motor Socket. Installing the Dasher any other way
will result in an incorrect mixing action.
NOTE: Do not use any Dasher other than the one provided
(P/N 71131).
Figure 3
9
PREPARING THE FROZEN DESSERT
MAKER cont’d...
4. INSTALLING THE DASHER MOTOR
Rotate Dasher Motor clockwise until it locks into place (See
Figure 4). When the Dasher Motor locks into place, the
Connection Plug of the Dasher Motor will make a proper
connection with the Dasher Motor Connection Plug Receptacle.
IMPORTANT
1. Plug the power cord into 120V AC outlet. The Electronic Timer
LED will display Set Time on the left side, and on the right side
the LED will flash to indicate the remaining time. There are two
time options to choose from: 40 minutes or 50 minutes.
2. Press the Start button on the Electronic Timer control panel,
and then press the power switch on the mixing assembly, the
Dasher Motor will start working.
3. When the Electronic Timer reaches the last 30 seconds of the
selected setting time, a buzzer will sound to notify you the
selected setting time is almost completed. The Dasher Motor
will automatically be switched off when time runs out.
MAKING FROZEN DESSERTS
Figure 4
Position the Frozen Dessert Maker near an electrical outlet on a
flat stable surface, allowing adequate space around it, without
obstructing the ventilation grills at the sides.
If you have not already done so make sure you have completed
the steps in “Preparing The Frozen Dessert Maker” section earlier
in this manual.
OPERATING INSTRUCTIONS
USING THE ELECTRONIC TIMER
The Electronic Timer built-in to your BIG CHILL™ Frozen
Dessert Maker allows you to set the time to the 40 or 50 minutes
that the Dasher Motor will run. Choose the time that corresponds
to the recipe you are following. The Electronic Timer will switch
off the Dasher Motor power at the end of the specified time and
the buzzer will sound. If the ice cream has not achieved the
desired thickness you may then reset the Electronic Timer to run
for an additional 5 to 10 minutes.
NOTE: Do not overmix. Mixing too long can result in damage to
the Dasher Motor, as the frozen dessert will begin to freeze too
hard to be mixed further.
10
1. Plug the power cord into 120V AC outlet.
2. Start the Built-in Chilling System by pressing the On/Off
Chilling Switch. The indicator LED will light to show that the
Chilling System is operating. Allow five minutes before adding
ingredients to the Removable Cylinder to allow both cylinders
to reach the optimum temperature.
3. After five minutes have passed since turning on the Built-in
Chilling System, turn on the Dasher Motor by pressing the
Start/Stop Button on the Dasher Motor, then add the
ingredients (according to the recipe) through the opening in
the Transparent Cover. Ingredients should be at a refrigerated
temperature. NEVER use hot ingredients.
4. Set the Electronic Timer according to the recipe. See “Using
the Electronic Timer”.
5. Never fill the Removable Cylinder more than half full if using
recipes not contained within this Owner’s Manual. Most frozen
dessert recipes expand in volume during the last minutes of
preparation and it will fill the cylinder.
11
OPERATING INSTRUCTIONS
cont’d...
MAKING FROZEN DESSERTS cont’d...
6. During preparation, you can add chocolate chips, raisins and
other ingredients through the opening in the Transparent
Cover. Alcoholic beverages should not be added until the end
of preparation, as they will slow the chilling process.
7. Preparation time may vary from 15 to 50 minutes, depending
on the recipe as well as the quantity and temperature of the
ingredients used.
IMPORTANT: Avoid turning off the Built-in Chilling System
before the frozen dessert is ready. If the switch is turned off or in
the event of power failure, the Built-in Chilling System
automatically shuts downs for approximately five minutes, which
may impact the success of the ice cream or other frozen dessert.
8. When the frozen dessert has reached a good consistency,
the Dasher Motor rotation reverses direction, indicating that
the frozen dessert is ready. You may either shut off the
Dasher Motor at this time and enjoy your Frozen Treat or you
may wait for the Dasher Motor to automatically shut off when
the Electronic Timer completes its countdown.
9. If you desire a slightly thicker frozen dessert, leave the
Built-in Chilling System on for an extra 5 to 10 minutes.
IMPORTANT: After each operation, make sure the Dasher Motor
and Built-in Chilling System are Off and allow the unit to sit for
one hour, then additional desserts can be made if desired.
10. To aid in removing the frozen dessert, remove the Dasher
Motor (including Transparent Cover and Dasher). Turn Off
the Dasher Motor, turn Off the Built-in Chilling System and
unplug the Ice Cream Maker. Press the Dasher Motor
Release Button down and remove the Dasher Motor
(including Transparent Cover and Dasher) by rotating counter
clockwise.
11. Remove the frozen dessert from the Removable Cylinder
using the plastic mixing knife (provided) or a wooden spoon.
Do not use metal or sharp utensils, as they will damage the
Removable Cylinder.
12. After removing the frozen dessert, allow the Removable
Cylinder to reach room temperature, then rinse and wash
with warm soapy water. Dry thoroughly with a soft cloth.
12
STORING FROZEN DESSERTS IN
THE FROZEN DESSERT MAKER
Frozen desserts can be kept in the Frozen Dessert Maker for 10 to
20 minutes with the Dasher Motor off after mixing is completed.
The Built-in Chilling System should be turned off after 10 minutes.
STORING FROZEN DESSERTS IN THE FREEZER
You can store your frozen desserts in your freezer for a limited
time period; however keeping it too long will reduce its flavor and
quality. After one to two weeks, any leftover frozen dessert should
be disposed of properly.
To store frozen dessert in the freezer, follow these rules:
Store the frozen dessert in a clean, well-sealed freezer container.
Do not use the Removable Cylinder as a storage container.
Maintain a minimum temperature of 27°F in your freezer.
Mark the date of preparation and type of frozeb dessert on the
container.
IMPORTANT
Frozen desserts are susceptible to bacteria. The Frozen Dessert
Maker and tools must be kept clean and dry.
Never refreeze unfrozen or semi-frozen desserts.
Remove the frozen dessert container from the freezer about half
an hour before serving and place it in the refrigerator to allow it to
soften to a scoopable hardness.
Frozen desserts may also be set out for 10 to 15 minutes at room
temperature to reach a suitable temperature for scooping. Keep
the container closed.
DESSERT STORAGE TIMES IN FREEZER
Desserts made from
raw ingredients:
1 week
Sorbets:
Desserts made from
semi-cooked ingredients:
1 to 2 weeks
2 weeks
13
USER MAINTENANCE
INSTRUCTIONS
CARE AND CLEANING
Before cleaning the Frozen Dessert Maker, make sure the
Frozen Dessert Maker is unplugged.
To release the Transparent Cover from the Dasher Motor, loosen
the locknut beneath the motor assembly (See Figure 1).
The Removable Cylinder, Dasher and Transparent Cover can be
washed in warm water with dishwashing liquid.
The Fixed Cylinder may be wiped with a damp, soft cloth. Then
dry thoroughly with a cloth.
Do not wash any of the components in a dishwasher.
The Dasher Motor assembly can be cleaned with a damp cloth.
Never immerse the Dasher Motor in water and do not rinse
under the tap.
The Frozen Dessert Maker housing can be cleaned with a damp
cloth.
Never immerse the Frozen Dessert Maker in water and do not
rinse under the tap.
STORAGE
Unplug unit; store in its box or in a clean, dry place.
Never store it while it is still plugged in.
Never wrap cord tightly around the appliance.
Do not put any stress on the cord where it enters the unit, as it
could cause the cord to fray and break.
HELPFUL HINTS
Certain recipes involve cooking. Prepare them at least a day
ahead to ensure that they chill completely. It is recommended to
always chill the basic mixture.
For cold mixtures, the best results are obtained by beating the
eggs and sugar with an electric whisk. This helps increase the
volume.
The majority of recipes consist of cream, milk, eggs and sugar.
You may use whatever cream you wish, but the flavor and
texture will vary greatly according to the quality of cream chosen.
The higher the percentage of fat, the richer the ice cream, for
14
example, Heavy Cream contains a minimum of 36% fat, Light
Whipping Cream 30%, Light Cream 18%, and Half and Half 10%.
Always maintain the same overall quantity of liquid. For example,
the lightest ice cream can be made by using more milk than
cream, or by eliminating the cream altogether. You may also use
skimmed milk, but the texture of the ice cream will be very
different. If you decide not to use the amount of cream called for
in a recipe you will need to make up the difference with milk.
The frozen dessert recipe mixture can be kept in the refrigerator
for several days. Stir it well before pouring it into the cylinder.
Fill the cylinder no more than half full if using recipes not
contained within this Owner’s Manual. The mixture increases in
volume during preparation.
Alcoholic ingredients slow down the chilling process. Liqueurs
should be added only during the final minutes of preparation.
The flavor of sorbets depends largely on the degree of ripeness
and sweetness of the fruit and juice used. Taste the fruit before
adding it to the recipe. If it is too acidic, add sugar; if it is very
ripe, add less sugar or no sugar. Remember that cold reduces
sweetness.
Artificial sweeteners can be used in place of sugar. Add the
sweetener to the mixture and mix until completely dissolved.
Cooked mixtures must not be poured into the cylinder until they
are completely cold.
To sweeten the mixture during preparation, do not add sugar
directly into be cylinder (it will not dissolve). Instead, dissolve the
sugar in a little water or skimmed milk and pour the resulting
syrup (cooled) into the cylinder.
The fruit used in the recipes must always be washed and dried
before use. Even when not specified, fruit must always be peeled
and seeded.
When using raw eggs, make sure they are fresh.
15
TROUBLESHOOTING
If the frozen dessert is still not formed after 50 minutes, check
the following points before contacting the Consumer Relations
Department:
The ingredients must be poured into the Frozen Dessert Maker
at room temperature or, preferably, at refrigerator temperature.
frozen desserts cannot be made from hot ingredients.
The Removable Cylinder must not be more than half filled if
using recipes not contained within this Owner’s Manual. If the
quantity of ingredients is excessive, the time required to form the
frozen dessert increases considerably and the frozen dessert
may not be satisfactory.
The compressor is fitted with a safety device. In the event of
power failure, or if the Frozen Dessert Maker is turned off and on
again for any reason, or operation of the chilling system is
interrupted, the Frozen Dessert Maker will automatically shut
down for five minutes before turning on again. Operation will not
resume, even if the chilling button is pressed down in the On
position and the indicator light is on.
We strongly recommend checking all the above points before
contacting the Consumer Relations Department. If Consumer
Relations does not find a fault, the user will be required to cover
the costs of the testing.
RECIPES
ICE CREAM
Banana Pineapple Ice Cream
3 medium ripe bananas, mashed with a fork
1/3 cup crushed pineapple, drained
2/3 cup light corn syrup
1-1/2 cups heavy whipping cream
1 teaspoon vanilla extract
1. Plug the unit in and turn the chilling switch to the on position.
Allow the unit to chill for 5 minutes. While cooling prepare
mixture.
2. Using an electric mixer, combine all ingredients in a large
mixing bowl with a pour spout.
3. At the end of the 5 minute chilling process, turn the Dashing
Motor to the on position.
4. Slowly pour mixture through the opening in the Cover.
5. Allow to freeze for 35 minutes or until desired consistency.
The Dasher may reverse direction or stop, indicating the ice
cream is ready.
Yield: 4-1/2 cups
16
17
Berry Cheesecake Ice Cream
Butter Pecan Soft Serve Ice Cream
8 ounces cream cheese, softened
1 tablespoon lemon juice
1 teaspoon vanilla extract
3/4 cup frozen berries, thawed & drained
1 cup half & half
4.5 to 5.5 ounce box instant vanilla pudding & pie filling mix
3 cups 1% milk
1 cup heavy whipping cream
1/2 cup sugar
1 tablespoon butter flavoring
1 teaspoon vanilla extract
1 cup chopped pecans
1. Plug the unit in and turn the chilling switch to the on position.
Allow the unit to chill for 5 minutes. While cooling prepare
mixture.
2. Using an electric mixer, combine all ingredients in a large
mixing bowl with a pour spout.
3. At the end of the 5 minute chilling process, turn the Dashing
Motor to the on position.
4. Slowly pour mixture through the opening in the Cover.
5. Allow to freeze for 15 minutes or until desired consistency.
The Dasher may reverse direction or stop, indicating the ice
cream is ready.
Yield: 3-1/2 cups
1. Plug the unit in and turn the chilling switch to the on position.
Allow the unit to chill for 5 minutes. While cooling prepare
mixture.
2. Using an electric mixer, combine all ingredients except pecans
in a large mixing bowl with a pour spout.
3. At the end of the 5 minute chilling process, turn the Dashing
Motor to the on position.
4. Slowly pour the mixture through the opening in the Cover.
5. Allow to freeze for 40-45 minutes or until desired consistency
adding the pecans after 30 minutes. The Dasher may reverse
direction or stop, indicating the ice cream is ready.
Yield: 4-1/2 cups
18
19
Butterscotch Delight Ice Cream
Chunky Apple Cinnamon Ice Cream
3 to 3.5 ounce box instant butterscotch pudding & pie filling mix
1 cup whole milk
2 cups heavy whipping cream
½ cup sugar
1 tablespoon vanilla extract
1/3 cup toffee bits
1/3 cup semi sweet mini chocolate chips
1/3 cup brown sugar
2 teaspoons cinnamon
1/4 teaspoon salt
1-1/2 cups half & half
1 cup 1% milk
1-1/3 cups chunky apple sauce
1 tablespoon lemon juice
1. Plug the unit in and turn the chilling switch to the on position.
Allow the unit to chill for 5 minutes. While cooling prepare
mixture.
2. Using an electric mixer, combine all ingredients except the
toffee bits and the chocolate chips in a large mixing bowl with a
pour spout.
3. At the end of the 5 minute chilling process, turn the Dashing
Motor to the on position.
4. Slowly pour the mixture through the opening in the Cover.
5. Allow to freeze for 25 minutes or until desired consistency,
adding the toffee bits and mini chocolate chips after 20 minutes
of freezing. The Dasher may reverse direction or stop, indicating
the ice cream is ready.
1. Plug the unit in and turn the chilling switch to the on position.
Allow the unit to chill for 5 minutes. While cooling prepare
mixture.
2. Using an electric mixer, combine all ingredients in a large
mixing bowl with a pour spout.
3. At the end of the 5 minute chilling process, turn the Dashing
Motor to the on position.
4. Slowly pour the mixture through the opening in the Cover.
5. Allow to freeze for 50 minutes or until desired consistency.
The Dasher may reverse direction or stop, indicating the ice
cream is ready.
Yield: 5 cups
Yield: 4 cups
20
21
Cinnamon Soft Serve Ice Cream
Cooked Buttermilk Soft Serve Ice Cream
1/2 cup sugar
1/4 cup light corn syrup
4 teaspoons cinnamon
2 cups half & half
2 cups heavy whipping cream
2 teaspoons vanilla extract
2
6
1
2
1. Plug the unit in and turn the chilling switch to the on position.
Allow the unit to chill for 5 minutes. While cooling prepare
mixture.
2. Using an electric mixer, combine all ingredients in a large
mixing bowl with a pour spout.
3. At the end of the 5 minute chilling process, turn the Dashing
Motor to the on position.
4. Slowly pour mixture through the opening in the Cover.
5. Allow to freeze for 35 minutes or until desired consistency.
The Dasher may reverse direction or stop, indicating the ice
cream is ready.
cups heavy whipping cream
egg yolks
cup sugar
cups cold buttermilk
1. Pour whipping cream into a sauce pan. Heat to a simmer.
2. Whisk egg yolks and sugar in a bowl. Gradually add to hot
cream.
3. Cook over medium heat until mixture is thick enough to coat a
metal spoon. Stir in buttermilk.
4. Place in the refrigerator to chill for 4 hours.
5. Plug the unit in and turn the chilling switch to the on position.
Allow the unit to chill for 5 minutes.
6. At the end of the 5 minute chilling process, turn the Dashing
Motor to the on position.
7. Slowly pour the mixture through the opening in the Cover.
8. Allow to freeze for 25-30 minutes or until desired consistency.
The Dasher may reverse direction or stop, indicating the ice
cream is ready.
Yield: 4-1/2 cups
Yield: 4-1/2 cups
22
23
Cooked Chocolate Mint Ice Cream
Cooked Grape-Nuts Ice Cream
3 egg yolks
5 ounces peppermint patties
1-1/2 cups whole milk
1/2 cup sugar
1 cup heavy whipping cream
1 teaspoon vanilla extract
3 cups heavy whipping cream
6 egg yolks
2/3 cup sugar
1-1/2 teaspoons vanilla extract
1 cup Grape-Nuts
1. Lightly beat the egg yolks in a bowl. Heat the peppermint
patties and milk in a saucepan stirring continually until the
chocolates have melted and then remove from heat.
2. Add the egg yolks and sugar and return to the heat. Continue
cooking until the mixture thickens and coats a metal spoon.
3. Remove from heat and allow to cool.
4. Add heavy whipping cream and vanilla extract. Place in the
refrigerator to chill for 4 hours.
5. Plug the unit in and turn the chilling switch to the on position.
Allow the unit to chill for 5 minutes.
6. At the end of the 5 minute chilling process, turn the Dashing
Motor to the on position.
7. Slowly pour the mixture through the opening in the Cover.
8. Allow to freeze for 25 minutes or until desired consistency.
The Dasher may reverse direction or stop, indicating the ice
cream is ready.
1. Pour whipping cream into a sauce pan. Heat to a simmer.
2. Whisk egg yolks and sugar in a bowl. Gradually add to hot
cream.
3. Cook over medium heat until mixture is thick enough to coat a
metal spoon.
4. Stir in vanilla extract and place in the refrigerator to chill for 4
hours.
5. Stir in Grape-Nuts.
6. Plug the unit in and turn the chilling switch to the on position.
Allow the unit to chill for 5 minutes.
7. At the end of the 5 minute chilling process, turn the Dashing
Motor to the on position.
8. Slowly pour the mixture through the opening in the Cover.
9. Allow to freeze for 15 minutes or until desired consistency.
The Dasher may reverse direction or stop, indicating the ice
cream is ready.
Yield: 3 cups
Yield: 4-1/2 cups
24
25
Cooked No Fat, No Salt, No Sugar
Vanilla Ice Cream
1 teaspoon unflavored gelatin
2-1/4 cups skim milk
1 cup nonfat dry milk
4 ounces Egg Beaters
15 (1 gram) packets Equal
1 tablespoon vanilla extract
1. In a saucepan combine milk and gelatin, allow to stand for 1
minute.
2. Stir mixture over low heat until gelatin dissolves, do not boil.
3. Remove from heat and allow to cool.
4. Using an electric mixer, combine remaining ingredients.
Place in the refrigerator to chill for 4 hours.
5. Stir for a few seconds and pour mixture through a strainer to
strain out any gelatin lumps.
6. Plug the unit in and turn the chilling switch to the on position.
Allow the unit to chill for 5 minutes.
7. At the end of the 5 minute chilling process, turn the Dashing
Motor to the on position.
8. Slowly pour the mixture through the opening in the Cover.
9. Allow to freeze for 25 minutes or until desired consistency.
The Dasher may reverse direction or stop, indicating the ice
cream is ready.
Cooked Vanilla Ice Cream
2 eggs
1-1/2 cups whole milk
1/2 cup sugar
1-1/2 cups heavy whipping cream
1 teaspoon vanilla extract
1. Beat the eggs, milk and sugar together. Cook and stir over
medium to low heat until mixture thickens and coats a metal
spoon.
2. Remove from heat and allow to cool.
3. Add heavy whipping cream and vanilla extract. Place in the
refrigerator to chill for 4 hours.
4. Plug the unit in and turn the chilling switch to the on position.
Allow the unit to chill for 5 minutes.
5. At the end of the 5 minute chilling process, turn the Dashing
Motor to the on position.
6. Slowly pour the mixture through the opening in the Cover.
7. Allow to freeze for 30 minutes or until desired consistency.
The Dasher may reverse direction or stop, indicating the ice
cream is ready.
Yield: 5 cups
Yield: 3 cups
26
27
Peppermint Ice Cream
Philadelphia Style Soft Serve Vanilla Ice Cream
2 ounces Egg Beaters
1/2 cup granulated sugar
1-1/2 cups heavy whipping cream
1-1/4 cups whole milk
1-1/2 teaspoons peppermint flavoring
3/4 cup finely crushed peppermint candy
1-1/2 cups heavy whipping cream
2 cups half & half
1 tablespoon vanilla extract
1 cup granulated sugar
1/4 teaspoon salt
1. Plug the unit in and turn the chilling switch to the on position.
Allow the unit to chill for 5 minutes. While cooling prepare
mixture.
2. Using an electric mixer, combine all ingredients except
crushed peppermint candy in a large mixing bowl with a pour
spout.
3. At the end of the 5 minute chilling process, turn the Dashing
Motor to the on position.
4. Slowly pour the mixture through the opening in the Cover.
5. Allow to freeze for 40 minutes or until desired consistency
adding the crushed peppermint candy after 30 minutes of
freezing. The Dasher may reverse direction or stop, indicating
the ice cream is ready.
1. Plug the unit in and turn the chilling switch to the on position.
Allow the unit to chill for 5 minutes. While cooling, prepare
mixture.
2. Using an electric mixer, combine all ingredients in a large
mixing bowl with a pour spout.
3. At the end of the 5 minute chilling process, turn the Dashing
Motor to the on position.
4. Slowly pour mixture through the opening in the Cover.
5. Allow to freeze for 40 minutes or until desired consistency.
The Dasher may reverse direction or stop, indicating the ice
cream in ready.
Yield: 4-1/2 cups
Yield: 4-1/2 cups
28
29
Soy Chocolate Peanut Butter Chip Ice Cream
Soy Dream Ice Cream
2 ounces Egg Beaters
1 cup granulated sugar
3-3/4 cups chocolate soy milk
1 tablespoon vanilla extract
1 cup Reese's Peanut Butter Chips
3 cups fresh berries, sliced
3/4 cup soymilk (plain or vanilla)
3 tablespoons honey
1. Plug the unit in and turn the chilling switch to the on position.
Allow the unit to chill for 5 minutes. While cooling prepare
mixture.
2. Using an electric mixer, combine all ingredients in a large
mixing bowl with a pour spout.
3. At the end of the 5 minute chilling process, turn the Dashing
Motor to the on position.
4. Slowly pour the mixture through the opening in the Cover.
5. Allow to freeze for 40 minutes or until desired consistency
adding the Reese's Peanut Butter Chips after 30 minutes. The
Dasher may reverse direction or stop, indicating the ice cream is
ready.
1. Plug the unit in and turn the chilling switch to the on position.
Allow the unit to chill for 5 minutes. While cooling prepare
mixture.
2. Add ingredients to a blender or food processor and blend until
smooth and creamy.
3. At the end of the 5 minute chilling process, turn the Dashing
Motor to the on position.
4. Slowly pour mixture through the opening in the Cover.
5. Allow to freeze for 30 minutes or until desired consistency.
The Dasher may reverse direction or stop, indicating the soy
dream is ready.
Yield: 2-1/2 cups
Yield: 4-1/2 cups
30
31
Strawberry Ice Cream
Sugar Free Pecan Ice Cream
4 ounces Egg Beaters
1/2 cup granulated gugar
1-1/2 cups heavy whipping cream
1-1/2 cups whole milk
1-1/2 teaspoons vanilla extract
3/4 cup frozen strawberries, thawed, drained and mashed with a
fork
3 cups half & half
4 ounces Egg Beaters
15 (1 gram) packets of Equal
1 tablespoon vanilla extract
1/4 teaspoon almond extract
1/8 teaspoon salt
1/2 cup chopped pecans
1. Plug the unit in and turn the chilling switch to the on position.
Allow the unit to chill for 5 minutes. While cooling prepare
mixture.
2. Using an electric mixer, combine all ingredients in a large
mixing bowl with a pour spout.
3. At the end of the 5 minute chilling process, turn the Dashing
Motor to the on position.
4. Slowly pour mixture through the opening in the Cover.
5. Allow to freeze for 35 minutes or until desired consistency.
The Dasher may reverse direction or stop, indicating the ice
cream is ready.
1. Plug the unit in and turn the chilling switch to the on position.
Allow the unit to chill for 5 minutes. While cooling prepare
mixture.
2. Using an electric mixer, combine all ingredients except pecans
in a large mixing bowl with a pour spout.
3. At the end of the 5 minute chilling process, turn the Dashing
Motor to the on position.
4. Slowly pour the mixture through the opening in the Cover.
5. Allow to freeze for 50 minutes or until desired consistency
adding the pecans after 40 minutes of freezing. The Dasher may
reverse direction or stop, indicating the ice cream is ready.
Yield: 5 cups
Yield: 5-1/2 cups
32
33
Tofu Fruit Ice Cream
Tofu Pineapple Crush Ice Cream
2 cups pureed fruit of your choice
10 ounces regular tofu, drained & cut in 1 inch chunks
1-1/2 cups sugar
10 ounces soft tofu, drained & cut in 1 inch chunks
2/3 cup soymilk (vanilla or plain)
2 tablespoons lemon juice
1 tablespoon vanilla extract
1/8 teaspoon salt
1 cup brown sugar
20 ounces unsweetened crushed pineapple in natural juices
(drain and set aside 1/3 cup for stirring in before freezing)
1. Plug the unit in and turn the chilling switch to the on position.
Allow the unit to chill for 5 minutes. While cooling prepare
mixture.
2. Puree the fruit in a blender or food processor.
3. Add remaining ingredients and blend until smooth.
4. At the end of the 5 minute chilling process, turn the Dashing
Motor to the on position.
5. Slowly pour mixture through the opening in the Cover.
6. Allow to freeze for 35 minutes or until desired consistency.
The Dasher may reverse direction or stop, indicating the ice
cream is ready.
Yield: 3-1/2 cups
1. Plug the unit in and turn the chilling switch to the on position.
Allow the unit to chill for 5 minutes. While cooling prepare
mixture.
2. Add ingredients to a blender or food processor and blend until
smooth and creamy.
3. Stir in 1/3 cup of pineapple that was set aside.
4. At the end of the 5 minute chilling process, turn the Dashing
Motor to the on position.
5. Slowly pour mixture through the opening in the Cover.
6. Allow to freeze for 40 minutes or until desired consistency.
The Dasher may reverse direction or stop, indicating the ice
cream is ready.
Yield: 5 cups
34
35
Vanilla Ice Cream
2 ounces Egg Beaters
1/2 cup granulated sugar
1-1/2 cups heavy whipping cream
1-1/2 cups whole milk
1-1/2 teaspoons vanilla extract
1. Plug unit in and turn the chilling switch to the on position.
Allow the unit to chill for 5 minutes. While cooling prepare
mixture.
2. Using an electric mixer, combine all ingredients in a large
mixing bowl with a pour spout.
3. At the end of the 5 minute chilling process, turn the Dashing
Motor to the on position.
4. Slowly pour mixture through the opening in the Cover.
5. Allow to freeze for 35 minutes or until desired consistency.
The Dasher may reverse direction or stop, indicating the ice
cream is ready.
White Chocolate with Macadamia Nuts
Soft Serve Ice Cream
3 to 3.5 ounce box instant white chocolate pudding & pie filling
mix
1 cup whole milk
3-1/2 cups half & half
1/2 cup sugar
1 tablespoon vanilla extract
2 ounces white chocolate baking squares, finely grated
1 cup chopped macadamia nuts
* For flavor variation, add 3/4 cup of any one of the following:
M&M’s, Toffee Chips, Chocolate Chips, Oreo Cookie Crumbles,
Butterfinger crumbled or Reeses Peanut Butter Cup Pieces.
1. Plug the unit in and turn the chilling switch to the on position.
Allow the unit to chill for 5 minutes. While cooling prepare
mixture.
2. Using an electric mixer, combine all ingredients except
macadamia nuts in a large mixing bowl with a pour spout.
3. At the end of the 5 minute chilling process, turn the Dashing
Motor to the on position.
4. Slowly pour the mixture through the opening in the Cover.
5. Allow to freeze for 45-50 minutes or until desired consistency
adding the macadamia nuts after 40 minutes. The Dasher may
reverse direction or stop, indicating the ice cream is ready.
Yield: 5 cups
Yield: 5 cups
36
37
SHERBET
Grape Sherbet
Cantaloupe Sherbet
1 medium size cantaloupe—cubed
14 ounce can non-fat sweetened condensed milk
2 tablespoons honey
1 envelope unflavored gelatine
1. Plug the unit in and turn the chilling switch to the on position.
Allow the unit to chill for 5 minutes. While cooling prepare
mixture.
2. Add ingredients to a blender or food processor and blend until
smooth and creamy.
3. At the end of the 5 minute chilling process, turn the Dashing
Motor to the on position.
4. Slowly pour mixture through the opening in the Cover.
5. Allow to freeze for 40 minutes or until desired consistency.
The Dasher may reverse direction or stop, indicating the sherbet
is ready.
4 ounces frozen grape juice concentrate, thawed - cold
3 cups 1% or 2% milk
2/3 cup sugar
1-1/2 teaspoons vanilla extract
1. Plug the unit in and turn the chilling switch to the on position.
Allow the unit to chill for 5 minutes. While cooling prepare
mixture.
2. Using an electric mixer, combine all ingredients in a large
mixing bowl with a pour spout.
3. At the end of the 5 minute chilling process, turn the Dashing
Motor to the on position.
4. Slowly pour the mixture through the opening in the Cover.
5. Allow to freeze for 30 minutes or until desired consistency.
The Dasher may reverse direction or stop indicating the sherbet
is ready.,
Yield: 4-1/2 cups
Yield: 6 cups
38
39
Mandarin Chocolate Sherbet
Orange Sherbet
4 cups vanilla flavored low-fat soymilk
6 ounce can frozen orange juice concentrate, thawed
1 cup sugar
6 tablespoons unsweetened cocoa powder
1 teaspoon vanilla
1/8 teaspoon salt
1 envelope unflavored gelatin
3 ounce box orange gelatin*
3/4 cup sugar
1/8 teaspoon salt
1 cup boiling water
3 cups 1% or 2% milk
1 teaspoon vanilla extract
1. Plug the unit in and turn the chilling switch to the on position.
Allow the unit to chill for 5 minutes. While cooling prepare
mixture.
2. Add ingredients to a blender and blend until smooth and
creamy.
3. At the end of the 5 minute chilling process, turn the Dashing
Motor to the on position.
4. Slowly pour mixture through the opening in the Cover.
5. Allow to freeze for 40 minutes or until desired consistency.
The Dasher my reverse direction or stop, indicating the sherbet
is ready.
Yield: 6 cups
1. Dissolve gelatin, sugar and salt in the boiling water. Cool to
room temperature in a large mixing bowl or pitcher with a pour
spout. Do not chill in the refrigerator, as the gelatin will set up.
2. Plug the unit in and turn the chilling switch to the on position.
Allow the unit to chill for 5 minutes.
3. Add milk to cooled gelatin mixture stirring constantly.
4. At the end of the 5 minute chilling process, turn the Dashing
Motor to the on position.
5. Slowly pour the mixture through the opening in the Cover.
6. Allow to freeze for 50 minutes or until desired consistency.
The Dasher may reverse direction or stop, indicating the sherbet
is ready.
*Any flavor may be substituted for flavor variation, such as lime
or raspberry
Yield: 6 cups
40
41
Pineapple Sherbet
Raspberry Sherbet
16 ounces crushed pineapple—in its own juice
12 ounce can evaporated skim milk
1/3 cup sugar
1 teaspoon vanilla extract
10 ounces frozen raspberries in syrup, thawed-cold
1-1/2 cups 1% or 2% milk
1/3 cup nonfat dry milk
1/2 cup sugar
1. Plug the unit in and turn the chilling switch to the on position.
Allow the unit to chill for 5 minutes. While cooling prepare
mixture.
2. Using an electric mixer, combine all ingredients in a large
mixing bowl with a pour spout.
3. At the end of the 5 minute chilling process, turn the Dashing
Motor to the on position.
4. Slowly pour mixture through the opening in the Cover.
5. Allow to freeze for 40 minutes or until desired consistency.
The Dasher may reverse direction or stop, indicating the sherbet
is ready.
1. Puree raspberries and syrup in a blender or food processor
with a metal blade until smooth.
2. Pour mixture through a strainer, pressing out as much fruit
puree as possible. Discard seeds.
3. Place raspberry puree back in blender or food processor with
remaining ingredients and process until well mixed.
4. Plug the unit in and turn the chilling switch to the on position.
Allow the unit to chill for 5 minutes.
5. At the end of the 5 minute chilling process, turn the Dashing
Motor to the on position.
6. Slowly pour the mixture through the opening in the Cover.
7. Allow to freeze for 40 minutes or until desired consistency.
The Dasher may reverse direction or stop, indicating the sherbet
is ready.
Yield 4 cups
Yield: 4 cups
42
43
SORBET
Watermelon Sherbet
Apple Sorbet
5 cups watermelon—seeded & cubed
3/4 cup sugar
1 tablespoon lemon juice
1 envelope unflavored gelatin
12 ounce can evaporated skimmed milk
12 ounce can frozen apple juice concentrate, thawed-cold
2 cups cold water
2 tablespoons lemon juice
1/3 cup light corn syrup
1. Plug the unit in and turn the chilling switch to the on position.
Allow the unit to chill for 5 minutes. While cooling prepare
mixture.
2. Add ingredients to a blender and blend until smooth and
creamy.
3. At the end of the 5 minute chilling process, turn the Dashing
Motor to the on position.
4. Slowly pour mixture through the opening in the Cover.
5. Allow to freeze for 40 minutes or until desired consistency.
The Dasher may reverse direction or stop, indicating the sherbet
is ready.
1. Plug the unit in and turn chilling switch to the on position.
Allow the unit to chill for 5 minutes. While cooling prepare
mixture.
2. Using an electric mixer, combine all ingredients in a large
mixing bowl with a pour spout.
3. At the end of the 5 minute chilling process, turn the Dashing
Motor to the on position.
4. Slowly pour mixture through the opening in the Cover.
5. Allow to freeze for 35 minutes or until desired consistency.
The Dasher may reverse direction or stop, indicating the sorbet
is ready.
Yield: 6 cups
Yield: 4 cups
44
45
Chocolate Sorbet
Green Tea Sorbet
1-1/4 cups sugar
3 cups water
1/2 cup unsweetened cocoa powder
1/4 teaspoon salt
2 teaspoons vanilla extract
3 cups water
2-1/2 tablespoons good quality green tea
1/2 cup sugar
1. Cook sugar in dry saucepan without stirring until it begins to
dissolve.
2. Over medium heat, stir occasionally and continue cooking until
all sugar is melted and it is just starting to turn a very light
caramel brown.
3. Add water—be careful as it will sizzle and splutter. Continue
stirring until caramel is dissolved in the water.
4. Whisk in cocoa and salt until all ingredients are dissolved.
5. Transfer to a bowl and cool to room temperature, stirring
occasionally. This will take approximately 30 minutes.
6. Stir in vanilla extract.
7. Plug the unit in and turn the chilling switch to the on position.
Allow the unit to chill for 5 minutes.
8. At the end of the 5 minute chilling process, turn the Dashing
Motor to the on position.
9. Slowly pour mixture through the opening in the Cover.
10. Allow to freeze for 35 minutes or until desired consistency.
The Dasher may reverse direction or stop, indicating the sorbet
is ready.
1. Bring water to a boil, add leaves and remove from heat.
2. Steep for 5 minutes.
3. Add sugar and stir until dissolved
4. Strain through a fine sieve.
5. Chill tea, covered, until cold.
6. Plug the unit in and turn the chilling switch to the on position.
Allow the unit to chill for 5 minutes.
7. At the end of the 5 minute chilling process, turn the Dashing
Motor to the on position.
8. Slowly pour mixture through the opening in the Cover.
9. Allow to freeze for 30 minutes or until desired consistency.
The Dasher may reverse direction or stop, indicating the sorbet
is ready.
Yield: 3 cups
Yield: 3-1/2 cups
46
47
Orange Sorbet
Pineapple Sorbet
2
1
1
1
2-1/4 cups cold water
1-1/4 cups sugar
6 ounces frozen pineapple concentrate, thawed-cold
2 teaspoons lemon juice
2 teaspoons vanilla extract
cups fresh orange juice
tablespoon lemon juice
cup water
cup sugar
1. Plug the unit in and turn the chilling switch to the on position.
Allow the unit to chill for 5 minutes. While cooling prepare
mixture.
2. Using an electric mixer, combine all ingredients in a large
mixing bowl with a pour spout.
3. At the end of the 5 minute chilling process, turn the Dashing
Motor to the on position.
4. Slowly pour mixture through the opening in the Cover.
5. Allow to freeze for 30 minutes or until desired consistency.
The Dasher may reverse direction or stop, indicating the sorbet
is ready.
Yield: 4 cups
1. Using a saucepan, bring the water and sugar to a boil. Allow
to boil for 2 minutes.
2. Remove from heat and allow to cool.
3. Add remaining ingredients and mix well. Place in the
refrigerator to chill for 4 hours.
4. Plug the unit in and turn the chilling switch to the on position.
Allow the unit to chill for 5 minutes.
5. At the end of the 5 minute chilling process, turn the Dashing
Motor to the on position.
6. Slowly pour the mixture through the opening in the Cover.
7. Allow to freeze for 50 minutes or until desired consistency.
The Dasher may reverse direction or stop, indicating the sorbet
is ready.
Yield: 5 cups
48
49
YOGURT
Plum Sorbet
Blackberry Frozen Yogurt
3/4 pound plums, rinsed pitted sliced with peeling
1 cup fresh orange juice
3 tablespoons sugar
1 tablespoon orange zest
1. Plug the unit in and turn the chilling switch to the on position.
Allow the unit to chill for 5 minutes. While cooling prepare
mixture.
2. Add ingredients to a blender or food processor and blend until
smooth and creamy.
3. At the end of the 5 minute chilling process, turn the Dashing
Motor to the on position.
4. Slowly pour mixture through the opening in the Cover.
5. Allow to freeze for 30 minutes or until desired consistency.
The Dasher may reverse direction or stop, indicating the sorbet
is ready.
Yield: 3 cups
1/3 cup sugar
1/3 cup water
16 ounces frozen blackberries, unsweetened-thawed-cold or 2
cups fresh blackberries, stemmed and washed
1 cup 1% milk
1 cup plain yogurt
1/2 cup nonfat dry milk
1. In a saucepan, combine sugar and water. Bring to a boil;
lower heat and cook for 3 to 4 minutes to dissolve sugar.
Remove from heat and allow to cool slightly.
2. In a blender or food process fitted with a metal blade, puree
berries. Strain and push through fruit puree. When finished,
discard seeds. Pour cooled water mixture through strainer in
order to speed up straining process.
3. Combine remaining ingredients using an electric mixer until
smooth and creamy. Chill in refrigerator for 4 hours.
4. Plug the unit in and turn the chilling switch to the on position.
Allow the unit to chill for 5 minutes.
5. At the end of the 5 minute chilling process, turn the Dashing
Motor to the on position.
6. Slowly pour the mixture through the opening in the Cover.
7. Allow to freeze for 40 minutes or until desired consistency.
The Dasher may reverse direction or stop, indicating the yogurt
is ready.
Yield: 5 cups
50
51
Low Fat Raspberry Frozen Yogurt
Vanilla Frozen Yogurt
1 cup fresh or frozen raspberries, unsweetened-thawed-cold
1/4 cup warm water
1 teaspoon unflavored gelatin
12 (1 gram) packets Equal
1 cup plain low fat yogurt
2 ounces Egg Beaters
1/3 cup cold water
1/3 cup nonfat dry milk
1 cup plain yogurt
1 cup half & half
1 cup whole milk
2/3 cup sugar
4 ounces Egg Beaters
1 tablespoon vanilla extract
1/4 cup malted milk powder
1/8 teaspoon salt
1. In a blender or food process fitted with a metal blade, puree
berries. Strain discarding seeds.
2. In a cup combine water with gelatin; let stand 1 minute. Place
in the microwave and heat for 30 seconds stir to make sure the
gelatin is dissolved. Cool slightly.
3. Combine pureed berries with Equal and dissolved gelatin. Stir
in yogurt.
4. In a small bowl, combine Egg Beaters with 1/3 cup water and
dry milk then add raspberry mixture. Chill in refrigerator for 4
hours.
5. Plug the unit in and turn the chilling switch to the on position.
Allow the unit to chill for 5 minutes.
6. At the end of the 5 minute chilling process, turn the Dashing
Motor to the on position.
7. Slowly pour the mixture through the opening in the Cover.
8. Allow to freeze for 35 minutes or until desired consistency.
The Dasher may reverse direction or stop, indicating the yogurt
is ready.
1. Plug the unit in and turn the chilling switch to the on position.
Allow the unit to chill for 5 minutes. While cooling prepare
mixture.
2. Using an electric mixer, combine all ingredients in a large
mixing bowl with a pour spout.
3. At the end of the 5 minute chilling process, turn the Dashing
Motor to the on position.
4. Slowly pour the mixture through the opening in the Cover.
5. Allow to freeze for 40 minutes or until desired consistency.
The Dasher may reverse direction or stop, indicating the yogurt
is ready.
Yield: 5 cups
Yield: 3-1/2 cups
52
53
ITALIAN ICE
Gazpacho Italian Ice
Espresso Italian Ice
3 tablespoons instant coffee granules
3-2/3 cups boiling water
3/4 cup sugar
1 teaspoon vanilla extract
1. Dissolve coffee and sugar in the boiling water.
2. Stir in vanilla extract.
3. Place in refrigerator to chill for 4 hours.
4. Plug the unit in and turn the chilling switch to the on position.
Allow the unit to chill for 5 minutes.
5. At the end of the 5 minute chilling process, turn the Dashing
Motor to the on position.
6. Slowly pour the mixture through the opening in the Cover.
7. Allow to freeze for 20 minutes or until desired consistency.
The Dasher may reverse direction or stop, indicating the Italian
ice is ready.
Yield: 3 cups
2 cups spicy tomato juice
1 large peeled seeded chopped fresh ripe tomato
1 cup peeled seeded chopped cucumber
1/4 cup finely minced red onion
1/4 cup finely minced peeled green or red pepper
4 ounces Egg Beaters
2 tablespoons sugar
2 tablespoons olive oil
2 tablespoons red wine vinegar
1/4 teaspoon salt
1/8 teaspoon pepper
2 drops of chipotle Tabasco sauce
1. Plug the unit in and turn the chilling switch to the on position.
Allow the unit to chill for 5 minutes. While cooling prepare
mixture.
2. Using a blender, combine all ingredients and pulse 5 or 6
times to thoroughly mix ingredients.
3. At the end of the 5 minute chilling process, turn the Dashing
Motor to the on position.
4. Slowly pour the mixture through the opening in the Ccover.
5. Allow to freeze for 40 minutes or until desired consistency
adding. The Dasher may reverse direction or stop, indicating the
Italian ice is ready.
Yield: 4 cups
54
55
GELATO
BEVERAGES
Black Walnut Gelato
Apple Rum Ice Cream Shake
2 cups half & half
4 ounces Egg Beaters
2/3 cup dark corn syrup
3 tablespoons vanilla extract
1/8 teaspoon salt
1 cup chopped black walnuts
1/3 cup packed dark brown sugar
1/4 teaspoon salt
2 cups half & half
1-1/3 cups chunky apple sauce
1 tablespoon lemon juice
2 teaspoons rum extract
1. Plug the unit in and turn the chilling switch to the on position.
Allow the unit to chill for 5 minutes. While cooling prepare
mixture.
2. Using an electric mixer, combine all ingredients except
walnuts in a large mixing bowl with a pour spout.
3. At the end of the 5 minute chilling process, turn the Dashing
Motor to the on position.
4. Slowly pour the mixture through the opening in the Cover.
5. Allow to freeze for 50 minutes or until desired consistency
adding the walnuts after 40 minutes of freezing. The Dasher
may reverse direction or stop, indicating the gelato is ready.
1. Plug the unit in and turn the chilling switch to the on position.
Allow the unit to chill for 5 minutes. While cooling prepare
mixture.
2. Using an electric mixer, combine all ingredients in a large
mixing bowl with a pour spout.
3. At the end of the 5 minute chilling process, turn the Dashing
Motor to the on position.
4. Slowly pour the mixture through the opening in the Cover.
5. Allow to freeze for 50 minutes or until desired consistency.
The Dasher may reverse direction or stop, indicating the shake is
ready.
Yield: 4 cups
Yield: 5-1/2 cups
56
57
Banana Ice Cream Shake
Fresh Strawberry Frozen Daiquiri
14 ounce can sweetened condensed milk
2 tablespoons vanilla extract
1 cup half & half
2 cups heavy whipping cream
1 cup mashed banana
2 cups cold water
1/4 cup lime juice
20 ounces frozen strawberries in syrup, thawed - cold
3 ounces rum
1. Plug the unit in and turn the chilling switch to the on position.
Allow the unit to chill for 5 minutes. While cooling prepare
mixture.
2. Using an electric mixer, combine all ingredients in a large
mixing bowl with a pour spout.
3. At the end of the 5 minute chilling process, turn the Dashing
Motor to the on position.
4. Slowly pour mixture through the opening in the Cover.
5. Allow to freeze for 30 minutes or until desired consistency.
The Dasher may reverse direction or stop, indicating the shake is
ready.
1. Plug the unit in and turn the chilling switch to the on position.
Allow the unit to chill for 5 minutes. While cooling prepare
mixture.
2. Using an electric mixer, combine all ingredients except rum in
large mixing bowl with a pour spout.
3. At the end of the 5 minute chilling process, turn the Dashing
Motor to the on position.
4. Slowly pour the mixture through the opening in the Cover.
5. Allow to freeze for 40 minutes or until desired consistency
adding the rum after 15 minutes of freezing. The Dasher may
reverse direction or stop, indicating the daiquiri is ready.
Yield: 4-1/2 cups
Yield: 5 cups
58
59
Frozen Daiquiri
Frozen Margaritas
3 cups limeade
3 ounces rum
1-1/2 cups cold water
1-1/2 cups margarita mix, non-alcoholic-cold
1/4 cup tequila
1. Plug the unit in and turn the chilling switch to the on position.
Allow the unit to chill for 5 minutes.
2. At the end of the 5 minute chilling process, turn the Dashing
Motor to the on position.
3. Slowly pour the limeade through the opening in the Cover.
4. Allow to freeze for 40 minutes or until desired consistency
adding the rum after 15 minutes of freezing. The Dasher may
reverse direction or stop, indicating the daiquiri is ready.
Yield: 3 cups
1. Plug the unit in and turn the chilling switch to the on position.
Allow the unit to chill for 5 minutes. While cooling prepare
mixture.
2. Combine all ingredients except tequila in large mixing bowl
with a pour spout.
3. At the end of the 5 minute chilling process, turn the Dashing
Motor to the on position.
4. Slowly pour the mixture through the opening in the Cover.
5. Allow to freeze for 35 minutes or until desired consistency
adding the tequila after 15 minutes of freezing. The Dasher may
reverse direction or stop, indicating the margarita is ready.
Yield: 3 cups
60
61
Frozen Pina Coladas
Frozen Strawberry Daiquiri
2 cups pina colada mix, non-alcoholic-cold
1-1/3 cups cold water
1/2 cup rum
2 cups strawberry daiquiri mix, non-alcoholic-cold
1-1/3 cups cold water
1/2 cup rum
1. Plug the unit in and turn the chilling switch to the on position.
Allow the unit to chill for 5 minutes. While cooling prepare
mixture.
2. Combine all ingredients except rum in large mixing bowl with a
pour spout.
3. At the end of the 5 minute chilling process, turn the Dashing
Motor to the on position.
4. Slowly pour the mixture through the opening in the Cover.
5. Allow to freeze for 40 minutes or until desired consistency
adding the rum after 15 minutes of freezing. The Dasher may
reverse direction or stop, indicating the pina colada is ready.
1. Plug the unit in and turn the chilling switch to the on position.
Allow the unit to chill for 5 minutes. While cooling prepare
mixture.
2. Combine all ingredients except rum in large mixing bowl with
a pour spout.
3. At the end of the 5 minute chilling process, turn the Dashing
Motor to the on position.
4. Slowly pour the mixture through the opening in the Cover.
5. Allow to freeze for 40 minutes or until desired consistency
adding the rum after 15 minutes of freezing. The Dasher may
reverse direction or stop, indicating the daiquiri is ready.
Yield: 4 cups
Yield: 4 cups
62
63
Grape Slushie
Holiday Eggnog
8 ounces frozen grape juice concentrate, thawed - cold
1-3/4 cups cold water
1-1/3 cups whole milk
1/4 cup granulated sugar
2 teaspoons vanilla extract
4 cups eggnog
4 teaspoons brandy extract
3/4 teaspoon nutmeg
1. Plug the unit in and turn the chilling switch to the on position.
Allow the unit to chill for 5 minutes. While cooling prepare
mixture.
2. Using an electric mixer, combine all ingredients in a large
mixing bowl with a pour spout.
3. At the end of the 5 minute chilling process, turn the dashing
motor to the on position.
4. Slowly pour mixture through the opening in the Cover.
5. Allow to freeze for 35 minutes or until desired consistency.
The Dasher may reverse direction or stop, indicating the slushie
is ready.
1. Plug the unit in and turn the chilling switch to the on position.
Allow the unit to chill for 5 minutes. While cooling prepare
mixture.
2. Using an electric mixer, combine all ingredients in a large
mixing bowl with a pour spout.
3. At the end of the 5 minute chilling process, turn the Dashing
Motor to the on position.
4. Slowly pour the mixture through the opening in the Cover.
5. Allow to freeze for 25 minutes or until desired consistency.
The Dasher may reverse direction or stop, indicating the Eggnog
is ready.
Yield: 4 cups
Yield: 4 cups
64
65
Lemon Slushie
Lime Frosty
8 ounces frozen lemonade concentrate, thawed - cold
1-3/4 cup cold water
1-1/3 cups whole milk
1 cup granulated sugar
1-1/2 teaspoons vanilla extract
3 cups whole milk
6 ounces frozen limeade concentrate, thawed - cold
1/2 cup sugar
2 drops green food coloring
1. Plug the unit in and turn the chilling switch to the on position.
Allow the unit to chill for 5 minutes. While cooling prepare
mixture.
2. Using an electric mixer, combine all ingredients in a large
mixing bowl with a pour spout.
3. At the end of the 5 minute chilling process, turn the Dashing
Motor to the on position.
4. Slowly pour the mixture through the opening in the Cover.
5. Allow to freeze for 40 minutes or until desired consistency.
The Dasher may reverse direction or stop, indicating the slushie
is ready.
1. Plug the unit in and turn the chilling switch to the on position.
Allow the unit to chill for 5 minutes. While cooling prepare
mixture.
2. Using an electric mixer, combine all ingredients in a large
mixing bowl with a pour spout.
3. At the end of the 5 minute chilling process, turn the Dashing
Motor to the on position.
4. Slowly pour the mixture through the opening in the Cover.
5. Allow to freeze for 35 minutes or until desired consistency.
The Dasher may reverse direction or stop, indicating the frosty is
ready.
Yield: 5 cups
Yield: 4 cups
66
67
Maraschino Cherry Shake
Orange Slush
10 ounces maraschino cherries in juice
2 cups heavy whipping cream
1/2 cup whole milk
1/2 cup sugar
1 teaspoon vanilla extract
8 ounces frozen orange juice concentrate*, thawed - cold
2 cups cold water
1-1/3 cups whole milk
2/3 cup granulated sugar
1-1/2 teaspoons vanilla extract
1. Drain and reserve juice from cherries; chop cherries
2. Plug the unit in and turn the chilling switch to the on position.
Allow the unit to chill for 5 minutes. While cooling prepare
mixture.
3. Using an electric mixer, combine remaining ingredients with
cherry juice in a large mixing bowl with a pour spout.
4. At the end of the 5 minute chilling process, turn the Dashing
Motor to the on position.
5. Slowly pour the mixture through the opening in the Cover.
6. Allow to freeze for 40 minutes or until desired consistency
adding the chopped cherries at the added ingredient beep when
2 minutes are remaining. The Dasher may reverse direction or
stop, indicating the shake is ready.
1. Plug the unit in and turn the chilling switch to the on position.
Allow the unit to chill for 5 minutes. While cooling prepare
mixture.
2. Using an electric mixer, combine all ingredients in a large
mixing bowl with a pour spout.
3. At the end of the 5 minute chilling process, turn the Dashing
Motor to the on position.
4. Slowly pour mixture through the opening in the Cover.
5. Allow to freeze for 35 minutes or until desired consistency.
The Dasher may reverse direction or stop, indicating the slush is
ready.
* any other flavor for variation, such as lemon or lime
Yield: 5-1/2 cups
Yield: 4-1/2 cups
68
69
Oreo Cookies’n Cream Ice Cream Shake
Peach Shake
4 to 4.5 ounce box instant Oreo Cookies’n Cream pudding & pie
filling mix
1-1/2 cups whole milk
2 cups heavy whipping cream
1/2 cup sugar
1 tablespoon vanilla extract
2 cups half & half
3/4 cup sugar
1/4 cup non-fat dry milk
15 ounces canned peach chunks, drained
1 tablespoon lemon juice
2 teaspoons vanilla extract
1. Plug the unit in and turn the chilling switch to the on position.
Allow the unit to chill for 5 minutes. While cooling prepare
mixture.
2. Using an electric mixer, combine all ingredients in a large
mixing bowl with a pour spout.
3. At the end of the 5 minute chilling process, turn the Dashing
Motor to the on position.
4. Slowly pour the mixture through the opening in the Cover.
5. Allow to freeze for 25 minutes or until desired consistency.
The Dasher may reverse direction or stop indicating the shake is
ready.
1. Combine half & half, sugar and dry milk in a blender or food
processor and process until smooth.
2. Add peaches and remaining ingredients then process until
smooth.
3. Plug the unit in and turn the chilling switch to the on position.
Allow the unit to chill for 5 minutes.
4. At the end of the 5 minute chilling process, turn the Dashing
Motor to the on position.
5. Slowly pour the mixture through the opening in the Cover.
6. Allow to freeze for 25 minutes or until desired consistency.
The Dasher may reverse direction or stop. indicating the shake is
ready.
Yield: 4 cups
Yield: 4 cups
70
71
Strawberry Ice Cream Malt
Tropical Smoothie
10 ounces frozen strawberries with sugar, thawed - cold
1 cup whole milk
2 cups half & half
1-1/2 teaspoons vanilla extract
2 teaspoons strawberry flavoring
1/4 cup malted milk powder
4 cups V8 Splash Smoothies Tropical Colada
8 ounce can crushed pineapple, drained
1/2 teaspoon pineapple flavoring
1/2 teaspoon almond extract
1/2 teaspoon coconut extract
1/2 teaspoon banana extract
1. Plug the unit in and turn the chilling switch to the on position.
Allow the unit to chill for 5 minutes. While cooling prepare
mixture.
2. Puree strawberries with whole milk in a blender until smooth.
3. Add the remaining ingredients to the blender and process until
well mixed.
4. At the end of the 5 minute chilling process, turn the Dashing
Motor to the on position.
5. Slowly pour the mixture through the opening in the Cover.
6. Allow to freeze for 40 minutes or until desired consistency.
The Dasher may reverse direction or stop, indicating the malt is
ready.
1. Plug the unit in and turn the chilling switch to the on position.
Allow the unit to chill for 5 minutes. While cooling prepare
mixture.
2. Using an electric mixer, combine all ingredients in a large
mixing bowl with a pour spout.
3. At the end of the 5 minute chilling process, turn the Dashing
Motor to the on position.
4. Slowly pour the mixture through the opening in the Cover.
5. Allow to freeze for 35 minutes or until desired consistency.
The Dasher may reverse direction or stop, indicating the
smoothie is ready.
Yield: 4 cups
Yield: 4-1/2 cups
72
73
Vanilla Bean Ice Cream Shake
14 ounces can sweetened condensed milk
Seeds from a 2-inch vanilla bean halved lengthwise & scraped
2 cups half & half
2 cups whipping cream
1. Plug the unit in and turn the chilling switch to the on position.
Allow the unit to chill for 5 minutes. While cooling prepare
mixture.
2. Using an electric mixer, combine all ingredients in a large
mixing bowl with a pour spout.
3. At the end of the 5 minute chilling process, turn the Dashing
Motor to the on position.
4. Slowly pour mixture through the opening in the Cover.
5. Allow to freeze for 40 minutes or until desired consistency.
The Dasher may reverse direction or stop, indicating the shake is
ready.
Yield: 5-1/2 cups
White Chocolate with Macadamia Nuts
Soft Serve Ice Cream
3 to 3.5 ounce box instant white chocolate pudding and pie filling
mix
1 cup whole milk
3-1/2 cups half & half
1/2 cup sugar
1 tablespoon vanilla extract
2 ounces white chocolate baking squares, finely grated
1 cup chopped macadamia nuts
1. Plug the unit in and turn the chilling switch to the on position.
Allow the unit to chill for 5 minutes. While cooling prepare
mixture.
2. Using an electric mixer, combine all ingredients except
macadamia nuts in a large mixing bowl with a pour spout.
3. At the end of the 5 minute chilling process, turn the Dashing
Motor to the on position.
4. Slowly pour the mixture through the opening in the Cover.
5. Allow to freeze for 45-50 minutes or until desired consistency
adding the macadamia nuts after 40 minutes. The Dasher may
reverse direction or stop, indicating the ice cream is ready.
Yield: 5-1/2 cups
74
75
NOTES:
Chocolate Strawberry Banana Malt
2 cups half and half
1/4 cups sugar
14 ounce can sweetened condensed milk
1/4 cup chocolate malted milk
11 to 12 ounce can strawberry banana nectar from concentrate
1 teaspoon banana extract
1 teaspoon strawberry extract
1/8 teaspoon salt
1. Plug the unit in and turn the chilling switch to the on position.
Allow the unit to chill for 5 minutes. While cooling prepare
mixture.
2. Using an electric mixer, combine all ingredients in a large
mixing bowl with a pour spout.
3. At the end of the 5 minute chilling process, turn the Dashing
Motor to the on position.
4. Slowly pour the mixture through the opening in the Cover.
5. Allow to freeze for 40 minutes or until desired consistency.
The Dasher may reverse direction or stop, indicating the malt is
ready.
Yield: 4-1/2 cups
76
77