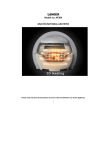
1
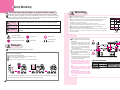
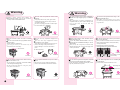
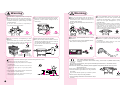
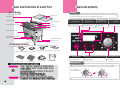
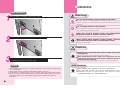
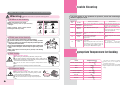
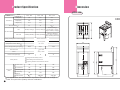
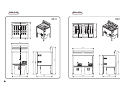
Features of the Product
Content Table
Features of the Product
Safety Warning
Before Using Product
Separate operation of 2 tanks (RFA-426)
You can fry two different foods at the same time more conveniently
Installation and Caution
Name and Function of Each Part
using 2 tanks.
Digital one-touch
Cooking temperature displayed in the control part helps you ignite
and adjust temperature up and down.
Frying residues draining method
Rinnai fryer is designed to place frying residues left at the bottom of tank
improving cooking quality and taste of your food.
How to Use
Micro-computer automatic control system
If you set up the desired temperature for cooking, the oil temperature
will be maintained stably under the control of temperature sensor.
Easy oil draining
You can drain oil easily by turning the knob for oil draining in the
front side.
Frying basket (for sale separately) and frying basket hanger
Because frying basket can be hooked on frying basket hanger, you
can try out oil for crackling.
Frying residue filtering paper
Maintenance
Error Message (Troubleshooting)
Appropriate Frying Temperature for
Cooking
Frying residue filtering paper is included. You can filter out frying
Specification
residues when draining.
Exterior Dimension
Easy cleaning for fryer inside
It's designed to help you when you clean the inside of product. You
can keep product clean all the time.
Safety Warning
You must have full knowledge of product before using it.
The following marks are made to be easily understood so that you can prevent any safety
accident caused by misuse in advance and use the product more conveniently. Completely
understand the following contents before read the manual.
Danger
If this mark is neglected, the user may be dead or seriously injured.
Warning If this mark is neglected, the user may be seriously injured.
Caution
If this mark is neglected, the user may be injured or damaged in
property.
General Danger,
Warning and Caution
No Touch
No Access
Caution:Inflammable
Must Do
It should be
grounded.
If gas seems to leak, take action as follow:
The product nameplate is on the right side of the product.
(If you don't know which gas you should use, contact our service center.)
Make sure that the power voltage is the same as specified.
(This product is used at 220V/60Hz only.)
Otherwise, the product will be damaged and cause firing and electric shock.
In case of moving out, make sure that you should use the gas as specified
In this event, take action as follow:
Stop using the product and close the middle valve.
Open the window to ventilate.
Contact our service center by using a phone outside.
Must Do
Must Do
When you install product, have a
safe distance from combustible
materials.
Must Do
Do not attach extraneous materials
around product after installation.
Do not turn on the light. Do not switch on/off any electrical appliance and do not touch any electric
plug. Do not use a telephone.
Use a phone outside
The fuel gas contains mercaptan, so that you can feel that the gas leaks even where only 1/1000 of
the gas exists in the air with specific smell (smell of rotten garlic or egg).
3
Otherwise, the gas may be incompletely combusted and cause you to be
poisoned by carbon monoxide or to be burned by explosive ignition.
In addition, it may not be ignited.
If too close, it could cause fire. Also, when
you attach a stainless plate to combustible
walls, if you use for a long time, fire may
break out due to the heat transmission.
When you install a heat-resistant plate,
leave an interval of 3cm.
Danger
Caution:Inflammable
Use the specified gas only.
Make sure that you should use the gas as specified on the product nameplate.
on the nameplate.
The following marks mean as follow:
Must Do
Warning
If you install selves too close to product, fire
may break out.
Check whether there is a fire alarm. If fire alarm
is located within 100cm from product, fire alarm
could mistakenly go off and gas supply could be
cut off when you operate product.
The heat-resistant plates should be
manufactured and installed properly for the
user's housing structure. Such heatresistant plates should be purchased by the
user.
If you install other gas appliances around
product, indirect heat from them may affect
product operation. Avoid using other gas
appliances at once.
You must install exhaust hood over the top of
product. Install product where it can provide
good ventilation and exhaustion and where
humidity is less.
Prohibited
About heat-resistant plate
Consult sales agent or installation facility about heatresistant plate.
4
Warning
Warning
Do not keep close materials which can be
easily set on fire.
Do not use ignitable gas such as spray.
Do not keep close inflammables like curtains. Do not
use ignitable gas such as spray, gasoline and
benzene nearby.
Do not go away while switch is on
(outing, sleeping)
If product is overheated, it could cause breakdown or
fire. In particular, if you leave product alone while flame
is on, fire may break out.
Ventilate frequently while using.
While using, ventilate the air by opening the
window. Otherwise, you may be poisoned by
carbon monoxide.
from the outlet.
Prohibited
You could get burned if hot oil or water splashes on
you. Make sure water not to go into hot oil.
Do not use when water in one tank and oil in the other
tank. You can get burned.
Prohibited
The floor of Installation site must be
even and stable.
If you install product in unstable
conditions and use, combustion could be
abnormal or you could get injured.
Do not use product in a moving car or
ship, otherwise product would sway
causing burn or fire.
Prohibited
5
feel any abnormal combustion, abnormal
sound, abnormal smell, immediately stop using
the product and close the middle valve to
ventilate, and then plug out the power cord
Must Do
Must Do
prohibited
Do not pour water into high temperature
of oil.
Troubleshooting
When an earthquake or fire occurs, or if you
Do not block exhaust port.
Do not place a dish towel or pan etc on top of
exhaust port.
Do not hang frying basket on exhaust port.
Fire could break out.
Prohibited
Do not touch while product is operating
or for some time after product is
switched off.
Keep product out of children' reach.
While in use or after use, product's surface,
surrounding and exhaust port are extremely
hot. If you touch, you might get burned.
There is a danger of burn or electric shock. Do
not let children get closer.
The product must not be disassembled
/repaired/modified by anyone other
than our service engineers.
Disassembly/repair/modification by any unqualified
staff may influence on the product safety. If you think
that the product has problems, see this manual or
contact our service center.
Prohibited
Do not install the product where water
may splash.
Splashed water may cause an electric shock
and short circuit.
Prohibited
When you drain waste oil, you need to
drain it twice.
If you drain all of waste oil at once, it would be hard
to convey and remove. You must drain it twice.
Before draining waste oil, you must wait until oil gets
cold.
Must Do
Before you drain waste oil, make sure
waste oil tank and waste oil filter are at
the bottom of product.
Must Do
No Touch
6
Warning
Warning
After using, make sure flame is
extinguished. When you go out or take a
break, close intermediate valve.
Do not use the product other than
cooking.
Using the product to dry cloth, ignite other
inflammable objects and etc may cause fire
and product damage.
Do not let anything get inside of exhaust port.
Fire could break out.
For gas connection and product installation,
consult with a gas supply agency or installation
agency.
Gas connection or product installation by
unqualified staff may cause product damage and
fire. In this case, we do not take any
responsibility.
Must Do
Must Do
While/after using, the product is very hot. If
you touch it, you may be burned. Be careful not
to get burned.
Prohibited
Prohibited
Do not let hands or face etc close to exhaust
port.
Do not let the handle of frying basket toward
exhaust port..
Do not use any separate supportive
items.
Do not use any supportive tools
purchased in the market.
Hot air comes from exhaust port.
You may get burned, or the handle may be
deformed due to overheating.
Their shapes and capabilities do not fit for our
product resulting in bad performance or
product damage. You must use Rinnai's
parts.
Exhaust Port
Do not touch the product while using or for a
certain period after using.
Before ignite product, check whether tank is
filled with water or oil.
If you use product without water or oil in it,
product will be overheated resulting in fire or
discoloration.
When you fry for a long time, oil volume may
diminish and catch fire. You need to supply oil to
make up for the loss.
Be careful temperature sensor(Thermistor)
will not be affected.
When you take out oil tank mesh to clean oil tank
inside, protect temperature sensor(Thermistor)
from physical shock.
If physical shock is given to temperature
sensor(Thermistor), it could cause malfunction.
For Sale Separately
Prohibited
Prohibited
Prohibited
Must Do
temperature sensor
(Thermistor)
Do not leave product alone while tank is
filled with water or oil.
Do not place materials on top of oil tank
cover.
Do not have the gas hose and power cord pass
on the top or at the bottom of the product.
Do not attach supportive duct or ventilating fan
to exhaust port.
If you leave oil for a long time, oil becomes oxidized.
This will degrade cooking quality.
If tank is filled with water for a long time, tank
may have rust inside of it.
Oil tank cover may be deformed damaging
product and materials could fall into oil tank.
It may be fused by contacting the hot part, so that
gas may leak and fire may occur.
It could cause product breakdown or fire.
Ventilating Fan
Supportive Duct
Prohibited
Prohibited
7
Prohibited
Must Do
8
Warning
Warning
Do not use any supportive tools or a big iron
plate that may cover the whole exhaust port.
Do not scratch/process/extend the power
cord. Do not force it to be bent or bound.
It may be abnormally overheated by incomplete
Otherwise, it may be broken causing fire and an
combustion causing fire, product damage or carbon
monoxide poisoning.
electric shock.
Keep your face away from the burner or
exhaust port while igniting. Do not look at
combustion part under the bottom of
product while igniting.
You may be burned and injured by the heat of fire or
In this case, we do not take any responsibility to
explosion.
any product damage and accident.
Prohibited
Prohibited
Adjust oil quantity corresponding to tank
capacity.
If you use too much oil, oil volume will be swollen by
heat resulting in overflow or oil may splash on you
when you put foods into oil causing burn.
Make gas pipe as short as possible.
When you use LPG, make the distance from the
product and gas containers as much as 3 meters or
less. (Keep gas containers outdoors)
Lay gas hose not to be touched over exhaust port
behind of product.
Must Do
Must Do
Prohibited
After using, press On/Off button to stop
operation.
Fire extinguishes after pressing ON/OFF button.
When you are not cooking, close valve.
Do not repeatedly ignite the product. If
the product has not been ignited and
needs be ignited again, ignite it again
after the live gas disappears. (3~4
seconds later).
During the monsoon season or on a humid day,
the product may not be well ignited due to the
high humidity in the ignition part. If you
repeatedly ignite the product in this case,
some live gas may be accumulated around the
product and may be exploded and fired.
Must Do
Do not use product when power cord is
defective or power cord and metal part
are loosed.
It could cause an electric shock or a fire. Call
for our after sales service agency.
+773<-58
87?-:
Must Do
Prohibited
Oil Proper
Quantity
RFA-226:22
RFA-326:29
RFA-426:22 x2
Make sure connection between gas connector and gas hose is firm.
Otherwise, gas may leak and cause a fire.
It should be
grounded
Make sure of using the gas as specified on the nameplate.
(LP gas/City gas)
The gas connection work should be carried out by a
qualified gas supply agency or gas piping facility
agency.
Gas combustion related products should be certified of KS
mark. Check their expiration dates too.
When you connect gas hose, push it to the red line in gas
connector and tighten using a fastener.
9
Must Do
This product needs AC 220V power.
For more information about electric wiring, consult with a qualified electric facility
company.
Any work for AC 220V power, power ground and cabling should be done in accordance with the
relevant rules as follow:
Relevant Rule: Electric Facility Standard, Electric Appliance Using Method, Electric Work Law, Inner
Wiring Rule and etc.
Even at any place where 220V is used, the power
consent should be grounded if it is not grounded
at its side.
If you boost electric power up to 220V in place
where 110V is used, it must be grounded.
(Use the boosting transformer that consumes 1kW/h
or more.)
Must Do
10
Installation and caution
Before using product
Directions for installation
Before using product, you must check whether or not water or oil is in tank.
Have enough space between product and walls.
1. Use the specified gas only
When you use product for the first time, or just moved in,
LP GAS
CITY GAS
Make sure that you should use the gas as specified on the
product nameplate.(LP gas/City gas)
Prohibited
(The product nameplate is on the right side of the product.)
Must Do
50cm or
longer
from the
top of
product
2. Check power cord connection
Make sure power cord is plugged in correctly.(AC 220V)
Do not touch power cord with wet hands.
Distance from
Heat-resistant plate
wall to heatDistance from product to
resistant plate:
heat-resistant plate on
3cm or longer
the ceiling
AC 220V
15cm or
longer
from wall
100cm or longer from ceiling
15cm or longer from wall
15cm or longer
from wall
Must Do
Must Do
3. Check gas connector
Connect standard gas hose by pushing it to the red line
in gas connector and tighten using a fastener.
Gas combustion related products should be certified of
KS mark. Check their expiration dates too.
<When installing heat-resistant plate> <When installing without heat-resistant plate>
Connect correctly.
There should be at least 100cm or longer gap from the inflammables such as ceiling and
selves to the exhaust port.
There should be 15cm or longer gap from the rear or side of product to
inflammable walls.
If hard to keep the gap of 15cm or longer from inflammable walls(100cm or longer
from exhaust port to ceiling), a heat-resistant plate shall be installed as above.
Must Do
4. Check gas valve
Check intermediate valve
Directions when installing around gas appliances.
Check if intermediate valve on the pipe to fryer is open.
Must Do
5. Check the location of waste oil knob and
waste oil tank
Must Do
Before put oil, make sure waste oil knob is screwed in.
Place waste oil tank under the oil draining hole to catch
waste oil from oil tank.
When you use product for the first time, turn waste oil
knob two or three times to deflate in waste oil pipe.
Must Do
Do not install other gas appliances around fryer.
5. Keep inflammables away.
If you have to install other gas appliances nearby, leave 30cm or longer space between gas
appliances.
Do not keep inflammables nearby product. Do not hang
out the wash around exhaust port. It may cause fire or
breakdown.
To prevent the breakdown of safety device, avoid using several gas appliances at the same time.
Prohibited
11
12
How to use properly
Name and Function of each Part
Display
Main Body
Oil Tank Cover
Exhaust Port
Oil Remove Mesh
Frying Basket Holder
Oil Remove Mesh Supporter
Oil Tank
When you ignite for the first time, sometimes ignition fails due to the remaining air
in the pipe. Repeat ignition until air completely vents itself.
Combustion
Display Lamp
You can check
combustion statue.
Oil Tank Mesh
Operation
Display Lamp
After plug in power cord,
press On/Off button
then lamp will be lit.
Setting Temperature
Display
Temperature
Display Lamp
When it reaches to the
setting temperature,
lamp will be lit.
It shows setting temperature.
It shows self-diagnosis NO.
87?-:
Ignition Check Window
Temperature Controlling Part
Waste Oil Knob
Height Controlling Bolt
Waste Oil Tank
(RFA-426)
Component Parts
Oil Remove Mesh Supporter User's Manual Frying Basket/For Sale Separately
Oil Tank Cover
On/Off button
You can turn on or
turn off product.
Oil Remove Mesh
Oil Tank Mesh
Waste Oil Filter
Temperature up/down button
Temperature can be adjusted from
50 to 220 .
Timer Knob/Timer
You can set time from 0
min to 30min.
Waste Oil Tank
How to use timer
Checkout
Turn timer knob clockwise to the location of time where is 5 minutes added to your
desired setting time, then tune in the timer knob to your desired time position.
(For example)
10 minutes setting
Must Do
Reference
13
Timer is a just alarming function. It doesn't extinguish combustion.
14
How to operate
Plug In
Putting Food Into Fryer
When temperature reaches to the setting
temperature, temperature lamp will be lit.
Then put food into fryer.
After plugging in power cord,
temperature display, temperature
lamp, combustion lamp and
operation lamp will be lit twice.
Early Preparation
Lighting of temperature lamp means the
temperature of oil in the tank reaches to
the setting temperature.
Automatic Temperature Maintaining System
When the temperature of oil drops while
cooking, (for example, when you put
food into fryer), temperature lamp will be
off and product will automatically start
combustion to heat up oil to the setting
temperature again. Check the lighting of
combustion lamp. If you want to adjust
setting temperature lower than current
oil temperature after temperature has
risen up. Cool down the oil in the tank
and set up temperature again.
87?-:
After blinking twice, temperature
display will show - - - .
Pressing ON/OFF Button
When you press ON/OFF button, it
will show default temperature (160 )
of product.
Adjust Cooking Temperature
When you press temperature up and
down button, figure in the display will go
up and down by 1 per press.
When you press temperature up and
down button for 3 seconds, figure in the
display will change by 10 .
Set your desired temperature by
pressing temperature up or down
button.
A few seconds later, combustion will start. (if you don't set temperature,
combustion will begin at the default temperature (160 ).
15
ON/OFF
If you press ON/OFF button after cooking is
done, temperature display will show - - - .
Pressing Restart Button
If you need to cook again, press ON/OFF
button. Then it will start combustion
according to the last setting temperature.
When you don't cook for a long time, in order to prevent oil oxidation, stop operation
or set temperature below 100 .
16
Maintenance
How to drain waste oil
Warning
Pull out waste oil draining knob forward softly.
Do not disassemble/repair/modify the product.
The product must not be disassembled/repaired/modified by other than our service
Prohibited
engineers. Otherwise, the relevant person may be injured by abnormal combustion or
malfunction.
Do not spray water on the product.
Do not spray water on the product including its top plate and etc. Otherwise, electric
Prohibited
Prohibited
Turn waste oil draining knob counterclockwise slowly.
Must do
shock and fire may occur due to short circuit.
Wipe the product without using any inflammable
substance such as thinner, benzene and etc.
Such inflammable substances such as thinner and benzene may cause fire.
Wear gloves when cleaning product inside, exhaust
port and exhaust guard for maintenance work.
Otherwise, you may get scratch.
Caution
Maintenance work should be done with the middle valve closed
wearing gloves.
Otherwise, you may be injured: Electric Shock, Fire and scratch etc.
At the completion of draining waste oil, close waste
oil draining knob in the reverse order.
Warning
1. When draining waste oil, you're in danger of burning. You must drain waste oil after
oil is cooled down.
2. Check waste oil tank or waste oil filter before draining waste oil.
3. During delivery of waste oil tank, you're in danger of burning. Drain waste oil twice.
4. When you use product for the first time, because valve is filled with air so that you
may not be able to open valve. Before using product, repeat drain waste oil
frequently.
17
Must do
After maintenance work, make sure that there are no
unnecessary items such as tools and etc inside the product.
If there is some, remove it.
Otherwise, the product may be damaged; fire may occur; and you may be injured.
Daily Checkout!
Must do
Isn't exhaust port clogged by any alien substance?
Are the heat sensor hem of the safety device for
automatic block of gas and/or the ignition plug
contaminated with any alien substance?
18
Trouble Shooting
Read this section carefully for correct maintenance!
Warning
In case there is any problem in product, check the followings
before apply for A/S.
Maintain and clean the product wearing gloves.
1.Surface of the Product
Wipe it well with a soft cloth.
Usable
Unusable
Wiping it with any metal or nylon brush may
damage it.
Soft Cloth
After cooking, wipe it with neutral
detergent and dry it fully.
Nylon Brush
Metal Brush
Sponge Brush Edible Oil Acidic/Alkali Detergent
Neutral
Detergent
Abrasive
2.Front part of the Product
If you wipe it with a metal brush, it will be damaged.
If product is left alone for a long time after cooking, oil strain
may be too sticky to be wiped out. Wipe the product right after
using when it's cooled down.
If too much contaminated, wipe the product using a dried towel
with a neutral detergent, and then wipe it again using a dried
cloth.
Since control part is in the front part of product, void cleaning
using water
3.Tank Inside
Thinner/Benzene
Error
NO.
Trouble
31
Abnormal
Thermistor
11
Ignition
Failure
72
Fake Flame
Detection
71
P.C.B. Unit
Error
14
Overheated Oil
Tank
Action to be taken
Check Point
Turn on and off product by pressing
ON/OFF button.
Press ON/OFF button again.
Check whether Thermitor wire
is taken off or disconnected.
Check if gas intermediate valve is
open.
Check gas supply by turning on
other gas appliances.
Close gas intermediate valve and apply for
A/S.
Check P.C.B. unit
Check electric-magnetic valve
P.C.B. unit circuit check
Apply for A/S
Electric-magnetic valve control
error
Check Bi-metal and Thermistor. Replace them
if necessary.
Apply for A/S.(If Bi-metal is cut off due to
overheating, power supply will stop. It
resumes again when temperature drops. At
that time, press ON/OFF button again.)
Check oil is in or not.
Replace
overheating
sensors.(Bi-metal, Thermistor)
Appropriate Temperature for Cooking
Clean it wearing gloves.
Caution
After cleaning, dry it completely. (Otherwise, it will get rust.)
Do not wipe temperature sensor(Thermistor) with a metal brush etc.
Clean it using a soft brush or cloth. Otherwise, product performance will
deteriorate and shelf life will be shortened.
Do not let oil tank mesh hit against temperature sensor
part.
Use a soft brush for cleaning the bottom of tank inside.
4.Component Parts
Clean it wearing gloves.
Caution
19
When product is cooled down after cooking, wipe
component parts such as oil removing mesh, oil tank
mesh etc with a neutral detergent.
Dry product fully after cleaning with neutral detergent.
If they are left in water for a long time, they're apt to
rust.
Food
Temperature(
Potato, Sweet Potato
160~180
Fish
180
Meat
180
Korokke(Croquette)
180~190
Frozen Steak
170~190
Donuts
180
Chicken
170~180
)
This table is a standard for appropriate
cooking. But you can adjust cooking
temperature as you see fit.
In general, used oil needs to be heated up at
higher temperature and it may take longer for
frying.
20
Product Specification
Dimension
RFA-226
Model
RFA - 226
RFA - 326
RFA - 426
Width(mm)
450
600
900
Depth(mm)
600
600
600
Height(mm)
1070
1070
1070
)
22
29
22 2
LPG
18.0kW(1.29kg/h)
20.0kW(1.43kg/h)
Dimension
Tank Capacity(
Gas Consumption
Town Gas
31.8kW(2.28kg/h)
Left:16.3kW(1.17kg/h)
Right:16.3kW(1.17kg/h)
600
Section
31.8kW(27,350kcal/h)
18.0kW(15,500kcal/h) 20.0kW(17,200kcal/h) Left:16.3kW(14,000kcal/h)
Right:16.3kW(14,000kcal/h)
Heating Velocity(time to reach 200 )
Within 28 minutes
Ignition Method
Direct Ignition
450
Temperature Control Range( )
Product Weight/Packing Weight(kg)
50 ~ 220
39/46
47/57
Gas Connection
70/83
9.5 mm
Power
220V / 60Hz
16
Power Consumption(W)
16
31
1070
Extinguishment Safety Device
Safety Device
Overheating Prevention Device
Component
parts
Oil tank Cover
1EA
1EA
1EA
Oil Tank Mesh
1EA
1EA
2EA
Oil Removing Mesh
1EA
1EA
2EA
Oil Removing
Supporter
1EA
1EA
2EA
Waste Oil Tank
21
850
Lightning Induction and Protection Device
25
1EA
33
1EA
25
2EA
The appearance and specification of product are subject to change in
order to improve the quality without notification.
404
556
22
RFA-326
600
600
RFA-426
600
850
850
1070
1070
900
554
23
556
854
556
24
Memo
Memo
/);.:A-:
ver. 080428