1
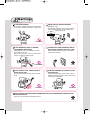
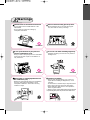
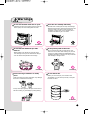
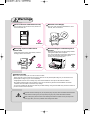
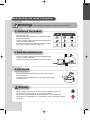
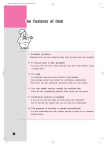
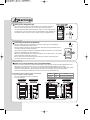
Warnings
Must use the designated gas
- Use of other types of gas may cause bad ignition or incomplete combustion.
- When you move into other place, you should confirm same type of gas.
- The name table of available gas is attached on upper end of the item right side.
- It is dangerous to convert the item when the gas is different from available one,
and please contact our service center to confirm the type of designated gas.
To do
Concerning Connection of Electricity
- AC 220V~240V of power is necessary for the item. Please inquire a professional
electricity installation agent about wiring.
- AC 220V~240V of power, its ground connection and cable working should be done in
accordance with the relevant regulations.
- The relevant regulations: Electricity installation standards, Directions of use for electric
appliances, regulations for indoor wiring, etc.
- When you need individually to increase the pressure into AC 220V~240V in 110V area,
ground connection should be worked out.
- Even in 220V~240V area without ground connection of power outlet the ground
connection should be worked out, too.
To do
Make sure to keep the item away from inflammables.
- When the wall around the item is made of inflammables such as plywood, the item should be placed away more
than 20cm in the side and 15cm in the rear. The exhaust hood should be installed over the product.
- Close distance may cause fire. Its use for long time around the wall of stainless steel sheet or steel sheet directly
attached on inflammables such as plywood may also cause fire or damage of the wall by heat transfer.
- Heat-proof board should be installed more than 3cm away from the inflammable wall.
It should be made to install according to the structure
of user’s kitchen on his(her) expense.
- Any other adhered to the item is not allowed
for it may cause fire.
<Heat-proof board not installed>
Material
Thickness
Cautions
Stainless steel sheet
0.3mm
more than 3Cm away from inflammable wall
Steel sheet
0.5mm
Need to strengthen against transformation
<Heat-proof board installed>
1
T he Features of Item
To offer various menus
- normal, cereals, porridges, etc.
Function of reservation
- up to 24 hours
Function to control steaming time
- being able to control by cooking menu and taste of customer
To perform the optimum rice cooking
- Performs the optimum rice cooking with automatically perceiving
the amount of rice
Self-diagnosis function
- when out of normal condition it itself shows sign of abnormal.
Power cut recovery function
- within 7 minutes after electricity failure it automatically returns to
rice cooking process
Its compact size makes it easy to use
Simple operation and clear looking digital functioning board
Durable materials and stainless exterior
Delicious taste of rice by high heating power
Short cooking time
2
Warnings
Do not put inflammables near the item.
- Do not use inflammable gas such as sprays nearby.
- Do not place nearby materials easily to catch fire like
curtains, or not put nearby the inflammables like
sprays, gasoline and benzene to be use. It may
cause fire.
Prohibited
Do not use a number of plugs on one
outlet.
- It may cause abnormal heating or fire and one
plug on one out is desirable.
Prohibited
Keep away from children. Do not touch
- Keep away it from children to prevent the dangers
of burn or safety accidents for them.
Don’t touch!
Do not leave the item alone while using
(going out or sleeping).
- It may cause its malfunction or fire by over-heating.
- Pause using the item while on telephone or going out.
Prohibited
Keep the item away from water.
- Do not set it up where water splashes.
- On cleaning do not sprinkle water or spill over the item.
It may cause the dangers of incomplete combustion,
electric leakage or electric shock.
Prohibited
Frequent ventilation is necessary on its
using. Must do
- Operate ventilation fan or open window on using.
Without ventilating it may cause carbon monoxide
poisoning.
To do
3
Warnings
Do not block ventilator.
Taking action to abnormal situation.
- Do not block ventilator with dish cloth and others.
It may cause incomplete combustion or malfunction.
Prohibited
Do not dismantle, repair or remodel
except Rinnai service men.
- Dismantlement, repair or remodeling may cause
great impact on the item.
Refer to user’s manual or contact our service center
when it is regarded as malfunctioned.
Prohibited
- Earthquake or fire
- When abnormal combustion, sound or smell is perceived,
stop the operation promptly, turn off the middle valve,
ventilate, and plug off.
close
To do
Confirm not to other substance stick to
plug and push the plug to the end of outlet.
- Other substance stick to the plug or incomplete
jointing may cause fire.
To do
Do not scratch, work, extend, break or
tie the power code.
Frequent ventilation is necessary on its
using. Must do
- It may cause breaking the code, fire and electric
shock.
- It may cause gas leakage, electric shock or electric
leakage with broken gas pipe or power code through
touching high heated parts.
Prohibited
Prohibited
Person who has artificial medical equipments such as an artificial heart should consult
doctors before use.
- He(or she) may be affected by operation of item.
To do
4
Cautions for Safety
Warnings
Request a gas agency or its relevant
company for gas connection and product
installation.
- Arbitrary gas connection or item installation may
cause malfunction of the item or fire, which our
company is not responsible for.
Prohibited
Do not remove or change the parts of
item. And do not use any other aids such
as aluminum foil, etc.
- It may cause carbon monoxide poisoning by
imcomplete combustion, fire or damage of item
by over heating.
Do not touch the item while or right
after using.
- The item is very hot while or right after using that
caution is necessary. It may cause burn.
- Use protection material like gloves to take out the
inner pot while or after cooking.
Don’t touch!
Confirm ignition and extinguishing
- Confirm normal combustion from ignition identifying
window on using.
- Confirm extingushment after use and turn off the
middle valve.
- Turn off the middle valve on sleeping or going out.
ignition identifying window
To do
To do
Do not use except for cooking rice.
- Do not use any parts other than normal ones. It may cause bad rice cooking, item damage or incomplete combustion.
- Do not use the aluminum pot on other general gas range or for other cooking purpose such as making soup, boiling
water, ect. It may cause transfomation or color change of the pot, or fire by over heating.
- Using for drying clothes or igniting other inflammable except cooking may cause fire or item damage.
Prohibited
5
Warnings
Install the item on the bottom flat and fixed.
- Do not install it on the instable bottom or the
inflammable.
- It may cause fire or bad rice cooking by
incomplete combustion.
Make sure the heat sensing part always clean.
- Other substances stick on the heat reducing part
may cause bad rice cooking or damage.
Prohibited
Do not open the item to put your face
near the combustion room.
- Keep your face or body away from the combustion
room when the door is open on combustion. It
may cause burn.
To do
Do not use it in which something might drop.
- Dropping something over the item may cause its
damage or fire.
Prohibited
When water or cooking liquid flows into
the combustion part,
- Moisture or cooking dregs stick to the combustion
part may make ignition impossible or cause
imcomplete combustion. Use it after removing
moisture or dregs.
To do
6
Prohibited
Cautions on igniting
- When it does not ignite at first 2 or 3 times, try
again after the leaked gas disappears (in 3 or 4
seconds).
- On wet season or moisture day it might be hard to
ignite, and not using for long time might make
ignition difficult by pipe with air. Then repeat the
action of ignition above.
When you ingite, check ignition status through window
by standing away from the product more than 30cm.
Over 30cm
To do
Warnings
Do not use the item while door is open.
- Lightening on the burner easily goes out when the
door is open, and rice cooking does not work.
Close the door steadily and firmly.
- Powerful action of closing the door may cause damage.
- Without closing the door firmly the hot heat may leak
through a crack in the door to cause the item to
transform or change color, or the operation part in
the side to transform or get out of order.
Prohibited
Do not heat the aluminum pot with
water in.
- Boiling water in the aluminum pot may cause
color change of inner pot so refrain from doing it.
- You can still use the pot after color change.
To do
Do not put any stuff on the item.
- Do not use the item with any stuff put on. Hot
heat occur on the item while cooking rice, and do
not put any stuff including the inflammable such
as plastic and paper on the item. It may cause the
item damage or danger of fire.
Prohibited
Avoid near large combustor or windy
place.
-Heat occurred by the large combustor may damage
the item or cause bad rice cooking.
- It may cause poor ignition, damage of inner item or
bad rice cooking, or gas leakage by extinguishing.
Prohibited
Do not deform lid.
-When you move rice pan, use exclusive cart.
- If inevitable, you can stack up merely 4 rice pots
and less at a time.
4
Prohibited
7
Warnings
This is an item for commercial use only.
- This is made for commercial use only and do not
use for domestic use.
Prohibited
When plug off, do not take hold of
power code.
- Taking hold of the code to plug off may cause its
damage, electric shock or fire.
Prohibited
When the user changes,
- New user must read and understand the user’s
manual, then use the item.
To do
When cleaning the combustion part in
the item,
- Wear the gloves not to hurt with cooling off after
closing the middle valve and power.
- It is very hot right after using and the hand may burn.
- Clean in the combustion part wearing gloves
because of some projecting parts.
To do
Cautions on using
- The scale marked in the pot is not for rice but for water.
- Proper amount of rice for this item is from the minimum for 20 persons(about 3kg rice) to maximum for 50
persons(about 7.5kg rice).(For 1 level standard).
- Inappropriate amount of rice cooking may cause scorched bottom of the pot or half-cooked condition.
- Rice scaling and the scale in the pot shown in the user’s manual are general recommendation. But actual
condition of rice and taste of consumer may change.
- Do not use scrubber but soft cloth to clean the pot after soaking. Using hard scrubber may cause the surface of
pot worn out and remove the sale.
Less than minimum cooking rice (for 20 persons, 3kg rice) may cause the bottom scorched. More
than maximum cooking rice (for 50 persons,7.5kg rice) may cause half-cooked condition.
Cautions
8
When cleaning the pot the friction of the cleaning cloth and the surface of inner pot may cause
some gray water, but it is no problem when change clean water.
Name of Each Part
The Body (The picture is RRA-155 and RRA-105 consists of 2 levels)
Ventilator
Control part
Power code
Door Handle
Flame
check
window
Roller
Sensing part
Earth
wire
Leg
RRA-105 (2 EA)
RRA-155 (3 EA)
Kettle
Lid
9
The Control Panel
Power Lamp
Power Switch
Displays the power
condition of the item
Menu Selection Lamp
Steam Cooking
time control switch
Display
When setting the Steam time :
displays steam time
Refer page 14
When rice cooking:
displays operation Refer page 15
When error: displays trouble
Refer page 19
Rice Cooking Start/Stop Switch
Normal Select Lamp
Grain Cereals Select Lamp
Porridge Select Lamp
Rice Cooking Process Display Lamp
Displays the process
during rice cooking
Menu Switch
Select between normal,
Grain Cereal, or Porridge
Steam time Setting Switch
Standard setting: 15 minutes for normal,
20 for Grain Cereal,
30 for Porridge
Current Time Display Lamp
A. M/P.M Display Lamp
Reservation Time Display Lamp
Current Time, Reservation
Time Display Panel
Set Switch
10
Set current time &
reservation time Refer to page 16
Hour/Minute Control Switch
Reservation Control
Display Lamp
Level Set Switch
A ssembly & Installation
Check the available gas and power.
- Be sure to connect the gas displayed on the name table of the
product. This product is for low pressure.
To do
- This product is for 220V~240V.
- If available gas is not clear or when it does not coincide with
product display, please contact the place where you purchased or
service center of our company.
- Please check the available gas.
Please set the product at level.
- Set the product at level using the height controlling
leg under the product.
To do
Height controlling leg
Please connect the gas pipe arrangement in this way.
- Request a gas agency or its relevant company for gas
connection and product installation.
To do
- Install a middle valve.
- When gas pipe bursts due to outside shock, there may be
fire or damage of the product due to leakage.
Caution
- When arranging gas pipe excessively, over burn due to
product breakdown or fire due to leakage may occur.
Prohibited
Be sure to ground when installing.
- When power outlet does not have grounding in AC 220V~240V
area, please do the grounding construction.
To do
11
When installing the product, make sure to keep distance from inflammables.
To do
- If the wall around the product is inflammable like plywood,
install the product away from the wall over 20cm (side) or
over 15cm (rear). Also be sure to install a ventilation hood
to top of the product.
- If the distance is too close, it can cause fire. Also if you attach
stainless steel plate, general steel plate to inflammable wall (such
as plywood) and use for long period, it can cause fire or damage
to wall through heat transfer.
- When installing heat plate, maintain the distance between
heat plate and inflammable wall over 3cm.
<Heat-proof board not installed>
Remove inflammables around the item.
- It causes fire.
To do
When installing over 2 items, maintain the distance between the 2 products over 30cm.
- For smooth service, be sure to maintain the distance between
the 2 products over 30cm.
To do
Over 30cm
Install ventilation system.
To do
12
- This product exhausts combustion gas in large quantity when
operating, so be sure to install ventilation system such as
ventilation hood.
U se Method
Check items before using.
To do
- Check the gas/power you are using.
- Check if there is any inflammable thing such as paper, plastic,
oil around the product.
- Open middle valve.
- Check if the power plug is inserted thoroughly in the outlet.
- Press the power switch and check if the power lamp lightened.
Preparing rice (Menu: When selecting normal)
- Cooking rice can be handy when you use measuring lines in the pan.
- Rice Quantity Conversion Table
Caution
Measure rice quantity accurately using a scale.
“O” mark is for porridge cook. This product doesn’t have porridge cooking function.
Cooking cycle can vary by the type of rice, water temperature, and water volume etc.
Warning
Rice Porridge
To do
- There are two type of rice quantity : 1.0kg and 1.5kg.
- Measuring line inside of pan is an indicator of water level in porridge condition. You can adjust
water level according to porridge status.
Warning: It can overflow if there is too much water than recommended volume in user guide.
Watery porridge Normal porridge
Rice
Quantity
1.0kg
1.5kg
Water: 10 times
more than the
rice quantity
Water: up to
measuring line
inside the pan
Stiff porridge
Water: 6 times
more than the
rice quantity
Washing Rice
To do
- Wash rice several times (3~4) till clean water comes out. There are rice
powder, dust, other pollutant on the rice surface, so wash the rice quickly
and throw away the water so the smell does not soak into rice.
- If you wash the rice for too long time, or with too much force, the rice
breaks down and it can cause the bad cooking. Wash rice gently.
13
Do not soak rice in water for long period.
To do
- Soak rice after washing. If you wash after soaking, rice may break
down and it causes bad rice cooking.
- 30min in summer, 1hour in winter is suitable. If you soak rice for too
long (2hours), rice easily breaks down and it causes the bad rice
cooking such as early fire extinguish and half-cooked.
- When there is left over of soaked rice, remove the water from rice with
a sifter and keep it in the refrigerator.
- In case of cereals, make the soaking time same as general rice.
Exceptions) In case of red beans, soak it for over 12hours or boil it then cook.
Wash the pot cleanly.
- Always maintain inside and outside of the pot clean. If washing is not
thorough inside the pot, it may cause bad cooking.
To do
About Selection and Storage of rice
To do
- Please avoid rice with old time of validity, and use rice in opened
package. Rice with old time of validity, it easily breaks and soaking
time gets longer so it may cause bad cooking.
- Store rice in cool place with low humidity.
Setting water quantity and water volume
To do
14
- Put washed rice soak in water and put water to the measuring line in pan inside.
Warning: Measuring line is a standard recommendation.
- Example) When you cook for 30 people, set washed rice soak in water to “30”, and also set water to
“30”.
- Adjust water volume according to rice type(cereals, white rice, government-stock rice etc.) and rice
storage period(new rice, long-stored rice etc.)
- Measuring line inside of pan is a general
standard, therefore you can adjust water volume
to taste.
- Try to avoid maximum or minimum rice cooking.
Rice can be half-cooked or stick at the bottom.
- “O”mark is for porridge cook. This product
Water level
doesn’t have porridge cooking function.
Preparations for Cooking
To do
- Open door and cover the pot filled with soaked rice and water
with pot lid then push it deep inside the combustion room.
- It is convenient to take out the pot after cooking when you put
the pot with the handle facing forward.
- Push the pot to the end then close the door slowly.
- Push the power switch.
- If you push the power switch the steam lamp will blink for 5sec
then the steam time will appear on steam time display panel.
- The steam time is basically set to general: 15min, cereal:
20min, porridge: 30min.
Set cooking menu
To do
- Push the menu switch of the level you want to cook to select 1
among ‘Normal’, ‘cereal‘, and ‘porridge’.
- ‘Normal’, ‘Cereal’, ‘Porridge’ on menu select lamp will lighten up in
order each time you push the menu switch.
- Once you set the menu, it will be applied as it was to next cooking.
Changing steam time
To do
- Push the steam time set switch.
- If you push the steam time set switch, the steam time will be
displayed on the steam time display panel and steam lamp will
blink on cooking process display lamp. (about 5sec)
to change the steam time
- At this time, use control switch ,
of your choice.
<before changing steam time> <After changing steam time>
- After changing steam time, push steam time set switch again or wait
5sec to complete the steam time setting.
To do
15
Rice Cooking
To do
Caution
- After putting the pot filled with soaked rice and water into the level, push
start/stop switch. It is automatically ignited and cooking will start.
- At this moment, the cooking lamp will be lightened and product operation display
panel starts to rotate.
- For some time after the start of cooking, the ignition and extinguishing will repeat. The
cooking lamp will be still lightened and operation display panel will continuously rotate.
For delicious rice cooking. this product has automatic rice quantity sensing
system by repeating ‘off’, ‘on’ when it first starts to cook. At this time, the
fire may go off with ‘puck’ sound but nothing is wrong to the product so use
at ease.
Steaming
- When cooking is over, the buzzer will sound twice and the light
on cooking lamp will go off and the process goes to steaming.
- The steam lamp will be lightened and steam time will appear
on steam time display panel.
- When steam time is over the buzzer will sound 10 times then
the light on steam lamp will go off and completion lamp will be
lightened.
- Once the cooking starts, the steam time cannot be changed.
- If you want to know the steam time during the cooking, push <Steaming in process> <Steaming complete>
the steam time switch and the steam time will appear.
Cooking Completion
To do
Caution
- When the steaming is over, open the door and pull out the pot.
- At this time, the pot is very hot so always use gloves.
- Push start/stop switch. The light on completion lamp and
steam time display panel will go off.
- Close the middle valve.
Do not load too much weight on the product door. Do not put the pot filled
with soaked rice and water or the pot after the cooking on the door. It may
cause damage to the product
About continuous rice cooking…
To do
16
- If you are cooking continuously, wash inside the pot cleanly and use
it after the heat sensor inside the pot gets completely cool. If you
cooking with dregs inside the pot or when heat sensing part inside
the pot is not completely cool, bad cooking may occur.
- Put soaked rice and water into the cooled pot then push the pot into
the level you want to cook then close the door and always wait for
5min then start the next cooking.
Close the door and always start after 5min.
In case of power cut
- During a power cut, the operation will stop. At this time, if electricity comes back
within 7min it will automatically go on with the process before the
power cut.
If electricity came
back within 7min
- If electricity comes back after 7min, it does not return to its original course but
error [00] will be displayed on the operation panel and the buzzer will sound. In
this case, push start/stop switch to stop the error display then push the power
switch to turn off power and you will have to start the cooking from the beginning.
Caution: In state when 7min passed after power cut and if you
start over the cooking without changing the contents inside the
pot, scorch on bottom of the pot or early extinguishing may occur.
Time setting (about setting current time…)
- If you first plug the power into the outlet and push [power switch: on/off], 12:00
will appear on [current time, reservation time display panel].
- Push set switch] at this condition.
- If [current time display lamp] blinks, adjust the current time using [time setting
switch: hour, min].
- Push [hour] on [Time setting switch] to change the number 1, 2, 3… 12 and [AM,
PM display lamp] will change [AM] [PM] or [PM] [AM] with 12 as basis.
- Push [min] on [time setting switch] for over 2 sec to change number 1, 2, 3… 59, 00.
- Input current time then push the [set switch] to set current time.
About setting reservation time…
- Push the [set switch] to make [reservation time display lamp] and [current time,
reservation time display panel] blink, then use the [time setting switch hour, min]
to change reservation time. (6:00 will appear on the first time.)
- Push [hour] on [Time setting switch] to change the number 1, 2, 3… 12 and
[AM, PM display lamp] will change [AM]->[PM] or [PM]->[AM] with 12 as basis.
- Push [min] on [time setting switch] to change number 1, 2, 3… 59, 00.
- Push [time setting switch hour, min] over 2 secs and the number will go up automatically till you
remove your finger.
- After inputting reservation time, push [set switch] to set reservation time and it will change to
current time. Check the current time, then push [set switch] again.
17
About reservation cooking…
To do
- Set the reservation time of your desire.
- Put the pot filled with soaked rice and water into the level you want to cook.
- Push the level button you want to cook among [top, middle, low] of select
switch. Lamp will be lightened.
- If you want to cancel the reservation, push the pertinent level switch for
2~3secs. Lamp will go off and the reservation will be cancelled.
Cautions
To do
18
- You can freely choose among top, middle, and low level in reservation cooking, and it is possible to
cook 2 levels or 3 levels simultaneously. But it is not possible to set the time separately by level.
- (Example: It is impossible to reserve 7 AM for top level, 8AM for middle level, and 9AM for low level.)
- Reservation time setting is maximum 24hours.
- When you put rice in the water for long period in summer or high temperature inside the kitchen,
the rice may get spoiled and also rice can be damaged and it may cause bad cooking.
- For safe cooking, please set reservation time within 10 hours and avoid the maximum rice quantity.
- This product is designed to stop automatically for safety when burner combustion continuous over
50 minutes. (Refer to “Measures for product error”)
c heckup and Mending
Warnings
- When you are checking or mending, close the middle valve and pull out the power plug
then put on gloves before doing it.
- You may get electric shock, fire, or injured.
To do
- You can get injured from sharp parts due to the product’s property.
- Do not disassemble, repair, or remodel.
- Person other than Rinnai service agent should not disassemble, repair, or remodel.
Prohibit - One may can injured from over combustion, electric shock, or abnormal function.
- Do not spray water.
Prohibit
- Do not spray water over upper board of the product or exhaust port. It may cause fire, or
electric shock due to short circuit.
Caution
- During use or right after use, the product is hot so do not touch it.
- Check or mend after the product is sufficiently cooled.
- Do not use inflammables such as thinner or benzene when cleaning.
Prohibit
- Fire may occur if you use thinner or benzene for mending.
After checking, mending, check if there is any tool or gloves left inside the product or
around the product.
- It may cause damage to product and fire.
Check every day!
- Is fire hole on the burner inside the combustion room not clogged with broth?
- Is there any extra matter or dregs on the heat sensor of gas automatic cutoff device?
To do
19
Read carefully and mend it properly!
Warnings - When cleaning or mending the product, always wear gloves.
1. Surface of the product
- Wipe with soft cloth.
- The surface may get damaged if you wipe with metal or
nylon scrubbing brush.
- In case of overflow, wipe off with neutral detergent then
remove the water sufficiently.
- If you let the overflow remained in the product, it will
dry up and you may not be able to get it off.
Available
Unavailable
soft cloth
nylon
metal brush
sponge brush
cooking oil
acidic or basic detergent
neutral detergent
abradant
thinner or benzene
2. Inside the combustion room
- In case of overflow, wipe off with neutral detergent then
remove the water sufficiently.
- Clean the food dregs just like the picture with door open.
3. Pot, Pot lid
- Use sponges with neutral detergent to wipe and remove the
water sufficiently.
- The surface may get damaged if you wipe with metal or nylon
scrubbing brush.
Warning
- When checking or mending, do it after the product is sufficiently cooled.
- The product is hot right after use so it has danger of burn.
- Do not touch the part beside the handle during cooking or right after use.
- The product is hot right after use so it has danger of burn. If necessary, always
use gloves.
20
To do
Don’t
M easure when error
This product stop operating and buzzer will sound ‘ppeee’ automatically if any
problem occurs during use or if you use it incorrectly. Also error mark is displayed
on operation display panel.
Warning
If error occurs during use, stop using and shut the middle valve and ventilate air
then pull out the power plug.
Error display
Error display
Cause
Measures
“00”
When electricity comes back after over 7min
of power cut during cooking
Push “start/stop switch” to stop error display
then restart with different rice
“10”
When burner combusted over 50min
“11”
When burner does not ignite properly
“12”
BLINKING
When over extinguishing occurs during cooking
Push “start/stop switch” to stop error display
then check middle valve, gas supply then
restart
“16”
Early extinguishing display
Cooking is not properly done in early stage
Push “start/stop switch” to stop error display
then restart with different rice
“14”, “24”, “31”,
“70”, “71”, “72”, “73”
When error occurred in electric circuit
Contact our service center for necessary
checkup
Apply for the service after you’ve checked the same error display is shown
repeatedly. And refer to “if you think it has trouble”
Display when power cut
Error display
ower return within 7min
Power return after 7min
During cooking
Automatically return to original process
Cooking stops and “00” is displayed
During reservation
cooking
If power returns before the reservation time the cooking goes on. If power returns after the
reservation time, the reservation cooking stops and “00” is displayed.
21
P roduct Specifications
58
58
203
203
Unit: mm
700
571
777
129
90
607
36
90
607
36
85
400
373
75.5
50
50
75.5
373
917
867
1287
90
129
1337
700
571
777
215
107
95.5
441
85
400
RRA-105 (2 levels)
215
107
441
RRA-155 (3 levels)
Commercial gas automatic rice cooker
Product name
Model name
RRA-105
RRA-155
Width(mm) length(mm) height(mm)
700 777 917
700 777 1337
Weight (kg)
100
150
Connection
95.5
Gas
3/4” (20A)
Electric
220V~240V / 50Hz~60Hz
Safety device
Extinguish safety device, Extinguish safety timer
Power consumption
32W
45W
Minimum/maximum cooking quantity (kg)
3~15
3~22.5
Accessories
Pot (2), Pot lid (2)
Pot (3), Pot lid (3)
Top
Low
Overall
Top
Middle
Low
Overall
11.3
11.3
22.1
11.3
11.3
11.3
33.7
Gas
consumption LP gas (kW) (0.80kg/h) (0.80kg/h) (1.58kg/h) (0.80kg/h) (0.80kg/h) (0.80kg/h) (2.42kg/h)
amount
11.3
22.1
11.3
11.3
11.3
33.7
11.3
Natural gas (kW)
(9,700kcal/h) (9,700kcal/h) (19,000kcal/h) (9,700kcal/h) (9,700kcal/h) (9,700kcal/h) (29,000kcal/h)
TG(HK)
32.5
11.3
11.3
21.5
11.3
11.3
11.3
(9,700kcal/h) (9,700kcal/h) (18,500kcal/h) (9,700kcal/h) (9,700kcal/h) (9,700kcal/h) (28,000kcal/h)
TG( SIN )
11.4
11.4
22.1
11.4
11.4
11.4
33.7
(9,800kcal/h) (9,800kcal/h) (19,000kcal/h) (9,800kcal/h) (9,800kcal/h) (9,800kcal/h) (29,000kcal/h)
The external appearance of the product may change without notice for improvement of quality.
22
User s Manual
365days gas safety
safe gas and merry society
let s prevent gas accidents
with caution and inspection
No Use For Semi-low
Pressure or Mid-Pressure
Commercial Gas
Automatic Rice Cooker
RRA-105 (2 levels)
RRA-155 (3 levels)
The picture above is RRA-155
This product is for commercial use that it is not to use at home.
This user s manual must be read before use in order to use
properly and prevent potential danger.
This user s manual might be kept at a place easy to be found.