1
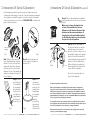
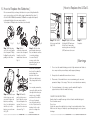
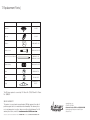
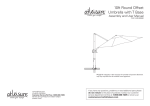
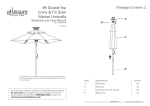
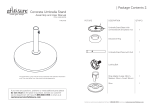
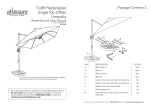
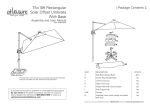
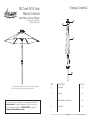
9ft Crank & Tilt Solar
Market Umbrella
| Package Contents 2.
Assembly and User Manual
ITEM: UMB-507203/UMB-507210
UMB-MJ005/UMB-507234
A
B
C
D
The schematics in this manual are for assembly and operation illustration
only. They may differ from the umbrella’s actual appearance.
If you have any questions, problems or need additional parts please
do not return to the place of purchase. Contact our customer
service department toll free at 1-855-880-7205 or email us at
[email protected]
PART
DESCRIPTION
QTY(PC)
A
Solar Panel
1pc
B
Solar Cap
1pc
C
Umbrella Frame with Canopy
1pc
D
Bottom Pole
1pc
Contact our customer service department toll free at 1-855-880-7205 or email us at [email protected]
3. Instructions Of Set-Up & Operation |
| Instructions Of Set-Up & Operation (cont’d) 4.
Before beginning assembly of product, make sure all parts are present.
Compare parts with package contents list. If any part is missing or damaged,
do not attempt to assemble the product or return to the place of purchase.
Contact our customer service toll free at 1-855-880-7205 for replacement
parts or further instructions.
Step 5. Put the solar umbrella in the sunlight to
charge the batteries before the first use as shown
in Fig. 5.
Make sure to charge the batteries for
at least 8 hours before the first use.
Otherwise it will shorten lifespan of the
batteries and decrease performance. If
charging the solar panel while attached
to the umbrella, make sure the switch on
the pole is in the off position.
Fig. 5
Solar screw
in adapter
3
Light Switch
Fig. 1
Fig. 2
Step 1. Put the solar cap on the
top of umbrella and leave the plug
and wire out of the solar cap from
underneath. Attach the solar panel
and solar cap to the solar screw-in
adapter in the top of the umbrella by
turning the solar panel clockwise. Do
not over tighten.
Step 2. Insert the plug into the
socket under the solar panel as
shown in Fig. 2.
OFF
2 Tilt Button
Fig. 6
1 Crank Handle
Reverse the set-up steps above to
take down the umbrella.
Step 3. Attach
the bottom pole
of the umbrella
by screwing the
threaded ends
together. Do not
over tighten as
it may damage
the threads as
shown in Fig. 3.
Fig. 3
ON
Step 6. Turn the crank handle in
the clockwise direction to open the
umbrella canopy, in the opposite
direction to close the canopy. To close
the umbrella it must be in the upright
position.You can tilt the umbrella to
your desired angle by pressing the tilt
button to release the umbrella top.
Release the button to maintain the
desired angle.Press the light switch
to turn on/off the solar lights.
Fig. 4
Step 4. We
recommend
that you stand
and secure the
umbrella to an
umbrella base
(not included).
Secure the
umbrella
pole firmly by
tightening the
locking nut as
shown in Fig. 4.
Contact our customer service department toll free at 1-855-880-7205 or email us at [email protected]
You must charge batteries before first use.
Please note that batteries can discharge if they are left unused or uncharged for a
long period of time. Since there can be a six-month period between production and
final customer purchase, we recommend you charge your solar umbrella for at least 8
hours in direct sunlight before the first use. Failure to charge the batteries will result in
premature dimming of the lights in your new solar umbrella. Make sure the light switch
is in the off position when charging the solar panel.
For everyday normal use, turn on the light switch in the night-time when you want to
use solar light and turn off the switch after use. And make sure the light switch is in the
off position in the daytime for the solar panel to recharge the batteries.
Please remove the plastic film on all solar panels, hubs, and lights as this protective
coating is to prevent damage in shipping
Contact our customer service department toll free at 1-855-880-7205 or email us at [email protected]
| How to Replace the LEDs 6.
5. How to Replace the Batteries |
We recommend that you change the batteries in your solar light umbrella
every year or when you feel the light output is diminished. Buy three (3
AA size Ni-MH 1200mAh (minimum) (1300mAh are supplied with panel)
rechargeable batteries from any major retailer.
Tools required: Phillips head screw driver (not included)
Umbrella Ribs
LED Socket
Solar Light(LED)
Solar Cover
Fig. 7
Step 1. Pull the plug
out of the socket under
the solar panel. Pull by
holding the plug, not by
pulling on the wires.
Fig. 10
Step 4. Carefully open
the bottom case and
set aside. Replace the
batteries, matching
the +/- on the batteries
with the +/- on the
battery case as shown
in Fig. 10.
Fig. 8
Step 2. Twist
counterclockwise and
remove the solar panel
from the top of the
umbrella as shown in
Fig. 8.
Fig. 11
Step 5. Carefully
put the bottom case
back. Align the screw
holes and replace the
screws. Do not over
tighten the screws as
shown in Fig. 11.
Fig. 9
Step 3. Put the solar
panel upside down on a
flat, non-abrasive surface
to avoid scratching.
Loosen all four (4)
screws on the solar
panel bottom case as
shown in Fig. 9.
Step 1. Pull out the
Solar cover and Solar
light (LED).
Step 2. Replace with new
Solar light (LED) and new
Solar Cover if wanted by
inserting the new solar light
(LED) and new solar cover.
Step 3.
Complete.
| Warnings
Attach the solar panel
back onto the umbrella
and recharge the
batteries in the sun.
Make sure batteries are
fully charged before first
use.
1. Do not use this umbrella during periods of high wind and rain. Failure to
do so may result in personal injury and/or property damage.
For everyday normal use,
turn on the light switch in
the night-time when you
want to use solar light
and turn off the switch
after use. And make
sure the light switch is
in the off position in the
daytime for the solar
panel to recharge the
batteries.
4. To prevent damage to the canopy, open the umbrella facing the
opposite direction that the wind is blowing.
Contact our customer service department toll free at 1-855-880-7205 or email us at [email protected]
2. Always take the umbrella down when not in use.
3. Placement of the umbrella over or near a swimming pool can cause
premature fading of the canopy. This is not covered under our warranty.
CANOPY CARE INSTRUCTIONS:
Simply clean the umbrella canopy with a soft brush and mild detergent.
Do not machine wash.
Do not iron.
Air dry the canopy thoroughly before storing for extended periods of time.
Make sure the canopy is completely open during drying process to prevent
shrinkage.
Contact our customer service department toll free at 1-855-880-7205 or email us at [email protected]
7. Replacement Parts |
Description
Picture
Re-order No.
Solar panel
SOL-P6P
Solar Cap
SOL-CAP
Tilt Button
HDW-38ATB-SLVR
Tilt Button Screw
HDW-38ASCW-SLVR
Bottom Pole (Screw In 38mm)
BMP38ASC-SBL
BMP-38ASC-CHAR
Tilt Button Spring
HDW-38ASPG-SLVR
Switch
OFF
Crank
Canopy
ON
HDW-2SWITCH
CRK-38A-SLVR
CAN-9M6RBP-AT, GT,
BR, TO
This ATLeisure product is covered by U.S. Patent No. 7,533,679 and U.S. Patent
No. 7,604,015.
90–DAY WARRANTY
This product is covered under a manufacturer’s 90-day warranty from date of
purchase against defects in materials and workmanship. This warranty does
not cover damage due to neglect, abuse or weather related damage. For full
warranty disclosure, email us at [email protected].
Contact our customer service department toll free at 1-855-880-7205 or email us at [email protected]
www.atleisure.com
ATLANTA, GEORGIA
Customer Service Toll Free 1-855-880-7205
Monday through Friday from 8:00am-5:00pm
(Eastern Time)