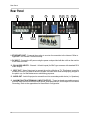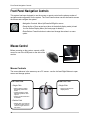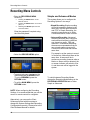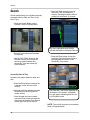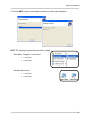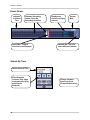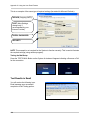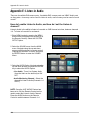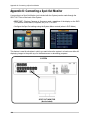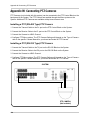
1
www.lorexcctv.com PROFESSIONAL INTEGRATED SURVEILLANCE SYSTEM 22” LCD MONITOR WITH INTEGRATED 16-CHANNEL DIGITAL VIDEO RECORDER & MULTI-FUNCTION DISPLAY INSTRUCTION MANUAL English Version 2.0 MODELS: L22WD1600 SERIES www.lorexcctv.com Copyright © 2009 Lorex Technology Inc. Thank you for purchasing this product. Lorex is committed to providing our customers with a high quality, reliable security solution. This manual refers to the following models: • L22WD1600 Series Lorex may introduce new model numbers for the above series. To learn more about the this product, and to learn about our complete range of accessory products, please visit our website at: www.lorexcctv.com CAUTION RISK OF ELECTRIC SHOCK DO NOT OPEN CAUTION: TO REDUCE THE RICK OF ELECTRIC SHOCK DO NOT REMOVE COVER. NO USER SERVICABLE PARTS INSIDE. REFER SERVICING TO QUALIFIED SERVICE PERSONNEL. The lightning flash with arrowhead symbol, within an equilateral triangle, is intended to alert the user to the presence of uninsulated "dangerous voltage" within the products ' enclosure that may be of sufficient magnitude to constitute a risk of electric shock The exclamation point within an equilateral triangle is intended to alert the user to the presence of important operating and maintenance (servicing) instructions in the literature accompanying the appliance. WARNING: TO PREVENT FIRE OR SHOCK HAZARD, DO NOT EXPOSE THIS UNIT TO RAIN OR MOISTURE. CAUTION: TO PREVENT ELECTRIC SHOCK, MATCH WIDE BLADE OF THE PLUG TO THE WIDE SLOT AND FULLY INSERT. BEFORE YOU START THIS PRODUCT MAY REQUIRE PROFESSIONAL INSTALLATION LOREX IS COMMITTED TO FULFILLING YOUR SECURITY NEEDS • We have developed user friendly products and documentation. Please read the Quick Start Guide and User Manual before you install this product. • Consumer Guides and Video Tutorials are available on our web site at www.lorexcctv.com/support • If you require further installation assistance, please visit www.lorexcctv.com/installation or contact a professional installer. • Please refer to the “Need Help” insert for technical support and customer care information. • Please note that once the components of this product have been unsealed, you cannot return this product directly to the store without the original packaging. www.lorexcctv.com AVANT DE COMMENCER ANTES DE EMPEZAR CE PRODUIT POURRAIT EXIGER UNE INSTALLATION PROFESSIONNELLE ESTE PRODUCTO PUEDE EXIGIR UNA INSTALACIÓN PROFESIONAL LOREX S’ENGAGE À SATISFAIRE VOS BESOINS SÉCURITAIRES LOREX SE COMPROMETE A SATISFACER SUS NECESIDADES EN SEGURIDAD • Veuillez lire le guide de démarrage rapide et le mode d’emploi avant d’installer ce produit. • Favor de leer la guía de instalación rápida y la guía del usuario antes de instalar este producto. • Les guides du consommateur et les séances de tutorat vidéo sont disponibles sur l’Internet en visitant www.lorexcctv.com/support • Puede conseguir las guías del consumidor y los cursos en enseñanza video sobre el Internet visitando www.lorexcctv.com/support • Si vous avez besoin de l’aide pour l’installation, veuillez visiter www.lorexcctv.com/installation ou contactez un spécialiste en installation • Si necesita ayuda para la instalación, visite www.lorexcctv.com/installation o contacte un especialista en instalaciones • Veuillez référer à l’insert “Need Help” pour ob¬tenir de l’information sur le service à la clientèle et le support technique • Favor de referir al documento “Need Help” para obtener información acerca del servicio al cliente y al soporte técnico • Veuillez constater qu’une fois que les com¬posantes de ce produit ont été retirées de l’emballage, vous ne pourrez plus retourner ce produit directement au magasin. • Favor de notar que una vez que los componentes de este producto han sido removidos del embalaje, no podrá devolver este producto directamente a la tienda w w w . l o r e x c c t v . c o m NEED HELP? CONTACT US FIRST DO NOT RETURN THIS PRODUCT TO THE STORE Please make sure to register your product at www.lorexcctv.com to receive product updates and information 3 Easy Ways to Contact Us: Online: Product Support is available 24/7 including product information, user manuals, quick start up guides an d F A Q ’ s at www.lorexcctv.com/support To order accessories, visit w ww.lorexcctv.com By Email: Technical Support (for technical/installation issues) s u [email protected] Customer Care (for warranty and accessory sales) c u [email protected] Customer Feedback i n f [email protected] By Phone: N O RTH AMERICA: 1-888-425-6739 (1-888-42-LOREX) M E XICO: 1-800-514-6739 I N TERNATIONAL: +800-425-6739-0 (Example: From the UK, dial 00 instead of +) Technical Support (for technical/installation issues) Press option 1 for English, and then press option 1 OR Customer Care (for warranty and accessory sales) Press option 1 for English, and then press options 2 t o 5 NECESITA AYUDA VOUS AVEZ BESOIN D’AIDE? COMUNÍQUESE PRIMERO CON NOSOTROS CONTACTEZ-NOUS D’ABORD NO DEVUELVA ESTE PRODUCTO A LA TIENDA NE RETOURNEZ PAS CE PRODUIT AU MAGASIN Cerciórese de por favor colocar su producto en www. lorexcctv.com/registration para recibir actualizaciones y la información del producto Veuillez veiller à enregistrer votre produit à www. lorexcctv.com/registration pour recevoir des mises à jour et l’information de produit 3 3 maneras sencillas de comunicarse con nosotros : www En línea: apoyo al producto disponible 24/7 incluyendo información del producto, manuales para el usuario, guías de inicio rápido y preguntas más frecuentes en façons faciles de nous contacter : www www.lorexcctv.com/support Pour commander des accessoires, visitez www.lorexcctv.com Por Correo Electrónico: soporte técnico (para asuntos técnicos/la instalación) www.lorexcctv.com [email protected] O Par Courriel: support technique (pour les questions techniques et d’installation) [email protected] OU service à la clientèle (pour les questions de garantie et les ventes d’accessoires) servicio al cliente (respecto a la garantía y a la venta de accesorios) le support des produits est disponible 24 heures sur 24, 7 jours sur 7, y compris les informations sur les produits, les guides de l’utilisateur, les guides de démarrage rapide et les foires à questions www.lorexcctv.com/support Para colocar pedidos de accesorios, visite En ligne: [email protected] [email protected] Comentarios de cliente Commentaires des clients [email protected] [email protected] Por Teléfono: L’Amérique du Nord: 1-888-425-6739 (1-888-42-lorex) MEXICO: 1-800-514-6739 INTERNACIONAL: +800-425-6739-0 (Ejemplo: Desde el Reino Unido, marque el 00 en lugar del +) soporte técnico (para asuntos técnicos/la instalación) oprima la opción 1 para inglés y luego oprima la opción 1 O servicio al cliente (respecto a la garantía y a la venta de accesorios) oprima la opción 1 para inglés y luego oprima las opciones 2 A 5 sus opiniones son bienvenidas en [email protected] para colocar pedidos de accesorios, visite www.lorexcctv.com Par Téléphone: Norte América: 1-888-425-6739 (1-888-42-lorex) MEXICO: 1-800-514-6739 INTERNATIONAL: +800-425-6739-0 (Exemple: À partir du Royaume-Uni, composez 00 au lieu de +) support technique (pour les questions techniques et d’installation) appuyez sur l’option 1 pour l’anglais, et ensuite sur l’option 1 OU service à la clientèle (pour les questions de garantie et les ventes d’accessoires) appuyez sur l’option 1 pour l’anglais, et ensuite sur les options 2 à 5 nous serions heureux de recevoir vos commentaires à [email protected] pour commander des accessoires, visitez www.lorexcctv.com Important Safeguards Important Safeguards In addition to the careful attention devoted to quality standards in the manufacture process of your video product, safety is a major factor in the design of every instrument. However, safety is your responsibility too. This sheet lists important information that will help to assure your enjoyment and proper use of the video product and accessory equipment. Please read them carefully before operating and using your video product. Installation 1. Read and Follow Instructions - All the safety and operating instructions should be read before the video product is operated. Follow all operating instructions. 2. Retain Instructions - The safety and operating instructions should be retained for future reference. 3. Heed Warnings - Comply with all warnings on the video product and in the operating instructions. 4. Polarization - Do not defeat the safety purpose of the polarized or grounding-type plug. A polarized plug has two blades with one wider than the other. A grounding type plug has two blades and a third grounding prong. The wide blade or the third prong are provided for your safety. If the provided plug does not fit into your outlet, consult an electrician for replacement of the obsolete outlet 5. .Power Sources - This video product should be operated only from the type of power source indicated on the marking label. If you are not sure of the type of power supply to your location, consult your video dealer or local power company. For video products intended to operate from battery power, or other sources, refer to the operating instructions. 6. Overloading - Do not overload wall outlets of extension cords as this can result in the risk of fire or electric shock. Overloaded AC outlets, extension cords, frayed power cords, damaged or cracked wire insulation, and broken plugs are dangerous. They may result in a shock or fire hazard. Periodically examine the cord, and if its appearance indicates damage or deteriorated insulation, have it replaced by your service technician. 8. Ventilation - Slots and openings in the case are provided for ventilation to ensure reliable operation of the video product and to protect it from overheating. These openings must not be blocked or covered. The openings should never be blocked by placing the video equipment on a bed, sofa, rug, or other similar surface. This video product should never be placed near or over a radiator or heat register. This video product should not be placed in a built-in installation such as a bookcase or rack unless proper ventilation is provided or the video product manufacturer’s instructions have been followed. 9. Attachments - Do not use attachments unless recommended by the video product manufacturer as they may cause a hazard. 10. Camera Extension Cables – Check the rating of your extension cable(s) to verify compliance with your local authority regulations prior to installation. 11. Water and Moisture - Do not use this video product near water. For example, near a bath tub, wash bowl, kitchen sink or laundry tub, in a wet basement, near a swimming pool and the like. Caution: Maintain electrical safety. Powerline operated equipment or accessories connected to this unit should bear the UL listing mark of CSA certification mark on the accessory itself and should not be modified so as to defeat the safety features. This will help avoid any potential hazard from electrical shock or fire. If in doubt, contact qualified service personnel. 12. Accessories - Do not place this video equipment on an unstable cart, stand, tripod, or table. The video equipment may fall, causing serious damage to the video product. Use this video product only with a cart, stand, tripod, bracket, or table recommended by the manufacturer or sold with the video product. Any mounting of the product should follow the manufacturer’s instructions and use a mounting accessory recommended by the manufacturer. 7. Power-Cord Protection - Power supply cords should be routed so that they are not likely to be walked on or pinched by items placed upon or against them, paying particular attention to cords at plugs, convenience receptacles, and the point where they vii Important Safeguards Service Use 13. Servicing - Do not attempt to service this video equipment yourself as opening or removing covers may expose you to dangerous voltage or other hazards. Refer all servicing to qualified service personnel. 19. Cleaning - Unplug the video product from the wall outlet before cleaning. Do not use liquid cleaners or aerosol cleaners. Use a damp cloth for cleaning. 14. Conditions Requiring Service - Unplug this video product from the wall outlet and refer servicing to qualified service personnel under the following conditions. A. When the power supply cord or plug is damaged. B. If liquid has been spilled or objects have fallen into the video product. C. If the video product has been exposed to rain or water. D. If the video product does not operate normally by following the operating instructions. Adjust only those controls that are covered by the operating instructions. Improper adjustment of other controls may result in damage and will often require extensive work by a qualified technician to restore the video product to its normal operation. E. If the video product has been dropped or the cabinet has been damaged. F. When the video product exhibits a distinct change in performance. This indicates a need for service. 15. Replacement Parts - When replacement parts are required, have the service technician verify that the replacements used have the same safety characteristics as the original parts. Use of replacements specified by the video product manufacturer can prevent fire, electric shock or other hazards. 16. Safety Check - Upon completion of any service or repairs to this video product, ask the service technician to perform safety checks recommended by the manufacturer to determine that the video product is in safe operating condition. 17. Wall or Ceiling Mounting - The cameras provided with this system should be mounted to a wall or ceiling only as instructed in this guide, using the provided mounting brackets. 18. Heat - The product should be situated away from heat sources such as radiators, heat registers, stoves, or other products (including amplifiers) that produce heat. viii 20. Product and Cart Combination - Video and cart combination should be moved with care. Quick stops, excessive force, and uneven surfaces may cause the video product and car combination to overturn. 21. Object and Liquid Entry - Never push objects for any kind into this video product through openings as they may touch dangerous voltage points or “short-out” parts that could result in a fire or electric shock. Never spill liquid of any kind on the video product. 22. Lightning - For added protection for this video product during a lightning storm, or when it is left unattended and unused for long periods of time, unplug it from the wall outlet and disconnect the antenna or cable system. This will prevent damage to the video product due to lightning and power line surges. Important Safeguards General Precautions 1. All warnings and instructions in this manual should be followed. 2. Remove the plug from the outlet before cleaning. Do not use liquid aerosol detergents. Use a water dampened cloth for cleaning. 3. Do not use this unit in humid or wet places. 4. Keep enough space around the unit for ventilation. Slots and openings in the storage cabinet should not be blocked. 5. During lightning storms, or when the unit is not used for a long time, disconnect the power supply, antenna, and cables to protect the unit from electrical surge. FCC CLASS B NOTICE Note This equipment has been tested and found to comply with the limits for a Class B digital device, pursuant to Part 15 of the FCC Rules. These limits are designed to provide reasonable protection against harmful interference in a residential installation. This equipment generates, uses, and can radiate radio frequency energy and, if not in-stalled and used in accordance with the instruction, may cause harmful interference to radio communications. However, there is no guarantee that interference will not occur in a particular installation. If this equipment does cause harmful interference to radio or television reception (which can be determined by turning the equipment on and off), the user is encouraged to try to correct the interference by one or more of the following measures: • Reorient or relocate the receiving antenna • Increase the separation between the equipment and receiver • Connect the equipment into an outlet on a circuit different from that to which the receiver is connected • Consult the dealer or an experienced radio or television technician for assistance This equipment has been certified and found to comply with the limits regulated by FCC, EMC, and LVD. Therefore, it is designated to provide reasonable protection against interference and will not cause interference with other appliance usage. However, it is imperative that the user follows this manuals guideline to avoid improper usage which may result in damage to the unit, electrical shock and fire hazard injury In order to improve the feature functions and quality of this product, the specifications are subject to change without notice from time to time. www.lorexcctv.com ix Features Features Monitor • 22” widescreen LCD with user selectable aspect ratio (Wide 16:9, Standard 4:3) • Professional Grade High Resolution (1680x1050) glossy LCD panel • VGA Input: use your LCD Display as a PC monitor • USB Picture Frame feature: display digital pictures from a USB flash drive • Component Video input (YPbPr): connect a DVD player, Digital Cable or Satellite receiver • Spot Video Out supports a connection to another monitor to display video in a different location (e.g. Public View Monitor) • Multiple control options; front panel buttons, remote control, mouse, remote software • Trilingual On-Screen Display (English, Spanish, French) • Video Tutorial for camera installation and system set up • Screen saver for energy efficiency • Wall mountable (VESA standard) • Stand with cable management solution • Environmentally friendly, recyclable packaging material DVR • 16 channels with Pentaplex operation: View, Record, Playback, Back Up & Remotely Control the system simultaneously • MPEG-4 Digital Video Compression: small file sizes without compromising video quality • Recording Frames Per Second (FPS): 240/200 (NTSC/PAL) @ 352X240 • Recording Resolution: 704x480, 704x240, 352x240(NTSC), 704x576, 704x288, 352x288(PAL) • Custom recording for each camera • Covert Camera: record without displaying camera image • Continuous Recording with Motion Event logging for easy event searching • Selectable 4-channel audio recording & programmable motion detection • Pre-Event Recording of a preset amount of time before motion triggers the recording to see activities leading up to an event • SATA Hard Drive with 100% duty cycle for optimal performance in the commercial video security market— expandable up to 750GB • S.M.A.R.T HDD Support (Self-Monitoring Analysis and Reporting Technology): Auto Detection / Recovery to ensure the HDD is functioning properly at all times • Supports external USB: Hard Drive, Optical Drive (DVD-RW, CD-RW) and Flash Drive • Scheduled backup to an external USB storage and Network Storage Using FTP • Watermarking of video files to encrypt the data • 8 programmable Alarm Inputs, 1 Relay Alarm output • Pan/Tilt/Zoom Camera Control: RS-485 interface • Network Protocol: TCP/IP, DDNS and Web x Table of Contents Getting Started ............................................................................................................ 1 Tips & Tricks - Useful System Information ............................................................... 2 System Loading Sequence .......................................................................................................... 4 Monitor Display Shutoff ............................................................................................................... 4 System Shutdown ........................................................................................................................ 4 Front Panel .................................................................................................................. 5 Front Panel .................................................................................................................. 6 Side Panel - USB Ports ............................................................................................... 6 Rear Panel ................................................................................................................... 7 Rear Panel ................................................................................................................... 8 Using the Octopus Cable ........................................................................................... 9 Installing Cameras .................................................................................................... 10 Installation Warnings: ................................................................................................................ 10 Camera Stand Installation: ........................................................................................................ 10 Connecting DIN Cameras .......................................................................................................... 11 Connecting BNC Cameras ........................................................................................................ 12 Camera Connection Diagram .................................................................................................... 12 Multi-Function Display: Monitor Modes .................................................................. 13 DVR Mode (Mode 1) .................................................................................................. 14 DVR Mode - Remote Control Usage ........................................................................ 15 Front Panel Navigation Controls ............................................................................. 16 Mouse Control ........................................................................................................... 16 Mouse Controls ......................................................................................................................... 16 On-Screen Display Menu .......................................................................................... 17 System Display ......................................................................................................... 18 Network Connectivity Indicators ................................................................................................ 18 Camera Display Modes ............................................................................................................. 19 Zoom Mode ............................................................................................................................... 19 PIP Mode (Reverse PIP) ........................................................................................................... 20 PTZ (Pan/Tilt/Zoom) & Focus Controls ..................................................................................... 20 Menu Navigation Controls & Tips ........................................................................... 21 Virtual Keyboard Control ........................................................................................................... 21 Active Option Indicator .............................................................................................................. 21 Volume Adjustment ................................................................................................................... 21 System Setup Controls ............................................................................................ 22 Main Menu ................................................................................................................................. 22 Display Menu ............................................................................................................. 23 OSD (On-Screen Display) ......................................................................................................... 23 MONITOR .................................................................................................................................. 24 SEQUENCE .............................................................................................................................. 24 Modifying a Sequence ............................................................................................................... 25 SEQUENCE SETUP - REMOTE ............................................................................................... 25 SEQUENCE SETUP - MOUSE ................................................................................................. 26 SPOT-OUT ................................................................................................................................ 27 SCREENSAVER ....................................................................................................................... 27 Camera Menu ............................................................................................................ 28 CAMERA TITLE ........................................................................................................................ 28 xi COLOR SETUP ......................................................................................................................... 29 PTZ SETUP ............................................................................................................................... 29 PTZ PROPERTIES .................................................................................................................... 30 MOTION SENSOR .................................................................................................................... 30 Sound Menu .............................................................................................................. 31 SOUND ...................................................................................................................................... 31 SOUND ...................................................................................................................................... 31 BUZZER .................................................................................................................................... 31 DATE/TIME ............................................................................................................................... 32 System Menu ............................................................................................................. 32 DATE/TIME ............................................................................................................................... 32 NETWORK ................................................................................................................................ 33 MAIL SETUP ............................................................................................................................. 33 MAIL SETUP ............................................................................................................................. 34 SYSTEM MANAGEMENT ......................................................................................................... 35 CONTROL DEVICE ................................................................................................................... 37 HDD EVENT .............................................................................................................................. 38 ALARM INPUT .......................................................................................................................... 38 Event / Sensor ........................................................................................................... 38 HDD EVENT .............................................................................................................................. 38 ALARM OUT .............................................................................................................................. 39 BUZZER OUT ............................................................................................................................ 39 EMAIL NOTIFICATION ............................................................................................................. 40 Disk Management ..................................................................................................... 40 Recording Menu Controls ........................................................................................ 42 Simple and Advanced Modes .................................................................................................... 42 Simple Recording Mode ........................................................................................... 43 Recording Operation ................................................................................................................. 43 Simple Recording ...................................................................................................................... 43 Simple Recording Mode ........................................................................................... 43 Simple Recording Mode ........................................................................................... 44 Advanced Recording ................................................................................................ 44 Recording Operation ................................................................................................................. 44 Advanced Recording ................................................................................................ 45 Continuous / Motion Setup ........................................................................................................ 45 Continuous / Motion Parameter ................................................................................................. 45 Continuous / Motion Parameter ................................................................................................. 45 Continuous / Motion Schedule ................................................................................................... 46 Advanced Recording ................................................................................................ 47 Alarm Setup Mode ..................................................................................................................... 47 Alarm Parameter ....................................................................................................................... 47 Alarm Parameter ....................................................................................................................... 47 Alarm Schedule ......................................................................................................................... 48 Saving the Settings .................................................................................................................... 48 Archiving ................................................................................................................... 49 Archive Backup to FTP .............................................................................................................. 51 Search ........................................................................................................................ 52 Search By Event ........................................................................................................................ 53 VGA Mode (Mode 2) .................................................................................................. 54 VGA Connection Errors ............................................................................................................. 54 xii VGA Mode - Remote Control Usage ........................................................................ 55 Component Mode (Mode 3) ...................................................................................... 56 Setting Component (Component Mode) On Your DVD Player .................................................. 56 Component Mode - Remote Control Usage ............................................................ 57 Picture Frame Mode (Mode 4) .................................................................................. 58 USB Flash Drive Images ........................................................................................................... 58 Picture Frame Mode - Remote Control Usage ........................................................ 59 Picture Frame Display ............................................................................................................... 59 Picture Frame Settings Menu . . . . . . . . . . . . . . . . . . . . . . . . . . . . . . . . . . . . . . . . . . . . 60 Picture Frame - Menu ............................................................................................... 60 Picture Frame Settings .............................................................................................................. 60 Picture Resizing Application ...................................................................................................... 61 Installation Guide Mode (Mode 5) ............................................................................ 62 Installation Guide Mode - Remote Control Usage ................................................. 63 Color Submenu . . . . . . . . . . . . . . . . . . . . . . . . . . . . . . . . . . . . . . . . . . . . . . . . . . . . . . . 64 Monitor - Menu Settings ........................................................................................... 64 Image Settings ........................................................................................................................... 64 Display Settings ......................................................................................................................... 65 Display Control Submenu . . . . . . . . . . . . . . . . . . . . . . . . . . . . . . . . . . . . . . . . . . . . . . . 65 PIP Settings ............................................................................................................................... 66 Misc. Settings ............................................................................................................................ 67 About Lorex Client .................................................................................................... 68 System Requirements .............................................................................................. 69 Software Installation ................................................................................................. 70 Screen View Controls ................................................................................................................ 74 PTZ Controls ............................................................................................................................. 74 AVI File Conversion ................................................................................................................... 75 Event Viewer ............................................................................................................................. 75 Connection Manager ................................................................................................ 76 Adding a Site (Individual Unit Configuration) ............................................................................. 77 Configuration Tab ...................................................................................................................... 78 Modifying a Site ........................................................................................................................ 79 Remote Connection .................................................................................................. 80 Search Functions ...................................................................................................... 81 Event Viewer ............................................................................................................................. 82 Search Options .......................................................................................................................... 83 Archive ....................................................................................................................................... 83 Remote Setup ............................................................................................................ 84 Recording Setup - Simple .......................................................................................................... 84 Recording Setup - Advanced ..................................................................................................... 85 Camera Setup ........................................................................................................................... 86 Sound Setup .............................................................................................................................. 87 Event/Sensor Setup ................................................................................................................... 88 System Setup ............................................................................................................................ 89 Display Setup (Screensaver) ..................................................................................................... 91 Lorex Player .............................................................................................................. 92 Video File Watermarking ........................................................................................................... 92 Image Save Function ................................................................................................................. 93 Print Function ............................................................................................................................ 93 xiii Event Viewer ............................................................................................................................. 94 Web Client ................................................................................................................. 96 Multiple Connection Setup ....................................................................................... 97 Adding Multiple Sites with Multiple Systems ............................................................................. 98 Selecting a Site for Connection ................................................................................................. 98 Appendix A: System Specifications ........................................................................ 99 Appendix B: Setting up Remote Viewing ............................................................. 101 Appendix C: Using the Auto Email Feature .......................................................... 111 Appendix D: Recommended Tips for System Setup ........................................... 115 Appendix E: Listen-in Audio .................................................................................. 122 Appendix F: Playback Previously Recorded Data? ............................................. 123 Appendix G: Setting Auto-Recording to OFF ....................................................... 125 Appendix H: Setting up Motion Recording ........................................................... 127 Appendix I: Using the Storage Calculator ............................................................ 131 Appendix J: Replacing the Hard Drive .................................................................. 132 Appendix K: Connecting a Spot-Out Monitor ...................................................... 134 Appendix L: Connecting Motion / Alarm Devices ................................................ 135 Appendix M: Connecting PTZ Cameras ................................................................ 136 Appendix N: Full Connectivity Diagram ............................................................... 137 xiv Getting Started Getting Started The system comes with the following components: POWER ADAPTER INTEGRAGTED DVR/LCD MONITOR MOUSE REMOTE CONTROL OCTOPUS CABLE ETHERNET CABLE HARDWARE & SOFTWARE MANUALS, QUICKSTART GUIDE, & SOFTWARE CD HARD DRIVE SIZE, NUMBER OF CHANNELS, AND CAMERA CONFIGURATION MAY VARY BY MODEL. PLEASE REFER TO YOUR PACKAGE FOR SPECIFIC CONTENT DETAILS. CHECK YOUR PACKAGE TO CONFIRM THAT YOU HAVE RECEIVED THE COMPLETE SYSTEM, INCLUDING ALL COMPONENTS SHOWN ABOVE. 1 Tips & Tricks - Useful System Information Tips & Tricks - Useful System Information The following Tips & Tricks contain useful information about your system: • Your default system password is 1234. This password may be required when entering menus, reviewing Recorded Data, Archiving, PTZ, and for Remote Access. You can change this password in the System Menu. • Make sure to set up your DATE & TIME prior to starting recording. These settings are very important to maintain system data accuracy. • Picture in Picture (PIP) behaves in different ways, depending on MODE: z z z z z When in VGA Mode, the PIP will display the DVR Screen. When in Component Mode, the PIP will display the DVR Screen. When in Picture Frame Mode, the PIP will display the DVR Screen. A PIP Screen will NOT be displayed when the Installation Guide Video is playing When in DVR Mode, the REVERSE-PIP will display the Component, Video or VGA Input. This function could be used to watch a movie or view your PC display while still monitoring the Live Video display. • When setting up the system for Remote Access, it is very important to turn off the system, CONNECT THE ETHERNET CABLE to the system and to the router, and then turn the system back on again. If the cable is connected while the system is on, it will not properly get Network Information from the Router. • If you are experiencing difficulties accessing your system remotely, press the INFO Button on the Remote Control -or- the Enter Button on the Front Panel to display the System Information. The IP ADDRESS SHOULD NOT BE 127.0.0.1 - if it is, your system network settings are not correct. Please see the Network section of this manual for details. • To listen to AUDIO IN PLAYBACK MODE, make sure to maximize the selected channel to full screen. Audio will NOT play when playback is in split screen mode. • When EDITING SYSTEM SETTINGS, it is important to note the color of your Highlight Box. When the highlight box is in GREEN, it indicates that the option is available for editing. When the highlight box is in ORANGE, it indicates that the option is in active editing mode, and the setting can be changed. • The SPOT OUT option on the system does NOT display exactly what is shown on the Monitor screen - the spot out will show individual cameras in Sequence Mode, based on Menu Settings. Orange Highlight - Indicates that the option is in active editing mode. Green Highlight - Indicates that the option is available for editing. Once the option is highlighted, press the ENTER key to edit the option (highlights changes to Orange). 2 Tips & Tricks - Useful System Information Basic System Setup The following connections are recommended prior to loading the system for the first time. 3 Tips & Tricks - Useful System Information System Startup / Shutdown System Loading Sequence • Press the POWER button located on the front panel of the system to start the unit, or press the Power Button on the Remote Control. • The system will perform a hard drive check The unit will initially load to a split screen view, displaying all channels (if available). Empty channels will be displayed in Blue. NOTE: If a new HARD DRIVE is detected, the system will prompt you to FORMAT the drive. If you do not choose to format the HARD DRIVE, the drive will not be detected by the system. If you choose to FORMAT a drive in this way, the drive will no longer be readable by a regular PC without using the HARD DRIVE VIEWER software included on the CD provided with this unit. Please see the Appendices for details on Hard Drive format. Monitor Display Shutoff • Press the Power Button on the front panel or remote control for one second to turn off the monitor only. • The system will continue to record while the monitor is off. • The LED indicators on the front of the system will remain ON. • The monitor shutoff can be automatically set using the Screen Saver settings in the System Menu. System Shutdown • Press and hold the Power Button on the front panel or remote control for three seconds to turn off the system, or select Shutdown from the Mouse Menu. Enter the Admin Password (by default, 1234). • Only the ADMIN can turn the unit ON/OFF. • The system will NOT continue to record while the unit is off. • The LED indicators on the front of the system will be OFF. 4 System Shutdown Prompt Front Panel Front Panel 1 2 3 4 5 6 7 8 1. SYSTEM POWER BUTTON - Press the System Power button to turn the Monitor display ON/ OFF. Press and hold the button to turn the DVR ON/OFF. 2. MULTI-FUNCTION MENU MODES - Press the Multi-Function Menu button to switch between monitor modes: • DVR Mode - Displays the DVR with live camera view. • VGA Mode - Displays the device connected to the VGA port on the monitor (i.e. a computer). • Component Mode - Displays the device connected to the component green, blue, and red inputs (Y/Pb/Pr) in high resolution (i.e. DVD Player). • Picture Frame Mode - Displays JPEG images from a USB flash drive on the monitor as still images. Images cannot exceed 1600x1200 pixels. • Installation Guide - Displays the system installation video. 3. SETUP MENU - Press the Setup Button to display the System Menu (in DVR Mode), the Monitor Configuration Setup Menu (in VGA or Component Mode) or the Picture Frame Setup Menu (in Picture Frame mode). 5 Front Panel Front Panel 1 2 3 4 5 6 7 8 4. RETURN BUTTON - Exits a menu and returns the screen to the default view for the selected Mode. 5. NAVIGATION & ENTER CONTROLS - Use the Navigation controls to move Up, Down, Left and Right in menus, and press Enter to select options. 6. POWER LED - Indicates that the system is ON/OFF (RED LED). 7. REC LED - Indicates that the system is currently recording (when the RED LED is ON). 8. NET LED - Indicates that a remote connection has been made to the unit (over the Network) when the RED LED is ON. Side Panel - USB Ports The USB ports provide a connection point for a USB PC Mouse, USB flash drives and external USB hard drives. • Use a mouse for navigating in DVR and Picture Frame modes. • Connect a USB flash drive or external USB hard drive or optical drive (CD-RW/DVD-RW) for system Archive Backup. • Add JPEG pictures to a USB flash drive to use the monitor as a digital Picture Frame display. 6 Rear Panel Rear Panel 1 2 10 3 4 5 11 12 6 7 8 9 13 1. 6 PIN DIN VIDEO INPUTS - Channel 1-4 Camera inputs (for cameras with 6 Pin DIN connections). Cameras with 6 Pin DIN connections draw power from the system - additional power adapters are not needed. 2. BNC VIDEO INPUTS - Channel 1-8 camera inputs (used to connect Cameras with BNC connection type). Cameras with BNC connections require an additional power adaptor. 6 PIN DIN 3. OCTOPUS CABLE INPUT - Connect the Octopus Cable to the system to add an additional 8 cameras (CH 9~16). 4. VGA INPUT - Connect a PC (or other devices with a VGA Output) to the system. The system will perform as a Computer Monitor (when in VGA Mode). 5. COMPONENT VIDEO IN - Connect a DVD Player, Digital Cable or Satellite Receiver to the component Video Inputs (Y/Pb/Pr). 6. COMPONENT AUDIO IN - Connect a DVD Player, Digital Cable or Satellite Receiver to the component Audio Inputs (Audio in Left/Right Channels). The Component Output must be turned ON on most DVD Players before connection to the system. 7. RELAY / PTZ / RS-232 BLOCK - These terminals are used to send a signal to a secondary device or control PTZ (Pan/Tilt/Zoom) type cameras. 7 Rear Panel Rear Panel 1 2 10 11 12 3 4 5 6 7 8 9 13 8. ETHERNET PORT - Connects the monitor to a router for connection to the Internet. Refer to Appendix C for Remote Connection setup. 9. DC INPUT - Connect the AC power using the power cord provided with the unit from the monitor to an electrical outlet. 10. RCA AUDIO INPUTS - Channel 1-4 Audio inputs (for BNC type cameras with standard RCA Audio output). 11. SPOT OUT - Video Output port to connect the unit to a Monitor or TV. This feature is used for situations in which you want to have the system in a back room while still displaying images to the public eye, for theft deterrence or advertising purposes. 12. AUDIO OUT - Audio Output port to connect the unit to a secondary audio device (i.e. Speakers). 13. ALARM FUNCTION TERMINALS (INPUT/OUTPUT) - These terminals are used to connect external alarm devices such as a motion sensor, door/alarm sensor, or time lapse VCR for Alarm Recording. Refer to the appendices for Alarm Block Configuration. 8 Using the Octopus Cable Using the Octopus Cable The Octopus Cable (included with the system) allows eight additional cameras to be added to the system. 1. Connect the cable to the VIDEO IN 9 - 16 port on the rear panel of the system. NOTE: DO NOT connect the Octopus Cable to the VGA port. 2. Attach BNC cameras to the cables. Each cable is labelled with a channel number. Once the cable and cameras are attached to they system, use the menu to configure the camera settings and recording options. Connect to the System Connect to BNC Cameras 9 Installing Cameras Installing Cameras Before you install the camera, carefully plan where and how you will position the camera, and where you will route the cable that connects the camera to the system. Installation Warnings: • Select a location for the camera that provides a clear view of the area you want to monitor, which is free from dust, and is not in line-of-sight to a strong light source or direct sunlight. • Plan the cables’ route so that it is not close to power or telephone lines, transformers, microwave ovens or other electrical equipment that could interfere with the system. • Select a location for the camera that has an ambient temperature between 14°F~113°F (-10°C~45°C) • If you plan to install the camera in a location that has conditions not recommended in this manual, consult with a professional installer and consider use of a separate camera cover or housing • Before starting permanent installation, have another person hold the camera for you while you verify its performance by observing the image on the monitor. Camera Stand Installation*: 1. Attach the pedestal to the ceiling, wall or other surface by the base using the provided screws. 2. The mounting bracket must be attached to a structural device such as a wall stud or ceiling rafter using the supplied screws. 3. Attach the camera to the pedestal. Adjust the angle of the camera, and tighten the thumbscrew to set the position NOTE: The Camera can be attached to the stand using the screw point on the top or the bottom (to maintain proper camera alignment). This prevents the image from becoming inverted. Wall Mount * Camera model may not be exactly as shown. 10 Ceiling Mount Installing Cameras Connecting DIN Cameras 1. Connect the female end of the DIN Extension Cable to the camera. NOTE: Make sure that the ARROW on the cable is pointing up. This will align the pins on the cable correctly with the port on the stem, preventing the pins from becoming bent and the cable from becoming inoperable. * 2. Mount the camera to the desired surface (ceiling, wall, shelf, etc.). Connecting the cables BEFORE permanently mounting the stand will help prevent issues with cable length (camera is mounted too far from the system and cannot be connected). 3. Aim the camera at the desired location. Remember to REMOVE THE PROTECTIVE FILM from the lens of the camera by pulling on the plastic tab. 4. Connect the male end of the supplied DIN extension cable to an open DIN camera port on the back of the system. Continue connecting additional DIN cameras. NOTE: The arrow on the DIN camera should be facing up when connecting the DIN Extension Cable to the system. * Camera model may not be exactly as shown. 11 Installing Cameras Connecting BNC Cameras 1. Connect the Extension cable to the Camera and System: A. Connect the Barrel Power connector to a power adaptor. B. Connect the BNC connector to an available BNC Port of the system. C. Connect the Male Power connector to the Camera. D. Connect the BNC connector to the Camera. 2. Connect the Power Adaptor to a wall outlet. IMPORTANT NOTE: The ends of the extension cable are NOT the same - one end has a Male power port, and the other has a Female power port. Before permanently running the Camera Extension Cable, make sure that the cable has been oriented between the Camera and the unit correctly. Male Power Port - The male power port end of the Extension cable connects to the Camera. Camera Connection Diagram 12 Female Power Port - The female power port end of the Extension cable connects to the Power Adapter. Multi-Function Display: Monitor Modes Multi-Function Display: Monitor Modes This system contains a multi-function display, which allows the system to function in several modes: • Mode 1: DVR Mode - Displays the DVR with live camera view. • Mode 2: VGA Mode - Displays the device connected to the VGA Port on the monitor (i.e. a computer). • Mode 3: Component Mode - Displays the device connected to the component green, blue, and red inputs (Y/Pb/Pr) in high resolution (i.e. DVD Player, Digital Cable or Satellite Receiver). • Mode 4: Picture Frame Mode - Displays JPEG images from a USB flash drive on the monitor as a slide show. • Mode 5: Installation Guide - Displays the system installation video. For more information on the use and settings for a specific mode, please refer to the associated section in this manual for details. NOTE: The system will continue to record while in other modes. This provides an advanced level of Covert Surveillance. 13 DVR Mode (Mode 1) DVR Mode (Mode 1) DVR Mode is the primary mode for the system, and is the default mode when the system is powered on. In DVR Mode, the system performs the following functions: • View and Record live video channels in Single, Quad, Multi-Display or Sequence Mode. • Customize the recording on up to 8 camera channels in continuous, motion or alarm recording modes. • Archive data to a USB flash drive, an external USB hard drive, optical drive (CD-RW/ DVD-RW), or Network Storage through FTP. • Search through Previously Recorded Events • Customize the Display, Cameras and System to best suit your security needs through the user friendly System Menu. NOTE: The system will continue to record independently of the current Monitor Mode. To return to DVR Mode (from any other Mode): Front Panel: 1. Press the Multi-Function Mode Button on the Front Panel. 2. Use the Up and Down arrows on the Navigation Control to select DVR. 3. Press the Enter button on the Navigation Control to switch to DVR Mode. Remote: 1. Press the DVR Button on the Remote Control -or2. Press the Mode button on the Remote Control. Use the arrows to select DVR, and press the Enter button. 14 DVR Mode - Remote Control Usage DVR Mode - Remote Control Usage 1. MODE: Press the Mode Button to display the Multi-Function Mode Menu. 2. POWER: Press the Power Button to turn off the Monitor Display. Press and hold the button for 3 seconds to shut down the entire system. 1 11 3. DVR: Change to DVR Mode. 2 12 3 13 6. NAVIGATION/PLAYBACK: Press the Navigation Controls to move Up, Down, Left or Right in System and Mode menus. Use the Playback controls to Pause, Play, Reverse or Fast-forward the Playback in DVR Mode. 4 14 5 15 7. INFO: Displays the System Information in DVR Mode. 6 16 8. SEARCH BUTTON: Displays the Video Playback Search menu. 7 17 9. NUMBER KEYPAD: Use to switch between Cameras in live view mode. 8 18 10. VOL +/-: Increase or Decrease the volume of the camera currently broadcasting live audio. 9 19 4. VGA: Change to VGA Mode. 5. RETURN: Exits from a System Menu. 11. DVR SETUP: Displays the DVR Setup Menu. 12. REMOTE ID: Changes the ID for the remote control to match the System ID (if changed). Use the Remote ID when using one remote to control multiple systems). To set the Remote to default, press and hold the Remote ID button for 5 seconds, then select number 1. Press the Enter and Return buttons. 20 10 21 22 23 13. PICTURE FRAME: Change to Picture Frame Mode. 14. COMPONENT: Change to Component Mode. 15. ENTER BUTTON: Press the Enter Button to select an 1. Mode option in the System Menu or Multi-Function Menu. Also 2. Power displays PIP when in camera viewing mode. 13. Picture Frame Mode 14. Component Mode 3. DVR Mode 15. Enter Button 4.VGA Mode 16. Display Mode 5. Return Button 17. PTZ Mode 6. Navigation Controls 18. Keylock 7. Information 19. Sequence Mode 8. Search Button 20. PIP Mode 9. Number Keypad 21. Zoom Mode 21. ZOOM: Displays one channel with Digital Zoom. 10. Volume +/- 22. Archive 22. ARCHIVE: Displays the Archive menu. 11. DVR Setup 23. Audio Channel Select 23. AUDIO CHANNEL SELECT: Switches between live audio channels (CH1~4 only). Press Audio and select Channel 1~4. 12. Remote Control ID 16. DISPLAY: Switches the display to single, quad and multi-display views. 17. PTZ: Switches to PTZ Mode. 18. KEYLOCK: Locks all keys (except the Mode button). 19. SEQUENCE: Changes the Monitor Display to Sequence through channels (based on menu settings). 20. PIP: Displays the Component Input in the PIP Screen in the lower right corner. 15 Front Panel Navigation Controls Front Panel Navigation Controls This system has been designed to use the mouse or remote control as the primary modes of navigation and configuration for the system. The Front Panel buttons can also be used to access the menus and configure the system. • Navigation Controls: Move Up/Down/Left/Right in menus. • Press the Up or Down arrow keys (when in the default display mode) to load the On-Screen Display Menu (see next page for details). • Enter Button: Press this button to select and change the values in a menu option. Mouse Control Before powering on the system, connect a USB mouse to one of the USB ports on the side of the monitor. Mouse Controls The mouse behaves in the same way as a PC mouse - use the Left and Right Buttons to open menus and change options: LEFT BUTTON - RIGHT BUTTON - • Single Click: • Single Click: • Select options in Menu, Recording and Search Mode. • Change settings, select dates and perform other options • Click to use the Controls in PTZ Mode • Double Click: • Double click on a Channel in QUAD or other views to view the single camera in full screen. 16 • Opens the On-Screen Display Menu. On-Screen Display Menu On-Screen Display Menu To open the On-Screen Display Menu: • Press the Up or Down Arrows on the Front Panel • Right-click the mouse The Menu options include: 1. CHANNELS: Select a Channel Number (1~16) to display a camera in Full Screen Mode. 2. SETUP: Displays the System Setup Menu. Please refer to the System Setup section for detailed configuration. 1 3. SEARCH: Allows you to locate previously recorded video by Date and Time, or by Event Type. 4. PTZ: Displays the PTZ Control Screen. The PTZ / Focus Menus will only work with PTZ type cameras (not included) 5. DISPLAY: Changes the current display mode to Single, Quad, 6-channel split, 8-channel split or 9-channel split. 13-channel split, and 16-channel split screen views. 6. ARCHIVE: The Archive feature copies data from the internal hard disk to backup media, such as an external USB hard drive or USB flash drive. See the Archive Menu Section for details. 2 3 4 5 6 7. SEQUENCE: Selecting the Sequence option switches the live camera view to the Sequence set in the System Menu. 7 8. ZOOM: Displays one channel with Digital Zoom. 9 9. KEY LOCK: Locks all Front Panel and Remote Control buttons (except the Mode change buttons). The password is required to unlock the keys. The system can still enter any other mode while the keys are locked (VGA, Component, Picture Frame or Installation Video modes). 10 8 11 12 10. VOLUME: Adjusts the volume of the system. 11. PIP: Select the PIP Button to display the VGA or Component mode in a PIP window. This function could be used to watch a movie while still monitoring the Live Video display. 12. SHUTDOWN: Select the Shutdown option to turn off the system. 17 System Display System Display Camera Title: The title for the camera is displayed in the upper left corner of the channel window, to a maximum of 11 characters. To change the name, use the System Setup options. Date & Time: Displays the current Date and Time for the system. NOTE: It is very important to set the Date and Time prior to recording. If the date and time are changed after recording has started, old data may be overwritten and lost. Recording Status: : Record : Pre Record C: Continuous M: Motion A: Alarm Hard Drive Recording Settings: Displays the current Recording Type: • If displaying a % under 100%, the drive is not yet full. • If displaying 100%, the drive is full, and overwrite is OFF. • If displaying OW, the drive may not be full, however the system is set to Overwrite (starting from the oldest data) once the drive capacity is reached. Network Connectivity Indicators The Network Indicators appear when a remote connection is made to the unit via the Remote Agent software, or through the Internet Explorer Web Client: • Green: Indicates that the network connection is stable. • Blue: Indicates that the network connection is experiencing difficulties. • Red: Indicates that the network connection is not strong. Network Indicators 18 System Display Camera Display Modes Cameras can be displayed in several different modes by pressing the Display Button on the Remote Control or Mouse Menu. A Display Selection window will appear on-screen. Select from the available display types: 6 Channel Split View 8 Channel Split View Single Channel Quad (4) Channel 8 Channel Grid 13 Channel Split View 16 Channel Grid Zoom Mode • Displays the Camera in ZOOM Mode. • Use the Arrow keys to adjust the Zoom location. • Press the Return key to exit ZOOM Mode. 19 System Display PIP Mode (Reverse PIP) When using the PIP function when viewing in DVR MODE, it is referred to as ‘Reverse PIP’ (as normal PIP means displaying the DVR Screen as a PIP on any other mode). Select the PIP Button to display the VGA or Component mode in a PIP window. This function could be used to watch a movie will still monitoring the Live Video display. PTZ (Pan/Tilt/Zoom) & Focus Controls The PTZ / Focus Menus will only work with PTZ type cameras (not included): • Press the PTZ Button on the remote control or Mouse Menu to access the PTZ Control Screen: • The on-screen icons represent buttons on the front panel and remote control (up/down/left/ right). The Camera can be adjusted using these buttons • Press the Return Button to exit PTZ Mode. PTZ Control Screen • Press the PTZ Button a second time to access the Focus Control Screen: • The on-screen icons represent buttons on the front panel and remote control (up/down/left/ right). The Camera can be adjusted using these buttons z z F: Indicates FOCUS I: Indicates IRIS • Press the Return Button to exit PTZ Mode. NOTE: Make sure that the PTZ Settings are configured in the Menu before attempting to use any of the PTZ Menu Functionality. 20 Focus Control Screen Menu Navigation Controls & Tips Menu Navigation Controls & Tips YOUR SYSTEM PASSWORD IS: 1234 Virtual Keyboard Control The Virtual Keyboard control becomes available when keyboard input is needed for entering information such as Names, Network Information, etc. • Includes a~z, A~Z, 0~9 and Symbols.@#$%^&*() • Navigate using the arrow keys on the Front Panel or Remote Control, or by clicking with the Mouse. • Select the ENTER button once the Alpha/Numeric entry is completed. Click to View Uppercase and Symbols Active Option Indicator Orange Highlight - Indicates that the option is in active editing mode. Green Highlight - Indicates that the option is available for editing. Once the option is highlighted, press the ENTER key to edit the option (highlights changes to Orange). NOTE: Once changes have been made, select the APPLY button at the bottom of the screen, and press the ENTER button on the front panel or remote control. Changes will be saved at this time - exiting the menu without applying the changes will result in the changes being lost. Volume Adjustment Displays the volume level of the camera currently set to Live Audio The Camera Volume can be controlled using the Volume + / - keys. 21 System Setup Controls System Setup Controls • Enter the MENU screen by pressing the SETUP button on the Remote Control, by pressing the SYSTEM MENU button on the Front Panel or by selecting SETUP from the Mouse Menu. Enter the password (if required). The default password is 1234. Main Menu DISPLAY: Setup of display options. CAMERA: Setup for individual Cameras. SOUND: Sound settings for the system. SYSTEM: System and Network settings. EVENT/SENSOR: Alarm and Event setup. DISK MANAGEMENT: Hard drive options. • Select the SYSTEM SETUP option to configure the menu options. • Scroll through the six options by pressing the UP, DOWN, LEFT and RIGHT buttons on the Front Panel or Remote Control, or clicking with the Mouse • To enter a sub-menu, navigate to the option and press the ENTER button. To exit a SUBMENU, press the RETURN button. • To exit the MAIN MENU, press the RETURN button. 22 KLIJ: Scroll UP/DOWN/LEFT/ RIGHT within a menu option ENTER: Press this button to select and change the values in a menu option RETURN: Complete modifications of a menu option; exit a menu Display Menu Display Menu The Display Menu controls: OSD (On-Screen Display) • Status Bar - Turns the status bar ON/ OFF. The status bar displays: z z z z z Recording State (Recording: Red, Pre-recording: Green) Network Indicators Time and Date % HDD Free Refer to Recording Settings on page 50). • Camera Title - Turns the display of the Camera Titles ON/OFF. • Event Icon - Turns the Event Icon display ON/OFF. OSD - On-screen display settings control the camera titles, event indicators, and general screen settings. MONITOR - Display settings for Alarm and Events SEQUENCE - Controls the settings for the display of video images in Sequence Mode SPOT-OUT - Sends camera video to a secondary monitor (by individual camera based on the settings) through the SPOT-OUT Port. SCREENSAVER - Configuration for the system screensaver OSD (On-Screen Display) • Border - Turns the channel separation border ON/OFF when the display is in Quad Display Mode. • Border Color - Sets the Border Color: White, Blue, Red, Yellow, Green or Gray. • Menu Transparency - Sets the Menu Transparency between 0 (no transparency, menu is very dark) to 100 (full transparency, menu is very light). • Motion Sensor Display - Turns the display of the Motion Sensor to: Active: Display motion sensor of motion detection area. z Inactive: Display motion sensor except motion detection area. z Off: No display of motion sensor. z • Motion Sensor Color - Sets the motion sensor color. When Motion is detected on a channel, the moving parts of the image will be highlighted with colored squares (i.e. Blue Squares). Colors include Blue, Green, Red or Yellow. • Motion Transparency - Setup motion transparency. This sets the transparency of the Motion Sensor blocks from 0~3. • Language - Change the language for the On Screen Display and DVR Menu selections to English, French or Spanish. 23 Display Menu MONITOR SEQUENCE • Sequence Dwell - Sets the cycle time when the system is in Sequence Mode (between 1~60 seconds). • Spot-Out Dwell -The length of time to display a camera in Spot-out mode. • De-Interlace Mode - Removes the screen spread when set to ON. • Alarm Pop-Up Mode - Set to ON/ OFF. Switches the screen display to the detected channel when an Alarm is activated. Sets the Sequence Mode for the display of available channels. The Sequence Settings for camera views can only be changed using the Mouse or Remote Control. • Activation - Turns the Sequence ON/ OFF. NOTE: Up to 16 different Sequence Mode settings can be configured, however only ONE can be active at a time. • List - Displays the Sequence Title • Alarm Pop-Up Dwell - Determines the length of time that a channel is displayed when an Alarm is detected (between 1~60 seconds). • Motion Pop-Up Mode - Set to ON/ OFF. Switches the screen display to any channel when Motion is detected. • Motion Pop-Up Dwell - Determines the length of time that a channel is displayed when Motion is detected (between 1~60 seconds). • Aspect Ratio - Sets the Aspect Ratio for the display to 16:9 (widescreen) or 4:3 (Full Frame—black bars appear on sides) 16:9 Ratio 24 4:3 Ratio • ADD Button - Select the ADD button to create a New Sequence: Sequence Title - Enter a title for the New Sequence z Activation - Turn the Sequence ON/ OFF (only one sequence can be active at a time). z CANCEL Button - Cancels the addition of the New Sequence. z SAVE Button - Saves the New Sequence, and moves to the New Sequence Configuration screen: z Display Menu Once the New Sequence has been created, the Sequence Setup Mode screens appear. These screens will set the sequence patterns (see the following for details). Modifying a Sequence • An existing Sequence can be Modified by selecting it from the list, and pressing ENTER. Once changes have been made, select the MODIFY button to configure the views, then press the SAVE Button. NOTE: The system will prompt you for "MOUSE OPERATION ONLY," however, you can modify the Sequence setup using the remote control. SEQUENCE SETUP - REMOTE 1. Press the ENTER button on the Remote. The Highlight will change to YELLOW Setup Mode is now active. 2. Select the Display Mode by pressing the Left and Right buttons (7 different Display Options - Single, Quad, 6-split, 8 split, 9-split, 13 split, 16 split). 3. Press the Number Keys to Select channels to be displayed in Sequence (all squares must have an assigned number). Press ENTER when complete. 4. Repeat for the next Display Modes (up to 16 additions). 25 Display Menu 5. Press the RETURN button when complete. and select SAVE & EXIT. 6. Press the SEQUENCE button on the Remote or Mouse Menu to switch to Sequence display. SEQUENCE SETUP - MOUSE 1. Double Left Click on the Green Highlighted box. The Highlight will change to YELLOW - Setup Mode is now active. 26 2. Select the Display Mode by pressing the Left and Right buttons (7 different Display Options - Single, Quad, 6-split, 8 split, 9-split, 13 split, 16 split). 3. Click the Right Mouse Button to assign channels using a drop down menu (all squares must have an assigned number). Click anywhere outside the squares to exit. 4. Repeat for the next Display Modes (up to 16 additions). Display Menu • Check or Uncheck the selected Cameras to have the video sent to a Secondary Monitor in Sequence. NOTE: Any cameras NOT selected will not be sent as video to the Spot Out Monitor. SCREENSAVER 5. Right click an empty spot outside of the squares when complete. and select SAVE & EXIT. 6. Press the SEQUENCE button on the Remote or Mouse Menu to switch to Sequence display. SPOT-OUT Sends the Specified camera video to a secondary Monitor (using the Spot Out Port on the back of the unit). • Auto Brightness - Sets the length of time before the Screen brightness is turned down (10, 20, 30, 40 or 50 minutes, or 1 hour). NOTE: The unit continues to function, and pressing any key will turn the screen back on. • Main Display OFF - Turns the Main Display Screen ON/OFF: z z ON - The Main Display is always ON OFF - The Main Display is always OFF • FROM - Used ONLY when the Main Display OFF setting is set to ON. Sets the Start Time for the monitor to go into Screen Saver mode. • TO - Used ONLY when the Main Display OFF setting is set to ON. Sets the End Time for the monitor to exit from Screen Saver mode. 27 Camera Menu Camera Menu The Camera Settings and Controls: CAMERA TITLE - Settings for the on-screen display of individual Camera Titles. COLOR SETUP - Color settings for individual cameras. PTZ SETUP - Configuration for PTZ type cameras (not included with the system). MOTION SENSOR - Configuration for Video Motion Detection. CAMERA TITLE • Covert - Turns the on-screen display of the Camera ON/OFF. Covert Cameras continue to record, however the camera is not displayed on-screen. This feature is commonly used in situations where the Monitor is located in a public area, and a camera should not be displayed (i.e. Located in a Cash Count room, or directed at a Cash Register). Displays the Camera in Covert Mode. The Camera is not displayed - an empty blue screen is displayed instead of the Video. z Covert cameras are configured from the Menu. z z CH1 in Covert Mode CAMERA TITLE The Camera Title menu controls the Covert Camera and Camera Title options. • Title - Sets the name for the individual camera (0~9, A~Z) up to 11 characters, by using the Virtual Keyboard: Virtual Keyboard - Appears when the Camera Title change is selected. Navigate with the arrow keys, and press ENTER to select a Number or Letter. z • CAM # - Indicates the Camera Number (corresponds to the DIN/ BNC connection port on the back of the system). 28 Camera Menu COLOR SETUP PTZ SETUP Displays the settings for Brightness, Contrast, Tint and Color for individual cameras. PTZ Setup is for PTZ Type Cameras ONLY, which are not included with this system. For more information on PTZ Cameras, visit us on the web at http://www.lorexcctv.com. • Press the ENTER Button and select a camera setting‘. • Set the Brightness, Contrast, Tint and Color for each camera. These settings can be set to a range of 1(low)~100 (high) • Press the RETURN button to return to the Camera Color Setup screen. • Address - Select the physical address setting of the PTZ Camera DIP Switches (From 0~255, refer to the Camera Manual for details). • PTZ Protocol - Select the Protocol for the PTZ Camera. See the list of compatible protocols below. Consult the Owners Manual of the PTZ Camera for further details. • Baud Rate - Setup for the PTZ Communication Speed: (2400, 4800, 9600,19200, 38400 BPS) Press to enter the Detailed PTZ Properties screen. The bar displayed on the bottom of the Channel window allows the user to change each setting individually to achieve the best possible picture quality. Compatible PTZ Protocols: PELCO-D, PELCO-P, Samsung (MRX-1000), Samsung(SCC641), Honeywell(SD1), Lilin(Fastdome), Fastrax(11), D-MAX, Sunin DSC-230, Scan Dome-11, Vicon, Philips8560-700, Sensormatic, VRX-2101 Kalatel(KTD-312), EVI-D70/D100, HRX-2000, PTC-200C, Panasonic 950, Panasonic 604, GC-855N, HD800, FastTrax 11-2, PTC-400C, CBC, ZC-PT, VC-C4, LPT-A100L, DXR-50, DVR-Z1200, 130XR-Z2200, GSP, LG-Multi, CRX-1401 & HSD-251N 29 Camera Menu PTZ PROPERTIES MOTION SENSOR • Sensitivity - Controls the Motion Sensitivity for the individual camera between 1 (low) ~ 10 (high). • Area Setup - Opens the Area Setup for the camera: Selected Areas are shaded in BLUE. • Channel No. - Camera Number. • PTZ Driver - The compatible driver selected for the PTZ Camera. • Auto Focus - Sets the Automatic camera focus to ON/OFF. • Auto Iris - Sets the Automatic Shutter to ON/OFF. • Speed Controls - Sets the Pitch, Zoom, Focus and Iris speeds between 1~5. Deselected Areas are shaded in GREY. AREA SETUP - Move the Cursor by using the directional arrows located on the Remote Control or using the Mouse. - Press Enter to select or deselect a Region. - Press the Return key to access the confirmation screen. MOTION SENSOR CONFIRMATION SCREEN Select All - Selects all areas (BLUE SQUARES) Deselect All - Clears all areas (GREY SQUARES) Cancel - Cancels Area Setup Save & Exit - Saves the settings. 30 Sound Menu Sound Menu The system Sound settings: AUDIO - Settings for the system Audio for Live and Remote monitoring. BUZZER - Settings for system Buzzer (audible alerts). SOUND • Live Audio - Turns Live system Audio (from the Audio on the terminal) to ON/OFF. • Audio Monitoring Channel - Select the channel for Listen-in Audio (Channels 1~4 ONLY). NOTE: Listen In Audio only works with Channels 1~4. Other channels will send audio which will be Recorded. • Network Audio TX - Sets Network Audio Transmission to ON/OFF. • Network Audio RX - Sets Network Audio Receive to ON/OFF. BUZZER SOUND • Keypad - Turns the Keypad buzzer ON/OFF (when a key is pressed on the Panel). The Sound Menu controls the Live Audio and Network Audio transfer. 31 System Menu System Menu The System Settings controls contain: DATE/TIME - Date and Time controls for the system. NETWORK - Network and remote access controls. MAIL - Mail setup USER MANAGEMENT - Controls for system users. SYSTEM MANAGEMENT - System specific settings and controls CONTROL DEVICE - Settings for an external control device (such as a PTZ Keyboard). DATE/TIME • Date/Time - Sets the current system Date and Time.* • Date Format - Sets the Date Display format (MM-DD-YYYY, YYYY-MM-DD, etc.). • Time Format - Sets the Time Display format to either 12 or 24 hour display. • Network Time Server Setup Synchronizes the system to the specified remote time server. Select the SYNC button to connect to the remote server and synchronize the time. NOTE: Selecting the SYNC button will attempt to connect to the NTP server. If the server cannot be reached, a “Failure to Connect” message appears. • Timezone Setup - Selections for the local Time Zone (i.e. EST, CST, PST). The DST (Daylight Savings Time) can be set to ON/OFF. NOTE: MAKE SURE THAT THE DATE AND TIME ARE SET PRIOR TO RECORDING! If the Date/TIme is set into the past, a message will appear warning that Overlapped date(s) will be erased. DATE/TIME 32 System Menu NETWORK • Web Service - Allows the unit to be remotely accessed using Internet Explorer. This setting can be set to ON/ OFF. • Max TX Speed - Sets the default Maximum Data Transfer speed for the remote connection (default of 8192 KB/sec.). • Network (TCP/IP) Settings: • IP Address - The IP address assigned to the system. • DHCP (Dynamic Host Configuration Protocol) - Allows the system to receive Network Information from the DHCP Server (i.e. The local Router). If DHCP is set to ON, the IP Address, Gateway and Subnet Mask will be assigned by the DHCP Server (i.e. The local area network Router. The Router is not included with this system). z If DHCP is set to OFF, the Network Information will need to be assigned manually. z • DDNS (Dynamic DNS) - Allows the system to be accessed using a fixed domain (website URL) without entering the IP address. Lorex offers a free web based DDNS Service for remote access at http://lorexddns.net If you use the DDNS, there is no need to enter the IP Address with every connection. z Navigate to the DDNS website to configure the free account. Enter your specific information (as provided at the DDNS Site) z Refer to the Network Setup instructions in the Appendices for information on using the Free DDNS Service. z • Gateway - The network Gateway assigned by the Router (or manually entered). • Subnet Mask - The network Subnet Mask assigned by the Router (or manually entered). • 1st / 2nd DNS Server - Automatically detected if DHCP is set to ON. Displays the IP address of the local DNS Server (i.e. local Router). • DDNS Server - Set to the free DDNS Server provided by Lorex (http:// lorexddns.net). • Net Client Port - Default port of 6100. Used for remote connection. • Web Server Port - Default port of 80. Used for remote connection. MAIL SETUP The Mail Setup can use either the Lorex Mail Server or your existing Email settings to send notifications and alerts 33 System Menu MAIL SETUP • Default Server - Check to use the Default SMTP server provided by Lorex. Uncheck this option to configure the options using your own mail settings. NOTE: You must sign up for the http:// lorexddns.net DDNS to use the Lorex Mail Server. The following settings are only needed if you are NOT using the Lorex Mail Server. Uncheck the ‘Default Server’ box to access the following: • SMTP Server - Enter the Email server information for your IP. • Port - Default port of 25 • Security - Sets the Mail Security ON/ OFF (based on the requirements of the mail provider). • User - Enter the User Name. • Password - Enter the User Password • Test Email - Tests the Email Configuration, and generates a SUCCESS or FAIL message. USER MANAGEMENT The User setup consists of 3 groups: Administrator, Manager or User. Up to 7 new users can be added to the system. A maximum of 4 users can be remotely connected to the system simultaneously. • ADD - Opens the ADD New User screen to configure the new user settings • User ID - Enter an ID (Name) for the new user • Password - Enter a password for the New User • Group - Enter the permissions level: Admin - Highest Level Access. The Admin has full system access. There is only one ADMIN, and additional ADMIN level users cannot be added. z Manager - Mid Level Access. The Manager can use the Search Functions, and view live video. z User - Low Level Access. The User Can view cameras without changing settings. z • Email - Enter the Email address for the New User. • Email Notification - Turns the email notifications for the user ON/OFF. USER MANAGEMENT 34 System Menu SYSTEM MANAGEMENT System Information Screen • IP Address - Displays the IP address assigned to the system. • System Information - Navigate to the PRESS button, and choose ENTER to display the System Information. • MAC Address - Displays the unique MAC address assigned to the unit. This address is hard coded to the unit and cannot be changed. To display the System Information from the main Channel view screen, press the ENTER Key on the front Panel -or- Press the INFO button on the Remote Control. • Disk Capacity - Displays the Total Hard Drive space, and the amount of Hard Drive in use. • System Name - Input a name for the system using the Virtual Keyboard. • FW Update - Navigate to the PRESS button, and choose ENTER to update the System Firmware. • Factory Default - Navigate to the PRESS button, and choose ENTER to reset the system to Factory Defaults. • F/W Version - Displays the Firmware and Hardware version numbers. • Video Signal Type - Indicates the Video Signal Type as either NTSC or PAL (depending on Region). • DDNS Domain Name - The name setup when the online DDNS registration was created. • Net Client and Web Ports - Displays the ports for remote connection. • System Data - Saves or Loads the System Data (system settings). • Password - Turns the system password ON/OFF (when logging into the Menu Setup and Search Menus). Firmware Update New firmware is periodically available for download from the www.lorexcctv.com website. System Information Screen Displays the System Information. The IP address and MAC address are necessary for setting up the DDNS Server. 35 System Menu The firmware on the unit can be updated via the USB port: • Download the new firmware from the website. Copy the files from your PC to the USB flash drive. • Connect the USB flash drive to the system. Select the ‘Firmware Update’ option by selecting the PRESS button. • The USB device will be recognized by the system - Press the START button to display the available firmware. • Select the firmware and press ENTER. A prompt will appear confirming the Update. • Press OK to begin the update process. • The system must be restarted for the changes to take effect. Press OK, and exit the Menu. The system will automatically reboot. NOTE: The system will need to be rebooted once the firmware has been updated for the new changes to take effect. You can also upgrade your firmware over the network (from a remote location) using the provided Lorex Client Software. This is useful if you are in a remote location, or if you would like to upgrade multiple units at different locations. Please refer to the Lorex Client Software manual for details on performing a Remote Firmware Upgrade. 36 System Menu Factory Defaults The system can be returned to the Factory default settings: If the device is not detected, a message will indicate that No storage device was found. z • Select the ‘Factory Defaults’ option by selecting the PRESS button. • Choose OK to reset the unit, or CANCEL to exit without resetting. • Connect the USB flash drive to the system and select the Load option to restore settings. NOTE: If the system is reset to Factory Defaults, all settings will be lost (except the Date and Time). This is recommended after initial setup and installation is complete. CONTROL DEVICE Used with an external control device (not included with the system): System Data The system settings can be saved to a USB flash drive: • Connect the USB flash drive to the system and select the Save option to save settings: A Success message indicates that the backup was completed. z • System ID - Select system ID. (1~254). This is used to set a different ID number to the system (if used, reset the Remote Control ID to match the system ID). • Protocol - Select protocol (from the Device user Manual). • Baud rate - Setup baud rate (from the Device user Manual). 37 Event / Sensor Event / Sensor The Event Sensor Setting controls contain: HDD EVENT • Smart Alarm - Sets the Smart Alarm ON/OFF. An alarm occurs when errors are detected with the drive. • Check Interval - Sets the Hard Drive check interval (1~24 hrs). This setting allows the system to self-check the drive for any errors, and generate an Alarm if drive errors are found. HDD EVENT - Checks the system’s internal hard drive for errors. ALARM IN - Configuration settings for an external Alarm sensor (i.e. Door / Window Sensors). ALARM INPUT Configurations for any external alarm device (i.e. a Door or Window Sensor). ALARM OUT - Sends a signal to an external device when an alarm is detected. BUZZER OUT - Turns the audible Buzzer ON/OFF for selected event types. E-MAIL NOTIFICATION - Sends an email notification when a selected event occurs (based on User Configuration settings). HDD EVENT • Operation - Sets the Alarm Sensor Connection Status (Enable / Disable) for an external alarm (i.e. Door or Window Sensors). Refer to the appendices for details. • Type: Sets the Alarm Sensor type to N/O (Normally Open) or N/C (Normally Closed). 38 Event / Sensor ALARM OUT BUZZER OUT Sends an Alarm Out signal to a device (such as a Manual Door or independent Light/ Buzzer Alarm) when an Alarm In event is detected Generates a Buzzer when an alarm is detected. • Channel - Indicates all channels. • Operation - Setup Relay Connect with Alarm Sensor to either Enable or Disable. Must be ENABLED to change the settings manually. • Mode - Setup Reacted Relay as either Latched or Transparent Mode: z z Latched – When sensor alarm activated, relay reacted in setup duration. Transparent – Relay reacted temporary during sensor alarm activate. • Duration - Sets the Reacted Relay Time. (5sec~5min or Until key-in) • Type - Set the Relay Type to either N/O (Normally Open) or N/C (Normally Closed). • HDD Event - Turns the Alarm ON/ OFF when the Hard Drive experiencing problems. • Operation - Enables / Disables the buzzer for selected Event / Alarm types. Set to ENABLE to change the following settings: • Mode - Set the Reacted Relay to either Latched or Transparent Mode. • HDD Event - Generates a Buzzer alert when a hard drive event occurs (set to ON/OFF). • Duration - Sets the Buzzer time (5sec ~ 5min or until a user logs into the system). • Alarm - Generates a Buzzer Alarm when an Alarm Event is detected (set to ON/OFF). • Video Loss - Generates a Buzzer Alarm when a Video Loss Event is detected (set to ON/OFF). • Motion - Generates a Buzzer Alarm when a Motion Event is detected (set to ON/OFF). • CH1~16 Alarm - Sends the Alarm Out when an Alarm Event is detected (set to ON/OFF). • CH 1~16 Video Loss - Sends the Alarm Out when a Video Loss Event is detected (set to ON/OFF). • CH 1~16 Motion - Sends the Alarm Out when a Motion Event is detected (set to ON/OFF). 39 Disk Management EMAIL NOTIFICATION Disk Management Sends an email to the specified users when the following events occur: • Notification - Sets the email notification ON/OFF. • HDD Event - A notification is sent if a hard drive event is detected (set to ON/OFF). • Notifications can be enabled for each channel for: z z z Alarm Video Loss Motion can be selected NOTE: Emails will be sent at 5 minute intervals for the duration of the Event. • Record Time Limit - Setup for the Recording Time Limit (OFF, 12h, 1~3 days, 1 week or 1 month). NOTE: The Record Time Limit refers to the length of time data will be kept on the drive. For example: The Record Time Limit is set to 1 week. The system records data from the 1st of the month through the 7th of the month. On the 8th of the month, it will begin overwriting data (hour by hour) that occurred on the 1st of the month. On the 9th of the month, it will begin overwriting data that occurred on the 2nd of the month. The OVERWRITE feature must be ON for the Record Time Limit feature to work. • Overwrite - Determines how data is maintained when the hard drive is full: ON - When Overwrite is set to ON, data will be overwritten when the Hard Drive is full, starting with the Oldest recording, or based on the Record Time Limit settings. z OFF - When Overwrite is set to OFF, the data will not be overwritten when the Hard Disk is Full. Recording will Stop, and the Buzzer will be Activated. z 40 Disk Management • Format - Erases all hard drive data: Press start button. A warning message will be displayed with the prompt ‘All Recorded Data will be erased.’ z Select OK to erase the data, or CANCEL to return without erasing the hard drive. z • Once OK is selected, the user will be prompted to enter the ADMIN PASSWORD. Once the password is accepted, all hard drive data will be erased. Formatting Status Indicator Window: Once the format is complete, the system will return to the Disk Manage Menu. NOTE: After Formatting a hard drive with existing data, Playback of the old data is no longer possible. 41 Recording Menu Controls Recording Menu Controls • Enter the RECORDING MENU screen by: z z z Pressing the SETUP button on the Remote Control Pressing the SETUP button on the front panel, or Selecting the SETUP option from the On-Screen Menu. Enter the password if required using the Virtual Keyboard. Simple and Advanced Modes This system allows you to configure the Recording Options in two ways: • Simple Recording: Simple recording will set all cameras to behave in the same way, with the same resolution and FPS. In Simple Recording, the recording type can be set to either Continuous, Motion, Alarm or None. • Advanced Recording: Advanced recording will allow you to configure each camera to behave in a different way, based on quality, FPS and resolution. In Advanced Recording, the menus are separated so that you can set each camera to record in Continuous, Motion and Alarm at the same time. • Select the RECORD MENU option. • To enter a sub-menu, navigate to the option and press the ENTER button. To exit a SUBMENU, press the RETURN button. • To exit the MAIN MENU, press the RETURN button. NOTE: When configuring the Recording Settings, it is recommended that you use the mouse or remote control for navigation. Alternatively, you can use the Client Software provided with this system to change the System Settings and Recording Configurations remotely. Please refer to the Client Software Manual for details. 42 For example, set the system to record in Continuous, Motion and Alarm at the same time. A camera will be in continuous recording, however when a Motion or Alarm event is detected, the on-screen indicator will switch to M or A, and the event will be logged in the system. To switch between Recording Modes, change the Recording Mode setting on the RECORDING OPERATION tab to either Simple or Advanced. Simple Recording Mode Once the settings have been changed, a status window will appear indicating that the changes have been saved. Choose the OK button to close the status window and return to the Main Menu. Simple Recording Mode Recording Operation The Recording Operation Menu allows the user to switch between Simple and Advanced Modes. The settings for Schedule Mode, Pre-Event Recording Time and Post-Event Recording Time cannot be changed. These settings can only be configured in Advanced mode. Simple Recording To return to the Record Menu, select the Record Menu button from the Main Menu selections. The Simple Recording Menu controls the Quality, Size and FPS for all cameras at the same time. Each channel can be set for a single Recording Type (Continuous, Motion, Alarm or None). Simple Recording Mode Settings in the Simple Recording Mode affect all cameras at once (i.e. all cameras have the same FPS, Resolution, etc.). To set each camera separately, switch to Advanced Mode. • Recording Quality - Sets the video recording quality to Low, Standard, High or Highest for all cameras. • Recording Size - Sets the video capture size for all camera to 352x240, 704x240 or 704x480 for all cameras. • FPS - Sets the Frames Per Second for recording across all channels. The FPS for the channels can be set to 1, 2, 3, 7, 15 or 30 Frames per second (real time video capture) from a shared pool of 240 FPS. 43 Simple Recording Mode Simple Recording Mode Advanced Recording Select a single or multiple time blocks: Recording Operation • Mouse Control: Click a single block to open the Recording Type Menu. Click and Drag a block of times to configure multiple channels and times at once. The Recording Operation Menu allows the user to switch between Simple and Advanced Modes, set the Recording Schedule, and change the Pre and Post Event Recording times. • Remote Control & Front Panel: Navigate to the Channel Block section, and the entire block will be highlighted with a White outline: z z z Press the ENTER button to access the Time Blocks - the first hour on Channel 1 will be highlighted in Yellow. Navigate to the desired time block, and press the ENTER button to activate the block - if a single block is desired, press ENTER a second time. To select multiple blocks, use the arrows to drag the cursor until the desired time blocks are selected and press the ENTER key. • RECORDING MODE - Changes the Recording mode from Simple to Advanced. • SCHEDULE MODE- Sets the Scheduled Recording Mode to Daily or Weekly: The Recording Selection menu will open. Select ONE of: • None • Continuous Recording • Motion Recording • Alarm Recording z If you set the Schedule Mode to Daily, all settings made to the Continuous/Motion & Alarm Setup menus will affect all days in the same way. z If you set the Schedule Mode to Weekly, the settings can be set differently for each day of the week. • PRE EVENT RECORDING - When an alarm is detected, the Pre Alarm will begin recording before the Alarm was detected (retrieved from video cache). The Pre Alarm Recording Time can be set to between 1~5 seconds. Once a selection has been made, the Recording Selection window will close. 44 • POST EVENT RECORDING - When an alarm is detected, the Post Alarm will remain recording for the specified time. The Post Alarm Recording Time can be set to between 5~180 seconds. Advanced Recording Advanced Recording Continuous / Motion Setup The Continuous/Motion Setup section controls the Recording settings for each camera individually (quality, resolution, frame rate and audio). Both Continuous (constant recording) and Motion (recording when motion has been detected by the system) are set in this menu. Continuous / Motion Parameter Select an Hour (highlighted in ORANGE), and press ENTER again to open the Camera Settings for the selected hour, or select multiple blocks in a row and press ENTER. Selected Block of Hours Once a time block or several blocks have been selected, the Channel Setup window is displayed. • PARAMETER MODE - Contains the general recording parameters for each camera. • SCHEDULE MODE - Contains the schedule recording settings for each camera. Continuous / Motion Parameter Parameters for each camera are set by hour using the Time Interval bar. Hours can be selected individually or in groups (by clicking and dragging several blocks). NOTE: If Schedule Mode was set to Weekly earlier, a day selection option is available. • Size - Sets the video capture size for each camera to 352x240, 704x240 or 704x480. • FPS - Sets the Frames Per Second for recording for each channel. Each channel can be set to 1, 2, 3, 7, 15 or 30 Frames per second (real time video capture) from a shared pool of 240 FPS. If the FPS drops below 0, the settings will not be saved. • Quality - Sets the video recording quality to Low, Standard, High or Highest. • Audio - Turns audio recording ON/ OFF for 4 channels ONLY. Once settings have been adjusted for the hour, the changed time block will be displayed in a different color on the Time Interval bar. NOTE: Each different configuration will be displayed as a different color on the bar. 45 Advanced Recording Continuous / Motion Schedule Sets the Time or Motion recording for each channel (by hour). Select single or multiple time blocks: Select from: • NONE: Recording is turned OFF. • CONTINUOUS: Recording is always ON. • MOTION: Only starts the recording if motion is detected in the selected time interval. NOTE: This system has an Advanced Recording Feature where BOTH Continuous and Motion can be set to ON at the same time: z z z • Mouse Control: Click a single block to open the Recording Type Menu. Click and Drag a block of times to configure multiple channels and times at once. • Remote Control & Front Panel: Navigate to the Channel Block section, and the entire block will be highlighted with a White outline: z z z z The system will record continuously, but when motion is detected the system will display a M recording type on the relevant channel. The event will be logged as Motion in the system archive. This is useful in situations where you want to have continuous recording, but wish to have Motion detected for easier event searching. In addition, an email notification can be sent when Motion has been detected. Select the RETURN button to apply the changes. Once the settings have been adjusted for the hour(s), the changed time block(s) will be shown based on the legend: Press the ENTER button to access the Time Blocks - the first hour on Channel 1 will be highlighted in Yellow. Navigate to the desired time block, and press the ENTER button to activate the block - if a single block is desired, press ENTER a second time. To select multiple blocks, use the arrows to drag the cursor until the desired time blocks are selected and press the Legend: • None • Continuous • Motion • Continuous & Motion 46 Advanced Recording Advanced Recording Alarm Setup Mode The Alarm Setup section controls the Recording settings for each camera individually (quality, resolution, frame rate and audio). Recording Settings for external alarm detection are set in this menu. Alarm Parameter Select an Hour (highlighted in ORANGE), and press ENTER again to open the Camera Settings for the selected hour, or select multiple blocks in a row and press ENTER. Selected Block of Hours Once a time block or several blocks have been selected, the Channel Setup window is displayed. • PARAMETER MODE - Contains the general recording parameters for each camera. • SCHEDULE MODE - Contains the schedule recording settings for each camera. • Size - Sets the video capture size for each camera to 352x240, 704x240 or 704x480. Alarm Parameter Parameters for each camera are set by hour using the Time Interval bar. Hours can be selected individually or in groups (by clicking and dragging several blocks). NOTE: If Schedule Mode was set to Weekly earlier, a day selection option is available. • FPS - Sets the Frames Per Second for recording for each channel. Each channel can be set to 1, 2, 3, 7, 15 or 30 Frames per second (real time video capture) from a shared pool of 240 FPS. If the FPS drops below 0, the settings will not be saved. • Quality - Sets the video recording quality to Low, Standard, High or Highest. • Audio - Turns audio recording ON/ OFF for 4 channels ONLY. Once settings have been adjusted for the hour, the changed time block will be displayed in a different color on the Time 47 Advanced Recording Alarm Schedule Sets the Alarm Recording for each channel (by hour). Select single or multiple time blocks: • Mouse Control: Click a single block to open the Recording Type Menu. Click and Drag a block of times to turn Alarm Recording ON or OFF. • Remote Control & Front Panel: Navigate to the Channel Block section, and the entire block will be highlighted with a White outline: Press the ENTER button to access the Time Blocks - the first hour on Channel 1 will be highlighted in Yellow. z Navigate to the desired time block, and press the ENTER button to activate the block - if a single block is desired, press ENTER a second time. z To select multiple blocks, use the arrows to drag the cursor until the desired time blocks are selected and press the ENTER key. z Alarm Recording will be turned ON or OFF. Once the settings have been adjusted for the hour(s), the changed time block(s) will be shown based on the legend: Legend: • None • Alarm z 48 Saving the Settings You will be prompted to save the settings when exiting a window (when changes have been made) Click OK to save the settings, or CANCEL to exit without saving. Archiving Archiving Archiving Options The Archive feature copies data from the internal hard drive to USB backup media (such as a flash drive or external hard drive), optical drive (CD-RW/DVD-RW) or FTP. NOTE: Make sure that you have removed all data from the USB device prior to backup. • Enter the ARCHIVING screen by pressing the MENU button. Enter the password, and select the ARCHIVING option. • Select Device - Displays all detected backup media devices (USB flash drive or external USB hard drive), or allows the user to back-up data to a remote FTP Site. • From - Select the Start Time and Date for Backup. • To - Select the End Time and Date for Backup. • Mode - Select the Backup Mode: z z • Scroll through the options by pressing the UP, DOWN, LEFT and RIGHT buttons on the Front Panel or Remote Control. z Burning - Copies the data to the backup device. Burning/ Erasing - Copies the data to the backup device, then deletes the data from the System Hard Drive. Select the START button to begin backup. • To enter a sub-menu, navigate to the option and press the ENTER button. To exit a SUBMENU, press the RETURN button. • A/V channel - Select the Video and Audio Channel(s) for backup • To exit the MAIN MENU, press the RETURN button. VIDEO AUDIO • Title - Sets the Title for the backup sequence using the Virtual Keyboard. • Event - Attaches the EVENT Report text file to the backup. 49 Archiving Archiving Options Once the Start Time, End Time and Channel Selections have been completed, select the START Button A Drive Usage report will be displayed including Amount of space (in MB) needed, Start and End Times for Each Channel, with size of recordings (in MB) and Size of the Log File The Erasing status window displays the completion state of the Erasing of previously archived data (in%) Error Messages Select OK to begin the backup The Writing status window displays the completion state of the Backup (in%) The Extracting status window displays the completion state of the Extraction of previously archived data (in%) 50 Error dialogue when the archive process fails. Error dialogue displayed when the backup device (USB) is not detected Archiving Archive Backup to FTP A schedule for data backup to a local or remote FTP can be configured on the system. 1. Choose FTP from the ‘Select Device’ dropdown menu. 2. Press the FTP Button to access the FTP Settings: • Port: Enter the Port used to connect to the FTP Site. Press the FTP Test button to test the connection to the FTP site. A ‘Success’ or ‘Fail’ message will appear. Once a successful connection has been made, the FTP Configuration Menu will be displayed: • Operation: Set the FTP Backup to ON or OFF. • Device: Set to FTP (as shown in previous instructions). • Mode: Set the mode to Once (one time backup only) or Daily (data backup occurs every day at the time specified in the Start Time setting). • Start Time: Set a time to begin the backup process. • From: Set the starting time for the data archive. • To: Set the ending time for the data archive. • User ID: Enter the User ID used to log into the FTP site. • Password: Enter the Password used to log into the FTP site. For example, to back-up a retail sales day, set the ‘From’ time to 7 AM, and the ‘To’ time to 10 PM. Start the backup at 10:30 PM.This will archive 15 hours worth of data to the FTP site. • Address: Enter the IP Address of the FTP site 51 Search Search Search mode allows you to locate previously recorded video by Date and Time, or by Event Type. • Press and Hold the arrow keys to select the Time (increments of 1 minute). Pressing the button without holding will increment 15 minutes. • Press the Search Button on the Remote Control or Mouse Menu. Any days highlighted with GREEN indicate that there is recorded video data. • Enter the User Name and Password (if required). • Use the Left / Right arrows on the Remote Control, or click with the mouse to switch between the Search By Time and Search By Event screens. • Press the Enter button to start the playback. Press the Return button to stop playback and return to the Search By Time screen. Search By Date & Time Searches the system based on date and time. • Press the Enter button to access the Calendar (on the left side of the screen) • Navigate within the calendar using the Arrow Keys on the front panel or remote control. • Once the date has been located, press the Enter button to accept the date, and to access the Time Search (on the right side of the screen). The Date and Time will be displayed at the bottom of the screen. A playback icon will appear indicating that the unit is in Playback mode. NOTE: The unit will continue to record data while in Playback Mode. 52 Search Search By Event Searches the system based on Event Type (Alarm, Motion, Continuous or Others). • Press the right arrow button on the front panel or remote control to access the Search By Event screen. • Select From and To dates, Events (Alarm, Continuous, Motion and Other) and Cameras • Navigate within the options using the Arrow Keys on the front panel or remote control. Press the Enter button to select or deselect options (Note: Multiple event types can be selected). • Navigate to the Start button at the bottom of the screen and press the Enter button. A listing of events will be displayed. Navigate to an event, and press the Enter button to start the playback. Press the Return button to stop the playback.and return to the Event Search screen. 53 VGA Mode (Mode 2) VGA Mode (Mode 2) VGA Mode is used to display a device (i.e. a computer) connected to the VGA port on the rear panel of the monitor. To view your PC display using the Monitor: 1. Connect the PC to the Monitor using a VGA Cable. NOTE: A VGA Cable is not included with the system. 2. Switch the Monitor to VGA mode using the Multi-Function Mode Button on the front of the Monitor, or by pressing the VGA Button on the Remote Control. NOTE: Press the PIP button to display the DVR in the bottom right corner. VGA Connection Errors If the VGA cable is not correctly connected to the computer or system, several different error messages may be displayed: Cable Not Connected: Indicates that the VGA cable has not been securely fastened to either the system or PC. 54 No Sync or Signal: Indicates that the PC is not sending a good signal. Try changing modes on the PC. Going to Sleep: Indicates that the system is not receiving a signal from the PC, and is going into hibernation. This does not affect the DVR functions. VGA Mode - Remote Control Usage VGA Mode - Remote Control Usage Listed below is a quick reference for the Remote Control usage in VGA Mode. 1. MODE: Press the Mode Button to display the Multi-Function Mode Menu. 2. POWER: Press the Power Button to turn off the Monitor Display. Press and hold the button for 3 seconds to shut down the entire system. 3. DVR MODE: Return to DVR Mode. 4. VGA MODE: Change to VGA Mode. 1 8 2 3 9 4 10 5 11 5. RETURN: Exits from a System Menu. 6. NAVIGATION: Press the Navigation Controls to move Up, Down, Left or Right in the Monitor Menu. 6 7. VOL +/-: Increase or Decrease the volume of the camera currently broadcasting live audio. 8. MONITOR SETUP: Displays the Monitor Setup Menu. 12 7 9. PICTURE FRAME: Change to Picture Frame Mode. 10. COMPONENT MODE: Change to Component Mode. 11. ENTER BUTTON: Press the Enter Button to select an option in the Monitor Menu. Also displays the DVR in PIP mode in the bottom right corner of the screen. 12. PIP MODE: Displays the DVR screen in the PIP Screen in the lower right corner. 1. Mode 7. Volume +/- 2. Power 8. Monitor Setup 3. DVR Mode 9. Picture Frame Mode 4.VGA Mode 10. Component Mode 5. Return Button 11. Enter Button 6. Navigation Controls 12. PIP Mode 55 Component Mode (Mode 3) Component Mode (Mode 3) Component Mode is used to display a device connected to the component green, blue, and red inputs (Y/Pb/Pr) in high resolution (i.e. DVD Player, Set Top Box or Satellite Receiver). The audio from the component device is connected to the red and white audio inputs located to the right of the component inputs. To view a DVD Player using the system: 1. Connect the DVD Player to the Monitor using a component cable. NOTE: Component cables are not included with the system. 2. Switch the system to Component Mode using the Multi-Function Mode button on the front of the Monitor, or by pressing the Component Button on the remote control. NOTE: Press the PIP button to display the DVR in the bottom right corner. Setting Component (Component Mode) On Your DVD Player Before connecting a DVD Player to the component inputs of the system, it is important to confirm that your DVD player has Component Outputs. Please refer to your DVD player’s instruction manual for details on activating the Component Mode. NOTE: If the Component Mode is not properly activated on your DVD player, you may see a color distortion (i.e. pink colored screen) on the display of the system. 56 Component Mode - Remote Control Usage Component Mode - Remote Control Usage Listed below is a quick reference for the Remote Control usage in Component Mode. 1. MODE: Press the Mode Button to display the Multi-Function Mode Menu. 2. POWER: Press the Power Button to turn off the Monitor Display. Press and hold the button for 3 seconds to shut down the entire system. 3. DVR MODE: Change to return to DVR Mode. 4. VGA MODE: Change to VGA Mode. 5. RETURN: Exits from a System Menu. 1 8 2 3 9 4 10 5 11 6 6. NAVIGATION: Press the Navigation Controls to move Up, Down, Left or Right in the Monitor Menu. 7. VOL +/-: Increase or Decrease the volume of the camera currently broadcasting live audio. 8. MONITOR SETUP: Displays the Monitor Setup Menu. 12 7 9. PICTURE FRAME: Change to Picture Frame Mode. 10. COMPONENT MODE: Change to Component Mode. 11. ENTER BUTTON: Press the Enter Button to select an option in the Monitor Menu. Also displays the DVR in PIP mode in the bottom right corner of the screen. 12. PIP MODE: Displays the DVR screen in the PIP Screen in the lower right corner. NOTE: The Remote Control cannot be used to control the DVD Player, Set Top box or Satellite Box. 1. Mode 7. Volume +/- 2. Power 8. Monitor Setup 3. DVR Mode 9. Picture Frame Mode 4.VGA Mode 10. Component Mode 5. Return Button 11. Enter Button 6. Navigation Controls 12. PIP Mode 57 Picture Frame Mode (Mode 4) Picture Frame Mode (Mode 4) Picture Frame Mode is used to display JPEG images located on a USB flash drive (connected to a USB port on the side of the system). To view a JPEG images using Picture Frame Mode: 1. Connect a USB flash drive containing JPEG images to one of the USB ports on the left side of the system. NOTE: A USB flash drive is not included with the system. 2. Switch the system to Picture Frame Mode using the Multi Function Mode button on the front of the Monitor, or by pressing the Picture Frame Button on the Remote Control. 3. Configure the Picture Frame Menu to display the images. USB Flash Drive Images • Images must be in a JPEG file format (.jpg). All other files will not be recognized by the system, including other Image formats (i.e. BMP, GIF) or other file types (i.e. in the example on the right, the system will not display the “Camera.PDF” file). • Images must be in the root of the drive. Files located in folders will not be recognized by the system (i.e. in the example on the right, any images located in the “Picture Folder” will not be displayed). • The JPEG files should be a minimum of 640x480 pixels, and a maximum of 1600x1200 pixels to maintain image quality. Images with less pixels may appear distorted or pixelated when displayed. Using images with a pixel size greater than the minimum recommended size is encouraged. NOTE: An Image Resizing program has been included with the Software CD. 58 Picture Frame Mode - Remote Control Usage Picture Frame Display Images will be displayed in Picture Frame Mode (based on the Menu settings). NOTE: Press the PIP button to display the DVR in the bottom right corner. Picture Frame Mode - Remote Control Usage Listed below is a quick reference for the Remote Control usage in Picture Frame Mode. 1. MODE: Press the Mode Button to display the Multi-Function Mode Menu. 2. POWER: Press the Power Button to turn off the Monitor Display. Press and hold the button for 3 seconds to shut down the entire system. 3. DVR MODE: Change to DVR Mode. 1 7 2 3 8 4 9 5 10 4. VGA MODE: Change to VGA Mode. 5. RETURN: Exits from a Menu. 6 6. NAVIGATION: Press the Navigation Controls to move Up, Down, Left or Right in the Monitor Menu. 7. PICTURE FRAME SETUP: Displays the Picture Frame Setup Menu. 11 8. PICTURE FRAME: Change to Picture Frame Mode. 9. COMPONENT MODE: Change to Component Mode. 10. ENTER BUTTON: Press the Enter Button to select an option in the Monitor Menu. Also displays the DVR in PIP mode in the bottom right corner of the screen. 11. PIP MODE: Displays the DVR screen in the PIP Screen in the lower right corner. 1. Mode 7. Monitor Setup 2. Power 8. Picture Frame Mode 3. DVR Mode 9. Component Mode 4.VGA Mode 10. Enter Button 5. Return Button 11. PIP Mode 6. Navigation Controls 59 Picture Frame - Menu Picture Frame - Menu Connect the USB flash drive into the USB port on the monitor prior to starting Picture Frame Mode. If a USB flash drive is not detected by the system, the following message occurs: NOTE: To display the Picture Frame menu, press the MENU Button on the front panel of the system. Picture Frame Settings Menu • Device: Displays information about the currently connected Image Device (USB flash drive). • Dwell Time: Set the time for each picture to be displayed on-screen (in sequence). The dwell time can be set between 0 minutes (leave one image on-screen at all times) up to 60 minutes. • Aspect Ratio: Set the aspect ratio for display to 4:3 or 16:9. If the USB flash drive does not contain .jpg files, the following message will be displayed: Picture Frame Settings Once JPEG images have been located on the USB flash drive, the Picture Frame menu opens. • Thumbnail: Click the PREVIEW button to display the images on the USB flash drive in a Preview Pane. Use the Navigation Controls on the front panel or Remote Control, or use the mouse to select an image. Click Previous or Next to scroll between screens containing the images on the USB flash drive. Press Enter to begin viewing in Picture Frame Mode. 60 Picture Frame - Menu Picture Resizing Application 4. Select a location, and click OK. An application has been included on the Software CD to resize your JPEG images to 1600x1200 (highest recommended size), and save them directly to the USB flash drive. 1. Launch the application from the Software CD. The Picture Resize window will be displayed. 5. Once the Source and Target have been set, click Execute to resize and save the file. A Success message will be displayed. NOTE: Resized files carry the naming convention originalfilename_trans.jpg 2. Click on the Source button to locate the directory where the JPEG files are located. Select a file, and click Open. 3. Click on the Target button to locate the directory where the JPEG files are to be saved (i.e. USB flash drive). 61 Installation Guide Mode (Mode 5) Installation Guide Mode (Mode 5) The Installation Guide Mode is used to display the Installation Video included on the system hard drive. To view the Installation Video using the system, press the Multi-Function Mode button on the front panel, or press the Mode button on the Remote Control and select Installation Guide. Using the mouse, click the on-screen playback controls to pause, rewind or fast forward the video. You can also press the playback buttons on the remote control. The Installation video was loaded onto the hard drive that was pre-installed into the system. If you change the hard drive, the installation video will be no longer available. The video is also available on the Software CD provided with your system. NOTE: The Installation Video is also located on the CD included with the system. The video can also be viewed online at http:// www.lorexcctv.com/support in the Installation Guides section. 62 Installation Guide Mode - Remote Control Usage Installation Guide Mode - Remote Control Usage Listed below is a quick reference for the Remote Control usage in Installation Guide Mode. 1. MODE: Press the Mode Button to display the Multi-Function Mode Menu. 2. POWER: Press the Power Button to turn off the Monitor Display. Press and hold the button for 3 seconds to shut down the entire system. 3. DVR MODE: Change to return to DVR Mode. 1 2 3 6 4 7 4. VGA MODE: Change to VGA Mode. 5. VOL +/-: Increase or Decrease the volume of the camera currently broadcasting live audio. 6. PICTURE FRAME: Change to Picture Frame Mode. 7. COMPONENT MODE: Change to Component Mode. 5 NOTE: The Remote Control cannot be used to control the Installation Video playback. 1. Mode 5. Volume +/- 2. Power 6. Picture Frame Mode 3. DVR Mode 7. Component Mode 4.VGA Mode 63 Monitor - Menu Settings Monitor - Menu Settings Color Submenu Press the Setup button on the remote control, or front panel of the system to enter the Monitor Setup Menu (when in VGA or Component Modes). The Monitor Setup Menu controls the behavior and look of the Monitor (i.e. changing the Brightness and Contrast will affect the Brightness and Contrast in all Modes). NOTE: The mouse cannot be used to change values in this menu. Image Settings Use the Arrow keys on the front panel or Remote Control to select from Brightness, Contrast, Hue, Saturation, Sharpness or enter the Color submenu. Change the values using the arrow keys and enter. • Auto Color: Select Auto Color to allow the system to set the color of the monitor. Select YES to allow the system to set the color, or NO to exit. • Color Temperature: Press the Left/ Right arrow buttons to select USER, 4200K, 5000K, 6500K, 7500K, and 9300K. To set color temperature manually, select USER and then press the ENTER button. Set the Red, Green and Blue Values using the arrow keys. z NOTE: Hue and Saturation only adjustable in Component Mode. • sRGB: Set the sRGB to ON or OFF. 64 Monitor - Menu Settings Display Settings • Display Image: Sets the image display to Auto or Manual. • Aspect Ratio: Set the Aspect Ratio for the monitor. • Display Position: Adjust the Horizontal and Vertical screen positioning. Use the Arrow keys on the front panel or Remote Control to select from Auto Configuration, Phase, Clock or Highlight Window. Use the enter key to access the Display Control or Scheme submenus. Change the values using the arrow keys and enter. • Auto Configuration: Select Auto Configuration to allow the system to set the configurations of the monitor. Select YES to allow the system to set the color, or NO to exit. • Phase: Set the phase for the system. • Clock: Set the internal clock for the system. • Zoom: Zoom the monitor display In or Out. Use the Set the Zoom Position option to change the location for the Zoom control. • Scheme: Use the scheme controls to manually adjust the Red, Yellow, Green, Cyan, Blue and Magenta colors of the monitor. Display Control Submenu • Highlight Window: Select Full, Half, Letterbox, or Half Letterbox. 65 Monitor - Menu Settings PIP Settings PIP Position Submenu Use the Up, Down, Left and Right arrows to adjust the location of the PIP Screen. Press the Enter button to set, and the Return button to exit the menu. Use the Arrow keys on the front panel or remote control to select from PIP, PIP Input Select, PIP Size and Blend. Use the enter key to access the PIP Position or Pip Color Control submenus. Change the values using the arrow keys and enter. • PIP: Turns the display of the PIP (Picture in Picture) ON or OFF. If you turn the PIP to OFF, the default DVR screen will not be displayed when the PIP button on the remote control is pressed. • PIP Input Select: Select the input type for the PIP. By default, the unit will display the DVR screen. • PIP Size: Change the display size to Small, Medium or Large. • PIP Position: Change the location of the PIP window. • PIP Color Controls: Adjust Brightness, Contrast, Hue, and Saturation for the PIP window. • Blend: Adjust the transparency of the PIP window. 66 PIP Color Controls Submenu Use the Up, Down, Left and Right arrows to adjust the settings for Brightness, Contrast, Hue and Saturation. Press the Enter button to set, and the Return button to exit the menu. Monitor - Menu Settings Misc. Settings • OSD Position: Determines the position of the On-Screen Display window. Use the Up, Down, Left and Right arrows to adjust the location of the screen. Press the Enter button to set, and the Return button to exit the menu Use the Arrow keys on the front panel or remote control to access the OSD Configuration or VGA Factory Reset submenus. Change the values using the arrow keys and enter. OSD Configuration • OSD Transparency: Set the transparency for the OSD Menu. • OSD Zoom: Set the OSD Menu Zoom to ON or OFF. VGA Factory Reset Submenu Use the Factory Reset menu to return the Monitor settings to factory defaults. Use the Up, Down, Left and Right arrows to adjust the settings. Press the Enter button to set, and the Return button to exit the menu. • OSD Timer: Set the OSD Timer ON or OFF. If the timer is set to ON, the menu will automatically disappear after 30 seconds. 67 About Lorex Client Lorex Client 4.0 About Lorex Client The Lorex Client software package allows you to access your system from a remote location and perform the following functions. • View Live Video • Search & Playback previously recorded video from the remote system • Remote setup of your system • Record video to your PC Hard Drive • Archive & Backup video to your PC • Playback data from Archive • Perform Firmware Upgrades over the Network 68 System Requirements System Requirements The Lorex Client software (included with the system) has the following installation requirements. Minimum System Requirements: Operating System Windows XP Home Edition Windows XP Professional Windows Vista Processor .Pentium™ 4 - 1.5 GHz Processor (or equivalent) Memory 256 MB RAM (512 Recommended) Hard Drive 50 MB - Installation space required * Additional Hard Drive space required for recording. Recorded file size will vary depending on recording quality settings Recommended System Requirements: Operating System Windows XP Home Edition Windows XP Professional Windows Vista Processor Pentium™ 4 - 3 GHz Processor (or equivalent) Memory 1024 MB RAM Hard Drive 50 MB - Installation space required * Additional Hard Drive space required for recording. Recorded file size will vary depending on recording quality settings The Lorex Client Software is now Microsoft Windows Vista™ compatible. Visit us on the web at www.lorexcctv.com/support for the most current software version and product updates. 69 Software Installation Software Installation Insert the Lorex Client Installation CD in the DVD/CD-ROM Drive of your PC. The Software Install Wizard for the Lorex Client Software will begin. 1. Click the NEXT button on both dialogue windows to continue the Installation: NOTE: If the Installation Process does not automatically start, you will have to begin the installation process manually: • Double Click the MY COMPUTER icon on your Desktop • Double Click the CD-ROM DRIVE (Drive Letter will vary depending on the number of drives in your computer) • Double Click the SETUP.EXE file (may appear as SETUP with no file extension, depending on your system settings. The Installation Process will begin. 70 Software Installation 2. Click the NEXT button on both dialogue windows to continue the Installation: NOTE: The following Program Shortcuts will be created: • Start Menu - Programs - Lorex Client z Lorex Client z Lorex Player • Desktop Shortcuts for: z Lorex Client z Lorex Player 71 Software Installation Lorex Client Software - Main Screen 4 1 5 6 7 8 9 10 11 12 2 13 3 14 1. Main Screen - Displays live Camera images (delays in images may be due to Network speed and connectivity strength). 2. Connection Status - Displays the system connection status. 3. Camera Selection Buttons - Displays the Connected Camera Number. Press buttons 1~8 to select a Camera Number for display. 4. Minimize / Exit • Minimizes the Client Window • Exit Program. 5. Time Display - Shows the current Time & Date. 6. Search / Setup Buttons • Search - Will Search for previously recorded video. • Local Setup - Configurations for Network Connection and Local Recording. • Remote Setup - Changes the setup on the remote system. 72 Software Installation 4 1 5 6 7 8 9 10 11 12 2 13 3 14 7. DVR Selection - Select the Connection ID for the System. 8. Connect / Disconnect Buttons • Connect: Connect to the remote System. • Disconnect: Disconnects from the remote System. 9. Screen Display - Changes the Screen View (Single, Quad, 9, 16, Full screen, Sequence or Manual). 10. Save to File - Saves the currently displayed video to an AVI file on the local PC. 11. Event viewer - Displays the Event List and Image Search functions. 12. PTZ Control Button - Controls Cameras with PTZ & Focus configured (refer to the Instruction Manual for the System). 13. Alarm and Audio Buttons • Mic. • Speaker Mute • Alarm On/Off. 14. Exit - Closes the Lorex Client software. 73 Software Installation Screen View Controls Single Camera View 16 Camera View Quad View 8 Camera View Sequence Mode Full Screen View: Click to enlarge to Full Screen mode. Double click the screen to return to the regular view. Manual Switch Mode PTZ Controls Press the PTZ Button to access the extended PTZ Menu: P/T/Z Controller - Move the Camera Pan/Tilt using the Direction Keys FOCUS/ZOOM Select Button - Controls the Focus or Zoom Control using the + and - Buttons 74 Software Installation AVI File Conversion • Press the AVI (Video) Save Button to start Video Recording to the local PC • A dialogue box will appear while video is saving. Press STOP to end the video. • A second dialogue box will appear, indicating the saved files. The files are saved in the default location specified in the System Setup. Event Viewer • No - Event order number • DVR - Indicates the System name where the event originated. • CH - Indicates the channel where the event occurred (if applicable) • Time - Displays the Time and Date that the event occurred at. • Description - A description of the event type. 75 Connection Manager Connection Manager The Connection Manager contains the setup information to allow the user to remotely connect to the System. Adding a Group Group - Right click on ‘Site’ to add a New Group. A group can represent one or more Systems. For Example, you may have more than one system in your office, so would name your group ‘OFFICE’. Each individual unit can then be configured separately for Enter a name for the Group. 76 Connection Manager Adding a Site (Individual Unit Configuration) DVR Information - Enter the information specific to the unit (refer to page 30 for setup instructions): • Name - Enter a name for the unit. • IP / Domain Name Enter the IP address or Domain Name for the System. This will vary depending on setup (Internal Network Connection or External Remote access through the Internet)- refer to page 30 for setup details. • Port - Set to 6100 by default. • User ID - Enter the USER ID to connect to the system (the USER ID is configured on the System - i.e. ADMIN - case sensitive). • Password - The password used to access the System (i.e. The ADMIN password is set to 1234 by default). Camera Assign - Set each camera to a portion of the 9-view window by using the drop down menu selections* ADD Button - Adds the site to the Group. OK Button - Accepts the changes and Closes the configuration Window * NOTE: The Camera Assignment may already be completed for the first 4 cameras - if you wish to change the defaults or add additional cameras, use the dropdown selection to change the configuration. 77 Connection Manager Configuration Tab Video OSD - Sets the display options for the Video: • Title - Displays the camera title • Name - Displays the name of the Camera • Date - Displays the date • Time - Displays the time • Resolution - Displays the video resolution Video Output - Sets the Video Output type to Overlay Mixer, Video Receiver or GDI. Video Mode - Sets the Video Mode: • Screen Switching Interval - Sets the screen switching time for Sequence view. • Alarm Popup - Sets the Display popup when an Alarm is detected on the system • Quality Improve Adjusts the Video quality 78 Password - Enter the System Password (1234 by default). Connection Manager Modifying a Site Left click on the selected Site (from the Group Listing) to access the settings. DVR Information - Can be changed if desired. Camera Assignments Camera default positions can be reassigned if desired. Event Selection Selects the types of Events: • System • Alarm • Video • Record For detailed information on Events, refer to the System Instruction IN/OUT Selection - Sets the Audio and Alarm out. • Audio Out - Sends Audio to the System • Alarm Out - Sends Alarm to the System • Monitoring Audio Sets the default channel for Audio Monitoring. • Connection Attempts Maximum number of connection retries. MODIFY Button - Saves changes to the Site configuration. DELETE Button Deletes the site from the Group Listing OK Button - Accepts the changes and Closes the configuration Window 79 Remote Connection Remote Connection Once the site setup profile has been created, a connection can then be made to the System: 1. Select the Site profile from the Dropdown List. 2. Press the CONNECT button. The Connection Status window displays the state of the connection. Once a successful connection to the System has been made, the black screen view will switch to Live Camera View mode. Once a connection is made, the cameras will appear onscreen in Quad view mode. NOTE: If another user is connected to the System using the same credentials (i.e ADMIN), the connection will be rejected. 80 Search Functions Search Functions The Remote Observation Setup allows the user to search for video and events. 1 3 4 5 6 7 2 8 1. Search Screen - Displays the Selected Video. 2. Search Bar - Search & Display Camera Recording Times (24 hours). 3. LIVE Button - Return to Live Viewing Mode 4. SETUP Button - Access system settings. 5. Screen Layout - Change the display screen view. 6. SEARCH - Backup Video or Search for Events. 7. Camera Selection Button - Select individual cameras. 8. Quick Search - Find information by Date & Time. 9. Search Controller - Video playback controls 81 Search Functions Event Viewer Indicates 0~24 hour Time Indicates Recording Status: Grey (No Recording) and Blue Search Bar - Drag to select the recording time. Displays the Camera recording channel Volume Mute Channel Bar - Scroll to select different cameras. Search By Time Select date and Time Video Playback Controls: Play video in normal speed (Play and Reverse Playback) 82 Change Playback Speed (up to 64x Forward and Reverse) Search Functions Search Options Archive Copies a backup of the video data from the System to the local PC. • Time Range - Set the start and end times for backup. • Channel - Select channels to Backup. • Include Audio - Includes Audio with the video backup. Press OK to start the backup. A status window will appear for the backup process. Once complete, the window will disappear and the data will be saved in the designated folder. 83 Remote Setup Remote Setup The Remote Setup allows the user to make changes to the system from a remote location. Entering the System Password Checking Authority - To change the Remote System Settings, the user is required to re-enter the ADMIN password, and press OK. Recording Setup - Simple • Record Mode - Select the Recording Setup type (Simple or Advanced configuration). • Camera Group - Select Cameras 1~4 or 5~8 for setup. • Record Quality - Sets the Recording Quality. Select HIGHEST, HIGH, STANDARD or LOW. • Record Size - Sets the Recording Size (video display). Select 352x240, 704x240 or 704x480. • Record Frame Number - Sets the Recording Frame Rate. Select 1, 2, 3, 7 or 15 FPS • Use the Mouse to select or deselect Schedule options (Blue Highlighted blocks indicate that the segment is Selected). 84 Remote Setup Recording Setup - Advanced Select the Advanced option from the Record Mode dropdown menu. An window will appear to indicate that the Mode has changed. • Camera Group - Select the Channel Area (CH1~4 or CH5~8) • Schedule Mode - Set to Weekly or Daily. When the System is set to weekly mode, set each day individually • Pre Event Recording Time - Sets the Pre-Event Recording Time (between 0 ~ 5 Seconds). The Pre-Event records the data that occurred before the Event occurred. Refer to the System Instruction Manual for more details. • Post Event Recording Time - Sets the Post-Event Recording Time (between 5 ~ 180 Seconds). The Post-Event records the data that occurred after the Event occurred. Refer to the System Instruction Manual for more details • Alarm / Continuous / Motion Record Setup - Click the “Set” Button to setup the Cameras for Alarm, Continuous and Motion Recording: Set the Size, Recording Rate. Quality and Audio for each camera. Press OK to save the Settings. • Alarm / Continuous / Motion Recording Schedule - Use the mouse to select individual time blocks for Alarm, Continuous and Motion Recording. Selected blocks are displayed in Blue. 85 Remote Setup Camera Setup Settings for Individual Camera recording: • Camera Group - Select Cameras 1~4 or 5~8 for setup. • Covert / Title - Sets the Covert status and Name for each camera. Refer to the System Instruction Manual for more details on the Covert Camera Setting. • Color Setup - Sets the Brightness, Contrast, Tint and Color for each camera. • PTZ Setup - Set the Address, PTZ Protocol and Baud rate for each camera. Click the Properties button to enter additional setup information. Refer to the specific PTZ Camera Manual for details on configuration. • Motion Area - Click the “Camera” Button to access the Motion Setup Menu. Select an area by click and dragging with the mouse. The Selection menu will automatically appear to Select/Deselect/Cancel the Motion Setup. An area selected will have Yellow Squares, and a deselected area will have white squares. 86 Remote Setup Sound Setup • Live Audio - Sets Live Audio to ON/OFF. • Audio monitoring channel - Sets the channel for Live Audio Monitoring (1~4 Only). • Network Audio TX - Sets the Network Audio transmission to ON/OFF. • Network Audio RX - Sets the Network Audio Receive to ON/OFF. • Buzzer Setup - Turns the alarm buzzer OFF when a button is pressed on the System Front Panel Keypad. 87 Remote Setup Event/Sensor Setup • Alarm Input - Sets the Alarm Input Operation to Enabled or Disabled, and sets the Type to Normally Open or Normally Closed. Refer to the System Manual for details on configuration of External Alarm devices. • HDD Event - Turns the Alarm On/Off when a problem is detected with the System Hard Drive. • Alarm Out - Sets the Alarm out for a secondary Alarm Device. Refer to the System Manual for details on configuration of External Alarm devices. • Operation: Set the Relay Connect with Alarm Sensor to ON/OFF. • Mode: Set the Reacted Relay to Latched or Transparent Mode. • Type: Set to Low (Normally Closed) or High (Normally Open) • Duration: Setup Reacted Relay Time. (5sec~5min or Until key-in) • HDD Event: Alarm On/Off when HDD has the problem. • Buzzer Out - Sets the audible buzzer alert when an event is detected. • Buzzer: On/Off • Duration: Sets the Buzzer time (5sec~5min or Until key-in). • Mode: Setup Reacted Relay as Latched/Transparent Mode. • HDD Event: Alarm On/Off when HDD has the problem. • E-mail Notification - Generates an email notification when an Event is detected. Refer to the System Manual for details on configuration of Email Notification. • HDD Event: Sends an email when a problem with the System drive is detected. • Notification: Turn the email send ON or OFF. • Frequency: Set the amount of time to wait until resending an email. 88 Remote Setup System Setup System Info - Displays the System Information including the Software and Hardware versions, Video Signal type, IP and MAC addresses, and Disk Space usage. • FW Upgrade: Select the FW Upgrade button to remotely upgrade the System firmware. Navigate to the location of the saved *.img Firmware File (download the most recent firmware from http://www.lorexcctv.com). Follow the prompts to install the Firmware on the Remote System. Once the remote system firmware has been upgraded, the system will reboot, and you will need to reconnect with the Remote Client Software. SMTP - Setup the mail server and user’s E-mail (sends an email notification via email when an event occurs): • Default Mail Server: If the box is checked, you have selected to use the Lorex Mail Server. YOU WILL BE REQUIRED to set up your system on the Lorex web based DDNS at http://www.lorexddns.net to use the default mail server. Uncheck to use your own mail settings. 89 Remote Setup SMTP SECTION - Setup the mail server and user’s E-mail (for email send on Event notification): • Server: Your email settings (from your Internet Provider) for sending Email (if not using the Lorex Mail server). • Port: Default port 25 • User: Enter the User ID used by the Internet Provider for Internet connectivity. • Password: Enter the Password used by the Internet Provider for Internet connectivity. • Security: Set the security to ON or OFF. • FTP: Contains the settings for the FTP Backup. Users - Setup/Modify System Users by pressing the “Add” or “Modify” buttons. • Network Speed - Set the network connection speed. • Disk Overwrite - Sets the System HDD Overwrite On/Off. • Record Time Limit - Select the time (Off, 12 hours, 1day, 2day, 3day, 1weeks or 1month). This option is only available if disk overwrite is set to ON. 90 Remote Setup Display Setup (Screensaver) • Auto Brightness - select the time (10 min., 20min, 30min, 40min, 50min or 1 hour). If a time is set, the Remote System screen will go dark after the set time interval. • Screensaver* - Turns the Screen Saver to On or OFF. The screensaver will blank the screen during the specified times if set to ON: • From: Turns the Screensaver ON (start time). • To: Turns the Screensaver OFF (end time). * If selecting the OFF setting, “the screen saver (Main Display Off) will be disabled. 91 Lorex Player Lorex Player The Backup Player will playback data previously saved to the PC Hard Drive, or files backed up from the system to a USB Memory Stick, Optical Drive (CD-RW / DVD-RW) or to FTP. The Backup Player can be launched from either the Start Menu or Desktop Shortcut To open a file, select the FOLDER ICON in the lower left of the screen. Navigate to the save location, and select the video file for playback. Video File Watermarking The archived video files have a file protection (referred to as Watermarking). When the Player loads a file, it checks the file to confirm that no editing or changes have been made. If changes are detected, a warning message is displayed indicating that the file has been altered. When the file is loaded, a prompt appears to allow the program to check the Watermark in the file. Choose YES to check the file, or NO to skip the watermark checking. To cancel the Watermark check, click the STOP button. Once the file has been checked, the Player will load the file for playback. 92 Lorex Player Video Playback Image (only one camera can be displayed at a time) Playback Controls (See previous Search options for details). Select the Date and Time for the video playback Displays the currently displayed file name and Total playback time for the video recording. Image Save Function • Click the ‘Save Image’ Icon during Video Playback. • Enter a file name, select a File Type (JPG or BMP), and Location. Press the SAVE Button. • The current image will be saved. Print Function Prints the currently displayed image. Select the Printer, and press OK. 93 Lorex Player Log Viewer Search Range Set the Start Date and TIme, and End Date and Time. Search Button Press to perform a search based on Criteria Logs Displays logs (based on Search Range and Search Conditions). Displays the Log Number, Channel, Date and Description. Search Condition Select the Search criteria (Alarm, Motion, Continuous or System). Move to Previous or Next Page, or use the dropdown to select a specific page number. Event Viewer Displays a list of all Events. • NO - Event Number • DVR - Displays the System where the event originated from. • CH - Displays the channel number where the event occurred (if applicable. Some event types will not be display a Channel number) • Date and Time - The date and time that the event occurred • Description - Displays a description of the Event type. 94 OK Button Return to Timeline View (Search Mode). Lorex Player Archived Files Data can be archived in several ways: • Directly from the system using a Memory Stick or Removable Media (CD-RW / DVD-RW). • From the System to a remote location via FTP. • Using the Lorex Client software application. Once the data has been archived, a directory will be created containing the following: • AVI Files: An AVI Format video file will be created for each channel selected for backup. The file name will include the information about the file including Backup Type, Channel Number, Date (Month, Day, Year) and Time (Hour, Minute, Second). In the example shown below, the file named: “FTP_ch01_0220081357_022008135 9_00.avi” indicates that the file was archived using FTP, for Channel 1, on the 22nd of March, 2008 at 1:59pm. • SETUP.EXE File: The Setup.exe file contains the codecs needed to playback the AVI video file. If the archived data is to be played back on a PC that does not have the Lorex Client software or Lorex Player software installed, the Setup.exe file included in the archive can be run to install the Codecs. Once the Codecs are installed, the video data can be played back on another player program (i.e. Windows Media Player, WinAmp, etc.). • TXT Log File: The txt log file is written to the folder, and includes details about the backup process. Data included in the backup log consists of: z Information about the System (Firmware version, backup archiving type) z Backup Requested Data (Selected Start and End times, channels for video and audio backup) z Backup Results (A log of each file created during the backup process including start and end time, and file size). z File Total (Displays the total number of files that were created in the backup archive directory). 95 Web Client Web Client Once the System is configured, a connection can be made using Internet Explorer (this is the only supported Web Browser). • Enter the IP Address or DDNS Address of the System in the Address Bar of Internet Explorer. • A prompt will appear for Active-X - choose to install the controls. • The Lorex Client software will install remotely, and have the same functionality as the full installation (from CD). NOTE: Many factors impact the performance of your web browser such as security settings, popup blockers, firewall settings, routers, and other network conditions that are specific to the end user. Lorex recommends using the included Lorex Client software. 96 Multiple Connection Setup Multiple Connection Setup The “Site” can be used to connect to several remote systems at the same time (up to 16 systems). These systems can be at the same location, or can be at Multiple locations. Some examples include: • Adding multiple systems at the same location. For example, you may have an office that has more than one system at the location - use the client to connect to the system located at the Front Desk and the system located in the Warehouse at the same time. • Adding multiple systems at different locations. As an example, you may have several retail stores that are physically located in different areas of they city - use the client to set up a connection for each store using the stores’ specific DDNS or External IP address information to connect. Adding a Single Site with Multiple Systems To Configure Multiple Systems at one “Site”, add a site as shown on the previous page. You can add up to 4 systems to the site by: 1. Enter the information in the “DVR INFORMATION” section 2. Adding cameras to the drop down DVR Menu NOTE: You cannot overlap the camera locations. For example, if you assigned the first System to have cameras 1~4 appear in the top row, you cannot assign cameras 1~4 from the second system to the top row - use the second row down instead. 3. Click the ‘ADD’ button at the bottom to add the site. 4. Click on the Site Name to add another System to that location. 1 4 2 3 97 Multiple Connection Setup Adding Multiple Sites with Multiple Systems You can add Multiple Sites with Multiple Systems to the Lorex Client, however you can only connect to one “Site” at a time. To add Multiple Sites with Multiple Systems: 1. Add a Site by right clicking on the ‘Site’ link on the right side menu. 2. Add a System to the site by entering the System Information, including z z z z Entering a Name Entering a Domain Entering the Port, User ID and Password Adding Cameras to the DVR Dropdown and clicking on the ADD button. Repeat to add more Systems to the selected site, by clicking on the Site Name and completing the fields. 3. Add a second site by right clicking on the ‘Site’ link on the right side menu, and repeat the steps. Selecting a Site for Connection To select a site, click on the drop down menu on the right side of the client. Select a Site from the list, and the connection window will appear. The Connection Status window displays all Systems configured for the site, and will attempt to connect to each site separately. Once the connections have been made, the systems will be displayed in the Split screen view. NOTE: To connect to a new site, you must first disconnect from the existing site. 98 Appendix A: System Specifications Appendix A: System Specifications Monitor Description Specification LCD 22” widescreen LCD resolution 1680x1050 Monitor display Real-time 240 FPS (NTSC); 200 FPS (PAL) Image size 3-5 Kbyte (352x240, 352x288) (NTSC, PAL) 5-10 Kbyte (704x240, 704x288) (NTSC, PAL) 6-16 Kbyte (704x480, 705x576) (NTSC, PAL) Video input 16 x BNC Video output Programmable Spot-Out (BNC) Audio input 4 x line-in, RCA Audio output 1 z line-out, RCA VGA input included Component input Y Pb Pr Supply voltage 100VAC-240VAC, 12VDC, 6.67A, 60/50Hz Power consumption Approx. 65W Temperature range 23º~122º F / -5º~50ºC Weight 19.3 lbs / 8.7 kg Dimensions 21” X 14.4” X 2.7” / 532mm X 365mm X 67mm without stand) 21” X 16.2” X 7.4” / 532mm X 433mm X 188mm (with stand) Dimensions As our products are subject to continuous improvement, Lorex Technology Inc. and its subsidiaries reserve the right to modify product design, specifications and prices, without notice and without incurring any obligation. E&OE 99 Appendix A: System Specifications (cont’d.) Appendix A: System Specifications (cont’d.) DVR Description Specification Hard disk capacity SATA interface, maximum 750GB, 100% duty cycle Secondary storage USB default (USB flash drive, external USB HDD), USB optical drive (CD-RW/DVD-RW) Backup file format AVI, JPG, BMP Compression MPEG-4 Recording speed 240/200 (NTSC/PAL) @ 352x240 120/100 (NTSC/PAL) @ 704x240 60/50 (NTSC/PAL) @ 704x480 Recording schedule Hourly, Daily, Weekly—adjustable per channel Pre/Post alarm recording 5 seconds (pre); 3 minutes (post)—programmable per camera Event/Log search Up to 100,000 for user log in/out, configuration changes, remote access, connects/disconnects Playback Single, Quad, or 8-channel simultaneous Alarm input 8 x TTL, programmable as NC/NO Alarm output 1 x Relay with NO/NC contact; 30VDC/1A, 125VAC/0.5A resistive Activity detection 16x16 grid; sensitivity levels: 10 PTZ control RS-485 interface Remote functions Live view, LIve recording, Search, Setup, Backup Network speed control 8 levels (56KB~8MB)/sec. Network protocol TCP/IP, DDNS, Web Network interface 10/100 Base-TX, RJ-45 Software • Remote monitoring software supporting multiple sites with full remote control over the Internet or Local Area Network (LAN) • Internet Remote Functions: Live View, Live Recording, Search, Set-up, Backup • Firmware Upgrade over network • Email alerts with a web browser link • Microsoft Windows Vista™ Compatible Software (included) 100 Appendix B: Setting up Remote Viewing Appendix B: Setting up Remote Viewing Setting up the Remote Viewing Feature requires several steps. Networking skills are required to correctly configure the remote viewing functions. What do you need? • The LCD/DVR System. • A PC with the installed with the Lorex Client software (refer to the Software Guide for installation instructions) • A Router (not provided with the system) and High Speed Cable or DSL Internet Connectivity (for remote viewing outside your network) Network Setup / Remote Access Overview The System can be remotely controlled using your existing network and the Lorex Client software or Internet Explorer. SYSTEM INTERNET ROUTER (not included) PC (not included) 1. Connect the system to the router using the supplied Ethernet cable. Power on the system. The system must be connected to the router prior to powering on the system. This allows the system to communicate on your network 2. Find the IP address of your System through the Menu System on the unit. 3. Enable PORT FORWARDING on your Router. Refer to the included Router Guide and Basics of Remote Video Access Guide for further assistance with your specific network setup and hardware. 4. Set up a web account at http://lorexddns.net. 5. Setup the System DDNS. Configure the software, using the information gathered on the following pages. 101 Appendix B: Setting up Remote Viewing Network Checklist The following checklist is provided to assist you in confirming that all steps have been successfully performed during Network Setup. Use this checklist in conjunction with the steps outlined on the following pages. 1. I have the following: • High Speed Internet • A Router • The Ethernet Cable provided with this system • The System • A PC with the Remote Access software installed 2. I have confirmed that my System is set to automatically complete my Network settings (DHCP is set to ON): • Press the SETUP button on the Front Panel -or- Press SETUP on the Remote -or- Right Click on the screen and select the SETUP option. • Select the System Setup option • Select the System option • Select the Network Menu. Confirm that the options for both DHCP and DDNS have checkmarks in the boxes. 3. I have turned off the System, and performed the following: • Connected the Ethernet Cable to the back of the System • Connected the other end of the Ethernet Cable to my Router NOTE: Network Setup will not work if you do not have a router 4. I have found my System Information by either Pressing the ENTER button on the Front Panel -or- Pressing the INFO button on the Remote Control: • My IP Address is: ________________________________ • My MAC Address is: ______________________________ NOTE: If your IP address is showing as 127.0.0.1, please return to Step 1 and review all menu settings. Check to make sure that your Ethernet cable is properly connected to your Router and System. 102 Appendix B: Setting up Remote Viewing 5. I have enabled PORT FORWARDING on my Router for: • Port 80 • Port 6100 NOTE: Each Router is different, therefore the port forwarding settings will vary by model. Please visit us on the web at http://www.lorexcctv.com/support for assistance with several of the most common router types. If your router is not listed, please refer to the manual that came with your Router, or your Router manufacturer for assistance. 6. I have configured the DDNS for remote access to my system at http://lorexddns.net, and my configuration information is: • Username: _______________________________ • Password: _______________________________ • Domain Name: ____________________________ 7. I have configured my System to connect to the DDNS Server by completing my Network settings: • Press the SETUP button on the Front Panel -or- Press SETUP on the Remote -or- Right Click on the screen and select the SETUP option. • Select the System Setup option • Select the System option • Select the Network Menu. • Select the DDNS Server option, and use your information to complete the DDNS Configuration: z z z z DDNS Server Name: Lorex (default) Domain Name: Enter the name you set for the DDNS web configuration. User ID: Enter your user ID Password: Enter your password • Click the DDNS Status button to confirm the connection details. • A success message will appear, and the system will restart. 8. Configure the Remote Access Software: • If you are connecting from within your network (i.e. The System and your PC are both inside your house), you only need to enter the IP address of the System into the software (i.e. 192.168.0.105) • If you are connecting from outside your network (i.e. The System is at Home, and your PC is at work), use the DDNS Domain Name to configure the software). 103 Appendix B: Setting up Remote Viewing System - IP & MAC Address The IP & MAC Addresses are necessary for DDNS Setup (for remote access to the System). To Locate the System information, Press the ENTER button on the Front Panel or Info on the Remote Control while viewing the Cameras. The System Info window will be displayed. IP Address MAC Address - OR 1. Press the Menu Button on the Front Panel or Remote Control, or right click with the mouse to access the Setup Menu. Select the System Setup option and press the Enter button. 2. Navigate to the System Menu option. Press the Enter button to access the System Menu. 3. Navigate to the System Management menu, and press the Enter Button to access the settings. 4. Select the System Information option, and press the Enter Button to display the System Settings. IP Address MAC Address NOTE: Your IP address should look similar to 192.168.0.105, 10.0.0.105, etc. If your IP address is showing as 127.0.0.1, please review all menu settings, and check to make sure that your Ethernet cable is properly connected to your Router and System. 104 Appendix B: Setting up Remote Viewing Network - Router Port Forwarding You will need to enable port forwarding on your Router to allow for external communications with your System for ports: • TCP/IP PORT 6100 • WEB PORT 80 Computers, Systems, and other devices inside your network can only communicate directly with each other within the internal network. Computers and systems outside your network cannot directly communicate with these devices. When a system on the internal network needs to send or receive information from a system outside the network (i.e. from the Internet), the information is sent to the Router. NETWORK EXAMPLE Router External IP 216.13.154.34 Router Internal IP 192.168.0.1 Computer Internal IP 192.168.0.2 System Internal IP 192.168.0.3 Internet Internal Network When a computer on the Internet needs to send data to your internal network, it sends this data to the external IP address of the Router. The Router then needs to decide where this data is to be sent to. This is where setting up Port Forwarding becomes important. Port Forwarding tells the router which device on the internal network to send the data to. When you set up port forwarding on your Router, it takes the data from the external IP address:port number and sends that data to an internal IP address:port number (i.e Router External IP 216.13.154.34:6100 to System Internal IP 192.168.0.3:6100). The instructions found online in the Router Configuration Guide will assist you in the port forwarding configurations for a selection of different router models. Visit our Consumer Guides Support website at http://www.lorexcctv.com/support for details Web - Finding Your External IP Address You will need to have your External IP address to set up your DDNS account. One of the fastest ways to find this information is to use a 3rd Party website such as http://www.showmyip.com Your IP address can also be found within your Router settings. Refer to your router user guide for further details. 105 Appendix B: Setting up Remote Viewing Setting Up DDNS Service Lorex offers a free DDNS service for use with your DVR. A DDNS account allows you to set up a web site address that points back to your Local Network. The following outlines how to set up your free Lorex DDNS account. To setup your free Lorex DDNS account: 1. In your browser, go to http://lorexddns.net and click Create Account. 2. Complete the Account Information fields with your personal information. Complete the Warranty Information with your purchase details (optional). 3. Complete the System Information fields: • Product License: Select your product model from the Product License drop down menu (e.g. L800) • <Product Code> - <MAC Address>: The physical address of your product on your network. Do not include hyphens/dashes. • URL Request: Choose a URL for your DDNS connection (i.e. your name, your company or business name, or anything of your choice.) 4. Once the information has been entered, click Create New Account. 5. Your Account information will be sent to you at the email Address you used in Step 2. L22WD 106 Appendix B: Setting up Remote Viewing You will need this information for remote access to your system. Record your information below: Username: Domain name*: Password: * Only the first part of the Domain Name is required for setup on the system. For example, if the full domain sent is tomsmith.lorexddns.net, you only need to enter tomsmith on the system. 107 Appendix B: Setting up Remote Viewing There are two ways to find your DDNS information at a later date. 1. Review the Email sent to you by Lorex: tomsmith tomsmith1 tomsmith.lorexddns.net NOTE: If you entered an incorrect Email address when setting up the DDNS, you will NOT receive this email. To review the email, you must log into the DDNS Website. In order to receive email alerts, you must register your system with the Lorex DDNS, or alternatively change your default mail settings (see Appendix D). 108 Appendix B: Setting up Remote Viewing 2. Log in to the Lorex DDNS website at http://lorexddns.net and enter your username and password. Click Action in Device Summary to display a copy of the Confirmation email. 109 Appendix B: Setting up Remote Viewing System - DDNS SETUP Once the DDNS settings have been configured online, the information must be entered on the System to allow for remote connection via the Lorex Client 4.0 Software (or through Internet Explorer): 1. Access the Main Menu Setup screens, and navigate to the SYSTEM option. Press the ENTER button to access the setup. 2. Navigate to the NETWORK option. Press the Enter button to access the Network settings. Select the DDNS Server option, and press the ENTER button to enter the DDNS SETUP. 3. Enter the information received in email (including the password). Press the DDNS Status first - wait for the SUCCESS MESSAGE (as long as the information is correct). Select OK to save the settings. The System will restart to activate the new configuration. NOTE: Once all Network settings are configured, the System can be accessed using the Lorex Client 4.0 Software. 110 Appendix C: Using the Auto Email Feature Appendix C: Using the Auto Email Feature Setting up Email This System has the ability to automatically send email when an event is detected. To configure the automatic sending of Emails, the following Menu option setup is required: • System Menu - Mail • System Menu - User Management • Event/Sensor - Email Notification System Menu - Mail Navigate to the System Menu, and select the Mail Option. NOTE: All settings that are completed in the Mail section are for OUTGOING MAIL (i.e. The same settings that you use to send mail through Outlook or any other mail program. There are two ways to configure these settings: • Configuration using the Lorex Mail Server. Make sure the box is checked, and you will not need to enter any additional information, however YOU WILL BE REQUIRED to set up your system on the Lorex web based DDNS at http://lorexddns.net to use the default mail server -OR• Configuration using YOUR mail server settings. The Settings needed for this configuration can be found by contacting your Internet Provider, and asking for your ‘Outgoing Mail Settings’. • Default Server - Uncheck to use YOUR mail settings. • SMTP Server - Enter the Email server information for your ISP. • Port - Default port of 25 • Security - Sets the Mail Security ON/OFF (based on the requirements of the mail provider). • User - Enter the User Name. • Password - Enter the User Password NOTE: The Virtual Keyboard appears when entering the Mail Setup information. 111 Appendix C: Using the Auto Email Feature This is an example of the same type of required settings (formatted for Microsoft Outlook). SERVER (Outgoing SMTP) PORT (More Settings, change only if recommended by your Internet Provider) USER & PASSWORD SECURITY NOTE: This example is not required for the System to function correctly. This is used to illustrate the required settings (using another program). Testing the Mail Setup Press the TEST E-MAIL Button on the System. A window will appear indicating a Success or Fail for the connection. Test Results in Email You will receive the following in an Email message upon successful completion of the Testing portion. 112 Appendix C: Using the Auto Email Feature System Menu - Mail Navigate to the System Menu, and select the Mail Option. New users can be added to the System through the User Management screen, and existing users can be edited. The important features in the User Setup are the E-Mail address and E-Mail Notification: • Set the E-Mail to the desired Receiving Address. • Set the E-Mail Notification to ON. This must be set ON for the user to receive mail. Troubleshooting the Email Feature If you are having problems sending emails from the System, you may need to use a different port than specified in the Email Setup menu. If this port is changed, then the new port will need to be forwarded on your Network Router. Please refer to the Port Forwarding section of the manual for details, or contact Technical Support. 113 Appendix C: Using the Auto Email Feature Event / Sensor - E-Mail Notification Navigate to the System Menu, and select the Mail Option. • NOTIFICATION - Notification must be turned on for Automatic E-mail alerts to be sent. • HDD EVENT - Emails a notification to all active accounts when problems are detected with the Hard Drive. • ALARM / VIDEO LOSS / MOTION - Select the type of event for which you wish to trigger email notification: Alarm, Video Loss or Motion Detection (for each channel). • FREQUENCY - Set the frequency to receive mails for the duration of the event. NOTE: The Notification Email will only alert you to the fact that an event has occurred. No video or still footage will be sent. Reading Received Emails When a specified event occurs on the system, the following is received in Email. The E-Mail message indicates: • The Date and Time that the Event occurred • The Event Type. • The Channel where the event occurred. NOTE: The numbers in the email refer to internal system information, and are not indicative of any specific details. 114 Appendix D: Recommended Tips for System Setup Appendix D: Recommended Tips for System Setup There are several tips outlined below that will assist you in setting up your system: Connecting and Mounting Cameras: 1. Connect the DIN Extension Cable to an open channel port on the back of the System. Make sure that the ARROW on the cable is pointing up. This will align the pins on the cable correctly with the port on the stem, preventing the pins from becoming bent and the cable from becoming inoperable. 2. Connect one of the provided Cameras to the DIN Extension cable. Confirm that the arrows on the DIN Camera Cable and the DIN Extension cable are pointed together when connecting the cable. If the pins in the DIN Cable are bent, the Camera will NOT function. 3. Mount the camera to the desired surface (ceiling, wall, shelf, etc.). Connecting the cables BEFORE permanently mounting the stand will help prevent issues with cable length (camera is mounted too far from the system and cannot be connected). 4. Aim the camera at the desired location. Remember to REMOVE THE PROTECTIVE FILM from the lens of the camera by pulling on the plastic tab. Navigating within the System Menu • Enter the MENU screen by pressing the MENU button. Enter the password (if required), and select the SYSTEM SETUP option. • The Setup Menu controls the System Settings, Recording Settings and Archive. • Scroll through the options by pressing the UP, DOWN, LEFT and RIGHT buttons on the Front Panel or Remote Control. • To enter a sub-menu, navigate to the option and press the ENTER button. To exit a SUBMENU, press the RETURN button. • To exit the MAIN MENU, press the RETURN button. 115 Appendix D: Recommended Tips for System Setup Navigating within the System Menu (cont.) Menu Navigation Controls This System has been designed to use the Mouse or Remote Control as the primary modes of navigation and configuration for the system. The Front Panel buttons can also be used to access the menus and configure the system. • Navigation Controls - Move Up/Down/Left/Right. • Enter Button - Press this button to select and change the values in a menu option. Virtual Keyboard Control The Virtual Keyboard control becomes available when keyboard input is needed for entering information such as Names, Network Information, etc. • Includes a~z, Symbols.@#$%^&*() A~Z, 0~9 and • Navigate using the arrow keys on the Front Panel or Remote Control, or by clicking with the Mouse. • Select the ENTER button once the setup is completed. Click to View Uppercase and Symbols Active Option Indicator Orange Highlight - Indicates that the option is in active editing mode. Green Highlight - Indicates that the option is available for editing. Once the option is highlighted, press the ENTER key to edit the option (highlights changes to Orange). NOTE: Once changes have been made, select the APPLY button at the bottom of the screen, and press the ENTER button on the front panel or remote control. Changes will be saved at this time - exiting the menu without applying the changes will result in the changes being lost. 116 Appendix D: Recommended Tips for System Setup Changing the Date and Time Setting the correct date and time for your system is important. Once the date and time have been set correctly, it is highly recommended that you format your Hard Drive. 1. Enter MENU mode by pressing the MENU button on the front panel of the system, Remote Control or Mouse Menu. Select the SYSTEM SETUP Option. 2. Select the SYSTEM menu from the MAIN menu. Navigate using the up and down arrows on the front panel (or remote control). Highlight the selection in Green, and press the ENTER button to enter the SYSTEM Menu. 3. Select the DATE AND TIME Menu. Change the settings by navigating with the UP/DOWN/LEFT and RIGHT arrow keys. Set the following based on your local Time (and Timezone), and set the current date for the system. • Date/Time - Sets the current system Date and Time.* • Date Format - Sets the Date Display format (MM-DD-YYYY, YYYY-MM-DD, etc.). • Time Format - Sets the Time Display format to either 12 or 24 hour display. • Network Time Server Setup Synchronizes the system to the specified remote time server. Select the SYNC button to connect to the remote server and synchronize the time. (may also use a time server of the users choice). • Timezone Setup - Selections for the local Time Zone (i.e. EST, CST, PST). The DST (Daylight Savings Time) can be set to ON/OFF. * NOTE: If the Date/TIme is set into the past, a message will appear warning that Overlapped date(s) will be erased. ** MAKE SURE THAT THE DATE AND TIME ARE SET PRIOR TO RECORDING! ** 117 Appendix D: Recommended Tips for System Setup Formatting the Hard Drive Formatting the hard drive after changing the date, and before beginning the recording of YOUR data is recommended, as the system is set to Automatically start recording when powered on (continuous recording setting). NOTE: Formatting the Hard Drive will erase any previously recorded data. This will NOT affect your system configurations. 1. Enter MENU mode by pressing the MENU button on the front panel of the system, on the Remote Control or Mouse Menu. Select the SYSTEM SETUP Option. 2. Select the DISK MANAGEMENT menu from the MAIN menu. Navigate using the up and down arrows on the front panel (or remote control). Highlight the selection in Green, and press the ENTER button to enter the DISK MANAGEMENT Menu. 3. Navigate to the Format Option, and select the Start button. • Once OK is selected, the user will be prompted to enter the ADMIN PASSWORD. Once the password is accepted, all Hard Drive data will be erased. • A warning message will be displayed with the prompt ‘All Recorded Data will be erased.’ • Select OK to erase the data, or CANCEL to return without erasing the Hard Drive. 118 Formatting Status Indicator Window: Once the format is complete, the system will return to the Disk Manage Menu. Appendix D: Recommended Tips for System Setup Camera Setup Each camera should be assigned a name that corresponds to its use (i.e. Dock1, BackDoor, Cash3, etc.). This name is displayed on-screen, and helps to identify the camera location easily. 1. Enter MENU mode by pressing the MENU button on the front panel of the system, Remote Control or mouse menu. Select the SYSTEM SETUP Option. 2. Select the CAMERA menu from the MAIN menu. Navigate using the up and down arrows on the front panel (or remote control). Highlight the selection in Green, and press the ENTER button to enter the CAMERA Menu. 3. Select the CAMERA TITLE Menu. Change the settings by navigating with the UP/ DOWN/LEFT and RIGHT arrow keys. • CAM # - Indicates the Camera Number (corresponds to the DIN/BNC connection port on the back of the system). • Covert - Turns the on-screen display of the Camera ON/OFF. Covert Cameras continue to record, however the camera is not displayed on-screen. This feature is commonly used in situations where the Monitor is located in a public area, and a camera should not be displayed (i.e. Located in a Cash Count room, or directed at a Cash Register). • Title - Sets the name for the individual camera (0~9, A~Z) up to # characters, by using the Virtual Keyboard: Virtual Keyboard - Appears when the Camera Title change is selected. Navigate with the arrow keys, and press ENTER to select a Number or Letter. z APPLY - Saves the Title change. z PREVIOUS - Moves to the previous camera in the list z 119 Appendix D: Recommended Tips for System Setup Screen Saver Settings The screen saver will black the screen during a defined interval. 1. Enter MENU mode by pressing the MENU button on the front panel of the system, Remote Control or Mouse Menu. Select the SYSTEM SETUP Option. 2. Select the DISPLAY menu from the MAIN menu. Navigate using the up and down arrows on the front panel (or remote control). Highlight the selection in Green, and press the ENTER button to enter the DISPLAY Menu. 3. Select the SCREENSAVER Menu. Change the settings by navigating with the UP/DOWN/ LEFT and RIGHT arrow keys. Set the screen saver options: • Auto Brightness - Sets the length of time before the Screen brightness is turned down (up to # minutes). NOTE: The unit continues to function, and pressing any key will turn the screen back on. • Main Display OFF - Turns the Main Display Screen ON/OFF/TIMED: z z ON - The Main Display is always ON OFF - The Main Display is always OFF • FROM - Used ONLY when the Main Display OFF setting is set to ON. Sets the Start Time for the monitor to go into Screen Saver mode. • TO - Used ONLY when the Main Display OFF setting is set to ON. Sets the End Time for the monitor to exit from Screen Saver mode. 120 Appendix D: Recommended Tips for System Setup Backing up your System Configurations It is recommended to back up your system configurations to a USB flash drive. Configuring your system to meet your specific needs can be time consuming - having a backup of your settings will allow you to reset your unit with your personalized settings in the event of an unwanted change. 1. Enter MENU mode by pressing the MENU button on the front panel of the system, remote control or mouse menu. Select the SYSTEM SETUP Option. 2. Select the SYSTEM MANAGEMENT menu from the MAIN menu. Navigate using the up and down arrows on the front panel (or remote control). Highlight the selection in Green, and press the ENTER button to enter the SYSTEM MANAGEMENT Menu. 3. Navigate to the System Data option - the System settings can be saved to a USB flash drive: • Insert the USB flash drive into the System and select the Save option to save settings: A Success message indicates that the backup was completed. z If the device is not detected, a message will indicate that No storage device was found. z • To load your User Settings, Insert the USB flash drive into the System and select the Load option to restore settings. • System Backup is recommended after initial setup and installation is complete. NOTE: Make sure to store your USB flash drive in a safe place. TIP: The USB Backup is an effective way to configure multiple systems. Using the backup file, you can make sure that all systems are configured in the same way at all locations. 121 Appendix E: Listen-in Audio Appendix E: Listen-in Audio There are 4 available DIN camera ports, 8 available BNC camera ports and 4 BNC Audio ports on the system - how many can be used for Listen-In audio, and how many can be used to record sound? How do I enable Listen-In Audio, and how do I set the Listen-in channel? Listen-In Audio is the ability to listen to live audio on ONE channel at a time, between channels 1~4. To listen to live audio on a channel: 1. Enter MENU mode by pressing the MENU button on the front panel of the system (or on the Remote Control). Select the SYSTEM SETUP Option. 2. Select the SOUND menu from the MAIN menu. Navigate using the up and down arrows on the front panel (or remote control). Highlight the selection in Green, and press the ENTER button to enter the SOUND Menu. 3. Select the AUDIO Option. Navigate using the up and down arrows, and press the ENTER key to select the AUDIO Option: • Live Audio - Turns Live System Audio (from the Audio on the terminal) to ON/ OFF. • Audio Monitoring Channel - Select the channel for Listen-in Audio (Channels 1~4 ONLY). NOTE: Once the LIVE AUDIO Feature has been set to ON, the Remote Control can be used to select the Listen-In Audio Channel. Press the AUDIO button on the Remote Control to switch between Channels 1~4. 122 Appendix F: Playback Previously Recorded Data? Appendix F: Playback Previously Recorded Data? Search mode allows you to locate previously recorded video by Date and Time, or by Event Type. • Press the Search Button on the front panel, Remote Control or mouse menu. Enter the User Name and Password (if required). • Use the Left / Right arrows on the Front Panel or Remote Control to switch between the Search By Time and Search By Event screens. Search By Time Searches the system based on date and time. • Press the Enter button to access the Calendar (on the left side of the screen) • Navigate within the calendar using the Arrow Keys on the front panel or remote control. • Once the date has been located, press the Enter button to accept the date, and to access the Time Search (on the right side of the screen). • Press and Hold the arrow keys to select the Time (increments of 1 minute). Pressing the button without holding will increment 15 minutes. • Press the Enter button to start the playback. Press the Return button to stop playback and return to the Search By Time screen. Any days highlighted with GREEN indicate that there is recorded video data. The Date and Time will be displayed at the bottom of the screen. A playback icon will appear indicating that the unit is in Playback mode. NOTE: The unit will continue to record data while in Playback Mode. 123 Appendix F: Playback Previously Recorded Data? Search By Event Searches the system based on Event Type (Alarm, Motion, Continuous or System). • Press the right arrow button on the front panel or remote control to access the Search By Event screen. • Select From and To dates, Events (Alarm, Continuous, Motion and Other) and Cameras • Navigate within the options using the Arrow Keys on the front panel or remote control. Press the Enter button to select or deselect options (Note: Multiple event types can be selected). • Navigate to the Start button at the bottom of the screen and press the Enter button. A listing of events will be displayed. • Navigate to an event, and press the Enter button to start the playback. Press the Return button to stop the playback.and return to the Event Search screen. 124 Appendix G: Setting Auto-Recording to OFF Appendix G: Setting Auto-Recording to OFF The system is set to automatically start recording when powered on. You may wish to change these settings to better suit your security needs. These settings can be changed for an individual camera on one time block, or can be set for multiple cameras for multiple time blocks. Setting An Individual Time Block 1. Enter MENU mode by pressing the MENU button on the front panel of the system, Remote Control or mouse menu. Select the RECORD MENU Option. 2. Select the SIMPLE RECORDING MODE menu. Navigate using the up and down arrows on the front panel (or remote control). Navigate using the arrow keys 3. Select the Channel Menu (highlights the area in PINK). 4. Press the ENTER key to enter the configuration mode. One time block will be highlighted in GREEN. 5. Navigate to the desired time block and press ENTER. The selected time block will be highlighted ORANGE. 6. Press Enter once more to access the Configuration Menu. Select NONE, CONTINUOUS, MOTION or ALARM by pressing the UP and DOWN arrows. Press ENTER again to accept the change. 125 Appendix G: Setting Auto-Recording to OFF Setting Multiple Time Blocks 1. Enter MENU mode by pressing the MENU button on the front panel of the system, remote control or mouse menu. Select the RECORD MENU Option. 2. Select the SIMPLE RECORDING MODE menu. Navigate using the up and down arrows on the front panel (or remote control). Navigate using the arrow keys 3. Select the Channel Menu (highlights the area in PINK). 4. Press the ENTER key to enter the configuration mode. One time block will be highlighted in GREEN. 5. Navigate to the desired time block and press ENTER. The selected time block will be highlighted ORANGE. Press the UP, DOWN, LEFT and RIGHT Arrow keys to highlight multiple time blocks. 6. Press Enter once more to access the Configuration Menu. Select NONE, CONTINUOUS, MOTION or ALARM by pressing the UP and DOWN arrows. Press ENTER again to accept the change. 126 Appendix H: Setting up Motion Recording Appendix H: Setting up Motion Recording The system is set to automatically start recording when powered on in Continuous Mode. You may wish to change these settings to better suit your security needs by having the cameras start recording when MOTION is detected. These settings can be changed for an individual cameras on one time block, or can be set for multiple cameras for multiple time blocks. 1.Press the Setup button on the front panel of the unit -or- Press the Setup button on the Remote Control -or- Right Click and select SETUP. 2.Highlight the Record Menu and press the Enter button. 3.Select the Continuous/ Motion Setup Menu. 4.Select the Schedule Menu. 5.Select all desired Time Blocks. Once the blocks have been selected, an options box will appear. Set the selected time blocks to MOTION. 6. Press the Return Button or click the X to close the window. 127 Appendix H: Setting up Motion Recording 7. The Schedule Window will be displayed, with the Motion Time blocks displayed as highlighted boxes. 8. Press the Return Button several times to exit the Recording Menus. Remember to SAVE YOUR CHANGES! To check if the unit is recording in Motion, all channels should have a green box on the top right hand corner. When motion is picked up it will change to a red box with a yellow M. Continuous & Motion This system has an Advanced Recording Feature where BOTH Continuous and Motion can be set to ON at the same time: • The system will record continuously, but when motion is detected the system will display a M recording type on the relevant channel. • The event will be logged as Motion in the system archive. • This is useful in situations where you want to have continuous recording, but wish to have Motion detected for easier event searching. • In addition, an e-mail notification can be sent when Motion has been detected. 128 Appendix H: Setting up Motion Recording Motion Area Setup Use the System menu to configure the Motion Detection areas. Setting the motion detection areas are useful to mask in specific areas (i.e. Doors or Windows), so when movement is detected in these areas the System Recording will begin. The Motion Mask area can also be set to remove certain areas which you do not want to have detect motion, such as a heavy traffic area, or a piece of machinery which is in continuous motion. To change the Motion Detection Area: • Select the SYSTEM SETUP option to configure the menu options. • Select the Camera Setup option: 129 Appendix H: Setting up Motion Recording • Select the Motion Sensor Menu: • Click on the AREA SETUP for the desired Camera. • Use the Mouse to select or deselect areas for motion detection Selected Areas are shaded in BLUE. Deselected Areas are shaded in GREY. • Press the Return Button, or Right Click to exit. Select to Save Changes & Exit. 130 Appendix I: Using the Storage Calculator Appendix I: Using the Storage Calculator The Storage Calculator application is used to calculate the amount of recording time available on your hard drive, based on the System Recording Settings. This application is located on the Software Installation CD (provided with your System) 1. Select the settings to reflect the options you have chosen on your System: CH1~CH8 - Select the channels to include in the Recording Calculation Resolution - Set the recording Resolution to CIF (352x240), 2CIF (704x240) or D1 (704x480) Quality - Set the recording Quality to Low, Standard, High or Highest. FPS - Set the Frames Per Second for the recording to 1, 2, 4, 8, 15 or 30 FPS. AUDIO - Set the Audio Recording selection to ON or OFF (if audio is being recorded on the system). HDD Size - Select the size of the System Hard Drive. Main Screen - The Software loads with the following defaults selected. Use the dropdown selections to change the options to reflect your System settings. 2. Press the CALCULATE button. The Software will use all configurations to provide recording data specific to your System. Example of Recording Time Calculations 131 Appendix J: Replacing the Hard Drive Appendix J: Replacing the Hard Drive The System comes with a pre-installed Hard Drive, however the unit will work with a replacement single Hard Drive (up to 750GB). NOTE: Make sure that the System is OFF and the power cable has been disconnected before changing the Hard Drive. Removing the Hard Drive To remove the installed hard drive: 1. Using a Phillips screwdriver (not included) remove the screws from the metal hard drive cover on the back of the system. 2. Carefully remove the hard drive from the system. 3. Disconnect the power and data cables from the hard drive. 4. Remove the four mounting screws from the sides of the metal casing and carefully slide the hard drive out. Replacing the Hard Drive To install the new hard drive: 1. Carefully slide the new hard drive into the metal casing (label side down), and reattach the four mounting screws. 2. Connect the power and data cables to the hard drive—cables can only connect one way. Make sure that the cables are securely connected within the system and to the hard drive. 3. Carefully insert the hard drive in the unit. Gently slide the hard drive in place and line up the holes for the screws. 4. Reattach the screws firmly, locking the hard drive in place. The hard drive should be flush with the rear panel of the system. 5. Reconnect the power cable to the system. 132 Appendix J: Replacing the Hard Drive Formatting the New Hard Drive If a new HARD DRIVE is detected, the system will prompt you to FORMAT the drive. ATTENTION: You MUST format the new hard drive in order for it to function properly with the system. If you do not choose to format the HARD DRIVE, the drive will NOT be detected by the system. Mouse: • Click Yes. Remote Control: • Press the (Right arrow) button to select YES and press the (Enter) button. NOTE: Do NOT turn off the System while the drive is formatting. This can cause problems with the Hard Drive. If you choose to FORMAT a drive in this way, the drive will no longer be readable by a regular PC without using the HARD DRIVE VIEWER software included on the CD provided with this unit. The installation video is included with the Hard Drive that was pre installed with the System. If you change the hard drive, the installation video will no longer work. You can view the Installation Video using the included Software CD, or online at http://www.lorexcctv.com/support in the Installation Guide section. 133 Appendix K: Connecting a Spot-Out Monitor Appendix K: Connecting a Spot-Out Monitor A connection to a Spot-Out Monitor (not included with the System) can be made through the SPOT OUT Port on the back of the System. • SPOT OUT - Displays Cameras in Sequence mode, regardless of the display on the DVR (i.e Camera Views, Menus, Playback, etc.) to a TV or VCR. • Configure the Spot Out settings using the System Menu controls (when in DVR Mode). This feature is used for situations in which you want to have the system in a back room while still displaying images to the public eye, for theft deterrence or advertising purposes. SYSTEM SPOT OUT MONITOR (Not Included) 134 Appendix L: Connecting Motion / Alarm Devices Appendix L: Connecting Motion / Alarm Devices Motion detection and Alarm controls are enabled through the Menu system on the System. Additional motion sensor devices can be connected to the system (Motion Sensors, Door/ Window Sensors). A motion detection or sensor unit can be used to send a signal to the System to begin camera viewing on the matching Video Channel (when enabled in the Menu). • Example: A Window sensor unit has been installed on Alarm Block port #4. When this sensor is activated, the camera on DIN or BNC VIDEO port #4 will become active (if enabled in the MENU on the System) Installing a Sensor 1. Connect the GROUND Cable to the GND port on the Alarm Block on the System 2. Connect the SIGNAL Cable to a numbered port (1-8) To start ALARM RECORDING on the System, configure the System Menu. SYSTEM SENSOR (Not Included) 1-4 / 5-8: Alarm input terminals receive a signal from a device (i.e. Door or Window Sensor). Ground NO / NC: Alarm Output Terminals send a signal to another device when an alarm input is detected. 135 Appendix M: Connecting PTZ Cameras Appendix M: Connecting PTZ Cameras PTZ Cameras (not included with this system) can be connected to the PTZ Control Block on the back panel of the System. The PTZ Controls are enabled through the Menu system on the System. Additional PTZ Cameras are available at http://www.lorexcctv.com Installing a PTZ (RS-485 Type) PTZ Camera: 1. Connect the Transmit Cable to the D+ port on the PTZ Control Block on the System. 2. Connect the Receive Cable to the D- port on the PTZ Control Block on the System. 3. Connect the Camera to a BNC Channel. 4. Configure PTZ Menu options. The PTZ Camera Settings will depend on the Type of Camera refer to the specific Camera Manual for your brand and model of PTZ Camera. Installing a PTZ (RS-232 Type) PTZ Camera: 1. Connect the Transmit Cable to the TX port on the RS-232 Block on the System. 2. Connect the Receive Cable to the RX port on the RS-232 Block on the System. 3. Connect the Camera to a BNC Channel. 4. Configure PTZ Menu options. The PTZ Camera Settings will depend on the Type of Camera refer to the specific Camera Manual for your brand and model of PTZ Camera. SYSTEM PTZ CAMERA (Not Included) 136 Appendix N: Full Connectivity Diagram Appendix N: Full Connectivity Diagram The following diagram outlines a general set of connections available with the System. PC for Remote Access (not included) DIN CAMERAS CH1~4 (not included) ROUTER (not included) SPOT MONITOR (not included) DVD PLAYER (not included) POWER DC 12V LINE-IN / AUDIO OUT (speakers not included) BNC CAMERAS CH1~8 BNC CAMERAS CH9~16 VIA OCTOPUS CABLE PTZ CAMERA (not included) VGA MONITOR (not included) SENSOR (not included) 137 LOREX PRODUCT LIMITED WARRANTY Revision 1.0 1 year (Warranted parts do not include Bulbs, LED’s and Batteries) Lorex warrants, to the original retail purchaser only (the “Purchaser”), that this item (the “Product”) if properly used and installed, and where applicable, the CD-ROM on which the accompanying software is provided, is free from manufacturing defects in material and workmanship, provided the Product is used in normal conditions and is installed and used in strict accordance with the instructions contained. This warranty shall be for the following warranty periods (the “Warranty Period”), commencing on the date the Purchaser buys the Product at retail in an unused condition. Parts and Labor: Lorex’s obligations under this warranty shall be limited to • The repair and or replacement of the product by means of hardware and/or software (at option of Lorex); • The replacement of any warranted parts found by Lorex to be defective in the Product or, in Lorex’s sole discretion, the replacement of the Product found be Lorex to be defective. • If Lorex is unable to repair or replace the Product or CD-ROM, refund the then-current value of the Product. Any replacement parts furnished by Lorex in connection with this warranty shall be warranted to the Purchaser for a period equal to the un expired portion of Warranty Period for the Product. Warranty Exclusions This warranty does not apply to Bulbs, LED’s and Batteries supplied with or forming part of the product. This warranty is invalidated if other than Lorex accessories are or have been used in or in connection with the Product or in any modification or repair is made to the Product by other than a service depot authorized by Lorex. This warranty does not apply to defects or damages arising by use of the Product in other than normal (including normal atmospheric, moisture and humidity) conditions or by installation or use of the Product other than in strict accordance with the instructions contained in the Product’s Owner’s Manual. This warranty does not apply to defects in or damages to the Product caused by (i) negligent use of the Product, (ii) misuse, abuse, neglect, alteration, repair or improper installation of the Product, (iii) electrical short circuits or transients, (iv) Purchaser usage not in accordance with product installation, (v) use of replacement parts not supplied by Lorex (vi) improper Product maintenance, or (viii) accident, fire, flood or other Acts of God. This warranty does not cover the performance or functionality of any computer software included in the package with the Product. This warranty only covers defects in the CD-ROM media such as a broken or a defect in the CD-ROM that would prevent the CD-ROM from being read by your personal computer’s CD-ROM drive. Lorex makes no warranty that the software provided with the Product will function without interruption or otherwise be free of anomalies, errors or ‘Bugs’. Lorex makes no warranty with regard to any software provided with the Product unless specifically set forth otherwise in a license agreement accompanying such software. This warranty does not cover any costs relating to removal or replacement of any Product, CD-ROM, or software installed on your computer. Lorex reserves the right to make changes in design or to make additions to or improvements in its products without incurring any obligation to modify any product which has already been manufactured. Lorex will make every effort to provide updates and fixes to its software via its website. This warranty does not cover any alteration or damage to any other software that may be or may become resident on the users system as a result of installing the software provided. This warranty is in lieu of other warranties, express or implied, and Lorex neither assumes nor authorizes any person to assume for it any other obligation or liability in correction with the sale or service of the Product. In no event shall Lorex be liable for any special or consequential damages arising from the use of the Product or arising from the malfunctioning or non-functioning of the Product, or for any delay in the performance of this warranty due to any cause beyond its control. This warranty shall not apply to the appearance or accessory items including, but not limited to cabinets, cabinet parts, knobs etc., and the uncrating, setup, installation or the removal and reinstallation of products after repair. Lorex does not make any claims or warranties of any kind whatsoever regarding the Product’s potential, ability or effectiveness to prevent minimize, or in any way affect personal or property damage or injury. Lorex is not responsible for any personal damage, loss or theft related to the Product or to its use for any harm, whether physical or mental related thereto. Any and all claims or statements, whether written or verbal, by salespeople, retailers, dealers or distributors to the contrary are not authorized by Lorex, and do not affect this provision of this warranty. Lorex’s responsibility under this, or any other warranty, implied or expressed, is limited to repair, replacement or refund, as set forth above. These remedies are the sole and exclusive remedies for any breach of warranty. Lorex is not responsible for direct, special, incidental, or consequential damages resulting from any breach of warranty or under any other legal theory including but not limited to, loss profits, downtime, goodwill, damage to or replacement of equipment and property and any costs of recovering, reprogramming or reproducing any program or data stored in or used with a system containing the Product CD-ROM or accompanying software. Lorex does not warrant that the software will operate with any other software except that which is indicated. Lorex cannot be responsible for characteristics of third party hardware or software which may effect the operation of the software included. The purchaser may have other rights under state, provincial, or federal laws and where the whole or part of any item of this warranty is prohibited by such laws, it shall be deemed null and void, but the remainder of the warranty shall remain in effect. All expressed and implied warranties are limited in duration to the limited warranty period. No warranties apply after that period. Some states do not allow limitation on how long an implied warranty lasts, so this limitation may not apply to you. Some states do not allow the exclusion or limitation of incidental or consequential damages, so the above warranty may not apply to you. This limited warranty gives you specific legal rights and you may also have other rights that vary from state to state. Obtaining Service In order to obtain service, please make sure that you have registered your product on-line (www.lorexcctv.com) in the warranty registration section. Should the Product require service under this warranty, the Purchaser must provide Lorex with a copy of his/ her original, dated bill of sale; receipt or invoice, failing which Lorex will not perform any of its obligations under this warranty. If you return the Product and/or CD-ROM to Lorex, you must assume the risk of damage or loss during shipment. You must use the original packaging or the equivalent, and you must pay postage. To claim on this warranty, proceed with the following steps. ii). If the unit was purchased in Canada proceed as follows: Please contact our customer service department to obtain a return authorization number. Return the unit to: Lorex Service Center. 300 Alden Road, Markham, Ont. L3R 4C1 iii) If the unit was purchased in Europe please visit: 1 Pack the Product in a well-padded sturdy carton. 2. i). If the unit was purchased in the United States proceed as follows: a. Please contact our customer service department to obtain a return authorization number. Return the unit to: Lorex Service Center 2375 Hadley Rd, Plainfield, IN 46168 b. a. b. www.lorexinternational.com for return instructions. TOLL FREE CUSTOMER SUPPORT North America: 1-888-42-LOREX (1-888-425-6739) Local: 905-940-5355 International: 800-42-LOREX 0 (800-425-67390) www.lorexcctv.com Always use discretion when installing video and/or audio surveillance equipment especially when there is perceived privacy. Inquire regarding federal, state and/or local regulations www.strategicvista.com applicable to the lawful installation of video and or audio recording or surveillance. Party consent may be required. GARANTIE LIMITÉE DES PRODUITS LOREX Lorex garantit à l'acheteur original (ci-après désigné comme étant "l'acheteur") dans un magasin au détail seulement, et que ce produit (ci-après désigné comme étant le "produit"), s'il est installé correctement et - s’il y a lieu - utilisé conformément aux instructions ci-incluses, et le disque CDROM qui comporte le logiciel, seront libres de tout défaut de fabrication, tant dans les pièces que la main-d'oeuvre, pourvu que le produit soit utilisé dans des conditions normales et installé et utilisé strictement selon les instructions incluses dans le guide qui l'accompagne. Cette garantie couvrira la période mentionnée ci-dessous (ci-après désignée comme étant la "période de garantie"), commençant le jour où l'acheteur se procure le produit à l'état neuf dans un magasin au détail. Pièces et main-d'oeuvre : 1 année (les pièces couvertes n'incluent pas les ampoules, voyants à DEL ni les piles). Les obligations de Lorex selon les termes de cette garantie se limitent exclusivement aux points suivants : • Lorex se réserve le droit de réparer ou de remplacer, sa seule discrétion, le logiciel et/ou le matériel. • Le remplacement des pièces sous garantie que Lorex estime être défectueuses dans le produit ou le disque CD-ROM ou, à sa seule discrétion, le remplacement du produit jugé défectueux. • Si Lorex ne peut réparer ni remplacer le produit ou le disque CD-ROM, rembourser la valeur monétaire du produit ou du disque CD-ROM en cours au moment de l'achat. Toutes les pièces remplacées par Lorex seront couvertes pendant la période résiduelle de la garantie dudit produit. Exclusions de la garantie Pour obtenir du service, veuillez vous assurer que vous avez inscrit votre produit en ligne (www.lorexcctv.com) dans la section d'abonnement à la garantie. Cette garantie ne couvre pas les ampoules, voyants à DEL ni les piles incluses avec le produit ou faisant partie de celui-ci. Cette garantie deviendra nulle si des accessoires autres que ceux vendus ou distribués par Lorex sont utilisés ou ont été utilisés conjointement avec le produit ou si des modifications ou des réparations ont été effectuées au produit par une entité autre qu'un centre de service autorisé par Lorex. Cette garantie ne s'applique pas aux défauts ni aux dommages survenus suite à une utilisation anormale du produit (incluant des conditions atmosphériques et des taux d'humidité anormaux) ou suite à une installation ou une utilisation du produit autre que celle décrite dans le guide accompagnant le produit. Cette garantie ne s'applique pas aux défauts ni aux dommages causés au produit suite à (i) une utilisation insouciante du produit, (ii) mauvaise utilisation, abus, négligence, modification ou mauvaise installation du produit, (iii) court-circuits ou transitoires électriques, (iv) tout usage de l'acheteur qui ne correspond pas à l'installation prescrite du produit, (v) l'utilisation de pièces non fournies par Lorex, (vi) un entretien inadéquat du produit, ou (vii) tout accident, incendie, inondation ou autres désastres naturels. Cette garantie ne couvre pas la performance ni la fonctionnalité de tout logiciel informatique inclus avec le produit. Cette garantie ne couvre pas les défauts que pourrait contenir le support optique (disque CD-ROM) ou magnétique (disquette), tel qu'un CD-ROM brisé ou comportant un défaut qui l'empêcherait d'être lu adéquatement par le lecteur de disque de votre ordinateur. Lorex ne garantit pas que le logiciel fourni avec le produit fonctionnera sans interruption ni qu'il sera libre de tout défaut, d'erreurs ou de 'bogues'. Lorex ne garantit pas le logiciel inclus à moins que cela ne le soit mentionné spécifiquement dans l'entente de la licence incluse avec le produit. Cette garantie ne couvre pas les frais se rapportant à l'enlèvement ni à la réinsertion de tout produit, logiciel, périphérique ou disque CD-ROM installé sur votre ordinateur. Lorex se réserve le droit de modifier la conception ou d'apporter des ajouts ou des améliorations à ses produits, sans obligation de sa part de modifier les produits déjà fabriqués. Lorex fera tout en son pouvoir pour fournir des améliorations et des réparations à son logiciel via son site web. Cette garantie ne couvre pas les altérations ni les dommages effectues tout autre logiciel, ni les bogues pouvant résider de fa on permanente sur le système de l'utilisateur suite l'installation du logiciel ci-inclus. Cette garantie a préséance sur toutes les autres garanties tacites ou explicites, incluant la garantie en qualité loyale et marchande et les aptitudes visant toute autre obligation ou responsabilité de la part de Lorex, et par les présentes, Lorex n’autorise aucune personne ni entité à assumer pour elle nulle autre responsabilité en rapport avec la vente de ce produit. Lorex ne sera pas tenue responsable, en aucune circonstance, des dommagesintérêts directs ou indirects survenant de l'utilisation du produit ou suite au mauvais fonctionnement ou à l'absence de fonctionnement dudit produit, ainsi que pour tout délai dans l'exécution de cette garantie suite à des circonstances hors du contrôle de Lorex. Lorex ne garantit d’aucune manière l'apparence extérieure du produit, ni les pièces ou accessoires incluant, mais ne s'y limitant pas, le boîtier, les pièces du boîtier, les boutons, etc., ainsi que le déballage, l'installation, l'enlèvement et la réinstallation du produit après une réparation. Lorex ne garantit pas et ne fait aucune revendication en ce qui a trait au potentiel, à la capacité ou l'efficacité de prévenir, réduire ou d'une façon quelconque, d'influer sur les dommages à la propriété privée ou sur les blessures corporelles. Lorex ne sera pas tenue responsable des blessures corporelles, dommages à la propriété personnelle, perte ni au vol se rapportant de près ou de loin au produit ou son usage dans un cadre malveillant, qu'il soit physique ou mental. Lorex n'autorise aucunement les représentants, détaillants ou grossistes, à faire des revendications ou des énoncés de la part de Lorex, tant par voie écrite que verbale et ces énoncés n'influent d'aucune manière sur les clauses de cette garantie. La seule responsabilité de Lorex, selon les termes de cette garantie, qu'ils soient tacites ou explicites, se limite à une réparation, un remplacement ou un remboursement, selon les clauses décrites dans les présentes. Ces recours constituent les seuls auxquels a droit l'acheteur pour les bris des clauses de la garantie. Lorex ne sera pas responsable des dommages-intérêts spéciaux, directs ou indirects, qui résulteraient d'un bris des clauses de cette garantie ou de toute autre convention législative, incluant mais ne s'y limitant pas, les pertes de profits, pannes de courant immobilisant des équipements, la valeur ajoutée des biens incorporels, les dommages effectués au produit et à la propriété ou les coûts reliés à leur remplacement, ainsi que les frais de recouvrement, reprogrammation ou reproduction d'un programme ou des données stockées dans un système contenant le disque CD-ROM du produit ou le logiciel qui accompagne celui-ci. L'acheteur peut bénéficier de certains droits provinciaux ou fédéraux additionnels et toute clause de cette garantie qui soit prohibée par de telles lois sera jugée nulle et sans effet mais les autres clauses demeureront en vigueur. Lorex ne garantit pas que ce logiciel fonctionnera conjointement avec tout autre logiciel ou suite logicielle, ˆ moins que cela ne soit indique. Lorex ne sera pas tenue responsable des caractéristiques ni des fonctions du matériel ou des logiciels d'un tiers pouvant entrer en conflit avec le fonctionnement du logiciel ci-inclus. Toutes les garanties tacites ou explicites se limitent à la durée de la garantie limitée. Aucune garantie ne sera applicable après cette période de temps. Certains états ou provinces ne permettent pas de restrictions en ce qui a trait aux termes d’une garantie tacite, ni d’exclusions aux dommages-intérêts directs ou indirects et il se peut que ces restrictions ne s'appliquent pas à vous. Cette garantie donne à l’acheteur original des droits spécifiques et il se peut que d’autres droits, variant d’un état ou d’une province à l’autre, puissent lui être conférés. Obtention du service Si l'acheteur a besoin de service pour son produit, selon les termes de cette garantie limitée, il doit fournir à Lorex une copie de la facture d'achat affichant clairement la date et l'endroit où le produit a été acheté. Sans cette preuve d'achat, Lorex ne sera pas dans l'obligation de remplir ses obligations envers l'acheteur. Si vous retournez le produit et/ou le disque CD-ROM à Lorex, vous devez assumer le risque que ceux-ci soient endommagés ou perdus au cours de l'expédition. Vous devez emballer le produit dans sa boîte originale ou un emballage adéquat et vous devez défrayer les coûts d'expédition à l'une des adresses mentionnées ci-dessous. Pour bénéficier du service sous garantie, vous devez suivre les étapes ci-dessous : 1. Emballez le produit dans une boîte solide et remplie de matériau d'expédition. 2. i) Si l'appareil a été acheté aux États-Unis, suivez ces étapes-ci : a. Veuillez contacter notre département de service à la clientèle pour obtenir un numéro d'autorisation pour le retour. b. Retournez le produit à : Lorex Customer Service 2375 Hadley Rd, Plainfield, IN 46168 ii) Si l'appareil a été acheté au Canada, suivez ces étapes-ci : a. Veuillez contacter notre département de service à la clientèle pour obtenir un numéro d'autorisation pour le retour. b. Retournez le produit à : Lorex Customer Service 300 Alden Road, Markham, ON L3R 4C1 iii) Si l'unité a été achetée dans Europe veuillez visiter : www.lorexinternational.com pour les instructions de retour COMPOSEZ LA LIGNE D’ASSISTANCE SANS FRAIS AUS CONOMMATEURS: L'Amérique du nord: 1-888-42-LOREX (1-888-425-6739) Local : 905-940-5355 International : 800-42-LOREX 0 (800-425-67390) www.lorexcctv.com Soyez toujours très discret lorsque vous installez des systèmes de surveillance, surtout dans les endroits plus retirés. Informezvous au sujet des lois et règlements municipaux, provinciaux ou fédéraux qui s’appliquent à l’installation d’appareils de surveillance audio et vidéo. Il se peut que le consentement de la partie surveillée soit exigé. GARANTÍA LIMITADA DEL PRODUCTO LOREX Lorex garantiza, sólo al comprador original al por menor (el “Comprador”) que este artículo (el “Producto”), si se usa e instala debidamente, y – si hay lugar - el CD-ROM en el que se proporciona el software asociado, está libre de defectos de fabricación en materiales y mano de obra, sujeto a que el Producto sea usado en condiciones normales y que sea instalado y usado estrictamente de acuerdo con las instrucciones contenidas. Esta garantía será para los siguientes períodos de garantía (el “Período de Garantía”), a partir de la fecha en que el Comprador adquiera el Producto al por menor en la condición de no haber sido usado previamente. Repuestos y Mano de Obra: 1 año (Las piezas garantizadas no incluyen bombillas, LEDs y baterías) Las obligaciones de Lorex bajo esta garantía estarán limitadas a: • la reparación o el reemplazo del producto por medio de hardware y/o software (a opción de Lorex). • el reemplazo de cualquier parte garantizada que Lorex determine que está defectuosa en el Producto o CD-ROM o, por decisión única de Lorex, al reemplazo del Producto que Lorex encuentre defectuoso. • Si a Lorex no le es posible reparar o reemplazar el Producto o el CD-ROM, se devolverá el valor vigente en ese momento del Producto o CD-ROM. Se garantizará al Comprador cualquier pieza de repuesto provista por Lorex en conexión con esta garantía por un período igual a la parte no vencida del Período de Garantía del Producto. Exclusiones de la garantía Esta garantía no se aplica a las bombillas, LEDs y baterías suministradas con el producto o que formen parte del mismo. Esta garantía quedará nula si se han usado accesorios que no son Lorex en el Producto o en relación con el mismo o si se hace alguna modificación o reparación al Producto en algún taller que no sea un local de servicio autorizado por Lorex. Esta garantía no se aplica a defectos o daños resultantes del uso del producto en condiciones diferentes a las normales (incluyendo condiciones atmosféricas o de humedad normales) o por la instalación o uso del Producto en forma distinta a seguir estrictamente las instrucciones contenidas en el Manual del Propietario del Producto. Exclusiones de la garantía Esta garantía no se aplica a las bombillas, LEDs y baterías suministradas con el producto o que formen parte del mismo. Esta garantía quedará nula si se han usado accesorios que no son Lorex en el Producto o en relación con el mismo o si se hace alguna modificación o reparación al Producto en algún taller que no sea un local de servicio autorizado por Lorex. Esta garantía no se aplica a defectos o daños resultantes del uso del producto en condiciones diferentes a las normales (incluyendo condiciones atmosféricas o de humedad normales) o por la instalación o uso del Producto en forma distinta a seguir estrictamente las instrucciones contenidas en el Manual del Propietario del Producto. Esta garantía no se aplica a defectos o daños al Producto causados por (i) uso negligente del Producto, (ii) mal uso, abuso, negligencia, alteración, reparación o instalación incorrecta del Producto, (iii) cortocircuitos o corrientes eléctricas transitorias, (iv) uso por el Comprador que no está de acuerdo con la instalación del producto, (v) uso de piezas de repuesto no suplidas por Lorex (vi) inadecuado mantenimiento del Producto, o (vii) accidente, incendio, inundación u otros accidentes naturales. Esta garantía no cubre el rendimiento o funcionalidad de ningún software de computadora incluido en el paquete con el Producto. Esta garantía sólo cubre defectos en el material de CD-ROM, tal como roturas o defectos en el CD-ROM que impida que sea leído por la unidad de CD-ROM de su computadora personal. Lorex no garantiza que el software provisto con el Producto funcione sin interrupción o que de otra forma esté libre de anomalías, errores o “bugs”. Lorex no ofrece ninguna garantiza con respecto a algún software provisto con el equipo a menos que específicamente se establezca de otra forma en un acuerdo de licencia que acompañe a dicho software. Esta garantía no cubre ningún costo relativo a la remoción o reemplazo de algún Producto, CD-ROM, o software instalado en su computadora. Lorex se reserva el derecho de hacer cambios en el diseño o hacer adiciones o mejoras a sus productos sin incurrir en ninguna obligación de modificar algún producto que ya haya sido fabricado. Lorex tratará en lo posible de proporcionar actualizaciones y arreglos a su software por medio de su página en la red. Esta garantía no cubre ninguna alteración ni daño a algún otro software que pueda ser instalado o pueda quedar instalado en el sistema del usuario como resultado de la instalación del software provisto. Esta garantía es el reemplazo de otras garantías, expresas o implícitas, y Lorex no asume ni autoriza a ninguna persona a asumir por ella ninguna obligación en relación con la venta o servicio del producto. En ningún caso Lorex será responsable por ningún daño o perjuicio especial o consecuente resultante del uso del Producto o de su mal funcionamiento o incapacidad de funcionar, o por cualquier demora en la atención de esta garantía debida a causas fuera de su control. Esta garantía no se aplicará a la apariencia o artículos accesorios incluyendo, sin estar limitado a ellos, gabinetes, piezas de gabinetes, perillas, etc., y el desembalaje, instalación, configuración, o remoción y reinstalación del producto después de ser reparado. Lorex no hace ninguna de cada declaración ni garantía de ninguna clase con respecto al potencial, capacidad o eficacia del Producto para evitar, minimizar o en alguna forma afectar a los daños o lesiones personales o a la propiedad. Lorex no es responsable por ningún daño personal, siniestro o robo relacionado con el Producto o a su uso para cualquier daño, sea físico o mental relacionado con el mismo. Cualquier afirmación o declaración, sea escrita o verbal, hecha por vendedores, minoristas o distribuidores en sentido contrario no es autorizada por Lorex y no afecta esta disposición de esta garantía. La responsabilidad de Lorex según ésta o cualquier otra garantía, implícita o explícita, está limitada a la reparación, reemplazo o reembolso, como se establece anteriormente. Estas compensaciones son el único y exclusivo remedio por cualquier incumplimiento de garantía. Lorex no es responsable por daños y perjuicios directos, especiales, incidentes, o consecuentes resultantes de algún incumplimiento de garantía o bajo cualquier otra teoría legal, incluyendo pero sin estar limitada a: pérdida de utilidades, paralización, plusvalía, daños o reemplazo de equipos y propiedad y cualquier costo de recuperar, reprogramar o reproducir cualquier programa o datos almacenados o usados con un sistema que contenga el CD-ROM del Producto o el software que lo acompaña. Lorex no garantiza que el software operará con ningún otro software excepto con el que se indica. Lorex no puede ser responsable de las características de hardware o software de terceras personas que puedan afectar la operación del software incluido. El comprador puede tener otros derechos de acuerdo con las leyes federales, provinciales o estatales y cuando toda esta garantía o parte de la misma sea prohibida por dichas leyes, será considerada nula, pero el resto de la garantía permanecerá vigente. Todas las garantías expresadas e implícitas están limitadas en duración al período de garantía limitada. Ninguna garantía se aplicará después de dicho período. Algunos estados no permiten limitación a la duración de una garantía implícita, de modo que esta limitación puede no serle de aplicación. Algunos estados no permiten la exclusión o limitación de daños y perjuicios incidentes o consecuentes, por lo que la garantía anterior puede no serle de aplicación. Esta garantía limitada le otorga derechos legales específicos y usted puede también tener otros derechos que varía de un estado a otro. Cómo obtener servicio ii). Si la unidad fue comprada en Canadá proceda en la siguiente forma: Para devoluciones por favor contacte nuestro departamento de servicio para obtener un número de autorización. Devuelva la unidad a: Lorex Customer Service. 300 Alden Road, Markham, Ont. L3R 4C1 Para devoluciones por favor contacte nuestro departamento de servicio para obtener un número de autorización Devuelva la unidad a: Lorex Customer Service 2375 Hadley Rd, Plainfield, IN 46168 Empaque el Producto en una caja robusta bien acolchada. i). Si la unidad fue comprada en Estados Unidos proceda en la siguiente forma: Con el fin de obtener servicio, por favor asegúrese de registrar haber registrado su producto en nuestra pagina web www.lorexcctv.com en la sección de registro de garantía. Si el Producto necesitase servicio bajo esta garantía, el Comprador debe hacer llegar a Lorex una copia del recibo o factura de compra, con su fecha respectiva, sin lo cual Lorex no estará obligada a cumplir con ninguna de sus obligaciones bajo esta garantía. Si devuelve el Producto y/o el CD-ROM a Lorex, debe usted asumir el riesgo de daño o pérdida durante el envío. Debe usar el envase original o equivalente y debe pagar el flete. Para hacer un reclamo bajo esta garantía, proceda con los siguientes pasos. 1. 2. 1. a. b. a. b. iii) Si la unidad fue adquirida en Europa y desea devolver el producto por favor visite: www.lorexinternational.com para obtener instrucciones. NUMERO GRATUITO DE SERVICIO A CLIENTES: Norteamérica: 1-888-42-LOREX (1-888-425-6739) Internacional: 800-42-LOREX 0 (800-425-67390) Local : 905-940-5355 www.lorexcctv.com Use siempre discreción cuando instale equipo de vigilancia por video y/o audio especialmente cuando se percibe privacidad. Consulte acerca de las regulaciones federales, estatales y /o locales aplicables a la instalación legal de equipos de grabación o vigilancia por video y/o audio. Puede requerirse el consentimiento de las partes. See Hear PROTECT Enhance your security with genuine Lorex Cameras, Digital Video Recorders, Integrated Systems and Accessories. Order whatever you need at www.lorexcctv.com or call 1-888-42-LOREX (1-888-425-6739) Warehouse CVC6998HR Office CVC6993R Restaurant Convenience Store CNC1020 VQ1536HR PROTECT EVERYTHING THAT MATTERS Day Care Home Office Add wired or wireless cameras to expand the “Envelope of Protection” for your business, your home and your family LW2602 Drive Way SG7555 Front Door LW1010 Nursery LW2002W LW2002B Backyard LW2201