1
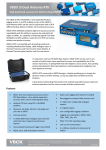
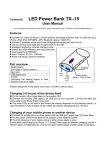
Head Up Display
User Manual
Thank you for purchasing our HUD. This product is for drivers’ safety, especially in
high-speed driving at night, HUD can keep driver eyes on the road and can decrease
car accident. HUD can project the important information (such as speed) onto the
windshield, it can help inexperienced novice to control their speed and to avoid
speeding violation in the speed limit road. More importantly, it enables the driver
instantly read the number in great vision and always make drivers eyes on the road in
clear mind.
Our HUD can display many useful information, and allows you to experience the
speed and also to ensure your driving safety and driving pleasure.
Our HUD uses the latest stable integrated circuits, all indexes are in line with the
standards. And our HUD has unique and elegant shape, smooth lines, thin body.
Before you using our HUD, please read the instructions in detail.
HUD main features
1. Apply to all cars in the world. Plug and Play.
2. 5.5” screen and high-definition display
3. Multi-color design makes the screen more abundant and easier to read
4. The use of nano-technology to eliminate unwanted reflections and can make
display information more sharper.
5. Display rich content: speed,driving direction,driving time, driving distance,
real time, satellite number, altitude,speed alarm,free switching between kilometer and
mile
6. Auto power on and off with vehicle started and shutdown, effective
protection of the car battery; while retaining the manual switch mode, and more easy
to control HUD.
7. Automatic and manual brightness adjustment mode, driving without glare.
HUD Button function
1.USB interface, to contact the vehicle OBD interface.
2.Button for power on and off
3. Wave button: Up button (turning the button to upside),OK button(pressing the
button vertically),Down button (turning the button to downside)
HUD display information
1 :real time icon
2 :display driving time and altitude
3 :function setting icon
4 :speed alarm
5 :speed
6 :driving direction and buzzer mark
7 :driving distance(KM/MILE) and driving time(Min)
8 :speed and voltage
9 :unit of speed and voltage
10:light sensor
11:unit of driving distance and driving time
12:Satellite icon
13:satellite number
14:speed icon
HUD installation
Put HUD on non-slip mat and then place on the dashboard. Connect one side of USB cable with
HUD interface and connect the other side of USB cable to the car cigarette lighter. Then start the
engine, LED will light, satellite icon will flash and HUD will search the satellite signal, HUD will
work.
Reflection film installation
Please Note: HUD project the display information on the car front windscreen ,
because the windscreen is double, which will make double image on the windscreen
when display.The double image of car will be different.If you can see clear the display
information, then there is no need to use the reflection film. If there is a double image,
then please use the reflection film.
First, please put the supplied non-slip mats in front of the dashboard, and then put the
HUD on it.
Second,please stick the reflection film on the windscreen.
The reflecting film should be pasted right above the host machine and it should be
able to reflect the whole display screen.
Methods of pasting the film:
1. Spray some water on the place that the film will be pasted on,and then use a dry
towel to clean it;
2. Tear off the back side(marked 1) of reflection film,then paste it to the right place.
3. After you have adjusted the location well, you can use a scratch board or
something else flat to slick the film and squeeze the water inside out until there is no
bubble or water in it.
4. Tear off the front side (marked 2) of the reflection film. If the film cannot display
the whole information, please adjust the non-slip mat.
Time adjustment
Please confirm the timezone of your country for the first time using.(the default
timezone is GMT+8). When connect HUD and power on, long press the wave button
vertically for 5s to enter into the setting menu.Then short press 6 times, the menu
display number 6, and the parameter display 8,upside or downside the wave button to
adjust to your country timezone,long time the wave button for 5s to back to the
display interface.
HUD
display
number
country
timezone
0
England,Ireland,Iceland,Portugal
GMT
1
Norway, Sweden, Denmark, Poland, Germany, France, the Netherlands,
Spain, Italy
GMT+1
2
Finland, Belarus, Ukraine, Romania, Turkey, Israel, Egypt, South Africa
GMT+2
3
Russia, Saudi Arabia, Bahrain, Kenya, Iran
GMT+3
4
Mauritius, United Arab Emirates, Afghanistan, Seychelles
GMT+4
5
Mauritius, United Arab Emirates, Afghanistan, Seychelles and Pakistan,
Turkmenistan, Sri Lanka, India
GMT+5
6
Bangladesh, Kazakhstan, Bhutan, Nepal
GMT+6
7
Vietnam, Laos, Cambodia, Thailand, Indonesia
GMT+7
8
China, Malaysia, Singapore, Philippines, Hong Kong, Taiwan, Macau
GMT+8
9
Japan, South Korea
GMT+9
10
Australia, Guam
GMT+10
11
Solomon Islands, Vanuatu
GMT+11
12
New Zealand, Fiji
GMT+12
13
Azores
GMT-1
14
Mid-Atlantic, Cape Verde
GMT-2
15
Brazil, Argentina, Uruguay
GMT-3
16
Venezuela, Bolivia, Paraguay, intelligence
GMT-4
17
Canada, Panama, Cuba, New York
GMT-5
18
Mexico
GMT-6
19
Salt Lake City
GMT-7
20
California, San Francisco, CA
GMT-8
21
East Alaska
GMT-9
22
Hawaii
GMT-10
23
Samoa, Midway
GMT-11
HUD setting
HUD display information is from satellite GPS , because when producing car, there is
a difference between vehicle dashboard and satellite GPS calculated value , then you
can enter the setup mode to fine-tune the HUD display value, in order to achieve
exactly the same value as dashboard. We have adjusted HUD according to the general
test values at the factory, if you find HUD display information is different from
dashboard,then make the following adjustments:
1.Long press the wave button vertically for 5s
Please enter into the setting mode,there are three button for wave button: Up button
(turning the button to upside),OK button(pressing the button vertically),Down button
(turning the button to downside) , after enter into the setting mode, press the OK
button vertically one time, the menu will increase one. Turning the upside button or
downside button to increase or decrease the parameter. After finish the adjustment,
Long press the wave button vertically for 5s to return to the display interface.
Enter to the setting mode:
The parameter is as below:
Menu Parameters
0
Speed
Adjustment Explanation
range
50-150
Adjustment range 50%-150%
1
Speed alarm
50-5000
Adjustment range 50%-150%
120
2
Brightness
adjustment
Speed unit
0-2
0
0-2
0 is the automatic adjustment; 1 is the
darkest and 2 is the brightest.
0 is KM, 1 is Mile,2 is voltage
Function
switch
Driving time
and altitude
switch
timezone
0-2
0 is KM,1 is driving time,2 is Mile
0
0-1
0 is driving time,1 is altitude
0
0-23
0-23 timezone
8
3
4
5
6
7
8
Start reference 110-150
voltage
Restore to
0-1
factory setting
Default
107
0
This is the auto power on and off voltage of 132
HUD, and no need to set
Set to 1,vertically press the OK button for 0
5s, then return to the display interface.
2.Vertically short press the OK button:
Switch the display information,e.g. KM, driving time(MIN),Mile
3.Downside turn the wave button for 5s,the alarm buzzer icon will off, and downside
turn the wave button for 5s again, the alarm buzzer icon will on.
4. Restore to factory setting: when HUD is power on, long press the wave button vertically for 5s
to enter into the menu setting, short press to mean 8, and downside the wave button to parameter 1,
and press the wave button for 5s to back to the display interface.
working voltage
Working current
sleeping current
DC8-18-24V
40mA
15mA
Compass precision
Speed range
Real time precision
HUD size
12V car charger
HUD weight
±1°
0-400KM
The same as satellite
13cm*7.8cm*1.5m
1000mA,USB cable: 1m
115g