1
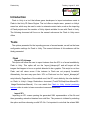
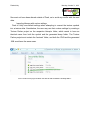
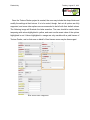
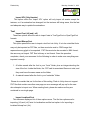
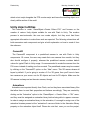
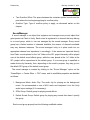
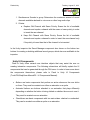
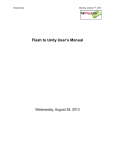
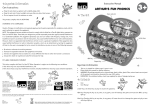
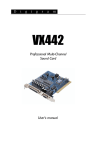
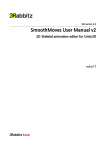
Monday, October 7th, 2013 FlashtoUnity The Flash to Unity Menu Friday, February 7th, 2014 FlashtoUnity Tuesday, August 27, 2013 Abstract: This document explains in detail the whole functionality of Flash to Unity’s menu at Unity’s bar. It develops on the contents of each sub-menu and attempts to familiarize the user with the basic environment of the tool. FlashtoUnity Monday, October 7th, 2013 Table of Contents Introduction ..................................................................................................................................... 4 Tools ............................................................................................................................................... 4 Flash ............................................................................................................................................ 4 Export XFL bitmaps ............................................................................................................... 4 Import XFL ............................................................................................................................. 4 Import XFL (Only binaries) .................................................................................................... 7 Text ............................................................................................................................................. 7 Import Font (.ttf) and (.otf) ..................................................................................................... 7 Import Bitmap Font................................................................................................................. 7 Import Localized Font............................................................................................................. 7 Paths ............................................................................................................................................ 8 Profiling utilities ............................................................................................................................. 8 Memory Profiler.......................................................................................................................... 8 FPS Counter ................................................................................................................................ 8 Unity object utilities........................................................................................................................ 9 Camera2D ................................................................................................................................... 9 Animations .................................................................................................................................. 9 Hierarchy coloring and tints.................................................................................................. 10 Advanced Animation ............................................................................................................ 11 Sprites ....................................................................................................................................... 11 Sprite ..................................................................................................................................... 12 Sprite Renderer ..................................................................................................................... 12 Texts.......................................................................................................................................... 13 SoundManager .......................................................................................................................... 15 Unity UI Components ............................................................................................................... 16 The help submenu ......................................................................................................................... 17 FlashtoUnity Tuesday, August 27, 2013 Introduction Flash to Unity is a tool that allows game developers to import animations made in Flash to the Unity 3D Game Engine. The tool offers a simple menu, present on Unity’s menu bar, which may be used in order to automate certain tasks, such as the importing of Flash projects and the creation of Unity objects suitable for use with Flash to Unity. The following document will focus on the several sub-menus the Flash to Unity menu offers Tools The options presented for the importing process of several assets, as well as the base configuration settings for Flash to Unity. The several divisions of this submenu will be thusly presented. Flash Export XFL bitmaps This option will allow the user to export textures from the XFL to a format readable by Flash to Unity. This option will run the “export_bitmaps.jsfl” and will export all the images that happen to be on a symbol detected to be a graphic. This script is run from Flash, and will return errors if the textures in Flash are not properly formatted. Alternatively, the user may open their .XFL on Flash and run the “export_bitmaps.jsfl” script directly. Regardless of the method used, the XFL must abide by the rules detailed on Flash to Unity’s Usage Restrictions document (Tools/F2U/Help/User Manual/09 Usage Restrictions Manual). You can watch the Flash to Unity tutorial pertaining textures video in order to learn more about common restrictions. Import XFL Importing an XFL means parsing the generated XML representation of the file and then generating animation binaries from said files. The process is initiated by selecting the option and then choosing a valid XFL file. It’s important to note that the related XML FlashtoUnity Monday, October 7th, 2013 files must not have been altered outside of Flash, as to avoid any conflict with the read data. Importing bitmaps with custom settings Flash to Unity uses default settings when attempting to convert the texture symbols into a texture atlas. Nonetheless, the user may use their custom settings by creating a Texture Packer project on the respective bitmap’s folder, which needs to have an identical name from both the symbol and the generated dump folder. The Texture Packer project must contain the “textures” folder, and both the .PNG and the generated .XML must have the same name. Correct Texture Packer project inclusion. Note how the name is identical to the dump folder's. FlashtoUnity Tuesday, August 27, 2013 Once the Texture Packer project is created, the user may include the dump folder and modify the settings at their leisure. It is to be noted, though, that not all options are fully supported, and some other options are recommended to be left with their default values. The following image will illustrate the latter assertion. The user should be careful when tampering with values highlighted in yellow, and must use the exact value of the options highlighted in red. Values highlighted in orange are only useable with a paid license of Texture Packer, and so their use on behalf of free license users may be discouraged. Basic Texture Packer configuration FlashtoUnity Monday, October 7th, 2013 Import XFL (Only binaries) This option unlike the ‘Import XFL’ option will only import all assets except the textures, so if an animation has changed, but the textures still being same, this the fast and adequate way to update the animations. Text Import Font (.ttf) and (.otf) These two options allow the user to import fonts in TrueTypeFont or OpenTypeFont formats. Import Bitmap Font This option permits the user to import a text font into Unity. It is to be noted that fonts may only be imported as FNT files, so there must also exist a .PNG image that represents every glyph to be exported. .FNT files must also be encoded in XML format; the user may not import .FNT files in binary or text format. Once the operation completes, check your resources for the following in order to make sure everything was imported correctly: 1. A folder named after the font in your “fonts” folder, plus an integer denoting the size of the font. Inside the folder, the .FNT and its associated files must exist, and they must have the same name as the folder. 2. A material named after the font in your “materials” folder. Please do consider that, as for the time of this writing, Flash to Unity does not support FNT files that contain more than one page; an error message will pop up for the user who attempts to import one. When creating fonts, please do make sure they are contained in one single page. Import Localized Font This submenu displays a list of three options more. The first two options are for importing (.ttf) and (.otf) fonts for localization and the last option is for importing a localized bitmap font (.fnt). FlashtoUnity Tuesday, August 27, 2013 When the font is selected, then a window is displayed with the font name and in the case for the bitmaps font the size will be displayed too, and most importantly a dropdown list to select the language for which the font will be used for localization. Paths This menu is intended for the user to set and/or modify the paths to the various tools Flash to Unity requires. Those paths should be set as soon as possible, and they are detailed as follows: 1. Texture Packer Path: This path should point to the Texture Packer (command line) installation directory. 2. Flash Path: This path should point to the Flash installation directory. You can also watch the videos about how to set these paths. Profiling utilities The profile submenu is a collection of informative functionality that allows the user to visualize different kind of data. This section will delve into the two main components of this submenu. Memory Profiler The memory profiler is a utility that serves the purpose of querying which audios and textures are currently loaded into memory. The user is encouraged to use this utility at runtime to check how many assets are currently loaded into memory. It may also be used in order to know how much memory is using being used by those assets. FPS Counter The FPS counter is a utility that directly depends on a font text asset. The FPS counter, as it name might imply, is a utility that lets the user visualize the frames per second the project is currently running at. In order to use one, the user may need to FlashtoUnity Monday, October 7th, 2013 attach a text script alongside the FPS counter script and leave the resulting object on a clearly visible section of the world. Unity object utilities This submenu is under “GameObject->Create Other->F2U” and focuses on the creation of various Unity objects suitable for use with Flash to Unity. The creation process is semi-automatic: the user can create objects, but they must feed them appropriate information to make them work as expected. The following subsections will both summarize each component and give a brief explanation on how to create it from the submenu. Camera2D The Camera2D component is a predefined camera to use with Flash to Unity components. Of course, the user may create their own camera from scratch, but they also should configure it properly, whereas the predefined camera contains default values for typical Flash to Unity usage. It’s recommended to create the camera from the F2U menu instead of making one from scratch. The predefined camera may be created by clicking on the “Camera2D” option on the “New” menu. This 2D camera draws all layers by default. If you’re going to create a 2.5 or 3D game, then you’ll have to have two cameras on your scene: one for 2D objects and one for 3D objects. Make sure the 2D camera is always set as the main camera, though. Animations Animations are imported directly from Flash, and so they have associated binary files that allow them to read their properties and behave accordingly. They are created by clicking on the “Animation” option in the “GameObject -> Create Other -> F2U” menu, and they must be assigned an animation binary before being able to appear onscreen. In order to assign an animation binary to the animation, it’s enough to assign one of the animation binaries present at the “animations” resource folder to the Animation Binary property on the animation object itself. Please do note that, once you run the project, FlashtoUnity Tuesday, August 27, 2013 the object’s name may change into that of the animation binary. Animations have a few modifiable properties, detailed as follows: 1. Script: Base script for animations. Shouldn’t be tampered with. 2. Animation binary: The binary file representing the animation. Please do take note that this binary creates the animation along with all of its children. When switching binaries, the process will create the new children, but will not destroy the previous children. 3. Sound group name: Used to determine which sound group the animation should use in order to reproduce its sounds. 4. Sound priority: The priority of the sounds emitted by the animation. 5. Preload sounds: Used to determine whether the animation’s sounds should be preloaded at startup or not. It is to be noted that the relationships between symbols at the XFL project are directly related to the object hierarchy at the Unity project. If the hierarchy were to be changed, then the change must be reflected on the XFL project. This also means that the user does not need to recreate the whole hierarchy out; as long as the references exist on the XFL project, then Flash to Unity will correctly generate each child animation. Hierarchy coloring and tints This option is available for all animations imported into Flash to Unity, but it’s disabled by default because it is process intensive and may produce lag when not used sparingly in a game. So far, the only components that have it enabled by default are popups and loading screens, which are not punished by the execution of hierarchy coloring. This process allows for a parent animation to change the color of each of its children animations when its own tint color changes. This process is performed recursively around each and every animation until it reaches animations with no children. This option is available in order to emulate color transformations available in Flash, which do not have an Monday, October 7th, 2013 FlashtoUnity equivalent on Unity. Hierarchy coloring may be activated from code by calling the following method: F2UUIUtils.SetUpdateHierarchyColorEnableRecursively(transform, true) Advanced Animation There’s another animation object, it can be create in the menu “GameObject -> Create Other -> F2U-> Advanced Animation”. It works by same binary as the F2UAnimation and contains same properties of it. This animation supports: Callback when animation stops. Callback when animation changes of label. Custom frame rate. Crossfade functions, crossfade by seconds and crossfade by frames, and callback function when the crossfade ends. But, this animation can also be managed by the Animation manager, so in the inspector it will show a checkbox to indicate if it should use custom frame rate or not. Sprites Sprites are the basic component in Flash to Unity to draw a graphic (texture). They serve as image holders, and may look deceptively simple. One may use sprites without the need of binding them to an animation, but the opposite isn’t true; animations must reference at least one sprite in order to be drawn. If used alone, the user must know the exact index at which the sprite is located in its respective texture atlas. Flash to Unity provides to type of sprite. The first sprite is for older versions than Unity 4.3 which is called “Sprite” and the second is called “SpriteRenderer” which is only supported in Unity 4.3 or a later version. FlashtoUnity Tuesday, August 27, 2013 Sprite They are created by clicking on the “GameObject” menu option and selecting the “Create Other -> F2U -> Sprite” option, and they must be referenced to their texture atlas in order to function properly. In order to assign a texture atlas binary to a sprite, it’s enough to assign one of the binaries found at the “textures” resource folder. The modifiable properties sprites present are: 1. Script: Base script for sprites. Shouldn’t be tampered with. 2. Texture Atlas Binary: Binary text asset for the sprite’s texture atlas. 3. Texture Atlas Index: Index at which the desired texture is found within the texture atlas. 4. Texture material: The material the sprite will use in order to be drawn. Material assignment works as follows: a. If the sprite has a sprite binary attached, then the object will search for an identically-named material on the “materials” folder. b. If the sprite does not possess a binary, yet a material is assigned to it, then the sprite will create a texture atlas with a sole index: the one that points to the material’s associated image. 5. Color: Tint of the sprite. Sprite Renderer This sprite works as the same way the Sprite does. The only difference is that it uses the Sprite Renderer component that Unity provides, so it takes the advantages of it. They are created by clicking on the “GameObject” menu option and selecting the “Create Other -> F2U -> SpriteRenderer” option. It also has the same properties the Sprite has: 1. Script: Base script for sprites. Shouldn’t be tampered with. 2. Texture Atlas Binary: Binary text asset for the sprite’s texture atlas. Monday, October 7th, 2013 FlashtoUnity 3. Texture Atlas Index: Index at which the desired texture is found within the texture atlas. 4. Texture material: The material the sprite will use in order to be drawn. Material assignment works as follows: a. If the sprite has a sprite binary attached, then the object will search for an identically-named material on the “materials” folder. b. If the sprite does not possess a binary, yet a material is assigned to it, then the sprite will create a texture atlas with a sole index: the one that points to the material’s associated image. 5. Color: Tint of the sprite. 6. Sprite Mesh Type: This unlike the first Sprite. It’s an option to indicate the way the mesh type to render. There are two type: a. FullRect: Will create the sprite with the minimum of triangles that it takes to draw the texture. b. Tight: Will create the sprite with a lot of triangles in the mesh. Texts Texts are components that serve to show, as their name implies, text on the screen. They are created by clicking on the “Text” option in the “GameObject -> Create Other -> F2U” menu, and they must be assigned a font before being able to appear onscreen. In order to assign a font to the text, the user is only required to attach the desired font’s text asset from the font resource folder to the “Font Text Asset” field on their text; similarly, the user must assign the corresponding font material to the text for it to be rendered. Once the previous steps are done, the user can start manipulating the text asset at their leisure. Once a font is assigned to the text, the user can run the project in order to preview the resulting text. In order to manipulate the text, just modify the “Text” field on the text component. Texts may be embedded into a so-called container sprite as to restrict their span. A container sprite may be any sprite, even an invisible one, that can bound the text in both FlashtoUnity Tuesday, August 27, 2013 its x and y axes. When embedded, the text may define how to handle the characters that overflow from the sprite’s limits. Texts can currently manage overflow in four different ways, property customizable through the text’s “Overflow Type” property: 1. None: Ignores the container sprite. 2. Alpha gradient: The text gradually disappears as it gets closer to the container sprite’s limits. 3. Newline: The text gets segmented by newlines, ensuring that no segment surpasses the sprite’s limits. 4. Clamp: The text gets forced into the container sprite, regardless of size. Truncates if necessary. Just as other components, texts have modifiable properties, listed as follows: Script: Base script for texts. Shouldn’t be tampered with. Font Text Asset: The text asset for the text’s font. Container Sprite: Sprite that bounds the text both vertically and horizontally. Text: The text to be displayed. Letter spacing: The space between letters. It’s normally a good idea to use values below 1. Color: The text’s color. Use Color Gradient: Used to determine whether the text should draw itself with a gradient between Color and Bottom Color. Bottom Color: The text’s secondary color. Only visible if Use Color Gradient is set to true. Anchor: Set the text’s anchor point. Kerning: used to determine whether the current text should use letter kerning or not. FlashtoUnity Monday, October 7th, 2013 Text Overflow Offset: The space between the container sprite’s bounds and the point where the text begins applying its overflow policy. Overflow Type: Type of overflow policy to apply, as discussed earlier on this chapter. SoundManager A sound manager is an object that registers and manages every sound object that gets injected via Flash to Unity. Each sound is registered in a channel that may belong to a sound group, which in turn are managed by the sound manager. Every sound group has a limited number of channels available; the amount of channels available may vary between instances. The sound manager’s duty is to place audio into an appropriate channel and reproduce it accordingly. If the assets are imported directly from Flash, sounds placed on the “sfx” folder at the XFL project hierarchy will be played over at the default sound effects group, while the ones placed at the “vo” folder at the XFL project will be reproduced at the default group. If no sound group is specified or made obvious by hierarchy, then, depending on the audio’s purpose, they may go into the default SFX group of the default sound group. The sound manager is created by clicking on the “Sound Manager” option on the “GameObject -> Create Other -> F2U” menu, and its modifiable properties are detailed as follows: 1. Background Music Audio Clip: The audio clip for playing as the background music. It’s recommended to use a WAV audio and compress it into the Unity audio Import settings (if it’s necessary). 2. SFXs Group: Default group for playing sound effects. 3. Default Sound Group: Default group for playing any sounds that doesn’t specify the group. Each sound group property has the following modifiable values: FlashtoUnity Tuesday, August 27, 2013 1. Simultaneous Sounds in group: Determines the maximum amount of sound channels available destined to voice over or other long audio clips. 2. Criteria: a. Replace Old Channel with Same Priority: Scans the list of available channels and expels a channel with the same or lower priority in order to insert the new channel. b. Keep Old Channel with Same Priority: Scans the list of available channels and expels a channel in order to insert the new channel only if its priority is lower than that of the channel to be inserted. In the Unity inspector the Sound Manager component also shows on the bottom two buttons for creating or deleting additional sound groups, which also are modifiable in the inspector. Unity UI Components Flash to Unity offers several user interface objects that may assist the user on creating interactive components. The following subsections will briefly explain the UI components that can be generated through the F2U menu. In order to learn more about the components themselves, please refer to Flash to Unity UI Components (Tools/F2U/Help/User Manual/03 - UI Components Manual). Buttons are basic components that perform an action whenever the user clicks on them. They must be created over either an animation or a sprite. Animated buttons are buttons attached to an animation that plays differently depending on whether the button is being clicked or whether the mouse is over it. They must be created over an animation. Checkboxes are basic components with two main states: checked or unchecked. They can be created over either a sprite or an animation. FlashtoUnity Monday, October 7th, 2013 Checkbox groups are built upon checkboxes, and their use is akin to the one of radio buttons: it’s ensured that only one checkbox from each group will be checked. They are built upon animations. Tab panels are built upon checkboxes, and their use is akin to window tabs. Tab panels show their related components on the scene; which components will be shown depends on which checkbox is selected. Only one checkbox from each tab panel will be checked. They are built upon animations. Drag gestures allow the user to arbitrarily drag a component around the screen. They are built upon animations or sprites. Rotate gestures allow the user to rotate a component around its own center by dragging a pivot. They are built upon animations. Scale gestures allow the user to scale, via either mouse scrolling or double dragging (this latter feature available only on touch devices). They are built upon animations. Swipe gestures allow the user to perform swiping motions around the screen as a form of input. They are built upon animations. Tap gestures allow the user to tap, or click, a component. They are built upon animations. Scroll items move either vertically or horizontally, and are used in conjunction with scroll panels. They are built upon either animations or sprites. Scroll panels are scrollable components whose position is orchestrated by a scroll item. They are built upon animations. Text inputs are basic text fields that can be used for capturing the user’s keyboard inputs. Their behavior can be customized to an extent and they are built upon either animations or sprites. The help submenu The help submenu has four options the user can click on; every option will open the user default browser and requires of Internet connection: FlashtoUnity Tuesday, August 27, 2013 “Reference Manual”: the user may click on the option to bring out the reference manual, which lists every single class on the project, and how to use it. “User’s Manual”: the user may also consult the user’s manual documents by using this option. There’s a specific manual document for different topics. “Release Notes”: shows up a document with the all the release note of the current F2U version. “Video Tutorials”: contains four options, each option will show a video tutorial of a specified topic.