1
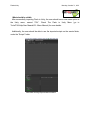
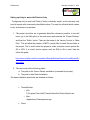
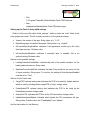
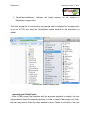
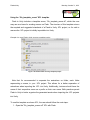
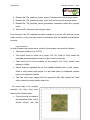
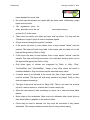
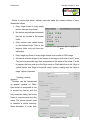
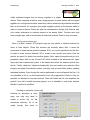
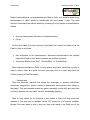
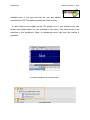
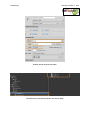
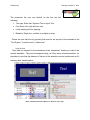
FlashtoUnity Monday, October 7th, 2013 Flash to Unity User’s Manual Wednesday, August 28, 2013 Monday, October 7th, 2013 FlashtoUnity Abstract: The following document is a user’s manual for Flash to Unity, which is a tool that allows transforming flash animations Flash animations into fully working Unity objects that can be used to implement either 2D games or 2D user interfaces. The general objective is to present a clear, simple and elegant user manual can refer to in order to learn about the tool. This manual may also be used as a reference. FlashtoUnity Monday, October 7th, 2013 Table of Contents Introduction ..................................................................................................................................... 4 Installation and First Use ................................................................................................................ 4 System Requirements.................................................................................................................. 4 Required software ....................................................................................................................... 5 Setup ........................................................................................................................................... 5 What you should already know............................................................................................... 5 Installation process.................................................................................................................. 5 What should be visible ............................................................................................................ 6 Setting up Unity to work with Flash to Unity ......................................................................... 7 Setting up the Flash to Unity build settings ............................................................................ 8 Importing your Flash Project .................................................................................................. 9 Creating a Flash to Unity Compliant XFL Project ............................................................... 11 Updating to a new version ........................................................................................................ 23 Uninstalling ............................................................................................................................... 24 Tips ............................................................................................................................................... 24 Further help ................................................................................................................................... 24 FlashtoUnity Monday, October 7th, 2013 Introduction Flash to Unity is a tool that allows game developers to import animations made in Flash to the Unity 3D Game Engine. The animations imported to Unity can be 2D animations for using them as UI components or animations in 2D. Flash to Unity is thought to be a simple API that can be used to import sprites, animations, sound effects and scenes, as well as manipulating them, allowing for a complete tool that is able to create and manage every aspect of the game that’s being created. So far, Flash to Unity is able to manipulate sprites, animated sprites and audio effects, as well as giving several options to create interactive customizable UI components such as buttons, animated buttons, sliders, checkboxes, radio buttons, tabbed navigation and scrollable panels, all of them capable of adjusting of a plethora of resolutions. The software also includes several goodies that may ease work, such as simplified XML I/O management, finite state machines, logs, 2D sound management and localization management. Installation and First Use System Requirements Windows 7 or Mac OSX 10.5 or later. At least 2GB of RAM. Any requirements Unity may need (http://unity3d.com/unity/system-requirements). Any requirements Texture Packer may need (http://www.codeandweb.com/texturepacker/documentation). Any requirements Adobe Flash may need (http://www.adobe.com/products/flash/tech-specs.html). Monday, October 7th, 2013 FlashtoUnity Required software Adobe Flash CS5 or later. Texture Packer 2.4.2 or later, paid license (support for free licenses via TPS parsing). Unity 4 or later. No Pro version required. A program suitable for FNT-style font creation and manipulation (optional for text handling). o Windows users may use BMFont. (http://www.angelcode.com/products/bmfont/) o Mac users may use Glyph Designer 1.7 or later. (http://www.71squared.com/en/glyphdesigner) o Alternatively, you may use Font Packer to do the job. (https://github.com/mattdesl/gdx-fontpack) Setup What you should already know This manual assumes the user has basic Flash and Unity 3D knowledge. The user is assumed to know about basic scene creation on both software, as well as transforming various effects into key frames. The user must also be familiarized with Unity’s API, especially around the usage of audio and graphic assets and resource management. Installation process 1. Make sure all system requirements are met and the required software is installed. 2. Import the Flash to Unity package as a custom package to your Unity project. In the Unity menu, select the Assets -> Import Package -> Custom Package, then select the file Flash to Unity package and import it. 3. Open up one of the sample scenes under “Assets > Scenes > F2U” and run it to test the package was successfully imported. Monday, October 7th, 2013 FlashtoUnity What should be visible After successfully importing Flash to Unity, the user should see a new menu option in the Unity menu, named “F2U”. Check The Flash to Unity Menu (go to Tools/F2U/Help/User Manual/02 - Menu Manual) for more details. Additionally, the user should be able to see the imported scripts on the assets folder, under the “Scripts” folder. Base Flash to Unity script and menu locations Monday, October 7th, 2013 FlashtoUnity Setting up Unity to work with Flash to Unity Configuring Unity to work with Flash to Unity is relatively simple, as the user may only need to tamper with some easily identifiable values. The next list will detail which values to set, and where to locate them. 1. The project should be set to generate Meta files whenever possible. In the edit menu, go to the Edit option in the main menu and selected the “Project Settings” and then the “Editor” option. Then set the mode of the Version Control to “Meta Files”. This will allow the creation of META (.meta) files for each file and folder in the project. This is useful when the project is under a version control system like Git or SVN. If a control version system such as SVN or Git is used, then the follow this guide: http://docs.unity3d.com/Documentation/Manual/ExternalVersionControlSystemSu pport.html 2. The user must set the following paths: a. The path to the Texture Packer installation (command-line prompt). b. The path to their Flash installation. The base installation directories are detailed as follows: TexturePacker: o Win: C:\Program Files (x86)\TexturePacker\bin\TexturePacker.exe o Mac: /Applications/Texturepacker.app Flash: Monday, October 7th, 2013 FlashtoUnity o Win: C:\Program Files(x86) \Adobe\Adobe Flash CSX\Flash.exe o Mac: /Applications/Adobe/Adobe Flash CS[Version].app Setting up the Flash to Unity build settings Flash to Unity use a file called “build_settings”, which is under the “xmls” folder in the Unity project resources. This file contains a section for the general settings: Version: the version of the app. String value, e.g. “1.0.2”. DefaultLanguage: the default language. String value, e.g. “english”. IsConsoleReportingEnabled: indicates if the application should log in the Unity developer console. Boolean value IsControllerInputEnabled: indicates if controller input is enabled, this is an optional setting. Boolean value. Section for the prefabs settings: LoadingTransitionPrefabPath: indicates the path of the prefab transition for the loading between scenes. String value. SelectionCursorPrefabPath: indicates the path of the prefab for the cursor for the UI input controller. String value. To use this, the setting IsControllerInputEnabled must be set to “True”. Section for the Frame rate: TargetFPS: optional setting that indicates the FPS to be used by Update method, which is used by the Application.targetFPS of Unity. Integer value. FixedUpdateFPS optional setting that indicates the FPS to be used by the FixedUpdate method. Integer value. AnimationFPS: indicates the FPS for all the F2U animations. Integer value. UpdateAnimationsMethod: indicates what Update the F2U animations will use. String value. Posible values are “FixedUpdate” and “Update”. And the last section for the Memory: Monday, October 7th, 2013 FlashtoUnity TargetTexturesMemory: indicates the target memory for the textures in Megabytes. Integer value. This build settings file is included into the package and is configured for the application to run at 30 FPS and using the FixedUpdate update method for the animations by default. Texture Packer's default installation paths. Importing your Flash Project Once a Flash project that complies with the proposed standard is created, the user may proceed to begin the importing process. In order to import Flash project into Unity, the user may need to follow the steps detailed in short. Please do note that, if the user Monday, October 7th, 2013 FlashtoUnity hadn’t set the paths to their tools, then a file browser will open for them to set the path to the missing tools. 1. Export the bitmaps for your XFL file. a. On Unity, select the “Tools” menu on the menu bar and then select the “Flash” submenu under “F2U”. b. Select the “Export XFL Bitmaps” option and select the XFL file you would like to process. c. If you hadn’t already had your XFL file open, the script will open it for you. It will then parse your project and transform every texture you had defined and transform it into a numbered bitmap. d. Alternatively to c, the user may choose to open their scene directly and run export_bitmaps.jsfl directly onto their .XFL project. 2. Import your XFL. a. Select the “Import XFL” option; this will open a prompt where you are to select the XFL you want to import to Flash to Unity. If you haven’t set Texture Packer’s path, then a prompt will ask you to do so. b. Navigate through your directory structure to the location where your .XFL file is stored. Once done, confirm your selection. The user might need to wait several minutes, depending on the size of their project and the performance of their machine, in order to the operation to finish importing the files. The proposed standard for .XFL projects is summarized as follows: Projects must have exactly 5 folders, where the entirety of the project will be located. The folders must be named “animations,” “assets,” “sounds,” “texts,” and “textures.” Monday, October 7th, 2013 FlashtoUnity o The “animations” folder must only contain movie clips that reference either textures in the “textures” folder, other movie clips in the “animations” folder, sound clips on the “sounds” folder or movie clips in the “texts” folder. o The “text” folder must only contain movie clips, each with exclusively a text component inside. o The “textures” folder must only contain graphics that reference images on the “assets” folder. o The “assets” folder may contain anything the user would like to inject to the project. o The “sounds” folder must exclusively contain sound clips. No symbol may have a name with spaces. The project must be saved as an .XFL file. Checking that everything was imported correctly After importing the animations, the user should make sure that every animation was exported correctly. The user may need to check the Unity console for errors that might have arisen while processing the XFL project. Important consideration on importing Adobe Flash projects Flash to Unity’s pipeline is merely constructive, meaning that it will never attempt to destroy or nullify components. Should the user modify their scene in such a way so that a certain component becomes unneeded, Flash to Unity will not detect the missing component. The user is completely responsible for properly disposing of unneeded components. Creating a Flash to Unity Compliant XFL Project Formatting an XFL Flash project for use in Flash to Unity is a task that must be done to make the software work as expected. The next sections will briefly explain how to format one’s Flash project as to comply with the format expected by Flash to Unity. Monday, October 7th, 2013 FlashtoUnity Naming conventions You can check the Flash to Unity XFL Structure (go to Tools/F2U/Help/User Manual/04 - XFL structure Manual) document in order to learn more about how Flash projects and symbols should be formatted. Folder structure The project’s folder structure is of importance when using Flash to Unity, so one should make sure to create the basic structure from the beginning to avoid future complications. Four base folders should be created in particular: The “animations” folder will hold every single animation to be imported into Unity. No symbols may be on this folder, save for Movie Clip symbols. The “textures” folder will hold every single texture to be imported into Unity. No symbols may be on this folder, save for Graphic symbols. The “sounds” folder will hold every single audio clip to be imported into Unity. No symbols may be on this folder. This folder must contain exactly two subfolders, aptly named “sfx” and “vo”. o The “sfx” folder may exclusively contain short audio clips to be used as sound effects. Flash to Unity doesn’t restrict which audio clips one places on this folder, though, so this hierarchy was implemented for order purposes. o The “vo” folder may exclusively contain long audio clips to be used as voiceover audio. Again, Flash to Unity will not force the user to comply with these criteria. The “assets” folder is a dummy folder where the user may place any symbol, image or source they please. Any kind of symbol may populate the assets folder. Monday, October 7th, 2013 FlashtoUnity With the exception of the textures folder, every folder may have subfolders. Additionally, due to Unity’s nature, only audio in the following formats will be imported into your Unity project: o WAV (Recommended for most projects) o AIFF o MP3 o OGG Naming conventions for Flash to Unity Required naming standards There must be no spaces on any item name. If using spaces became an absolute necessity, then one may use underscores (_) in order to simulate them. Suggested naming conventions Every symbol should have a unique identifier. No two symbols may have the same name, even if they are on different folders. Similar names are discouraged, but are a valid workaround. Every single item name, be it folder or symbol, should be written in all lowercase letters. All movie clips to be imported into Unity should have the suffix “_animation” on its name. For example, a walking animation may be named “walking_animation.” Every graphic to be imported into Unity should have the suffix “_texture” on its name. For example, “chessboard_texture.” the texture for a chessboard may be named Monday, October 7th, 2013 FlashtoUnity Using the “f2u_template_scene” XFL template Flash to Unity includes a template scene, “f2u_template_scene.xfl”, which the user may use as a base for creating scenes on Flash. The structure of this template mirrors the required and suggested standards of a Flash to Unity .XFL project, so it’s safe to assume the .XFL project is initially importable into Unity. Example of a usual Flash to Unity structure compliant project Figure 1 A common Flash to Unity compliant project Note that it’s recommended to separate the animations on folder, each folder representing a scene, in your .XFL project. This allows for a better separation of animations when importing the .XFL into Unity. Additionally, textures should have the name of their respective scene as a prefix on their own name. Both practices permit Flash to Unity to better organize the generated assets when importing the .XFL projects into Unity. To use this template as a base XFL, the user should follow the next steps: 1. Open the "f2u_template_screen.xfl” XFL with Flash. Monday, October 7th, 2013 FlashtoUnity 2. Rename the "f2u_template_screen_texture" texture symbol with a proper name. 3. Rename the "f2u_template_screen_texts" texts movie clip with a proper name. 4. Rename the "f2u_template_screen_animations" animations folder with a proper name. 5. Save the XFL document with a proper name. From this point, the XFL template has been changed to a custom XFL with the correct folder structure, so the user can create its animations with the standard and adequate structure. Usage Restrictions In order to ensure the project works correctly, these simple rules must be followed: The project should run at 30 FPS. The project must be saved as a single .XFL file. Flash to Unity needs the metadata generated by this format in order to function correctly. There must not be loose symbols on the project’s root. Every symbol must belong to a folder. Assets must be organized as per the standard detailed later on this section. Flash to unity parses each project in a per-folder basis, so misplaced symbols may not be imported correctly. The user must never tamper with the generated XML files outside the Flash editor unless they know exactly what to do. For movie clips to be properly imported into Unity, they must abide by the following rules: If the movie clip is located at the animations folder, then it should comply with the Monday, October 7th, 2013 FlashtoUnity name standard for movie clips. No movie clip should have two layers with the same name. Additionally, empty layers must not exist. The registration point for every animation must be set Correct object centering. at point (0, 0) of the scene. There must be exactly one object per layer and key frame. You may use the “Distribute to Layers” option in order to separate objects. A layer must not change the symbol it contains. If the movie clip were to have labels, then a layer named “labels” must be created. This layer will hold every label of the scene, and any label not on this layer will be ignored by Flash to Unity. If the movie clip were to have actions, then a layer named “actions” must be created. This layer will hold every action to be executed, and any action not on this layer will be ignored by Flash to Unity. Only three types of actions are supported by Flash to Unity: “Stop”, “GotoAndPlay” and “GotoAndStop”. Usage of any other action will result in undefined behavior. Only one action may be executed at any frame. If sounds were to be included in the movie clip, then a layer named “sounds” must be created. This layer will hold every sound to be played. Flash to Unity does not support streaming. The type of the movie clip must be “Movie Clip”. That is, one can’t use a movie clip as if it were a texture or a texture as if it were a movie clip. When the user wants to hide something in a layer, he or she must leave blank frames. Movie clips on the animations folder may only reference other movie clips on their same folder or graphics on the textures folder. Pivots may be used to animate, but they must be converted to key frames afterwards. This same procedure must be done if using custom easing. FlashtoUnity Monday, October 7th, 2013 Similar to movie clips above, textures must also abide by a certain number of rules, detailed as follows: Every single frame of every single texture must be a key frame. No texture may reference elements that are not located at the assets folder. Every texture must reside directly on the textures folder. That is, the textures folder may not have any Alignment menu. Appropriate options highlighted in green subfolders. Every single key frame of every single texture must contain a PNG image. All textures must be aligned to the center of the stage in both their X and Y axes. The user may manually align their components to the center of the stage. For this to happen, the user must go to the Align menu on Flash and click on the “Align to vertical center” and “Align to horizontal center” options, making sure the “Align to stage” option is checked. Creating a texture (graphic) Textures can be represented as graphic symbols on Flash. Each texture is composed of one or several key frames, with the only restriction being that every frame of a texture must be a key frame. The texture doesn’t need to describe a whole frame-byframe animation of some kind; Sharing textures’ dialogue Monday, October 7th, 2013 FlashtoUnity totally unrelated images may be strung together in a single texture. When importing a texture, every image present on each texture will be merged together into a single texture atlas, where they can be referenced by methods described later on this manual. It’s enough to just create a graphic symbol on the textures folder in order to create a texture. Please do take into consideration, though, that textures may only contain references to symbols present in the assets folder. Textures must only have a single layer, and its actual name is irrelevant as far as Flash to Unity concerns. Sharing textures between files Once in a while, several .XFL projects may use very similar or identical textures for some of their objects. Given that textures are normally heavy files, it would be convenient to share texture symbols between XFLs, as to avoid repetitions and the like. In order to share textures between XFLs, create a new symbol and name it like the symbol you want it to obtain from another project. Next, select the symbol and go to its properties; there, click on the “Source File” button located in the advanced tab. Open the project that contains the symbol to be shared and select the desired symbol from the list. Finally, check the “Update Automatically” box and confirm your selection. Both projects now share the selected symbol, and they may be used freely without needing redundant textures. Even though this can be performed on movie clips and the like, it is not advisable to do so, as this functionality is not fully supported by Flash to Unity for symbols not destined to become textures. Flash will break the link and duplicate the symbol if you edit it outside its parent project, so it is advisable to only share textures that don’t need to be modified. Creating an animation (movie clip) Creating an animation is fairly easy; one may only need to create a movie clip on the animations directory. It’s to be noted, though, that some of Advanced color transformations. Values highlighted in yellow are partially supported. FlashtoUnity Monday, October 7th, 2013 Flash’s functionality was not implemented into Flash to Unity, so it would be better if any transformation or effect would be transformed into key frames, if able. The most common functionality that can be added by converting it to key frames is enumerated as follows: Any non-classic tween that uses non-standard easing. Pivots. On the other hand, the most common functionality that cannot be added at all via Flash to Unity is as follows: Any brightness or tint transformation. Advanced transformations are partially supported (Flash to Unity cannot translate color offsets correctly). Any action different from “Stop”, “GotoAndPlay” or “GotoAndStop.” When importing animations, Flash to Unity ignores any frame marked as a guide. In order to mark a layer as a guide the user must right click on a layer and check the “Guide” property on the Flash editor. Creating texts Texts are important resource that allows the developers to present instructions, commands, suggestions, options, names or descriptions, among many other things, to the player. They are essential assets any game nowadays counts with, and they have evolved to become not only useful, but also aesthetically pleasing. Flash to Unity allows for the insertion of text written in Flash into any scene that requires it. Text may only be declared on the .XFL project for it to become available, though if the user wants to give it any use, they must assign it on Flash one of the Monday, October 7th, 2013 FlashtoUnity available pairs of font type and size the user has already converted into .FNT files and/or exported into Flash to Unity. A “texts” folder can be created on the .XFL project’s root. It may contain movie clips whose sole related object is a text centered to the scene. This folder works as an extension of the “animations” folder, so referencing movie clips from this location is permitted. A common text object in its containing scene. The "texts" folder. Monday, October 7th, 2013 FlashtoUnity Common way to set the font on Flash. The same font as in the previous picture, this time on Unity. Monday, October 7th, 2013 FlashtoUnity The properties the user can set/edit on the text are the following: Text type: Static text, Dynamic Text or Input Text. Font family, font style and font size. Letter spacing and line spacing. Behavior: Single line, multiline or multiple no wrap. Please do note that the only property that must be set as part of the standard is the “Text Engine.” It must be set to “classic text.” Using the texts Texts may be assigned to the animations at the “animations” directory in order to be actually drawable. They can be assigned freely, as if they were normal animations. It’s important to note that the instance of the text in the animation can be transformed as if it was any other transformation. Basic animation with a text object on it. Note the "text" layer. FlashtoUnity Monday, October 7th, 2013 Restrictions on Flash projects You can check the Flash to Unity XFL Structure (go to F2U/Help/User Manual/04 XFL structure Manual) document in order to learn more about what should and should not be done when creating Flash to Unity compliant projects. Flash Project Examples In order to show some sample projects, the Flash to Unity package include some Flash projects that were used to create the included demo scenes. To see and test importing or modifying these example projects, the user should go to the F2U folder of the Editor folder in Unity and find a zip file named “ExampleSourceAssets”, and then decompress it out of the Unity project. It also contains the font file sources that were used in the F2U demo scenes. Remember that the animations, textures, prefabs, texts, atlas, fonts that the F2U package includes can be removed from the project to reduce the application size. So, the game will contain only the assets it really uses. Updating to a new version The user must delete all Flash to Unity related files from their project if they would like to either update or downgrade their version. Additionally, the user must re-generate every single asset on their project in order for them to work with their version of Flash to Unity. Note that downgrading is not recommended because several features could go missing and your Flash project could no longer be compatible. Every version will include a “breaking changes” list, which will define each change that may generate incompatibilities with older versions, and will detail on how to modify the project in order to make it comply with the aforementioned changes. It’s important to back up the XML files such as f2u_build_settings.xml, style_sheet.xml and the localization XML because FlashtoUnity Monday, October 7th, 2013 upgrading the version may overwrite them. After the plug-in has been updated, you may check for any changes made to those XML files, and merge them as necessary. Uninstalling In order to uninstall Flash to Unity, remove every file related to Flash to Unity from your project. If you wish so, you may also uninstall the complementary software from your machine. Tips Because of how Flash to Unity works, the usage of 3D cameras to in order to display 2D components is heavily discouraged. Further help This manual was thought to introduce the user to Flash to Unity in a user-friendly way and explain the concepts behind the workings of such software. If you would like to delve into a detailed rundown of all the classes and method Flash to Unity offers, you may want to check the API Reference manual, which can be accessed from the F2U menu at the Help submenu, API Reference option. Additionally, you may want to read the following documents in order to learn more about the several utilities Flash to Unity offers: The Flash to Unity Menu: (go to Tools/F2U/Help/User Manual/02 - Menu Manual) in order to learn more about the menu this application creates on the Unity editor. Flash to Unity UI Components: (go to Tools/F2U/Help/User Manual/03 UI Components Manual) in order to learn more about the user interface functionality Flash to Unity offers. Flash to Unity’s Sprite Batching: (go to Tools/F2U/Help/User Manual/06 - Flash to Unity’s Sprite Batching) Guide in order to learn more about how and when to use sprite batching. Monday, October 7th, 2013 FlashtoUnity Flash to Unity Localization Manager: (go to Tools/F2U/Help/User Manual/05 Localization Manual) in order to learn more about the localization manager, a Flash to Unity utility that allows the user to easily switch between localized versions of the same project. Standards and Good Practices: (go to Tools/F2U/Help/User Manual/07 F2U Standards Manual) in order to learn more about the basic standards and good practices Flash to Unity developers should follow. Other useful Flash to Unity Functionality: (go to Tools/F2U/Help/User Manual/10 - Useful Functionality Manual) in order to learn about various methods and utilities Flash to Unity offers to developers. Flash to Unity’s Style Sheets: (go to Tools/F2U/Help/User Manual/08 - Style Sheets Manual) in order to learn more about how to customize large number of components with a style sheet. Flash to Unity’s Wish List: (go to Tools/F2U/Help/User Manual/11- F2U Wish List) in order to learn more about planned functionality to be added into the project in a further release. Flash to Unity’s required XFL structure: (go to Tools/F2U/Help/User Manual/04 XFL structure Manual) in order to learn more about the required elements and configurations Flash developers have to adopt while using Flash to Unity. Flash to Unity’s Sprite Batching Tutorial: (go to Tools/F2U/Help/User Manual/06 Sprite Batching Manual) in order to learn more about sprite batching. You can see these documents in the F2U menu bar option in Unity and if you click an option the selected document will be opened in the web browser.