1
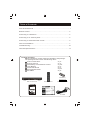
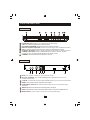
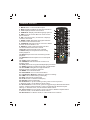
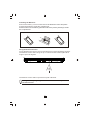
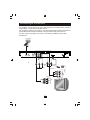
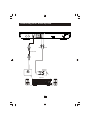
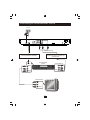
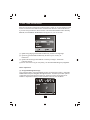
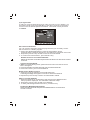
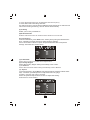
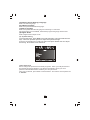
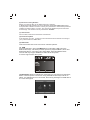
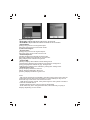
Important Safety Instructions
1) Read these instructions.
2) Keep these instructions.
3) Heed all warnings.
4) Follow all instructions.
5) Do not use this apparatus near water.
6) Clean only with dry cloth.
7) Do not install near any heat sources such as radiators, heat registers,
stoves, or other apparatus (including amplifiers) that produce heat.
8) Operate this product only from the type of power source indicated on the
label. If you are not sure of the type of power connected to your home,
consult your local power company. Disconnect the unit from the mains before
any maintenance or installation procedure.
9) Protect the mains cord from damage and stress.
10) Only use attachments/accessories specified by the manufacturer.
11) Unplug this apparatus during lightning storms or when unused for long
periods of time.
12) Refer all servicing to qualified service personnel. Servicing is required
when the apparatus has been damaged in any way, including damage to the
mains cord or plug, if the unit has been exposed to liquid or moisture,
has been dropped or is not operating correctly.
13) Do not impede the air flow into the unit by blocking the ventilation slots.
14) Attention should be drawn to the environmental aspects of battery disposal.
15) Use the apparatus in moderate climate.
WARNING: To reduce the risk of fire or electric shock, do not expose this
apparatus to rain or moisture.
WARNING: The batteries shall not be exposed to excessive heat such as
direct sun light, fire, etc.
This symbol indicates that dangerous voltages constituting a risk of
electric shock are present within this unit.
This symbol indicates that there are important operating and
maintenance instructions in the literature accompanying this unit.
This symbol indicates that this product incorporates double insulation
between hazardous mains voltage and user accessible parts.
When servicing use only identical replacement parts.
This symbol on the product or in the instructions means that your
electrical and electronic equipment should be disposed at the end of
life separately from your household waste. There are separate
collection systems for recycling.
For more information, please contact the local authority or your retailer
where you purchased the product.
Table of Contents
Front and Rear Panel ............................................................................... 1
Remote Control.... ................................................................................... 2
Connecting to a Television.........................................................................4
Connecting to an Audio System.................................................................5
Connecting to a DVD Recorder or VCR...................................................... 6
First Time Installation............................................................................... 7
Troubleshooting......................................................................................16
Technical Specifications...........................................................................17
Package Contents
Before installation, please check the contents of the package.
The package should contain the following items:
x1 pc
1 DVB-T TV Receiver
x1 pc
2 Remote Control
x1 pair
3 AAA Battery for the Remote Control
x1 pc
4 User Manual
x1 pc
5 Quick Start Guide
x2 pcs
6 Serial Number label
x1 pc
7 AV cables
AAA Battery
098004B95000001
DVB-T TV Receiver
Remote Control
Serial Number label
User Manual
Quick Start Guide
AV cables
Front and Rear Panel
1. Front panel
1
2
3
4
5
6
7
8
POWER BUTTON: Push to turn on/off the main power supply.
USB: For software upgrade and media playback.
LED DISPLAY WINDOW: Displays the current channel number.
REMOTE CONTROL SENSOR: Used to receive the signal from the Remote Control.
VOL+/-: Used to move around the menu screens or adjusting the volume.
CHANNEL UP/DOWN: Used to change channels without using the Remote Control.
STANDBY INDICATOR: Used to indicate the power state of the Set Top Box,
the LED will turn red when the Set Top Box is in standby mode.
STANDBY: Used to switch the set top box on and off.
2. Rear panel
1 RF IN: This socket connects to your external Aerial.
2 RF LOOP THROUGH: This socket will feed the RF signal to either your TV or
another video system.
3 COAXIAL: This socket connects to the Coaxial input on your surround sound system.
4 VIDEO: This socket outputs composite video signal.
5 COMPONENT VIDEO OUT: These sockets connect to your TV component input
terminals.
6 AUDIO L/R: These sockets output Analog Audio L/R signal.
7 HDMI: High definition audio and video output used to connect to a HDMI device.
8 MAINS CABLE: This is used to connect to your main power supply.
1
Remote Control
1. MUTE: Mute or restore Audio Output.
2. INFO: Displays additional channel information.
3. TTX: Displays Teletext Information.
4. SUBTITLE: Displays subtitle language options.
5. EXIT: Exits the current Menu or returns to the
previous Menu.
6. OK: Confirms an entry or selection. Displays
the list of channels.
7. RIGHT / LEFT: Navigates through the Menus.
Increases or decreases volume.
8. TV/RADIO: Switches from TV function to Radio
function and from Radio to TV.
9. RECALL: Used to switch between the last
two channels that have been viewed.
10.GOTO: Selects the play time of media.
11.PREV: Skips to the previous track during
media playback.
12. NEXT: Skips to the next track during media
playback.
26
27
13. REPEAT: Selects Repeat or turn off Repeat
28
mode.
29
14. STOP: Stops media play.
15. STANDBY: Switches the unit in and out of
Standby mode.
16. EPG: (Electronic Program Guide)Displays the EPG.
17. AUDIO: Selects an Audio Language or Audio Mode.
18. UP / DOWN: Navigates through the Menus.
Selects the next or previous Channel.
19. MENU: Turns on Main Menu.
20. FAVOURITE: Turns on Favourite Menu.
21. 0-9 (Numeric Buttons): Selects a channel or setting .
22. FWD: Fast forwards during media play.
23. REV: rewind during media play.
24. PLAY: Starts or resumes media play.
25. PAUSE: Pauses media play.
26. Red button: In picture viewing mode, press to zoom in picture.
In Teletext mode, it is the teletext colour button.
27. Green button: In DTV mode, press to toggle through different Resolution
options. In Music playback mode, press to toggle through different repeat
settings. In Teletext mode, it is the teletext colour button.
28. Yellow button: In DTV mode, press to change to different Aspect Ratios.
In Teletext mode, it is the teletext colour button.
29. Blue button: In Teletext mode, it is the teletext colour button.
2
Installing the Batteries
Remove the battery cover from the rear of the Remote Control and place
2xAAA size batteries inside the compartment.
Please make sure the battery polarities match the polarity markings inside
the compartment.
1.Open the cover
O
PE
2.Install batteries
3.Close the cover
N
CL
O
SE
Using the Remote Control
To use the Remote Control, point it towards the front of the Digital Set Top Box.
The Remote Control has a range of up to 7 metres from the Set Top Box at an
angle of up to 60 degrees.
ON
OFF
The Remote Control will not operate if its path is blocked.
Sunlight or very bright light will decrease the sensitivity of the
Remote Control.
3
Connecting to a Television
For a basic connection from your Set Top Box to the television, use the
Composite connection outlined below.
For a higher quality connection, use the Component Video connection
outlined below combined with the Composite Audio Connection.
For the highest quality connection use a direct HDMI connection,
see below.
TV Aerial
R F IN
R F LOOP
THROUGH
Digital
Audio
Pr
Pb
L
VIDEO
Y
R
100-240V~
50/60Hz
Coaxial
HDMI OUT
COMPONENT VIDEO / AUDIO OUT
RED
WHITE YELLOW
(Audio)
(Video)
HDMI
Component video
Composite
Video in
R
Audio in
L
Video in
Cr
Cb
Y
4
Connecting to an Audio System
R F IN
R F LOOP
THROUGH
Digital
Audio
Pr
Pb
L
VIDEO
Y
R
100-240V~
50/60Hz
Coaxial
HDMI OUT
COMPONENT VIDEO / AUDIO OUT
RED
WHITE
Coaxial cable
AUDIO IN
R
Coaxial
L
Amplifier
VOLUME
INPUT SELECTOR
POWER
BYPASS
PRO LOGIC
3 STEREO
MODE
TEST
CHANNEL
KARAOKE
MUTE
UP
DOWN
BASS
1
MIC
2
1
MIC VOL
2
EXCITE
5
MIC
TREBLE
ECHO
Connecting to a DVD Recorder or VCR
TV Aerial
R F IN
R F LOOP
THROUGH
Digital
Audio
Pr
Pb
L
VIDEO
Y
R
100-240V~
50/60Hz
Coaxial
HDMI OUT
COMPONENT VIDEO / AUDIO OUT
AUDIO/VIDEO OUT
ENABLES THE RECORDER TO
RECORD THE DIGITAL CHANNEL YOU
ARE WATCHING
ALLOWS THE RECORDER TO
RECORD DIFFERENT CHANNELS
DVD RECORDER
OR VCR
RF IN
AUDIO/VIDEO IN
R
R
L
L
VIDEO
VIDEO
AUDIO/VIDEO OUT
AUDIO/VIDEO IN
R
L
VIDEO
6
First Time Installation
After all connections have been made properly, switch on TV and make sure the
unit is connected to the Main Power. Press Power button to switch the unit on.
If you are using the unit for the first time or or have restored the unit to Factory
Default, the Installation Guide Menu will appear on your TV screen.
(1) [OSD Language] press RIGHT/LEFT key to select a language.
(2) [Country] press RIGHT/LEFT key to select your country of
residence.
(3) [Channel Search] press RIGHT or OK key to begin Automatic
channel search.
(4) Once channel tuning is complete, you can start watching TV programs.
Basic Operation
(1). Program Manage Settings
To access the Menu, press the MENU button and select [Program]. using the
RIGHT/LEFT keys to navigate through the menu. The Menu provides options
to adjust the Program Manage Settings. Select an option and press OK or
RIGHT to adjust that setting. Press the EXIT button to exit the Menu.
7
(a) Program Edit
To edit your program preferences (lock, skip, favourite, move or delete), you
will need to enter the Program Edit Menu. This Menu requires a password to
access. Enter the default password '000000'. The master unlock password
is '888888' .
Set Favourite Channels
You can create a shortlist of favourite programs that you can easily access.
Set Favourite TV or Radio program:
1. Select your desired channel then press the FAVOURITE button.
A heart-shaped symbol will appear and the channel is marked as a favourite.
2. Repeat the previous step to select more Favourite channels .
3. To confirm and exit the Menu, press the EXIT key.
Disable Favourite TV or Radio Channel :
Select the Favorite channel and press Favorite button on the remote control
to cancel.
View Favourite Channel
1. While in normal viewing mode, press Favourite button and the Favourite
Menu will appear.
2. Press UP/DOWN to browse through your Favourite Channels.
3. Press OK to select your favourite channel .
Delete a TV or Radio Program
1. Select the Program and then press the BLUE button.
A warning message will appear. Press OK to delete the channel.
2. Repeat the previous step to select more channels to delete.
Skip TV or Radio Channel
1. Select the channel you would like to skip and press the GREEN button.
A skip symbol is displayed. The channel is marked as a skip.
2. Repeat the previous step to skip more channels .
3. To save your settings and exit the menu, press EXIT key.
Disable the Skip Channel function:
Select the Skip channel and press the GREEN button on the remote
control to cancel.
8
Move a TV or Radio Program
1. Select the preferred channel then press the RED button. A move symbol
will appear.
2. Press UP/DOWN to move the channel.
3. Press OK to confirm.
4. Repeat the above steps to move more channels.
Lock Program
You can lock selected programs for restricted viewing .
Lock a TV or Radio channel :
1.Select the preferred channel then press the YELLOW button. A lock-shaped
symbol is displayed. The channel is now marked as locked.
2. Repeat the previous step to select more channels.
3. To confirm your settings and exit the menu, press the EXIT button.
4. Press the YELLOW button to disable the locked channels function.
5. To view the locked channels , you will be required to enter either the default
password '000000' or your last set password. The master unlock password is
'888888'.
(b) EPG (Electronic program guide)
The EPG is an on-screen TV guide that shows scheduled programs seven
days in advance for every tuned channel. Press the EPG button on the Remote
Control to access the guide.
You can use the UP/DOWN key to select the preferred program. If there is
more than one page of information, use the BLUE button for page up and
the YELLOW button for page down.
(c) Sort
Sort your channels from the following options:
[By LCN] - Sort the channels in ascending order.
[By Service Name] - Sort the channels in alphabetical order.
[By Service ID] - Sort the channels according to the station.
[By ONID] - Sort the channels according to ONID.
(d) LCN (Logical channel number)
Set LCN on or off.
9
(2). Picture Setting
To access the Menu, press MENU then select [Picture] using the RIGHT/LEFT
key. The Menu provides options to adjust the video settings. Press UP/DOWN
to select an option and press RIGHT/LEFT to adjust that setting. Press EXIT to
exit the menu.
(a) Resolution
You can change this setting if the picture resolution does not appear to be
correct. This setting is to match the most common setting for HDMI.
[480P]: for NTSC TV system .
[576P]: for PAL TV system .
[720P]: for NTSC or PAL TV system .
[1080I]: for NTSC or PAL TV system .
(b) TV Format
If the picture does not appear to be correct you can change this setting.
This should match the most common setting for TVs in your country.
[NTSC]: for NTSC system TV.
[PAL]: for PAL system TV.
10
(3). Channel Search
To access the menu, press MENU and select [Search Channel] using the
RIGHT/LEFT keys.
This M enu provides options to adjust the S earch C hannel settings.
Press UP/DOWN to select an option and press RIGHT/LEFT to adjust the setting s .
Press EXIT to exit the M enu
(a) Auto Search
This option will automatically search for channels and save them once the
scanning is complete. All previously saved channels and settings will be deleted.
1. Select [Auto Search] and press OK or RIGHT to start channel search.
2. To cancel channel search, press EXIT. Any channels that have been found
will be saved.
(b) Manual Search
This option allows you to scan for new channels without deleting previously
saved channels and settings.
1. Select [Manual Search] then press OK or RIGHT. The channel search
screen will appear.
11
2. Press the RIGHT/LEFT key to select the channel frequency.
3. Press OK to start searching channels.
If a channel is found, it is saved and added to the channels list. If channels can
not be found during searching, the unit will exit automatically.
(c) Country
Select your country of residence.
(d) Antenna Power
Enable Antenna Power if an external active antenna is connected.
(4). Time Setting
To access the M enu, press MENU then select [Time] using the RIGHT/LEFT
keys. The M enu provides options to adjust the time settings.
Press UP/DOWN to s elect an option and press RIGHT/LEFT to adjust the
setting s . Press EXIT to exit the menu.
(a) Time offset
Select auto or manual for GMT offset adjustments.
(b) Country Region
Select the Country Region when [Time Offset] is set to Auto.
(c) Time Zone
Select the Time Zone Offset when [Time Offset] is set to Manual.
(5). Option
To access the M enu, press MENU and select [Option] using the RIGHT/LEFT
keys. The menu provides options to adjust the OSD Language,
Subtitle Language and Audio Language.
Select an option and press RIGHT/LEFT to adjust the setting.
Press EXIT to exit the M enu
12
(a) OSD (On Screen Display) Language
Select an OSD language.
(b) Subtitle Language
Select the preferred subtitle language.
(c) Audio Language
Select the preferred audio language for watching TV channels.
If the language is not available, the default program language will be used.
(d) Digital Audio
Select digital audio output mode.
(6). System Setting
To access the M enu, press MENU and select [System] using the RIGHT/LEFT
keys. The menu provides options to adjust the system settings.
Press the UP/DOWN key to s elect an option and press RIGHT/LEFT to adjust
the setting. Press EXIT to exit the M enu .
(a) Set Password
Set or change the password for locked programs. Enter your old password or
the default password '000000'. You will then be asked to enter your new
password. Press OK button to confirm your new password.
Once it is confirmed, press EXIT to exit the Menu. The master unlock password
is '888888' .
13
(b) Restore Factory Default
Reset your Set Top Box to the Default Factory Settings.
In Main Menu select [Restore Factory Default] using the RIGHT/LEFT keys
and press OK or RIGHT to select. Enter your password or the default password
'000000' and press OK to confirm. This option will delete all preset channels
and settings. The master unlock password is '888888' .
(c) Information
View model, hardware and software information.
(d) Software update
If the status is set 'ON ', it will scan new software from broadcast according to
your preferred time in"Start time".
(e) Start Time
This is the time that the unit will scan for software updates.
(7). USB
To access the Menu, press the MENU button and select [USB] using the
RIGHT/LEFT keys. The menu provides options to playback Music, Photo and
Multimedia files. It can support AVI, MP3, WMA, JPEG and BMP formats.
The unit will only support USB device with FAT32 file system.
It will not support NTFS file system.
(a) Multimedia: When a USB device is attached you can select from the Music,
Photo or Movie options in this menu using the RIGHT/LEFT keys and OK to
select. If a USB device is not connected, the warning message "No USB device
is Found" will appear.
14
(b) Photo configure:
-Slide Time: adjust slide show interval to 1~8 seconds.
-Slide Mode: adjust slide show effect as mode 0~59 or random.
-Aspect Ratio:
[Keep]: Play picture in its original aspect.
[Discard]: Play picture in full screen mode.
(c) Movie Configure:
- Aspect Ratio:
[Keep]: Play movie in its original aspect.
[Discard]: Play movie in full screen mode.
- Subtitle Specific:
[Small]: Displays the subtitle as small mode.
[Normal]: Displays the subtitle as normal mode.
[Big]: Displays the subtitle as big mode.
- Subtitle BG:
[White]: Displays the subtitle in white background.
[Transparent]: Displays the subtitle in transparent background.
[Grey]: Displays the subtitle in grey background.
[Yellowgreen]: Displays the subtitle in yellowgreen background.
- Subtitle Font Color:
[Red]: Displays Subtitle in red font.
[Blue]: Displays Subtitle in blue font.
[Green]: Displays Subtitle in green font.
Note:
- We cannot guarantee compatibility (operation and/or bus power) with all
USB mass storage devices and assume no responsibility for any loss of
data that may occur when connected to this unit.
- With large amounts of data, it may take longer for the system to read the
contents of a USB device.
- Some USB devices may not be properly recognised.
- Even when they are in a supported format, some files may not play or
display depending on the content.
15
Troubleshooting
Problem
No picture
Potential Reasons
Power isn't connected
What to do
Connect the power
The power switch is not on Switch on the power
Screen shows
No Signal
DVB-T cable not connected Plug in the DVB-T cable
Aerial cable is faulty
No sound from
speaker
No or incorrect connection Connect the audio cable
with audio cable
correctly
Sound on mute
Only sound, no
image on the
screen
Remote Control
is not responding
Picture is breaking
up
Check aerial cable and
connections
Turn off mute function
No or incorrect connection Make sure cables are
with AV cable
connected correctly
The program is a radio
program
Press <TV/RADIO> key to
shift into TV mode
The battery is exhausted
Change battery
Remote Control is not
facing or close enough
to the Set Top Box
Adjust the position of the
Remote Control and move
closer to the unit
The signal is too weak
Check aerial cable and
connections
16
Technical Specifications
Item
Sub Item
Parameter
Tuner
Input Frequency
170~230MHz
470~860MHz
RF Input level
-25~-82dBm
IF Bandwidth
7MHz and 8MHz
Modulation
QPSK,16QAM,64QAM
Decoder Format
MPEG4 AVC/H.264 HP@L4
MPEG2 [email protected]
Output Format
576P , 720P, 1080i, 4:3 and 16:9
Output Port
HDMI(V1.3C), YPbPr, CVBS
Decoder Format
MPEG-1 (layer1&2&3 ), WMA, AC3
Audio output
Coaxial S/PDIF, 2xRCA(L/R)
Video
Audio
USB 2.0
Supported Capacity 160GB
Supported Media
Power
MP3, WMA, JPEG, BMP, AVI
Supply Voltage
100-240V~ 50/60Hz
Maximum Power
Consumption
8W
Standby Power
Consumption
< 1W
Weight
1.6 kgs
Size
320x250x38mm
17