1
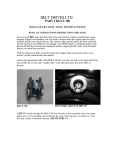
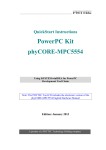
Arndt & Voß GmbH
Elektronik - Meßtechnik
User’s Manual:
M40079.V14
M40079.V14 Torque measuring unit
Contents:
Page
1.
Displays and control elements
2-4
2.
Power supply
4
3.
3.1
3.2
3.3
3.4
3.5
3.6
3.7
3.8
Setup
Model no
Torque sensor connection
Checking the gain adjustment
Zero adjustmen
Upper tolerance limit adjustment
Lower tolerance limit adjustment
Measuring value display
Choice of language version
4
4
4
4
5
5
5
5
5
4.
Operation mode
5
5.
5.1
5.2
5.3
Programming
Sign of measuring value
Measuring range
Measuring program
5
5
5
5
6.
Connection schematics
6
Security comments according to VDE 0411
7
The torque measuring unit M40079.V14 stores the torque peak value during the measuring
cycle. This measured value is valued in 3 classes. Additionnally, an automatic zeroing is
carried out in an AUTOZERO cycle. There the torque zero value, which occurs appliance
relatively in this cycle is corrected as offset for the following measurements.
The adjustment quantities from up to 32 different model-no. can be set aside secure of
network failure in the measuring unit and by selection of the corresponding model number,
be called up through the external control.
BDL 4_79V14E.DOC 12/01
Page 1 of 7
Arndt & Voß GmbH - Eichhofstr. 7 - D 21255 Tostedt
Telefon ++49 (0)4182-289 760 Fax -289 761 email: [email protected]
http://www.arndtundvoss.de
Arndt & Voß GmbH
Elektronik - Meßtechnik
User’s Manual:
M40079.V14
1. Displays and control elements
Front view 4384xq_1.bmp
1 - Display
2 - Lamp: passing of tolerance
3 - Lamp: tolerance GOOD
4 - Lamp: falling below tolerance
5 - Pushbutton UP
6 - Pushbutton ENTER
7 - Pushbutton Down
8 - Keyswitch SETUP – Operating mode (AUTO)
BDL 4_79V14E.DOC 12/01
Page 2 of 7
Arndt & Voß GmbH - Eichhofstr. 7 - D 21255 Tostedt
Telefon ++49 (0)4182-289 760 Fax -289 761 email: [email protected]
http://www.arndtundvoss.de
Arndt & Voß GmbH
Elektronik - Meßtechnik
User’s Manual:
M40079.V14
Back view 4384bck1.bmp
T1 T2...T3 T4 X312 X412 X401 X402 S1 F1-12V +12V + 5V -
Input torque sensor
not used
DC-voltage output torque sensor
Input from external control unit
Analog output torque X_average entire
Input power supply
Printer output
Power supply switch
Power supply fuse
Indicator -12V supply
Indicator +12V supply
Indicator +5V supply
BDL 4_79V14E.DOC 12/01
Page 3 of 7
Arndt & Voß GmbH - Eichhofstr. 7 - D 21255 Tostedt
Telefon ++49 (0)4182-289 760 Fax -289 761 email: [email protected]
http://www.arndtundvoss.de
Arndt & Voß GmbH
Elektronik - Meßtechnik
User’s Manual:
M40079.V14
Display modes
MAX (Nm)
Torque peak value of the last measuring cycle
Model no.
000...031
Last called type. The adjustment values of the shown model no.
are read from the memory while the display is switched on.
Autozero L
Autozero value
Actual value Nm Actual value (present value) of torque
MAX UT
Upper tolerance limit
MAX LT
Lower tolerance limit
Caution: The pushbuttons UP and DOWN are locked in the operating mode (AUTO), so
that the calibration values can only be changed in the SETUP-mode.
2. Power supply
Connect the plug X401 of A&V 4384 via the power cable (europ. standard) with 230V, 50
hertz and turn on the mains switch S1 on the backside.
3. Setup: Keyswitch at the front in position SETUP
3.1 Model no.
First step is to select the model number you wish to work with. Select the display mode
„ model-no.“ By repeated pushing of pushbutton ENTER. Select the necessary value
(000...031) by pushing the pushbutton UP or DOWN. The calibration values for 3.4, 3.5 and
3.6 will be read out from the memory when leaving the display mode „ model-no.“ .
3.2 Torque sensor connection
The sensor has to be connected with the connector T1 at the backside.
3.3 Checking the gain adjustment
The calibration may be done only by special educated persons. The calibration is possible at
the backside with hidden adjuster T1. The unit has been calibrated in our factory.
Gain adjustment with lever-arm and gauge weight:
approximation formula: torque (Nm) = lever-arm (cm) * weight (kg) * 0,1
For example: lever-arm 20cm, gauge weight 5kg -> torque 10Nm
a) Exonerate the torque sensor and set display value to zero (see 3.4).
b) Put the gauge weight to the lever-arm and read the display value.
c) If the display does not show the correct value, the calibration has to be corrected with the
hidden adjuster T1at the backside so that the display value is correct. After that, this check
and correction has to be repeated beginning at a) until the display shows the correct value.
BDL 4_79V14E.DOC 12/01
Page 4 of 7
Arndt & Voß GmbH - Eichhofstr. 7 - D 21255 Tostedt
Telefon ++49 (0)4182-289 760 Fax -289 761 email: [email protected]
http://www.arndtundvoss.de
Arndt & Voß GmbH
Elektronik - Meßtechnik
User’s Manual:
M40079.V14
3.4 Zero point adjustment
Select the display mode „ act.val. Nm“ by repeated pushing of pushbutton ENTER. With
exonerated torque sensor the adjustment will be done by positioning the online value display
to zero (Push pushbutton UP or DOWN).
3.5 Upper tolerance limit adjustment
Select the display mode „ MAX UL“ by repeated pushing of pushbutton ENTER. Adjust the
necessary value by pushing the pushbutton UP or DOWN. This adjustment will be stored for
the actual model-no. When the keyswitch is turned into position AUTO. Then the value will
be preserved even when the power supply is switched off.
3.6 Lower tolerance limit adjustment
Select the display mode „ MAX LL“ by repeated pushing of pushbutton ENTER. Adjust the
necessary value by pushing the pushbutton UP or DOWN. This adjustment will be stored for
the actual model-no. When the keyswitch is turned into position AUTO. Then the value will
be preserved even when the power supply is switched off.
3.7 Display of the MAX-value of the last measurement
Select the display mode „ MAX (Nm)“ by repeated pushing of pushbutton ENTER.
3.8 Choice of language version
(from program version > 40079V14 400)
Select the display mode " MAX (Nm) ". Push the pushbuttons arrow UP and DOWN at the
same time. The chosen language is shown: DEUTSCH, FRANCAIS, ESPANOL or
ENGLISH. Select the language by pushing the pushbutton arrow UP or arrow DOWN. Then
push pushbutton arrow RIGHT. The display mode" MAX (Nm) " is shown again and the
chosen options are stored durably.
4. Operating mode: Keyswitch at the front in position AUTO
The unit is ready for measuring independent of the display mode. After switching on the unit
an AUTOZERO CYCLE has to be done first, before measuring. In operating mode only the
display mode may be selected. The changing of any adjusted values is blocked.
5. Programming
5.1 Sign of measuring value
The changing of the sign is stopped by setting up connections at X312 (see 6. connection
schematics).
5.2 Measuring range
By adding different connections in the connector X312, the measuring ranges 2, 5, 10, 20,
50, 100 Nm are programmable (see 6. Connection schematics). Without any additional
connections the range 5 Nm is selected.
5.3 Measuring program
The result of the average value is fixed.
6. Connection schematics
BDL 4_79V14E.DOC 12/01
Page 5 of 7
Arndt & Voß GmbH - Eichhofstr. 7 - D 21255 Tostedt
Telefon ++49 (0)4182-289 760 Fax -289 761 email: [email protected]
http://www.arndtundvoss.de
Arndt & Voß GmbH
Elektronik - Meßtechnik
User’s Manual:
M40079.V14
BDL 4_79V14E.DOC 12/01
Page 6 of 7
Arndt & Voß GmbH - Eichhofstr. 7 - D 21255 Tostedt
Telefon ++49 (0)4182-289 760 Fax -289 761 email: [email protected]
http://www.arndtundvoss.de
Arndt & Voß GmbH
Elektronik - Meßtechnik
User’s Manual:
M40079.V14
Security comments according to VDE 0411
General technical
time for warming up 20 minutes
temperature
0...+40 Grd C
atmospheric humidity on to 75% rel.
frequency
50/60 Hz
power supply voltage 230V +/-10%
security
according to VDE 0411, protection class 1
This unit is built and checked under DIN 57411 part 1/VDE 0411 part 1 and
left the factory in a safe and perfect condition. To preserve this condition and
to guarantee a safe working the user has to follow the comments and warnings
which are given in this instructions.
Before turning on the power you have to make sure, that the voltage of operation and the
mains voltage correspond.
The mains plug may only be inserted into a socket with ground contact. The
safety effect may not be abolished by an extension lead without ground connection.
The opening of covers or removing of components, except if it is possible to do
by hand, might uncover parts or connections under dangerous voltage.
Racks may only be used inside a cover.
If an adjustment, a maintenance or a repair at the opened unit under voltage
is unavoidable, it may be done only by a qualified employee, who is well aqainted with the
dangers involved.
ATTENTION:
After the end of those works, the unit has to be checked according to
VDE 0411, part 1.
You have to make sure, that only fuses of the given type and values are taken
for replacement. The use of mended fuses or short-circuiting them is inadmissible.
If it is presumed, that a safe work is not possible, you have to take this unit out of work. A
safe work may not be possible, if
- there are visible damages at the unit.
- the unit doesn´t work.
- after longer storage under unfavourable circumstances.
- after heavy stress of transport.
BDL 4_79V14E.DOC 12/01
Page 7 of 7
Arndt & Voß GmbH - Eichhofstr. 7 - D 21255 Tostedt
Telefon ++49 (0)4182-289 760 Fax -289 761 email: [email protected]
http://www.arndtundvoss.de