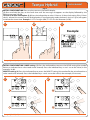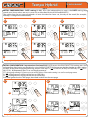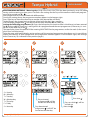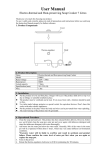
1
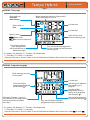
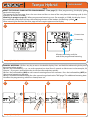
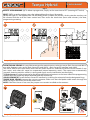
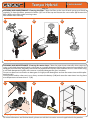
Tempo Hybrid User manual Page 1 INSTALLATION - Where to install the TEMPO HYBRID. Install the water timer outside, in a bright area, avoiding any areas which are in shade or dark. When choosing the installation position, observe the indications provided below. 1 2 angle exceeding 90° position RECOMMENDED angle exceeding 45° position RECOMMENDED > 45° angle LESS than 45° position NOT RECOMMENDED < 45° > 90° angle LESS than 90° position NOT RECOMMENDED < 90° Tempo Hybrid (cod.): 8487 INSTALLATION - How to install the TEMPO HYBRID. (1) The spout of the tap should have a 3/4" threaded male connector, if not, use an adapter. Screw the screw collar of the 3/4” female fitting onto the tap. Warning: only tighten the ring nut by hand and not with tools (ex. pliers). (2) Connect the watering line to the quick-click or threaded connector using the appropriate fittings. 1 2 3/4” Tempo Hybrid (cod.): 8487 - Do not install the water timer inside valve boxes, below ground level or indoors. - Do not use the timer with chemicals or liquids other than water. - Do not use the water timer with operating pressures lower than 0.2 bar (2,9 psi) or higher than 12 bar (174 psi). Tempo Hybrid User manual Page 2 INSTALLATION - Sostituzione batteria. To operate, the water timer uses mainly solar energy. To turn on the backlit display or when there is not enough solar energy (for example, after a few days of rain), the back-up AA 1.5 V (LR6) Alkaline battery will automatically be used to ensure correct operation of the water timer. The “sun” symbol on the display: - if this symbol flashes, it indicates there is not enough light (therefore the water timer will be battery operated) - if this symbol remains active, it indicates that there is sufficient light (therefore the water timer will operate on solar energy). If the battery used is new and the water timer is installed correctly, he life cycle of the battery will be approximately 4 years (or until the expiry date if this is less than 4 years). The life cycle of the battery therefore depends on: - environmental conditions (number of sunny/rainy days); - where the water timer is installed; - how often the backlit function is used. The water timer is protected against reverse polarity of the battery and automatically checks the battery level. Indicator of battery charge Charge state (FLASHING) Battery completely charged Battery partially charged Discharged battery to be replaced Depleted battery to be replaced Tempo Hybrid (cod.): 8487 INSTALLATION - Battery replacement. When the battery is flat: - if any key is pressed (for example, display back lighting), programming is suspended. To restore programming, replace the battery; - if NO key is pressed, programming is in any case carried out (only if there is enough sunlight (“sun” symbol permanently activated). To fit or replace the batteries, proceed as follows: (1) Fully press the side key () and simultaneously detach the front part of the water timer (2). Remove the flat batteries, if in place. (3) Fit the new battery in the support observing the correct polarity. Refit the water timer by joining the two parts until you hear the "click" of the coupling of the side key. 1 2 3 1,5 V AA Alkaline Tempo Hybrid (cod.): 8487 + AA Tempo Hybrid User manual Page 3 DISPLAY - Time page. Please refer to Use with Rain Sensor: When operating with the 12-hour clock, always indicate p.M. Or a.M. Current time Please refer to Use: Current day* Battery status: Start and run time of next watering cycle Water timer Rain Sensor (if present) Plus mode indicates if the programmes will be carried out on odd or even days Days on which the programme is to be carried out with the next watering cycle * S= sunday / M= Monday / T= Tuesday / W= Wednesday T= Thursday / F= Friday / S= Saturday if the plus function is set to ,there is also an indication of whether the current day is odd or even . Tempo Hybrid (cod.): 8487 DISPLAY - Programming page. Total watering run time For the week Current day* Start time of the programme displayed (for example, 2) If the plus function is set to , this indicates if the programmes will be carried out on odd or even days If flashing, this indicates that watering is in progress Number of the programme which is being set or displayed (for example, 2) Days on which the displayed programme will be carried out Run time of programmed displayed (for example, 2) * S= sunday / M= Monday / T= Tuesday / W= Wednesday T= Thursday / F= Friday / S= Saturday if the plus function is set to ,there is also an indication of whether the current day is odd Tempo Hybrid (cod.): 8487 or even . Tempo Hybrid User manual Page 4 INITIAL CONFIGURATION. Press any key to access the backlit display. (1) Press and hold the keys at the same time until the message set appears on the display followed by the flashing message 24h (2). 12-hour or 24-hour clock option. (2-3) Press the indicated key to select 12-hour or 24-hour clock setting. If the 12-hour clock is selected, the current time will be displayed or, if in programming mode, the letter A (a.m) or P (p.m) will appear to indicate the correct time. Example: A :=4 at night (4:00) / P :=4 in the afternoon (16:00). 1 2 3 Example: Tempo Hybrid (cod.): 8487 INITIAL CONFIGURATION - HOUR setting. (1) Press the indicated key to access the HOUR setting (the number flashes to indicate that a value needs to be entered). Press the indicated keys + and - to set the value (in the example, 18:00). MINUTE setting. (2) Press the indicated key to access the MINUTE setting (the number flashes to indicate that a value needs to be entered). Press the indicated keys + and - to set the value (n the example, 35 minutes). 1 2 a a b b Tempo Hybrid (cod.): 8487 Tempo Hybrid User manual Page 5 INITIAL CONFIGURATION - DATE setting (1-2-3). Press the indicated key to access the DATE setting (day month year): these values are set in same way as described for the HOUR and MINUTES. The water timer has an internal calendar so once the date has been set, the day of the week (for example, Monday) is recognised automatically. 1 2 3 a a a b b b Tempo Hybrid (cod.): 8487 INITIAL CONFIGURATION - Impostazione funzione PLUS. (1) To access the PLUS FUNCTION setting, press the indicated key after having set the date. by using the PLUS FUNCTION the user can decide whether to water: setting the days of the week during programming, only on ODD days (LU-ME-VE) or only on EVEN days (DOMA-GI-SA). 2) Repeatedly press A to set the parameter to: during programming it is necessary to set on WHICH days of the week watering is to start for each programme. all programmes will be carried out on ODD days. all programmes will be carried out on EVEN days. Press B to go back to the TIME page, described in detail on the next page. 1 2 A a b Tempo Hybrid (cod.): 8487 A a c b B d Tempo Hybrid User manual Page 6 PROGRAMMING WATERING. Press any key to access the backlit display. Press the indicated key a number of times until the number of the programme you wish to set appears in the bottom right (in the example, 1.). Start time (1). Press the indicated keys to set the start time of 1 (in the example, at 6:00). As the default setting, the time is always set to OFF (watering is NOT active): leave this if you do not intend to use the programme. Watering run time (2). After having set the start time, press the indicated key to access the RUN TIME setting for the watering programme 1 (the number flashes indicating that a value needs to be entered). Press the indicated keys to set the required run time (from 5 seconds to 90 minutes in the example, 20 minutes ). If you press and hold the key it will move forward more quickly. N.B.: during normal operation of the water timer, if the symbol is flashing, this indicates that watering is in progress. (3) Pressing the indicated key at any time takes the user back to the previous parameter setting (in this case the start times), if for example these need to be changed. 1 2 3 a a a b b b Tempo Hybrid (cod.): 8487 Tempo Hybrid User manual Page 7 PROGRAMMING WATERING - Watering days (1-2). If the PLUS FUNCTION has been previously set to Off, after having set the watering run time, press A to access the settings for the Days of the week on which each programme is to be carried out 1... 4. Each programme can be associated with different days. During the setting phase, the programme number appears in the bottom right. Press right key to move from one day to another (the selected day will flash) To deactivate a day (empty box) or activate it (box with the day), press top key. In the example, programme 1 will be carried out from Monday (M) to Friday (F). Setting the following programmes (3). Press the left top key to store the values which have just been entered for 1 and to set 2 (if necessary): setting of this last programme and the next programmes (if necessary) is carried out in the same way as for 1. The top display shows the total of all the watering RUN TIMES for the programmes set for the week (in the example, 4 hour and 40 minutes). From the page with backlit display active and once all the required programmes have been set, it is possible to display the settings of each programme (the programme number appears in the bottom right) and change them if necessary (as indicated in the previous pages). 1 2 3 a a a b b b + + + S = Sunday M = Monday T = Tuesday W = Wednesday T = Thursday F = Friday S = Saturday Tempo Hybrid (cod.): 8487 Day activated: programme 1 will be carried out on that day Day deactivated: programme 1 will NOT be carried out on that day Run time Days on which 1 will be carried out Start time Tempo Hybrid User manual Page 8 WHAT THE DISPLAY SHOWS AFTER PROGRAMMING - Time page (1). After programming, the display goes back to the time page. The bottom of the time page shows the start time and the run time of the next planned watering cycle (in the example, 30 minutes at 22:00). Watering in progress page (2). When programmed watering starts (for example, at 22:00), the display shows: the current day and time at the top, the remaining minutes at the bottom, the flashing symbol . When watering has finished, the time page will once again appear on the display. 1 2 Current time Current day Minutes remaining until the end of the programmed watering Tempo Hybrid (cod.): 8487 MANUAL WATERING. (1) Press any key to access the backlit display. Press and hold the indicated right key until the screen below appears. (2) Press the indicated keys + or - to set the required run time (from 5 seconds to 90 minutes in the example, 20 minutes ). If you press and hold the key it will move forward more quickly. (3) Press the indicated key (ON) to start manual watering after a few moments. Press the indicated key (OFF) to stop manual watering in advance. (4) Press and hold the indicated key for a few seconds to go back to the TIME page. This additional watering does not affect the programming which has already been set. 1 2 3 4 OFF Tempo Hybrid (cod.): 8487 ON Tempo Hybrid User manual Page 9 DELETE A PROGRAMME. (1) To delete a programme, simply set the start time to OFF (watering NOT active). RESET. (2) To reset the settings, press the indicated keys for at least 10 seconds. (3) the message SET will appear, then 24h and finally all the symbols will activate. At this point the two keys can be released and the reset has been carried out. Then reset: the clock time (hours and minutes), the date, programming watering. 1 2 3 Tempo Hybrid (cod.): 8487 USE WITH RAIN SENSOR. It is possible to connect the water timer to a wire rain sensor (Rain Sensor code 90915) or a radio-frequency rain sensor (Rain Sensor RF code 90831 + Rain Sensor RF interface code 8480). The sensor informs the water timer when the rain water which has collected inside the sensor exceeds 5 mm (rain status) and when this water has evaporated (normal operating status). The water timer automatically suspends watering activities while it is raining and signals sensor intervention on the display. The Rain Sensor must be connected to the designated electrical contacts on the inner side of the programming module after the jumper has been removed from the contacts(1). (2)RAIN SENSOR RF: install the Rain Sensor RF interface by inserting the wire aerial into the designated rings. (3)WIRE RAIN SENSOR: connect the sensor connector. Make sure that the bipolar cable enters through the cable passage in the lower part of the water timer. NOTA: If the Rain Sensor is not used, the jumper must remain installed on the contacts. 1 2 3 cod. 90831 cod. 90915 OK!!! cod. 8480 Tempo Hybrid (cod.): 8487 Tempo Hybrid User manual Page 10 CLEANING AND MAINTENANCE. Cleaning the filter. Clean the filter at the start of each season and check it regularly. To clean the filters, proceed as follow: (1) Turn off the tap and loosen the screw collar. (2) Remove the filter. (3) Rinse the filter under running water. Reassemble after cleaning. 1 2 3 Tempo Hybrid (cod.): 8487 CLEANING AND MAINTENANCE. Cleaning the water timer. Clean the water timer externally when necessary using a soft cloth dampened slightly with water or a specific detergent: follow the instructions provided by the detergent manufacturer. Regularly check that the photovoltaic cells are clean and free of dust. Clean them using a soft cloth dampened slightly with water or a specific detergent for glass/windows. Do not use abrasive instruments or detergents or highly acidic detergents to clean the water timer and the photovoltaic cells. During winter and/or when not in use, always remove the battery (1-2) and store the water timer in a dry place at a temperature no lower than 3 °C (3). 1 2 3 a + b AA Tempo Hybrid (cod.): 8487 For more information and further details, please consult the instruction manual supplied with the product.