1
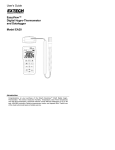
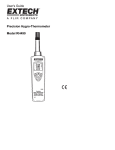
User's Manual
Models 4465CF and 446580
Hygro-Thermometers
WARRANTY
EXTECH INSTRUMENTS CORPORATION warrants the basic instrument to be free of
defects in parts and workmanship for one year from date of shipment (a six month limited
warranty applies on sensors and cables). If it should become necessary to return the
instrument for service during or beyond the warranty period, contact the Customer Service
Department at (781) 890-7440 for authorization. A Return Authorization (RA) number
must be issued before any product is returned to Extech. The sender is responsible for
shipping charges, freight, insurance and proper packaging to prevent damage in transit. This
warranty does not apply to defects resulting from action of the user such as misuse, improper
wiring, operation outside of specification, improper maintenance or repair, or unauthorized
modification. Extech specifically disclaims any implied warranties or merchantability or fitness
for a specific purpose and will not be liable for any direct, indirect, incidental or consequential
damages. Extech's total liability is limited to repair or replacement of the product. The
warranty set forth above is inclusive and no other warranty, whether written or oral, is
expressed or implied.
(
Tech Support Hotlines
781-890-7440 ext. 200
[email protected]
www.extech.com
Copyright © 2000 Extech Instruments Corporation.
All rights reserved including the right of reproduction in whole or in part in any form.
4465CF and 446580 V1.0 6/00
Introduction
Congratulations on your purchase of Extech’s 4465CF Hygro-Thermometer or 446580 HygroThermometer with built-in datalogger. This professional meter, with proper care, will provide
years of safe, reliable service.
Specifications
General Specifications
Display
Measurement
Data Hold
Datalogger (446580)
Data Output
Multi-function 3 ½ digit LCD display
Relative Humidity (RH) and Temperature (°C & °F)
Freezes Display
Records approx. 7000 readings
446580: RS 232 PC serial interface
4465CF: Analog 10mvDC per °C/F or %RH
Response Time
45% to 95% ≤ 3 minutes
Humidity
95% to 45% ≤5 minutes
Measurement rate
4465CF: 2.5 readings per second
446580: 1 reading per second
Operating Temperature 4465CF: 32 to 122°F (0 to 50 °C)
446580: 32 to 104 °F (0 to 40 °C)
Operating Humidity
< 80% RH
Storage Temperature 14 to 140°F (-10 to 60°C)
Storage Humidity
< 70%
Power Supply
006P DC 9V battery (Heavy duty Alkaline type)
Battery life
4465CF: 400 hours; 446580: 50 hours (approx.)
Weight
4465CF: 7.0 oz. (198 g); 446580: 7.1 oz. (200 g)
Size
10.6 x 2.7 x1.0" (180 x 72 x 32mm)
Measurement Specifications
Range
Resolution
Accuracy
% Relative 10% to 95% RH
0.1% RH 30 to 95% RH: +3% RH)
Humidity
10 to 30% RH: +5% RH
Temperature -20οC to 60 οC
0.1 οC
+0.8οC
4 οF to 140 οF
0.1 οF
+1.5 οF
Meter Description
1.
Temperature & Humidity Sensor
2.
3.
4.
5.
LCD Display
ON/OFF/HOLD key
Temperature units key
Temperature/Humidity Select key
6.
7.
8.
(RECORD-select also on 446580)
RECORD / ERASE key (446580 only)
Wet bulb calibration adjust (factory use only)
Dry bulb calibration adjust (factory use only)
9.
RS-232 output jack (446580) or
Analog output jack (4465CF)
Meter Operation
Meter Setup / Taking Measurements
1. Move the TEMP-%RH-RECORD switch (TEMP-%RH only on 4465CF) to the TEMP or
%RH position depending upon whether you wish to measure temperature or Humidity.
2. Move the oC- oF switch to the desired temperature units.
3. Move the ON-OFF-HOLD key to the ON position to power the meter.
4. The Humidity and Temperature sensors are contained in the tip of the meter. Point or
hold the meter in the area where the temperature and humidity are to be monitored. For
convenience, a standard tripod mount is located at the rear of the meter.
5. The 4465CF displays humidity or temperature in the center of the LCD in large letters
depending upon the position of the TEMP-%RH-switch. The 446580, displays both
parameters simultaneously with the primary measurement in the center of the LCD in
large letters and the secondary measurement shown in the lower right hand side of the
LCD. The 446580 also momentarily displays the Date on power-up in MM:DD format on
the lower left of the LCD. The date display becomes the clock display (military time
format) after several seconds and remains on the LCD.
6. As the humidity of the environment under test changes, the meter readings will take a
few minutes to stabilize.
7. When the low battery icon appears on the LCD, replace the 9V battery.
Data Hold
While taking measurements, move the ON-OFF-HOLD switch to the HOLD position. The
reading that was displayed at the time the switch was moved to the HOLD position will now
be held on the LCD. The H icon will also display to let the user know that the HOLD mode is
activated. Move the switch to the ON position to continue normal operation.
Datalogging
4465CF Analog Output
The phono jack located on the right side of the 4465CF accepts a 3.5mm phono plug
(detailed below). This plug can be used to send 10mV per oC /F (when TEMP is selected via
the switch) and 10mV per 1% RH (when the switch is in the %RH position) to a chart
recorder or other data storage device. The output impedance for this analog output signal is
50 ohms.
TIP: DC Voltage
SLEEVE / RING: Signal Ground
446580 RS-232 Output and Datalogging Software
The 446580 has a built-in RS-232 PC interface jack on the right side of the meter housing.
The supplied mini-plug to DB9 connector (detailed below) connects the meter to a PC. The
meter can store over 7000 readings (32Kb memory) and offers an adjustable sampling rate
of 1 to 65 seconds. Date and Time is saved along with the measurement data. The supplied
datalogging software permits the user to download and analyze the data on a PC.
TIP: Transmit (Tx) to PIN 3 of DB9
SLEEVE: Ground to PIN 5 of DB9
RING: Receive (Rx) to PIN 2 of DB9)
Record One Reading
1. Move the TEMP-%RH-RECORD switch to the RECORD position.
2. Press the RECORD/ERASE key once (the RECORD icon will appear
momentarily on the LCD top).
Record Continuously
1. Move the TEMP-%RH-RECORD switch to the RECORD position.
2. Press and hold the RECORD/ERASE key for 3 seconds (RECORD) flashes
periodically).
3. Press the RECORD/ERASE key once to stop recording data.
4. When the FULL icon appears on the LCD, the meter's internal memory has
reached full capacity. It is time to erase or download the data to a PC.
To Erase Data from the Datalogger Memory
1. From a power off condition, press and hold the RECORD/ERASE key while
powering up.
2. When the DEL icon blinks on the LCD, release the key. All data is now cleared.
PC Hardware Minimum Requirements
1. 486 PC with COM1 or COM2 port
2. 1.44MB Floppy Drive
3. EGA Monitor
4. 4MB RAM
PC Setup
With power removed from the PC, connect the RS-232 serial cable (mini-plug to DB9) to the meter and the available PC COM port.
Software Setup
1. Start Windows™ 95/98
2. Close all applications
3. Insert program disk 1 in the floppy drive
4. Click the Windows START key and select RUN
5. Type B:\ SETUP and press OK
6. The Setup utility will now run automatically
Running the Software
1. Launch the Program by double clicking the Program Icon
2. Select COM 1 or COM 2 when prompted
3. Note the RS-232 settings: Baud rate: 9600bps;
Parity: None; Data bits: 8; Stop bits: 1
Setting
1.
2.
3.
4.
the System Time
Select OPTION from the software menu
Select SYSTEM TIME SET from the OPTION list
The current PC system Time/Date will be transferred to the meter
Data is stored along with Time/Date information
ID CODE Setup
You can select a personal 5-digit ID Code to better identify a set of data. Select
MEMORY from the OPTION menu bar and type the code.
Sampling Rate Setup
Data can be recorded once per second up to one reading every 65 seconds. Set the
desired rate by choosing MEMORY from the OPTION menu bar. Type the desired
rate at the SAMPLING field on the Logger software screen.
Download Data from Meter to PC
Select MEMORY from the OPTION menu. To initiate the Data transfer, press the
TIME OF RECORDING software button. The data will appear on the software
screen in sets. Sets are groups of data with contiguous Time/Date stamps. Click on
Set number you wish to view then press SHOW DATA to see the data list.
Graph, Print. or Limit Data
After the SHOW DATA button is pressed, as described in the previous section, the
menu items GRAPH and PRINT appear. Select GRAPH and then either
Temperature or Humidity as desired to view data on an x-y graph. To print data,
select the PRINT item from the menu. To Limit the range of the displayed data,
select RANGE from menu and choose a FROM/TO range for Number of Records
and a MIN/MAX range.
Saving Data to a File
Select SAVE AS from the FILE menu and type a file name. To open this file later,
select OPEN FILE from the FILE menu and select the desired file name.
Datalog with Meter Connected to PC
With the meter connected to a PC, select START RECORDING from the FILE
menu. The software w ill show the word RECORDING, the filename, and the number
of records. Press STOP RECORDING from the FILE menu to cease the recording
session. Manipulate the data as previously described. The REC / rec software
buttons can be used to initiate datalogging also. Press REC to datalog continuously
of press rec to datalog one reading.
Export Data to Microsoft Excel
Select SAVE AS from the FILE menu. Type the file name using the .xls extension.
For example, DATA.XLS. Run Microsoft EXCEL and open the newly named file. The
Data can now be manipulated in spreadsheet form.
Dew Point Temperature Software Display
The 446580 software offers a Dew Point display. Select Dew Point from the OPTION
menu. A new window will appear showing the Temperature, Humidity, and Dew
Point Temperature.
Maintenance
Battery Replacement
The low battery indicator (BT on 4465CF or actual battery icon on 446580) will appear on the
LCD when the battery voltage falls to a critical level. Replace as follows:
1. Slide the battery compartment cover off. The cover is located on the rear of the
meter.
2. Replace the 9V battery and affix the battery compartment cover.
3. Remove the battery if the meter is to be stored for long periods.
Cleaning the meter
Use a damp cloth with a mild detergent to carefully wipe clean the meter housing and display.
Do not use solvents or abrasives to clean the meter.
Repair and Calibration
Extech offers complete repair and calibration services for all of the products we sell. For
periodic calibration, NIST certification or repair of any Extech product, call customer
service for details on services available. Extech recommends that calibration be performed
on an annual basis to insure calibration integrity.