1
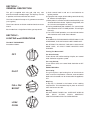
G3512 and G3532
DOMINATORPLUS Grills
USERS INSTRUCTIONS
SECTION 1 - GENERAL DESCRIPTION
SECTION 2 - LIGHTING and OPERATIONS
SECTION 3 - COOKING HINTS
SECTION 4 - CLEANING and MAINTENANCE
This appliance has been CE-marked on the basis of compliance with the Gas Appliance
Directive for the Countries, Gas Types and Pressures as stated on the Data Plate.
The appliance MUST BE installed by a competent person in compliance with the INSTALLATION AND
SERVICING INSTRUCTIONS and National Regulations in force at the time. Particular attention MUST
be paid to the following:
Gas Safety (Installation & Use) Regulations
Health and Safety at Work Act
Furthermore, if a need arises to convert the appliance for use with another gas, a competent person
must be consulted. Those parts which have been protected by the manufacturer MUST NOT be
adjusted by the User.
Users should be conversant with the appropriate provisions of the Fire Precautions Act and the
requirements of the Gas Safety Regulations. in particular the need for regular servicing by a
competent person to ensure the continued safe and efficient performance of the Appliance.
WARNING - TO PREVENT SHOCKS, ALL APPLIANCES WHETHER GAS OR ELECTRIC,
MUST BE EARTHED.
Upon receipt of the User's Instruction manual, the installer must instruct the responsible person(s) of
the correct operation and maintenance of the appliance. This equipment is ONLY FOR
PROFESSIONAL USE, and shall be operated by QUALIFIED persons. It is the responsibility of the
Supervisor or equivalent to ensure that users wear SUITABLE PROTECTIVE CLOTHING and to draw
attention to the fact that, some parts will, by necessity, become VERY HOT and will cause burns if
touched accidentally.
WEEE Directive Registration No. WEE/DC0059TT/PRO
At end of unit life, dispose of appliance and any replacement
parts in a safe manner, via a licenced waste handler.
Units are designed to be dismantled easily and recycling of all
material is encouraged whenever practicable.
Falcon Foodservice Equipment
HEAD OFFICE AND WORKS
Wallace View, Hillfoots Road, Stirling. FK9 5PY. Scotland.
SERVICELINE CONTACT
Phone: 01438 363 000
Fax: 01438 369 900
T100787 Ref.2
SECTION 1 GENERAL DESCRIPTION
The grill is supplied with wire grid, drip tray, cast
aluminium brander and drip trough. The drip tray must be
in position at all times when burners are on.
The G3512 model will accept a 1/1 gastronorm container
(not supplied).
There is one burner on G3532 model and two burners on
G3512.
Each model has a single flame failure gas tap control.
SECTION 2 LIGHTING and OPERATIONS
TO LIGHT THE BURNER
Proceed as follows:
a) Push control knob in and turn it anti-clockwise to
ignition position.
b) Light pilot with a taper whilst holding control knob fully
IN. Observe that pilot lights.
c) When pilot is lit, continue to hold control knob fully in for
20 seconds before release. If pilot is extinguished, wait
for 3 minutes and repeat from step a).
d) Having established pilot condition, turn control knob
anti-clockwise to FULL FLAME position. This will light
burner(s).
e) For LOW FLAME operation, turn control knob further
anti-clockwise to the small flame indicator.
Warning
IF BURNER IS EXTINGUISHED INTENTIONALLY OR
OTHERWISE, THE UNIT SHOULD BE TURNED OFF.
NO ATTEMPT TO RELIGHT THE GRILL SHOULD BE
MADE UNTIL, AT LEAST THREE MINUTES HAVE
ELAPSED.
Turning The Burner OFF
OFF
For Short Periods
To turn burner OFF whilst retaining a lit pilot, turn control
knob clockwise to ignition symbol.
For Long Periods
To turn burner OFF, turn control knob clockwise to OFF
position.
USING THE GRILL
PILOT
FULL ON/
BOOST
Pre-heating
The grill requires a pre-heating time of 20 minutes to
reach maximum temperature. However, toast and other
foods can be inserted 5 to 10 minutes after the appliance
is lit.
Drip Tray
A drip tray is situated in the bottom of the cooking
compartment. This should be kept in place at all times
when the burners are ON.
Warning
DO NOT DRAPE TOWELS etc. OVER UNIT WHEN IN
USE.
SUCH
ACTION
COULD
OBSTRUCT
VENTILATION AND LEAD TO OVERHEATING.
LOW/
COOK
SECTION 3 - COOKING HINTS
GRILLING is a QUICK, SIMPLE and DIRECT method of
cooking. Ideal for a wide and varied list of menu items,
heat is transferred from the source in direct rays
(radiation) on to the food requiring to be cooked.
These foodstuffs can be placed on trays or alternatively,
directly on the brander.
10kg is the maximum recommended brander load for
safe use.
DUE TO DIRECT HEAT PRESENT DURING GRILLING,
GREAT CARE SHOULD BE TAKEN WHEN COOKING
FOOD. BE CAREFUL OF SPLASHES FROM HIGH FAT
CONTENT FOODSTUFFS.
Using all purpose cleaner and a cloth clean inside
surfaces of grill.
Do not clean or dislodge burner plaques.
Replace base drip tray
Replace wire shelf
Replace upper drip tray
Replace aluminium brander
Using all purpose cleaner and a cloth, clean outside of
grill including stand if one is fitted.
Switch off grill and allow it to cool down before cleaning.
Wear appropriate protective clothing and gloves when
cleaning.
EMPTY DRIP TRAY AND TROUGH FREQUENTLY.
Clean up any spillages immediately.
USE OF TONGS IS RECOMMENDED WHEN TURNING
OR MOVING FOOD.
Do not clean burner plaques.
SECTION 4 CLEANING and MAINTENANCE
SECTION 5 - SPARES
The following parts may require replacing during unit life.
Switch off grill and allow it to cool down.
Remove aluminium brander and wash in hot soapy water
then rinse and dry. A non abrasive scourer may be used
to remove stubborn stains. Leave brander to soak
if required.
Plaque (Single)
Thermocouple
Pilot burner body
Pilot orifice (Natural Gas)
Pilot orifice (Propane Gas)
Remove upper drip tray and wash in hot soapy water then
rinse and dry. A non abrasive scourer may be used to
remove stubborn stains. Leave drip tray to soak
if required.
Governor
Remove wire shelf and wash in hot soapy water then
rinse and dry. A non-abrasive scourer may be used to
remove stubborn stains. Leave shelf to soak if required.
Handle for grid shelf
Pull out base drip tray and wash in hot soapy water then
rinse and dry. A non abrasive scourer may be used to
remove stubborn stains. Leave drip tray to soak if
required.
Burner
Gas Control
Knob for gas control
Disc for grid shelf handle
Grid shelf
Brander plate
Injector (Natural Gas)
Injector (Propane Gas)
X-lighting injector (Natural Gas)
X-lighting injector (Propane Gas)
Drip trough
Plaque holder
Flue diverter