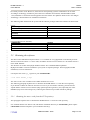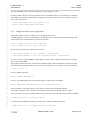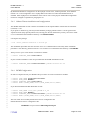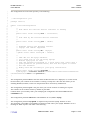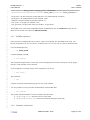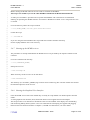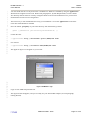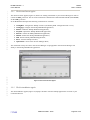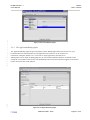
1
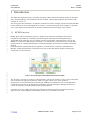
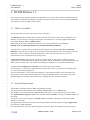
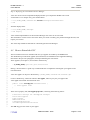
The Compact Muon Solenoid Experiment
TriDAS Trigger and Data Acquisition
RCMS
User’s Manual
Version 1.1
7/5/2004
Version:
Date:
Author:
CI Identifier:
1.1
29/06/04
M. Gulmini
rcms_um_D_19673
European Organization for Nuclear Research
Organisation Européenne pour la recherché nucléaire
1211 Geneva 23, Switzerland
Revision History
Date
Version
Description
Author
28/10/03
1.0
Document creation
M. Gulmini
02/06/04
1.1
Document creation
M. Gulmini
27/06/04
1.1
FM customization
A. Oh
29/06/04
1.1
Document Completion
M. Gulmini
Table of Contents
1
Introduction
1.1
RCMS Overview
1.2
Software technologies
1.3
References
4
4
5
5
2
RCMS Release 1.1
2.1
What is Available?
2.2
System Requirements
2.3
Obtaining the software
2.3.1 Obtaining the source code from the CVS repository
2.3.2 Source code Directory Structure
2.4
RCMS Installation
2.4.1 Java installation
2.4.2 MySQL installation and configuration
2.4.3 Jakarta Tomcat installation and configuration
2.4.4 RCMS Configuration
2.4.5 RCMS Compilation
2.4.6 Database initialization
2.4.7 Starting up the RCMS services
2.4.8 Starting the Graphical User Interface
6
6
6
7
7
8
8
8
9
10
10
12
12
13
13
3
Getting Started
3.1
Installing the Example
3.2
Browsing the HelloWorld Configuration
3.3
Control and monitoring of the Applications
3.3.1 The SessionControl applet
3.3.2 The SessionMonitor applet
3.3.3 The ApplicationDialog applet
15
15
16
25
26
26
27
4
RCMS User Extensions
4.1
Extensions directory structure
4.2
How to Customize the Function Managers
4.2.1 A few steps to a custom Function Manager
4.3
How to Extend the GUI
28
28
29
29
31
Introduction
Users Manual
RCMS
Date: 7/5/2004
1
1 Introduction
2
3
4
5
6
7
8
9
The CMS data acquisition group is presently developing a Run Control and Monitor System as described
in the TriDAS TDR [1]. This document tells how to obtain, install, build and operate the software made
available as version 1.1.
The main goal of this document is to make the reader able to install, configure, operate and extend the Run
Control software for use in CMS application scenarios. To achieve this goal some examples are provided.
It is not the purpose of this document to describe in detail the internal workings of the software.
10
11
12
13
14
15
16
17
18
19
20
21
22
23
24
25
26
27
28
29
30
31
32
33
34
1.1 RCMS Overview
RCMS (Run Control and Monitor System) is defined as the collection of hardware and softw are
components responsible for controlling and monitoring the CMS experiment during data taking.
The RCMS has to enable the users to remotely operate the experiment. The experiment is seen by the
RCMS as a collection of Sub-Systems (see Figure 1). A Sub-System is composed of one or many SubSystem partitions. A Sub-System partition is a logical grouping of resources that constitute a functional
element.
Each Sub-System and each Subs-System partition is associated with a controller, named Function
Manager. Sub-System partitions can themselves be part of other Sub-System partitions allowing the
construction of a tree hierarchy.
Figure 1: Session Managers and Sub-Systems defined in the RCMS
The “Session” is the top-level entry to control partitions. The session consists of one or many sub-systems,
each containing one Sub-system partition, which can again contain one or many partitions.
Each Session is associated with a Session Manager (SMR) that coordinates user access and dispatches
commands from the user to the Sub-System Controllers (Function Managers). Multiple Sessions may
coexist concurrently, controlling different Sub-System partitions.
A number of services support the interaction with the user and the execution of data-taking sessions.
Figure 2 shows a block diagram of the RCMS with the services defined in the TDR.
CERN PH/CMD - 2004
Page 4 of 32
RCMS Release 1.1
Users Manual
1
2
3
4
5
6
7
8
9
RCMS
Date: 7/5/2004
Figure 2: Block Diagram of the Run Control and Monitor System
The Resource Service, Job Control, and a framework for Session Managers and Sub-System controllers
(Function Managers) are provided with this RCMS Release. More details are given in the following
chapters. More information about the RCMS architecture can be found in [1] and [2].
10
11
12
13
14
15
16
17
18
19
20
21
22
1.2 Software technologies
23
24
25
26
27
28
29
1.3 References
Most Internet applications have adopted Web technologies and in particular Web Services when
distributed systems need to be interconnected. The XML data format is commonly used for data exchange
and the SOAP communication protocol for communication. The use of standard or widely adopted
technologies allows for maximum profit of advances made in the Internet world.
The software release described in this document is fully developed in Java and makes use of some
packages provided by the Sun Java Web Services Developer Pack (JWSDP), an integrated development
tool for Web Servic es.
Both native XML database technologies, based on the XMLDB interface, and relational database
management systems have being investigated. The present release provides support for eXist native XML
database and for mySQL database, that, for reliability and performance issues, is the recommended one.
[1] The CMS collaboration, The Trigger and Data Acquisition Project, Volume II, Data Acquisition &
High-Level Trigger, CERN/LHCC 2002-26, ISBN 92-9083-111-4
[2] V. Brigljevic et al., “Run Control and Monitor System for the CMS Experiment”, Proceeding of
CHEP 2003, San Diego, USA
CERN PH/CMD - 2004
Page 5 of 32
RCMS Release 1.1
Users Manual
1
2
3
4
5
6
7
RCMS
Date: 7/5/2004
2 RCMS Release 1.1
The main goal of the release described in this document is to provide a Run Control and Monitor System
framework for XDAQ based CMS Data Acquisition Systems, like the ones used in test beams, production
and validation centers and DAQ demonstrators.
8
9
10
11
12
13
14
15
16
17
18
19
20
21
22
23
24
25
26
27
28
29
30
31
32
33
34
2.1 What is Available?
35
36
37
38
39
40
41
42
43
44
45
46
2.2 System Requirements
The present release provides some of the services in Figure 2.
The Resource Service provides the user with an interface to store and retrieve DAQ configurations in a
database. Any user has its own login and password. Two databases are currently supported: the eXist
native XML database and the mySQL database.
EXist might be useful for development purposes, but it lacks in performance and reliability.
MySQL is the recommended database for production RCMS installations.
A Sub-System Controller Framework provides functionalities for developing Session and Function
Managers according to the DAQ needs. Session and Function Managers are the control engines for DAQ
applications. They are based on Finite State Machines. The actual state transition actions can be
programmed by users and adapted to any DAQ system.
A Job Control XDAQ application is provided as external package. The purpose of the Job Control
application is to launch and terminate XDAQ executables. The JC application can be downloaded from the
XDAQ web site. Refer to the ‘Job Control for RCMS Users Manual’ for a complete documentation.
An applet based Graphical User Interface (GUI) framework is also available.
The GUI allows to insert DAQ configurations into the Resource Service, and to use such configurations
for control and monitoring purposes.
The GUI is extensible. Control and monitor displays are developed as plugins of the GUI framework.
Three generic control and monitoring displays are provided with the release. Users can develop other
graphical displays according to their DAQ needs, and plug them into the GUI framework.
The RCMS is developed using the Java programming language.
The code has been tested with the Java 2 Platform Standard Edition 1.4.2 (J2SE 1.4.2).
The RCMS services are developed as Java servlets. They need a servlet container for their execution.
The Apache Jakarta Tomcat 4.1.30 servlet container (named Catalina), running on a Linux machine has
been used.
The Resource Service also requires a mySQL database installation (optionally, an eXist native XML
database can be used).
The applet based GUI has been tested on Linux and Windows operating systems using the appletviewer
provided in the J2SE distribution.
Some Web Browsers (Netscape, Internet Explorer) running on Linux and Windows operating systems
CERN PH/CMD - 2004
Page 6 of 32
RCMS Release 1.1
Users Manual
1
2
3
4
5
6
7
8
RCMS
Date: 7/5/2004
have been proved to work. However, some browser and operating systems combinations do not work.
Java Plug-in technology, included as part of the Java 2 Runtime Environment, Standard Edition (JRE
1.4.2) establishes a connection between popular browsers and the Java platform. Refer to the “Java Plug-in
Technology” documentation for installation instructions.
The following table summarizes the system and the software packages where the software has been tested:
Server:
OS/Package
Linux/Intel PC platform
Java 2 Standard Edition (J2SE)
Apache Jakarta Tomcat servlet container
(Catalina)
Exist DataBase
MySql DataBase
9
10
Version
Linux 2.4.9-31.1.cern #1, i686
1.4.2
4.1.30
0.9
4.0.20-0
Client (Graphical User Interface):
OS/Package
Linux/Intel PC platform
Microsoft Windows
Java 2 Standard Edition (J2SE) appletviewer
Version
Linux 2.4.9-31.1.cern #1, i686
NT, 2000, XP
1.4.2
11
12
13
14
15
16
17
18
19
20
21
22
23
24
25
26
27
28
29
30
31
32
33
34
35
36
37
38
2.3 Obtaining the software
The Run Control and Monitor System release 1.1 is available as a tar gzipped file on the XDAQ web site.
The file contains the release 1.1 source code, the Jakarta Tomcat servlet container 4.1.30 and the eXist 0.9
native XML database.
The file does not contain the mySQL database and the Java 2 Standard Edition platform.
MySQL and J2SE1.4 must be installed on your system as separate packages. See Paragraph3, RCMS
installation, for more information.
Uncompress the rcmsV1_1_1.tgz file in your InstallationDir:
> tar zxvf rcmsV1_1.tgz
The source code is also available in the CERN TriDAS CVS server.
The following paragraph explains how to checkout the RCMS Release 1.1 from the CVS repository.
If you decide to obtain the software from the CVS server you will need to install by yourself also the
Apache Jakarta Tomcat servlet container (http://jakarta.apache.org/tomcat), and, optionally, the eXist
DataBase (http://exist.sourceforge.net/), following the instructions provided with those packages.
2.3.1
Obtaining the source code from the CVS repository
This paragraph explains how to checkout the RCMS Release 1.1 from the CVS repository.
It is assumed that the user shell is tcsh, and that the installation directory is CheckoutDir (please replace
CheckoutDir with the full path to your installation directory).
CERN PH/CMD - 2004
Page 7 of 32
RCMS Release 1.1
Users Manual
1
2
3
4
5
6
7
8
9
10
11
12
13
14
15
16
17
18
19
20
21
22
23
RCMS
Date: 7/5/2004
Set the environment variable CVSROOT to point to the CMS CVS server.
If you are at CERN:
> setenv CVSROOT :kserver:cmscvs.cern.ch:/cvs_server/repositories/TriDAS
If you are outside CERN you can use the anonymous login:
> setenv CVSROOT :pserver:[email protected]:/cvs_server/repositories/TriDAS
> cvs login
using the password 98passwd
Go to the installation directory.
> cd CheckoutDir
Checkout release 1.1 of the RCMS source code.
> cvs co –P –r rcms_G_19674_V1_1_1 TriDAS/daq/services/rcms
The directory CheckoutDir/TriDAS/daq/services/rcms is referred as RCMSDir.
24
25
26
27
28
29
30
31
32
33
34
2.3.2
Source code Directory Structure
35
2.4 RCMS Installation
The directory CheckoutDir contains one subdirectory for each service.
rs:
Resource Service
manager:
Session and Function Managers
gui:
Graphical User Interface
extensions:
User customization code
The source code for each service is then located in the directory src/java.
36
37
38
39
40
41
42
43
44
45
46
47
48
49
2.4.1
Java installation
The RCMS software needs an installation of the Java 2 Platform Standard Edition 1.4.
If you already have it in your system skip this paragraph.
You can download the Java J2SE 1.4.2 from the Java Web Site (http://java.sun.com), and follow the
installation procedure for your system.
For a Linux system you could for instance download an RPM file (j2sdk-1_4_2_04-linux-i586-rpm.bin)
into a directory of your choice and install it.
> chmod +x j2sdk-1_4_2_04-linux-i586-rpm.bin
> ./j2sdk-1_4_2_04-linux-i586-rpm.bin
> rpm -i j2sdk-1_4_2_04-linux-i586.rpm
CERN PH/CMD - 2004
Page 8 of 32
RCMS Release 1.1
Users Manual
RCMS
Date: 7/5/2004
1
2
3
4
5
6
7
8
9
10
The new installation can be found in the directory /usr/java/j2sdk1.4.2_04.
11
12
13
14
15
16
17
18
19
20
21
22
23
24
25
26
27
28
29
30
31
32
33
34
35
36
37
38
39
40
41
42
43
44
45
46
47
48
49
50
2.4.2
In order to make sure that you always pick the correct executables of the java environment you should set
your PATH to the directory where the java binaries can be found. If you use the tcsh shell you can add in
your .tcshrc file the lines:
> setenv JAVA_HOME /usr/java/j2sdk1.4.2_04
> setenv PATH ${JAVA_HOME}/bin:$PATH
MySQL installation and configuration
The RCMS software needs an installation of a mySQL database server.
To install MySQL you need to download the rpms (MySQL-server -4.0.20-0.i386.rpm and MySQL-client4.0.20-0.i386.rpm) and install them (you must be superuser):
> rpm -i mySQL-server-4.0.20-0.i386.rpm
> rpm -i mySQL-client-4.0.20-0.i386.rpm
Set the root password for the Administrator account:
> /usr/bin/mysqladmin -u root password 'new-password'
> /usr/bin/mysqladmin -u root -h hostname password 'new-password’
In order to use the mySQL DataBase with RCMS you need to create a database named rs and a mySQL
user account named rcms.
The mySQL commands must be entered in the standard mySQL client command line interface provided
with the mySQL distribution. The user must log into the mySQL as root in order to issue the commands.
> mysql –u root –p
Create a database named rs:
mysql> CREATE DATABASE rs;
Create a user rcms without password, with the rights to connect to the rs database.
mysql> GRANT ALL PRIVILEGES ON rs.* TO rcms@”hostname”;
where “hostname” is the Host where you are going to install and run the RCMS software.
The mySQL installation does not need to be on the same host where the RCMS software will run.
If for instance you are using a mySQL database server running on the same host where RCMS is installed:
> GRANT ALL ON rs.* TO rcms@localhost;
For CERN Linux installations usually you need to put localhost.localdomain instead:
> GRANT ALL ON rs.* TO [email protected];
CERN PH/CMD - 2004
Page 9 of 32
RCMS Release 1.1
Users Manual
1
2
3
4
5
RCMS
Date: 7/5/2004
By default the RCMS is configured to use the mySQL account rcms, without password, and a database
named rs. It is also configured to use a mySQL DB on the same host where the RCMS software is
installed. Other mySQL users and database names can be used. At the purpose the RCMS configuration
need to be changed as explained in paragraph 2.4.4.
6
7
8
9
10
11
12
13
14
15
16
17
18
19
20
21
22
23
24
25
26
27
28
29
2.4.3
30
31
32
33
34
35
36
37
38
39
40
41
42
43
44
45
46
47
48
49
50
2.4.4
Jakarta Tomcat installation and configuration
The RCMS distribution tar file contains an installation of the Apache Jakarta Tomcat Servlet Container
(Catalina) 4.1.30.
If you prefer to install it by yourself just download the package (jakarta-tomcat-4.1.30.tar.gz) from the
Apache web site (http://apache.jakarta.com) and copy the file into the directory where you want to install
it. It is assumed that the installation directory is CatalinaInstallDir.
Uncompress the package:
> tar -xzvf jakarta-tomcat-4.1.30.tar.gz
The installation procedure does not move the server to a "default location" like many other installation
procedures. The directory jakarta-tomcat-4.1.30 is created. It is assumed that this directory is CatalinaDir.
Then just set in your .tcshrc file the environment variable:
> setenv CATALINA_HOME CatalinaDir
If your Catalina installation is the one provided with the RCMS distribution tar file:
> setenv CATALINA_HOME InstallationDir/jakarta-tomcat-4.1.30
RCMS Configuration
In order to compile and run your RCMS code you need to set some environment variables:
>
>
>
>
setenv
setenv
setenv
setenv
JAVA_HOME JavaInstallationDir
RCMS_HOME RCMSDir
CATALINA_HOME CatalinaDir
PATH ${RCMS_HOME}/bin:${JAVA_HOME}/bin:${PATH}
If you downloaded the RCMS distribution tar file:
>
>
>
>
setenv
setenv
setenv
setenv
JAVA_HOME /usr/java/j2sdk1.4.2_04
RCMS_HOME RCMSDir
CATALINA_HOME InstallationDir/jakarta-tomcat-4.1.30
PATH ${RCMS_HOME}/bin:${JAVA_HOME}/bin:${PATH}
The user needs also to modify the Resource Service configuration file.
Edit the Resource Service configuration file:
RCMSDir/rs/src/java/rcms/rs/RSConfiguration.java
CERN PH/CMD - 2004
Page 10 of 32
RCMS Release 1.1
Users Manual
1
2
3
4
5
6
7
8
9
10
11
12
13
14
15
16
17
18
19
20
21
22
23
24
25
26
27
28
29
30
31
32
33
34
35
36
37
38
39
40
41
42
43
44
45
46
47
48
49
50
51
52
53
54
55
56
RCMS
Date: 7/5/2004
The configuration file in the CVS repository is the following:
// RSConfiguration.java
package rcms.rs;
public class RSConfiguration
{
//
// Host where the Catalina servlet container is running
//
public final static String host = "localhost";
//
// Port used by the catalina servlet container
//
public final static String port = "8080";
//
// Database used by the Resource Service:
// “mysql” and “exist” supported
//
public final static String DB = "mysql";
//public final static String DB = "exist";
//
// JDBC URL for the mysql Database.
// It is used only if you are using "mysql"
// Default mysql port is 3306.
// User and password correspond to a valid mysql user (rcms) with a
// given password (no password here) that has the rights to access
// the "rs" database.
// Modify this URL according to your mysql installation.
//
public final static String mysqlURL =
"jdbc:mysql://localhost:3306/rs?autoReconnect=true&connectionTimeout=
0&socketTimeout=0&user=rcms&password=";
}
The configuration parameter host is the host where the Resource Service is deployed, or, in other words,
the host where your Catalina servlet container is running. Usually this is the same host where you are
installing RCMS (localhost). In this case the parameter does not need any modification.
The configuration parameter port is the port where your servlet container is listening for requests.
The Catalina servlet container listens by default on port 8080.
Catalina allows you to modify such a port modifying the configuration file server.xml located in
CatalinaDir/conf.
The configuration parameter DB defines which database to use (exist or mysql).
The configuration parameter mysqlURL is important only when the mySQL database is used.
This parameter is the JDBC (Java DataBase Connection) URL where your mySQL DataBase server is
listening for JDBC requests. The URL is the following:
CERN PH/CMD - 2004
Page 11 of 32
RCMS Release 1.1
Users Manual
RCMS
Date: 7/5/2004
1
2
3
4
5
6
7
8
9
10
11
12
13
"jdbc:mysql://<mysql_host>:<mysql_port>/<database>?autoReconnect=true&conne
ctionTimeout=0&socketTimeout=0&user=<user_name>&password=<user_password>";
14
15
16
17
18
19
20
21
22
23
24
25
26
27
28
29
30
31
32
33
34
35
36
37
38
39
40
41
42
43
44
45
46
47
48
2.4.5
49
50
2.4.6
<mysql_host>: the host where the mySQL DB server is installed (default: localhost)
<mysql_port>: the mySQL DB server port (default: 3306)
<database>: the ResourceService database (default: rs)
<user_name>: a mySQL user (default: rcms)
<user_password>: the password of the user (default: ‘no password’)
The RCMS source code will be compiled using the Ant Build Tool. The file build.xml used by the Ant
Build Tool is located in the directory ${RCMS_HOME}.
RCMS Compilation
Once it has been configured the source code is ready to be compiled. The Ant Build Tool is used. Ant
binaries and libraries are, for convenience, available in the cvs server as well as in the tar distribution file.
Go to the RCMS directory
> cd $RCMS_HOME
Compile and deploy RCMS
> ant install
The command compiles all the source code, creates the deployment structure, and copies it in the proper
directory of the Catalina servlet container.
If you would like to clean the results of the compilation you can use
> ant clean
The command
> ant
compiles everything without deploying the services in the Catalina.
It is also possible to create a Javadoc documentation of the RCMS APIs.
> ant javadoc
The javadoc API documentation is then available in the directories:
Ø $RCMS_HOME/rs/doc (Resource Service client API)
Ø $RCMS_HOME/manager/doc (Function and Session Managers client API)
Database initialization
CERN PH/CMD - 2004
Page 12 of 32
RCMS Release 1.1
Users Manual
RCMS
Date: 7/5/2004
1
2
3
4
5
6
7
8
9
10
11
12
13
14
15
16
17
18
19
Before running the RCMS software the user needs to initialize the DataBase.
This step is not needed if you use the eXist DataBase included in the RCMS distribution file.
20
21
22
23
24
25
26
27
28
29
30
31
32
33
34
35
36
37
38
39
40
2.4.7
41
42
43
44
45
46
47
48
49
2.4.8
A small java executable is provided. The script fills the DataBase with a minimal set of information
allowing for operating the RCMS software. For instance a RCMS user named “rcms” with password “xxx”
is created.
Go to the directory where the script is located:
> cd ${RCMS_HOME}/rs/src/java/rcms/utilities
Launch the script
> ./initDB.sh
If you are using the eXist Database this script needs the Catalina container started up.
For the mySQL database this is not necessary.
Starting up the RCMS services
The procedures to startup and shutdown the RCMS services are provided by the Apache Catalina servlet
container.
Go to the Catalina home directory:
> cd ${CATALINA_HOME}
Startup the services:
> bin/startup.sh
When necessary all the services can be shut down:
> bin/shutdown.sh
The directory ${CATALINA_HOME}/logs contains some Catalina log files. The file catalina.out contains
the standard output for all the services.
Starting the Graphical User Interface
Once the RCMS services have been started they are ready to accept SOAP over HTTP requests from the
clients.
A client graphical user interface (GUI) framework based on Java applets has been developed.
The GUI provides a user interface to the Resource Service and includes some displays for commanding
and monitoring XDAQ based systems. Users can extend the GUI developing new applets and plugging
them into the GUI framework. Refer to Chapter 4, “RCMS User Extensions”, for more details.
CERN PH/CMD - 2004
Page 13 of 32
RCMS Release 1.1
Users Manual
1
2
3
4
5
6
7
8
9
10
11
12
13
14
15
16
17
18
19
20
21
22
23
24
25
26
27
28
29
30
31
32
RCMS
Date: 7/5/2004
You can launch the GUI on any host where a standard Java J2SE1.4 is installed by using the appletviewer.
Web browsers might be used as well. Please read paragraph 2.2, System Requirements, for more details.
Java Security Policies must be correctly configured. Refer to the Java documentation or to your browser
documentation for the correct configuration.
The easiest way to start with RCMS and verify your installation is to use the appletviewer on the same
Linux host where RCMS is installed.
Put a file named .java.policy in your home directory with the following content:
grant { permission java.security.AllPermission; };
Launch the GUI:
> appletviewer http://<hostname>:<port>/RCMS/GUI.html
For instance
> appletviewer http://localhost:8080/RCMS/GUI.html
The applet on figure 3 will appear on your screen:
Figure 3: RCMS GUI – login
Login as user rcms and password xxx.
The login window disappears, and you are ready for your first RCMS example (see next paragraph,
Getting Started).
CERN PH/CMD - 2004
Page 14 of 32
RCMS Release 1.1
Users Manual
1
2
3
4
5
6
7
8
9
10
11
12
13
14
15
16
17
18
19
20
21
22
23
24
25
26
27
28
29
30
31
32
33
34
35
36
37
38
39
40
41
42
43
44
45
46
47
48
RCMS
Date: 7/5/2004
3 Getting Started
Previous paragraphs have explained how to install the RCMS software.
The installation has also been verified. The database has been initialized, the RCMS services have been
started up, the Graphical User Interface has been successfully launched, and you were able to login into the
RCMS system.
This paragraph will guide you through your first RCMS example.
The goal is to set up, configure and control a simple XDAQ based system.
We are going to achieve the goal using the XDAQ HelloWorld example.
In order to have a fully functional RCMS ‘Getting Started’ Example you need to install XDAQ version 2,
including its HelloWorld examples. Follow the XDAQ documentation for achieving this task.
3.1
Installing the Example
In order to configure (and then control) the XDAQ HelloWorld application some information need to be
stored into the Resource Service.
A Java program that fills the Resource Service is then provided. The program is a client of the Resource
Service, like the Graphical User Interface provided with the release is.
Since some data you need to store depend on your XDAQ installation, the Java program might need a few
modifications in order to store the proper configuration information.
Go to the Resource Service ‘samples’ directory
> cd ${RCMS_HOME}/rs/src/java/rcms/rs/samples
Edit the Java source file HelloWorldFiller.java and modify the variables having the xdaq_ prefix
according to your XDAQ installation.
The HelloWorldFiller.java is fully commented in order to help you understanding how configurations are
stored in the Resource Service. In the next paragraphs we will browse the configuration inserted by this
Java program using the RCMS Graphical User Interface.
Once you have modified the Java source code you need to recompile the example:
> cd ${RCMS_HOME}/rs
> ant samples
Then run the shell script ‘helloFiller.sh’
> cd ${RCMS_HOME}/rs/src/java/rcms/rs/samples
> ./helloFiller.sh
The script runs the HelloWorldFiller program. It creates a new RCMS user hello having password xxx and
inserts the HelloWorld configuration into the Resource Service.
CERN PH/CMD - 2004
Page 15 of 32
RCMS Release 1.1
Users Manual
1
2
3
4
5
6
7
8
9
10
11
12
13
14
15
16
17
18
19
20
21
22
23
24
25
26
27
28
29
30
31
32
33
3.2
RCMS
Date: 7/5/2004
Browsing the HelloWorld Configuration
In paragraph 2.4.8 you have already started the RCMS graphical user interface.
The HelloWorld configuration makes use of “localhost” as Session and Function Managers location.
This requires you start the appletviewer in the same host where you installed the RCMS:
> appletviewer http://localhost:8080/RCMS/GUI.html
Log into the RCMS with user hello and password xxx.
The GUI provides three menus: File, ResourceService , and Tools.
The File menu allows to Exit from the GUI, to logout and login as another user.
The ResourceService menu provides the interface to the Resource Service. You can insert, modify and
retrieve your configurations.
The Tools menu provides GUIs to control and monitor your system. The content of the menu can be
adapted to your system requirements. See Chapter 4, “RCMS User Extensions”, for further details.
In this paragraph the GUI will be used to browse the configuration inserted in the Resource Service by the
HelloWorldFiller program.
Choose System Definitions in the ResourceService menu. The System Definitions window will appear on
your screen (Figure 4).
Figure 4: System Definitions: ApplicationTypes
The ApplicationTypes are the categories of the XDAQ Applications needed in your system.
For instance the HelloWorld application category is added. The GUI will use the application types in
order to provide you with the correct popup menus. You can store in the Resource Service the information
for several XDAQ applications of the same category. If for instance you are developing a Builder Un it, BU
is your application category, but then many different versions of your BU software can be inserted in the
Resource Service.
CERN PH/CMD - 2004
Page 16 of 32
RCMS Release 1.1
Users Manual
1
2
3
4
5
6
7
8
9
10
11
12
13
14
15
16
17
18
19
20
21
22
23
24
25
26
RCMS
Date: 7/5/2004
The TransportTypes are the categories of the XDAQ Transports needed in your system.
As described in the introduction the RCMS is thought to control several Sub-Systems.
The names of the Sub-Systems are here defined (EVB, EVF, HelloWorld, etc.).
Some XDAQ Applications belong to a specific Sub-System (see Figure 5).
For instance a Builder Unit (BU) can be instantiated only in the EVB Sub-System, while a Filter Unit (FU)
can be instantiated only in the EVF Sub-System. The GUI will use this information to display the correct
menus.
Note: when an ApplicationType is added you need to commit your change (OK button), and then reopen
the SystemDefinitions window before going to the SubSystem menu in Figure 5.
Figure 5: System Definitions: Sub-Systems
Now we can look at the information about our XDAQ Hosts.
Choose Devices in the ResourceService menu.
As shown in Figure 6, one XDAQ executive (helloHost) has been inserted by the HelloworldFiller
program.
CERN PH/CMD - 2004
Page 17 of 32
RCMS Release 1.1
Users Manual
1
2
3
4
5
6
7
8
9
10
11
12
13
14
15
16
17
18
RCMS
Date: 7/5/2004
Figure 6: List of Devices (XDAQ Executives)
Click the modify button in order to see the information about the device (Figure 7).
Figure 7: Device: A XDAQ Executive definition
The field url defines the XDAQ SOAP url.
The field ApplicationType defines the application types (BU, RU, etc.) that are allowed to run on that
executive. When the field is empty all the application types are accepted.
The field LIBRARY_PATH defines the common path where all the libraries that have to be loaded by the
executive are located. These libraries will be defined in the Applications and Transports windows (showed
later). The LIBRARY_PATH can be left empty. In this case the absolute path for all XDAQ shared
libraries must be specified in the Applications and Transports windows.
CERN PH/CMD - 2004
Page 18 of 32
RCMS Release 1.1
Users Manual
1
2
3
4
5
6
7
8
9
10
11
12
13
14
15
16
17
18
19
20
21
22
23
24
25
26
27
28
29
30
31
32
33
RCMS
Date: 7/5/2004
logUrl and logLevel have been introduced to support the XDAQ 2 log4cplus feature. If you are not going
to use log4cplus leave these fields empty.
For a XDAQ Host you can also define some “subDevices”, corresponding to the network addresses that
will be used by the applications loaded on the executive to communicate with other applications. You can
for instance insert here the information about your TCP or Maze addresses.
Choosing Applications or Transports in the ResourceService menu you can define your XDAQ
applications and your XDAQ transports.
Figure 8 shows the information inserted for the HelloWorld Application.
The application URL contains the full path of the shared library providing the application’s code.
If a relative path is put here, the path will be completed when the application will be associated to an
executive using the LIBRARY_PATH previously described.
The transport defines the default transport the Application will use to communicate with other
applications.
Figure 8: A XDAQ Application
The procedure for defining XDAQ Transports is similar to the procedure used for the Applications.
For Applications and Transports a number of Default Configuration Parameters (see XDAQ Companion –
Configuration) can be defined. Clicking on the Next button, a window for defining your parameters will be
displayed. No parameters have been defined for the HelloWorld application.
Once your XDAQ Hosts, your Applications, and your Transports have been defined you can create a
RCMS Partition.
A RCMS Partition is a group of executives, applications and transports, plus their controller.
The controller is named Function Manager.
Any RCMS Partition belongs to a SubSystem (HelloWorld SubSystem in our example).
CERN PH/CMD - 2004
Page 19 of 32
RCMS Release 1.1
Users Manual
1
2
3
4
5
6
7
8
9
10
11
12
13
14
15
16
17
18
19
20
21
22
23
24
25
26
27
28
29
30
31
32
33
RCMS
Date: 7/5/2004
A RCMS Partition can also contain other RCMS Partitions belonging to the same SubSystem.
Since any Partition has a Function Manager, and can contain other Partitions, we might have a hierarchy
of Function Managers.
Choose Partitions in the ResourceService menu.
The hello_p Partition in Figure 9 belongs to the HelloWorld SubSystem, and contains only one hello
Application, running on the helloHost executive.
Figure 9: An example of Sub-System Partition
The xdaq format button in Figure 9 can be used to show the XDAQ XML configuration file for the
XDAQ executives used in the Partition.
Clicking on the modify button we can see the information stored for this RCMS Partition.
Figure 10 shows the information of the Function Manager that controls the Partition.
The behaviour of the Function Manager can be adapted to the specific requirements of your partition. For
more details see Chapter 4, RCMS Extensions.
The FunctionManager URL defines the URL where the Function Manager is listening for SOAP
requests. This is the URL of the Manager servlet deployed in your Catalina servlet container.
If the Catalina servlet container is on ‘localhost’, port 8080, this URL will be
http://localhost:8080/Manager/Manager.
The Partition FSM Definition defines which Finite State Machine Model the Function Manager must use.
The “DefaultFSM” model inserted by the HelloWorldFiller and used by this Partition represents the
XDAQ default State Machine Model.
Other Finite State Machine models might be used, as explained in Chapter 4.
The Partition FSM Implementation is the URL of the class implementing the commands corresponding
to the State Machine Model. The “DefaultFSM class” is provided with the RCMS framework, and contains
CERN PH/CMD - 2004
Page 20 of 32
RCMS Release 1.1
Users Manual
1
2
3
4
5
6
7
8
9
10
11
12
13
14
15
16
17
18
RCMS
Date: 7/5/2004
the default behaviour for the “DefaultFSM model”.
Figure 10: Create/Modify Partition: Function Manager
Clicking on the Next button you will see an empty window (SubPartitions window).
The window allows for adding sub-Partitions to the current Partition. In our example only one Partition has
been inserted, so there are no there are no possible subPartitions. The window is empty.
Clicking again on the Next button you can now see (and modify) the number of XDAQ Applic ation and
Transports in your Partition (Figure 11).
In the example we have only one HelloWorld Application.
CERN PH/CMD - 2004
Page 21 of 32
RCMS Release 1.1
Users Manual
1
2
3
4
5
6
7
8
9
10
11
12
13
14
RCMS
Date: 7/5/2004
Figure 11: Partition: Number of XDAQ Applications and Transports
XDAQ Applications and Transports must then be associated with a XDAQ Host.
In Figure 12 an instance of the hello Application is associated with the helloHost XDAQ executive.
Figure 12: Partition: Association between Applications and Hosts
Next window (Figure 13) allows for insert, delete and modify all the Default Parameters for your instances
of Application and Transports. The parameters are copied from the information about Applications and
CERN PH/CMD - 2004
Page 22 of 32
RCMS Release 1.1
Users Manual
1
2
3
4
5
6
7
8
9
10
11
12
13
14
15
16
RCMS
Date: 7/5/2004
Transports previously inserted, that you could now modify for each instance.
Since the parameters are copied inside the Partition, if you now modify the parameters defined for the
application (menu ResourceService – Applications), the changes will not be reflected in the Partition.
In this case you need to rebuild (modify) the Partition as well.
Figure 13: Partition: Default Parameters for each Application and Transport
As a final step you need to define which SubSystem partitions will be used in your control Session.
Select Sessions in the ResourceService menu (Figure 14).
The hello_s Session has been inserted by the HelloWorldFiller program.
Figure 14: List of Sessions
CERN PH/CMD - 2004
Page 23 of 32
RCMS Release 1.1
Users Manual
1
2
3
4
5
6
7
8
9
10
11
12
13
14
15
16
17
18
19
20
21
22
23
24
25
26
RCMS
Date: 7/5/2004
Looking at the Session (Figure 15) we see the information for the controller of the Session: the Session
Manager.
Similar to Partitions we have the SessionManager URL, the Session FSM Definition, and the
SessionFSM Implementation.
Be careful to the SessionManager URL.
The HelloWorld example uses http://localhost:8080/Manager/Manager.
The client GUI uses the URL to connect to the Session Manager. This means that the appletviewer must
run on the same host where the SessionManager is running. Replace localhost with the real “hostname” if
you want to run the GUI on remote machines.
Note that the State Machine Model used by this Session Manager is the same used for the previously
defined Function Manager, while the implementation of the State Transition Commands is not the same.
The class ManagerDefaultFSM is used instead. This default implementation forwards all the commands
(received from the clients) to all the SubSystems used in the Session.
The Session here defined just controls one SubSystem Partition (hello_p) of the SubSystem HelloWorld.
Figure 15: A Session
Figure 16 shows the control structure inserted into the Resource Service and used for the HelloWorld
example:
CERN PH/CMD - 2004
Page 24 of 32
RCMS Release 1.1
Users Manual
1
2
3
4
5
6
7
8
9
10
11
12
13
14
15
16
17
18
19
20
21
22
23
RCMS
Date: 7/5/2004
Figure 16: HelloWorld: RCMS simplest control structure
The Session Manager for the hello_s Session receives commands from a client (the GUI). The commands
are translated into commands for the HelloWorld SubSystem, in particular for the hello_p Function
Manager, which then controls the XDAQ HelloWorld Application.
3.3 Control and monitoring of the Applications
The Tools menu of the GUI framework provides three applets that can be used for control and monitoring
purposes.
These applets, called RClets, are developed as plugins to the GUI framework.
Users can easily modify these applets or develop new ones by following the rules described in Chapter 4,
RCMS Extensions.
All three RClets require as a first step to open a Session (Figure 17).
Figure 17: Opening a Session
CERN PH/CMD - 2004
Page 25 of 32
RCMS Release 1.1
Users Manual
1
2
3
4
5
6
7
8
9
10
11
12
13
14
15
16
17
18
19
20
3.3.1
The SessionControl applet
The SessionControl Applet (Figure 18) allows for sending Commands to your Session Manager in order to
control the hello_s Session. The list of the commands is defined in the State Machine Model (DefaultFSM)
for the hello_s Session.
In our HelloWorld Example the following commands are available:
Ø
Ø
Ø
Ø
Ø
Ø
Ø
Ø
Ø
ConfigHost: configure the XDAQ executive (the XDAQ XML Configuration file is sent);
ConfigApp: configure the XDAQ HelloWorld application;
Enable: enable the XDAQ HelloWorld application;
Suspend: suspend the XDAQ HelloWorld application;
Resume: resume the XDAQ HelloWorld application;
Disable: disable the XDAQ HelloWorld application;
Halt: halt the XDAQ HelloWorld application;
Reset: reset the XDAQ executive;
UpdateState: retrieves the Session Manager State;
The commands sent by the GUI to the Session Manager are propagated to the Function Manager and
finally to the XDAQ HelloWorld Application.
21
22
23
24
25
26
27
28
29
30
RCMS
Date: 7/5/2004
Figure 18: The SessionControl applet
3.3.2
The SessionMonitor applet
The SessionMonitor applet (Figure 19) displays the State of all the XDAQ applications involved in your
Controlled Session.
CERN PH/CMD - 2004
Page 26 of 32
RCMS Release 1.1
Users Manual
1
2
3
4
5
6
7
8
9
10
11
12
13
14
15
16
17
RCMS
Date: 7/5/2004
Figure 19: The SessionMonitor applet
3.3.3
The ApplicationDialog applet
The ApplicationDialog applet (Figure 20) displays all the XDAQ applications and executives in your
Controlled Session. The Parameters of each application and executive can be read and set.
Commands (Configure, Enable, etc.) can be sent to single applications and executives.
Although this can be useful for debug purposes, the user should remember that these commands could
change the overall State of the Session. The updateState button in the SessionControl applet can be used to
retrieve the actual state of the Session.
Figure 20: The ApplicationDialog applet
CERN PH/CMD - 2004
Page 27 of 32
RCMS Release 1.1
Users Manual
1
2
3
4
5
6
7
8
9
10
11
12
13
14
15
16
17
18
19
20
21
22
23
24
25
26
27
28
29
30
31
32
33
34
35
36
37
38
39
40
41
42
43
44
45
46
47
48
RCMS
Date: 7/5/2004
4 RCMS User Extensions
In the previous paragraphs you have seen how to install and configure the RCMS software.
You have then controlled and monitored your first XDAQ HelloWorld Application.
This paragraph will guide you throw the steps for extending the RCMS framework in order to control realworld Data Acquisition Systems.
4.1 Extensions directory structure
The source code for RCMS user extensions and customizations can be put in the
${RCMS_HOME}/extensions directory.
> cd ${RCMS_HOME}/extensions
The extensions directory of the RCMS 1.1 release contains three subdirectories: Template, DAQKit, and
EVF.
DaqKit and EVF directories contain RCMS extensions and customizations for the Event Builder and Event
Filter systems.
These extensions are real world examples of customizations of the RCMS framework, and can be used as
example by any RCMS user. They make use also of the “Job Control for RCMS” application.
Copy the Template directory to a UserDir directory, where you can put the customization code for your
system.
> cp –r Template UserDir
Modify now the file build.xml in order to compile the UserDir directory.
All the extensions subdirectories, like Template, contain three subdirectories: rs, manager, and gui.
The rs directory is used for clients of the Resource Service.
Java clients, called Fillers, can be useful to quickly store big configurations in the Resource Service,
instead of using the Graphical User Interface. An example of filler is the HelloWorldFiller used in the
previous chapter. The DAQKit and EVF extensions contain other fillers you can take as examples.
The manager directory contains two subdirectories: batch and statemachines.
The batch directory is used for clients of the Session Managers. Command line clients might be useful in
many DAQ Systems, as control scripts. A fully commented example of a command line script for the
HelloWorld example used in the “Getting Started” chapter (HelloBatch.java) can be found in the
directory ${RCMS_HOME}/manager/src/java/rcms/manager/samples.
Launch the program using the shell script
> ./helloBatch.sh
The statemachines directory contains State Machine command implementations for Session and Function
Managers.
CERN PH/CMD - 2004
Page 28 of 32
RCMS Release 1.1
Users Manual
1
2
3
4
5
6
7
8
9
RCMS
Date: 7/5/2004
See paragraph 4.2 for detailed instructions on developing your own State Machine Commands.
DAQKit and EVF extensions provide useful examples of customization.
The gui directory can be used to put your plugin applets (RClets).
The three applets SessionControl, SessionMonitor and ApplicationDialog described in the previous chapter
are examples of RClets.
See paragraph 4.3 for further information.
10
4.2 How to Customize the Function Managers
11
12
13
14
15
16
17
18
The Function Managers can be customized in order to perform actions specific to your partition. The
default behaviour for a Function Manager is to forward a command to all the XDAQ applications defined
in a partition. The Function Manager consists of a finite state machine model (FSM), and an
implementation of the commands of the FSM. To customize the Function Manager you need to add your
FSM model to the Resource Service and provide an implementation of customized commands. A
schematic of the command flow from the GUI to the Function Manager is shown in Figure 21:
19
20
21
22
Figure 21: Schematic of the Command flow to the Function Managers
23
24
25
Currently, the state of the Session Manager is deduced from the successful execution of commands on the
connected Function Managers and the FSM model of the Session Manager.
26
27
28
29
30
31
32
33
34
35
36
37
38
39
4.2.1
A few steps to a custom Function Manager
In the following a short step-by-step guide is given on how to implement a simple customized Function
Manager.
Step 1: create a FSM model
As already mentioned the FSM model is part of the Function Managers definition. The FSM model
contains all States of the FSM and all Commands. Furthermore the allowed state transitions are specified.
Currently GUI exists to access the FSM model in the Resource Service. To create a FSM model in the
resource service a java program is used, which accesses the Resource Service.
A sample java program can be found in
${RCMS_HOME}/rs/src/java/rcms/rs/samples/AddStateMachine.java.
The part containing the customization is in the method createStateMachine(String), where States
are created with
CERN PH/CMD - 2004
Page 29 of 32
RCMS Release 1.1
Users Manual
1
2
3
4
5
6
7
8
9
10
11
12
13
14
15
16
17
18
19
20
21
22
23
24
25
26
27
28
29
30
31
32
33
34
35
36
37
38
39
40
41
42
43
44
45
46
47
48
49
50
51
RCMS
Date: 7/5/2004
sm.addState( StateName )
and commands and transitions are created with
sm.addCommand( CommandName, SourceState, DestinationState ).
After customizing the java code, you have to compile AddStateMachine code with:
> cd ${RCMS_HOME}/rs
> ant samples
and can execute it using the script addStateMachine.sh. You have to provide the hostname and port of
the Resource Service, the login name, the password and the FSM model name on the command line as
arguments.
Upon successful execution a FSM model with your definitions (states, valid state transitions, name) is
saved in the Resource Service.
Step 2: create a custom implementation of commands
Customizing the class responsible for the execution of commands does the implementation of a custom
behavior. The default behavior for the State Machine Model DefaultFSM is implemented in the class
DefaultFSM (see HelloWorld partition in the Getting Started paragraph) located in the directory
${RCMS_HOME}/manager/src/java/rcms/manager/statemachines.
If you need to change the default behavior you can write your own java class that inherits from the
DefaultFSM class.
The DefaultFSM class inherits from the XDAQUserStateMachine class.
You can also write your own class that inherits directly from XDAQUserStateMachine. This is for
instance the customization method used in the DAQKit and EVF extensions, where the FSM model is
slightly different and allows for the use XDAQ “JobControl for RCMS” application.
An example is given below where the default method of enable() is overridden by the custom
implementation. In the example the enable sequence of different application is explicitly given.
// ExampleSM.java
public class ExampleFSM extends DefaultFSM {
public CommandResult enable () throws XDaqSOAPException {
String[] enableSequence = { “RU”, “BU”, “EVM” };
xdaqPartition.setEnableSequence( enableSequence );
return xdaqPartition.enableXDaqApplications();
}
}
The xdaqPartition variable is an instance of the XdaqPartition class, located in the directory
${RCMS_HOME} /manager/src/java/rcms/manager/xdaqAdapter.
The XDaqPartition class provides all the information about a Partition, as defined in the Resource Service,
and a number of methods to access such information. For more information take a look at the methods it
provides, using the javadoc documentation.
Complete examples can be found in the DaqKit and EVF extensions.
CERN PH/CMD - 2004
Page 30 of 32
RCMS Release 1.1
Users Manual
RCMS
Date: 7/5/2004
1
2
3
4
5
6
7
8
9
10
11
12
13
14
15
16
17
18
19
20
Step 3: Deploying the customized Function Manager
21
22
23
24
25
26
27
28
29
30
31
32
33
34
35
36
37
38
39
40
41
42
43
44
45
46
47
48
49
50
51
4.3 How to Extend the GUI
Your user classes will be compiled and deployed when you compile the RCMS source code.
An alternative is to compile only your statemachines:
> cd ${RCMS_HOME}/extensions/UserDir/manager/statemachines
> ant
And then deploy them:
> cd ${RCMS_HOME}/manager
> ant deploy
Your custom implementation of the Function Manager user class can now be used.
Just remember to set the correct class name when you create or modify your partition through the GUI, and
reopen your session.
The same steps should be followed for customizing the Session Managers.
The GUI framework can be extended with new java applets accessible by the Tools menu.
The distribution provides three applets (SessionControl, SessionMonitor and ApplicationDialog),
described in the previous paragraphs, developed following the rules below.
These applets (see Chapter 3) are located in the directory
> ${RCMS_HOME}/gui/src/java/rcms/rclets
Having a look to them is a good way to understand how to implement and integrate your applets in the
GUI framework.
Your new applets can be put in the directory ${RCMS_HOME}/extensions/UserDir/gui.
Create a subdirectory, named for instance userApplet, where to put your java applet code.
Your applet must inherit from the RClet class.
public class UserApplet extends RClet {
// User applet code
}
Then write a property file, UserApplet.properties, containing the following entries:
# Resource Strings for UserApplet example
title=User Applet
type=control
menuItem=Tools
loadOnStartup=false
allowMultipleInstances=false
The title flag gives the name of your applet.
CERN PH/CMD - 2004
Page 31 of 32
RCMS Release 1.1
Users Manual
1
2
3
4
5
6
7
RCMS
Date: 7/5/2004
The allowMultipleInstances flag tells if multiple instances of the applet are allowed.
The other flags have no effects in the present release.
Your new applet will be compiled and deployed when you compile the RCMS source code.
Remember just to modify the build.xml in the ${RCMS_HOME}/extensions/UserDir/gui directory.
CERN PH/CMD - 2004
Page 32 of 32