1
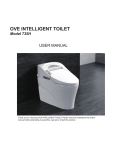
OVE INTELLIGENT TOILET
Model TUVA
Thank you for choosing OVE INTELLIGENT TOILET. Please read and understand this entire manual
before attempting to assemble, operate or install this product.
p. 1
CONTENT
SAFETY NOTICE ............................................................................................. p.3
WARNINGS ...................................................................................................... p.4
PART LIST ........................................................................................................ p.5
INSTALLATION INSTRUCTIONS ................................................................. p.6-8
FIRST TIME USE .............................................................................................. p.9
CONTROLS DESCRIPTION ..................................................................... p.10-11
FEATURES .................................................................................................... p.12
INTELLIGENT FEATURES ............................................................................. p.13
CLEANING THE FILTER ................................................................................ p.14
LONG TERM STORAGE ................................................................................ p.15
BATTERY MAINTENANCE ............................................................................ p.15
SPECIFICATION SHEET ............................................................................... p.16
MAINTENANCE & CONSUMER RESPONSIBILITIES ................................... p.17
LIMITED 1 YEAR WARRANTY ....................................................................... p.17
INFORMATION ABOUT YOUR WARRANTY COVERAGE ............................ p.17
NOTES ON WARRANTY ................................................................................ p.17
FOR WARRANTY SERVICE .......................................................................... p.17
INSTALLATION CHEAT-SHEET ..................................................................... p.18
CONTACT US ................................................................................................. p.19
p. 2
SAFETY NOTICE
ATTENTION!
BEFORE INSTALLING THE PRODUCT, YOU MUST READ AND
UNDERSTAND CAREFULLY ALL BELOW WARNINGS.
1. It is forbidden to disassemble toilet by yourself.
2. Please do not set this product in a wet place, because it is an electronic product. If set in the
bathroom, please insure that there is proper air flow.
3. Please insure that the product is set more than 0.6 meter away from the bathtub.
4. Please make sure electric power is AC 110V +/- 10%. Ensure the electrical socket can bare a load
of 1500W power (or else it can cause fire or electrical shock).
5. Please make sure the electrical source is well grounded.
6. Please do not put any water or detergent on the product or its electrical plug.
7. Do not touch the electrical plug with a wet hand (or else it can cause fire or electric shock).
8. Do not use the product if it has these following problems. When any of the following problems occur,
turn off the electricity and close the water valve.
•
Water leaking from the pipe or the main body.
•
Crack or breakage
•
Abnormal sound or smell of the product
•
Smoke coming out from the product
9. Keep any flame or flammable products away from the toilet.
10.Please do not step on the toilet seat, the seat cover, the main body, or put anything heavy on the
product. Otherwise, the product may break and may cause injury or the product may break and may
cause indoor flooding.
11.Please do not put your finger or anything else into the outlet of the drying blower.
12.Please do not touch or cover the drying blower outlet with clothes, or it may lead to burn injury or
electric shock.
13.Please do not tightly bend or press the flexible supply hose, or it may lead to water leakage or it may
decease the water pressure.
14.Please clean the product with soft cleaning products.
15.Please do not use any harsh detergents to clean the product.
16.Please do not throw anything other than toilet paper into the toilet or it may lead to blockage and
indoor flooding.
17.Please be careful to not let objects like a comb, toothbrush or other stuff fall into the toilet.
p. 3
WARNINGS
DO not leave the
toilet exposed to the
sun. May cause yellowing
or color fading.
To prevent against power
surge damages, make
sure the ground is working
in the power socket.
Direct sunlight affects the
good functioning of the
remote.
Radio
or
transmitting
devices may interfere with
the toilet’s remote control
functions
If you do not plan to use
the toilet for a long time,
close the inlet water valve
and unplug the toilet.
If the power cut off during
washing and the nozzle is
still out: Do not push it back
manually, it will revert to its
resting position once the
power is back ON.
Do not use DC current.
Only AC 110V with load
capacity over 1500W are
accepted.
If power cuts off during
nozzle self-cleaning, the
water will continue to flow
out. Manually close the
inlet water valve of the
toilet until power comes
back ON.
Do not expose the toilet to
freezing temperature. This
will void the warranty and
damage the piping.
Be careful not to spill water
on the top of the toilet:
Electronics are located
under the plastic cover.
Do not lean on the cover.
p. 4
PART LIST
G
Clockwise - turn up
Anti-cloclwise - turn down
M
A
H
I
B
J
C
D
K
E
F
L
Item
Qty
#
A
Light Indicator Panel
1
99TOI0115OU
B
Water Inlet
1
99TOI0116OU
C
Side Control Panel
1
99TOI0117OU
D
Water Supply Hose
1
99TOI0118OU
E
Water Filter
1
99TOI0119OU
F
Inlet Fitting & Valve
1
99TOI0120OU
G
Seat Cover
1
99TOI0121OU
H
Remote Receiver
1
99TOI0122OU
I
Battery Enclosure
1
99TOI0123OU
J
Manual Flush Button
1
99TOI0124OU
K
Nozzle
1
99TOI0125OU
L
Seal ring
1
99TOI0126OU
M
Remote
1
99TOI0127OU
p. 5
1
INSTALLATION INSTRUCTIONS
2
B
A
Remove the seat from the ceramic base. Simply pull the
seat up gently. Be careful, there are wires that need to be
disconnected before you can remove the seat completely
(see step #2).
Unplug the electrical cord and the water tube before completely pulling away the
toilet seat.
2A
2B
3
1
2
Unplug the cord.
3
To unplug the water tube:
1) Push the ring down with your fingernail.
2) Remove the blue clip.
3) While still pushing the ring down, gently pull-out the water tube.
NOT SUPPLIED
Install the floor drain cover connector according to the manufacturer’s
recommendations.
4
NOT SUPPLIED
Position correctly the two fixing bolts of the floor drain. Follow
manufacturer’s recommendations.
p. 6
5
INSTALLATION INSTRUCTIONS
6
Position the toilet on the floor drain, making sure the fixing bolts are
aligned with the toilet’s holes.
Insert the ring gasket under the toilet.
7
8
NOT SUPPLIED
Using a ratchet, reach behind the toilet and tightly screw the nut to the
fixing bolts.
9
Reconnect the electrical cord. Make sure both ends are well aligned.
10
1
2
Reconnect the water tube:
1) Gently, but firmly push the tube inside the hole.
2) Re-insert the blue clip.
With care, re-install the seat on the ceramic base. Make
sure no wires get squeezed or tangled.
p. 7
INSTALLATION INSTRUCTIONS
11
Connect the water inlet fitting to the water supply. Then connect the valve. Finally connect the filter to the valve.
12
Connect the filter outlet to the toilet’s water inlet with the supplied flex-tube.
13
24h
Apply silicone around the base of the toilet.
Wait for 24h for it to dry.
p. 8
FIRST TIME USE
1
Open the water supply inlet valve.
2
Plug the toilet in the power socket.
3
The toilet’s blue light will start blinking.
The blinking light indicates that the wash tank is filling with water, a sensor in the toilet will stop the
filling process automatically after around 3 minutes when the tank is full of water.
After the wash tank is filled with water, the indicator light will stop blinking.
4
The toilet will turn ON automatically. Once the beeping sounds and the flashing light have stopped,
the toilet is ready for use.
Notice:
• Warming up the toilet seat will take about 3 minutes.
• Warming up the bidet cleaning water will take about 3 min.
• Leave the power continuously ON to assure all functions are ready for anytime use.
• If the toilet is not used for 24h, it will enter in ECO MODE.
2
3
4
1
p. 9
CONTROLS DESCRIPTION
SIDE CONTROL PANEL
POWER / ECO:
Press 1 time, it will turn the toilet ON.
Press 2 times, it will activate the ECO MODE.
Press 3 times, it will turn the toilet OFF.
STOP:
Pressing this button will stop any ongoing function.
BIDET/MOVE:
Pressing this button will initiate the Static Bidet Cleaning function. Press it again to change
to the Back-&-Forth Bidet Cleaning function.
*The Bidet refers the 5 water jets function of the nozzle.
SPRAY/MOVE:
Pressing this button will initiate the Static Spray Cleaning function. Press it again to change
to the Back-&-Forth Spray Cleaning function.
*The SPRAY refers the 1 water jet function of the nozzle.
LIGHT INDICATOR PANEL
POWER
POWER indicator:
The light will turn RED
when the toilet is powered
ON.
The light will turn off when
the toilet is powered OFF.
ECO MODE
ECO MODE indicator:
The light will turn YELLOW
when the ECO MODE is
active.
The light will turn off when
the ECO MODE is not
active.
WATER
TEMP
SEAT
TEMP
SEAT
SENSOR
WATER TEMP indicator:
Below are the different
colors the light takes
depending on the current
setting:
SEAT TEMP indicator:
Below are the different
colors the light takes
depending on the current
setting:
Room Temp = Light OFF
34C (93F) = GREEN
37C (99F) = ORANGE
40C (104F) = RED
Room Temp = Light OFF
34C (93F) = GREEN
37C (99F) = ORANGE
40C (104F) = RED
SEAT
SENSOR
indicator:
The light will turn GREEN
when the Seat Sensor is
active.
The light will turn off when
the Seat Sensor is not
active.
BEEPING SOUNDS DIRECTIONS
1X BEEP = The toilet will give out one beeping sound every time it successfully receives a command from the Remote
Control.
2x BEEP = The toilet will give out two beeping sounds every time it has successfully received a command, but cannot
execute it. For example, if the Seat Sensor is not active and the user presses the BIDET/MOVE button, the toilet will beep
two times because the bidet function cannot be active if the seat sensor is not active.
3x BEEP = The toilet will give out three beeping sounds every time it has successfully received a command, but the
function the user is trying to adjust has already reached its maximum or minimum setting.
BEEPING for Temperature levels:
While adjusting the temperature for the Bidet/Spray water, the Seat or the Drying Air, the toilet will beep as follow to
indicate which temperature has just been set:
-ROOM TEMP = 1x long beep
-34C (93F) / 35C (95F) = 1x short beep
-37C (99F) / 45C (113F) = 2x beep
-40C (104F) / 55C (151F) = 3x beep
p. 10
CONTROLS DESCRIPTION
WATER TEMPERATURE:
Pressing this button will cycle through the 4 possible temperatures settings for the Spray/Bidet cleaning
water jets.
4 settings: Room temp / 34C (93F) / 37C (99F) / 40C (104F)
AIR TEMPERATURE:
Pressing this button will cycle through the 4 possible temperatures settings for the air drying function.
4 settings: Room temp / 35C (95F) / 45C (113F) / 55C (151F)
SEAT TEMPERATURE:
Pressing on this button will cycle through the 4 possible temperatures settings for the seat heating.
4 settings: Room temp / 34C (93F) / 37C (99F) / 40C (104F)
NOZZLE FORWARD:
Pressing this button during the Static Spray or Bidet cleaning will move the nozzle forward.
3 positions: Back, Middle and Front.
NOZZLE BACKWARD:
Pressing this button during the Static Spray or Bidet cleaning will move the nozzle forward.
3 positions: Back, Middle and Front.
PRESSURE + :
Pressing this button during the Static or the Back-&-Forth Spray or Bidet cleaning will increase the
water jet pressure.
8 settings: 8 increments from low to high.
PRESSURE - :
Pressing this button during the Static or the Back-&-Forth Spray or Bidet cleaning will decrease the
water jet pressure.
8 settings: 8 increments from low to high.
FLUSH:
Pressing this button will flush the toilet.
LIGHT:
Pressing this button will turn the toilet bowl’s light ON / OFF.
AIR PUMP SUPERCHARGE:
Pressing this button initiate the air pumps which will boost the water pressure even more than the
maximum attainable setting by the PRESSURE INCREASE button.
DRYING SESSION:
Pressing this button will initiate the Static Air Drying function. Press it again to change to the Back-&Forth Air Drying function.
BIDET CLEANING SESSION:
Pressing this button will initiate the Static Bidet Cleaning function. Press it again to change to the Back&-Forth Bidet Cleaning function.
*The Bidet refers the 5 water jets function of the nozzle.
SPRAY CLEANING SESSION:
Pressing this button will initiate the Static Spray Cleaning function. Press it again to change to the
Back-&-Forth Spray Cleaning function.
*The SPRAY refers the 1 water jet function of the nozzle.
STOP:
Pressing this button will stop any ongoing function.
p. 11
FEATURES
SPRAY CLEANING (1 WATER JET)
This function will only work if the user is sitting on the toilet. Press the “SPRAY/MOVE”
button for spray cleaning. Water will spray and clean the user. Press the button again and
the nozzle will move back & forth to insure the cleanest result. You can use this key stoke
to get the best cleaning effect.
BIDET CLEANING (5 JETS OF WATER)
This function will only work if the user is sitting on the toilet. Press the “BIDET/MOVE”
button for bidet cleaning. Water will spray and clean the user. Press the button again and
the nozzle will move back & forth to insure the cleanest result. You can use this key stoke
to get the best cleaning effect.
If you are not seated on the toilet seat, the toilet seat sensors will prevent water from squirting out of the
nozzle or warm air from flowing out of the dryer.
The nozzle washes itself before and after every use with the programmed automatic nozzle washing cycle.
The spray function will automatically stop after 2 minutes of continuous use. To start it again press the button.
It will take about 10 seconds after pressing the “Bidet/move” or “Spray/move” button before water starts to
spray out of the nozzle. Please be patient.
AIR DRYING
This function will only work if the user is sitting on the toilet. Press the “DRYING” button for
air drying. The air will drying the user. Press the button again and the air nozzle will move
back & forth to insure driest result. You can use this key stoke to get the best drying effect.
If you press the “Drying” key while the toilet is flushing, you will need to wait about 10 seconds before warm
wind starts to flow out of the dryer.
STOP
Pressing the stop button at any time will automatically stop any functions.
The toilet will keep spraying for 1-2 seconds after you stand up, so be sure to press the “Stop” button before
standing up from the toilet seat, during the cleaning process.
FLUSHING
Press “flushing” button before using intelligent toilet will clean the bowl with water
automatically.
LIGHT
Pressing the “Light” button on the remote control board will turn ON the toilet’s light,
pressing the button again will turn it OFF.
p. 12
INTELLIGENT FEATURES
ECO MODE
ECO MODE will cut down the electricity usage of
your intelligent toilet during times of none-usage. The
cleaning water tank will start heating the water only
once the user is sitting on the toilet, whereas in normal
mode, the cleaning water is kept to your preferences for
your instant enjoyment.
SOFT CLOSE DESIGN
The toilet seat and seat cover have a soundless soft
close design that prevents them from falling rapidly and
denting or scratching the toilet.
ANTI-MICROBIAL SEAT
The toilet’s seat is coated with an eco-friendly antimicrobial polymer preventing the growth of any microbe
on the seat. Clean by design, for your piece of mind.
SUPER SWIRL
If water keeps oozing out even after the toilet is clean,
adjusting the stopcock clockwise can help reach a good
flush effect. If the flush effect is still not good, adjusting
the stopcock counterclockwise or cleaning the filter
may help improve the flush effect.
AIR PUMP SUPERCHARGED
Press the “AIR PUMP” button on the remote control
to activate a supercharged water pressure pump.
This function will temporarily increase the water
pressure for maximum cleanness.
AUTOMATIC ODOR FILTER
As soon as the user sits on the toilet, a fan sucks the
air out of the toilet bowl and through an advance odor
fighting carbon filter. This prevents the bad smells during
the toilet’s usage, insuring a pleasant experience.
p. 13
CLEANING THE FILTER
Close the inlet valve, turn clockwise.
Do not take out the filter before closing the
inlet valve.
2
Open the filter counterclockwise and take
out the filter.
Clean the filter.
Use a tooth brush to clean the dirt on the
filter.
Use a cloth to clean the dirt and deposits in the
valve.
4
Install the filter clockwise.
Please tighten the filter to avoid leakage
1
3
Use water instead of detergent. Do not overexert
the filter while cleaning, do not damage the
shape of the filter.
5
Open the inlet valve counterclockwise.
Make sure the water does not leak out
p. 14
LONG TERM STORAGE
In order to prevent from any damages that may be caused from frozen toilet water, please drain away
the remaining water according to the following methods.
When leaving for a long time without using this toilet, please make sure to drain all the water from the
toilet.
1. Close water inlet valve.
2. Unfasten and remove the water drain bolt.
3. After draining all the water, please tightly screw the water drain bolt back into place.
4. Make sure to drain all water from the toilet, including the water in the tank for the bidet/spray cleaning,
also any water left in the seals or grooves, dry with towel.
Flush
BATTERY MAINTENANCE
In order to make sure the function of flushing can work in the event of an electricity black out, please
replace the battery once a year. Take out the battery when not using the toilet for a long time.
1) Open the window-shade.
2) Open the battery cover.
3) Take out the battery and replace them.
4) Close the battery cover and window-shade.
p. 15
SPECIFICATION SHEET
Item
Electric Load
Electric Cord
Remote control batteries
Product’s size
Outer carton’s size
Content
AC 120V / 1300W / 60HZ
1.2 m insulated power cord
2x 1.5V batteries
520x690x410 mm (HxDxL)
650x760x490 mm (HxDxL)
Cleaning System
Spray Cleaning (1 jet)
Bidet Cleaning (5 jets)
Water Temp
Heater Capacity
Cleaning Tank Capacity
Overheating Safety
Anti-Reflux
Water amount adjustment 0.4-1.0 L/min (water pressure 0.19 MPa / 27.6 psi)
Water amount adjustment 0.5-1.0 L/min (water pressure 0.19 MPa / 27.6 psi)
From ambiant temperature to 40 C
AC 120V / 1000W / 60HZ
1.5 L
Temperature safety fuse integrated. Toilet will shutdown if temp. is out of specs.
Anti-Reflux check valve integrated.
Drying System
Drying Air Temp
Air Speed
Heater Capacity
Overheating Safety
From ambiant temperature to 55 C
5 m/s
AC 120V / 300W / 60HZ
Temperature Fuse
Heating Seat
Seat Temp
Heater Capacity
Overheating Safety
From ambiant temperature to 40 C
AC 120V / 40W / 60HZ
By design
Deodorization System
Filter
Air Speed
Eliminates odors through activated charcoal filtering
3 M/S
Limitations
Water Supply Pressure
Water Supply Temp
Ambiant Temp
Lowest water pressure is 0.1MPa (14.5 psi), highest water pressure is 0.5MPa (72.5 psi)
10-35 C
10-40 C
p. 16
MAINTENANCE & CONSUMER RESPONSIBILITIES
■■ The DISTRIBUTOR does prohibits the use of harsh abrasive cleansers on any of its products. Harsh cleansers will damage the
inner workings of the toilets.
■■ For daily maintenance, use a wet cloth and a soft liquid cleaner.
■■ Never use abrasives or cleaners containing acetone, chlorine or strong bleach, scrapers, metallic brushes, nor other objects or
products which can graze or tarnish surfaces.
LIMITED 1 YEAR WARRANTY
The DISTRIBUTOR warranty is valid for a period of 1 year after purchased. Improper use of this product or any deviations to the
general guidance given in the user manual will void the warranty. This non-transferable warranty applies only to the original purchaser
and proof of purchase is required for all claims.
This warranty applies to the DISTRIBUTOR toilet installed for residential use only.
The DISTRIBUTOR warrants that, when installed in accordance with the Recognized Plumbing Industry Practice, the toilets are free
of manufacturing defects for a period of one (1) year from the date of purchase.
The DISTRIBUTOR will repair or replace the damaged product or parts only if they were installed and used in a proper way according
this user manual.
Before accepting to repair or replace the product, the DISTRIBUTOR is entitled to send a representative to inspect the product. We
will offer free of charge service for inspecting, repairing and replacing for the items within this warranty period; However the freight
charges are the customer’s responsibility.
INFORMATION ABOUT YOUR WARRANTY COVERAGE
This warranty does not cover damages or failure attributable to:
•
•
•
•
Toilets installed with obvious visual defects.
Rough handling or improper operation.
The presence of sediment or impurity in the water supply system used.
Defects or damages to toilets caused by installation that does not comply strictly with the instructions set forth in the Recognized
Plumbing Industry Practice.
• Defects or damage to toilets caused by severe accidents (e.g. fire, electric surge, etc.)
• Damage caused by flooding or standing water from leaking pipes, faucets, household appliances, etc.; Up to and including
flooding and any damage caused by acts of God.
NOTES ON WARRANTY
This warranty applies only to the original purchaser and installation site and is not transferable.
FOR WARRANTY SERVICE
►►To make a claim, contact the DISTRIBUTOR no later than 30 days following the date of discovery or detection of defect.
►►Proof of purchase, such as the bill of sale is mandatory when requesting warranty service.
►►The DISTRIBUTOR reserves the right to designate a representative to inspect the vanity for analysis.
►►No unauthorized person, installer, dealer, agent or employee of the DISTRIBUTOR or any representative is entitled to assume
any liability on behalf of the DISTRIBUTOR relating to the sale of this product or has the authority to increase or alter the
obligations or limitations of this warranty.
p. 17
INSTALLATION CHEAT-SHEET
p. 18
Save this manual for future reference
Conservez ce manuel pour usage ultérieur
Conserve este manual para futura referencia
HEAD OFFICE / SIÈGE SOCIAL / OFICINA PRINCIPAL
2800 Etienne Lenoir, Laval
Quebec H7R 0A3 Canada
Customer service / Service à la clientèle / Service al cliente
Tel.: 1-866-839-2888
Fax: 1-866-922-9990
[email protected]
8:00 am - 5:00 pm E.S.T Monday - Friday
8 h à 17 h HNE, du lundi au vendredi
8 h a 17 h HDE, de lunes a viernes
English and Frenchspeaking representatives available
Représentants disponibles en Anglais et Français
Representantes disponibles para inglés y francés
KEEP THIS INFORMATION
CONSERVEZ CES INFORMATIONS
CONSERVE ESTA INFORMATIÓN
Purchase date
Date d’achat
Fecha de compra
Product Tracking Reference
Suivi et référence du produit
Numero de referencia
www.ovedecors.com
p. 19