1
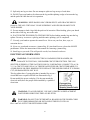
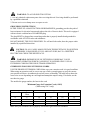
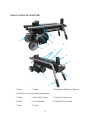
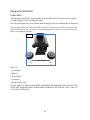
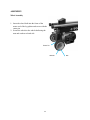
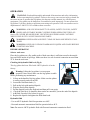
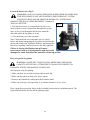
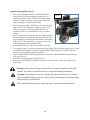
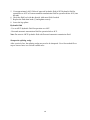
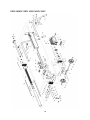
1 TABLE O F CONTENTS Product specifications.................................................................................... 2 Safety information.......................................................................................... 3 General safety rules........................................................................................ 4 Specific safety rules for log splitter................................................................ 5 Electrical information..................................................................................... 6 Know your log splitter.................................................................................... 9 Package contents............................................................................................ 10 Assembly........................................................................................................ 11 Operation........................................................................................................ 12 Maintenance................................................................................................... 15 Troubleshooting.............................................................................................. 17 Exploded view and parts list........................................................................... 18 Warranty......................................................................................................... 21 PRODUCT SPECIFIATIONS Model: 56206 Splitting force: 6 Tons Cycle time: 25 seconds Motor: 120 V A C, 60 Hz, 15 A, 2 HP, 1500W Motor speed: 3400 RPM Power cord: 6 feet, SJTW 14 AWG Log capacity: Diameter: 10 inch Length: 20.5 inch Hydraulic pressure: 3000 psi Hydraulic fluid: AW32 hydraulic fluid for operation over 40°F Dexron automatic transmission fluid for below 40°F Hydraulic tank capacity: 2.8 quarts Cylinder stroke: 18 inch Tire size: 6 inch Dimensions (LxWxH): 38-1/4x11x18 inch Weight: 99 lbs 2 SAFETY INFORMATION Please read and understand this entire manual before attempting to assemble, operate or install the product. These safety instructions are not meant to cover every possible condition that could occur. If you have any questions regarding the product please call customer service at 1-800232-1195, 8:00 a.m.-5:00 p.m., CST, Monday-Friday. Safety Signals The purpose of safety signal statements and symbols is to attract your attention to possible danger. Read them carefully to understand and practice proper accident prevention. DANGER Signals an EXTREME hazard Failure to obey a safety DANGER signal WILL result in serious injury or death to yourself or to others. Always follow the safety precautions to reduce the risk of fire, electric shock, and personal injury. WARNING Signals a serious hazard Failure to obey a safety WARNING signal CAN result in serious injury to yourself and to others. Always follow the safety precautions to reduce the risk of fire, electric shock, and personal injury. CAUTION Signals a moderate hazard Failure to obey a safety CAUTION signal MAY result in property damage or personal injury to yourself or to others. Always follow the safety precautions to reduce the risk of fire, electric shock, and personal injury. NOTE: Signals additional important general information. 3 GENERAL SAFETY RULES Safety is a combination of common sense, staying alert, and knowing how to use the log splitter. WARNING: TO AVOID MISTAKES THAT COULD CAUSE SERIOUS INJURY, DO NOT PLUG IN THE LOG SPLITTER UNTILTHE FOLLOWING STEPS HAVE BEEN READ AND UNDERSTOOD. 1. READ and become familiar with this entire instruction manual. LEARN the tool’s applications, limitations, and possible hazards. 2. AVOID DANGEROUS CONDITIONS. DO NOT use in wet or damp areas or expose to rain. 3. DO NOT use in the presence of flammable liquids or gases. 4. KEEP BYSTANDERS AT A SAFE DISTANCE. NEVER allow children or pets near the tool. 5. DRESS FOR SAFETY. DO NOT wear loose clothing, neckties, or jewelry (rings, watches, etc.) when operating tool. Inappropriate clothing can get caught and pull you into moving parts. 6. ALWAYS WEAR EYE AND FACE PROTECTION. 7. ALWAYS remove the power cord plug from the electric outlet when making adjustments, changing parts, or cleaning. 8. AVOID ACCIDENTAL START-UPS. Make sure the power switch is in the OFF position before plugging in the power cord. 9. DO NOT abuse the power cord. Keep cord away from heat, oil, sharp edges, or moving parts. Replace damaged cord immediately; it may create a shock or fire hazard. 10. NEVER LEAVE A RUNNING TOOL UNATTENDED. Turn the power switch to OFF. Do not leave the tool until it has come to a complete stop. 11. DISCONNECT THE POWER. Unplug the tool when not in use, before making adjustments, changing parts, cleaning, or working on the tool. 12. DO NOT OVERREACH. Keep proper footing and balance at all times. WARNING: Some dust created by power sanding, sawing, grinding, drilling and other construction activities contains chemicals known to the State of California to cause cancer, birth defects or other reproductive harm. Some examples of these chemicals are: Lead from lead-based paints, Crystalline silica from bricks and cement and other masonry products, and Arsenic and chromium from chemically-treated lumber Your risk from these exposures varies, depending on how often you do this type of work. To reduce your exposure to these chemicals: work in a well-ventilated area, and work with approved safety equipment, always wear MSHA/NIOSH approved, properly fitting face mask or respirator when using such tools. 4 13. MAINTAIN TOOLS PROPERLY. ALWAYS keep tools clean and in working order. 14. CHECK FOR DAMAGED PARTS. Check for alignment of moving parts, binding, breakage, or any other conditions that may affect the tool’s operation. Any part that is damaged should be properly repaired or replaced before use. Only wear safety goggles that apply with ANSI Z87.1 When operating power tools, foreign objects can be thrown into your eyes. This could result in permanent eye damage. Glasses or goggles that are not in compliance with ANSI Z87.1 could break resulting in severe eye injury. SPECIFIC SAFETY RULES FOR LOG SPLITTER 1. IF YOU ARE NOT thoroughly familiar with the operation of the log splitter, obtain instruction from a qualified person. 2. MAKE SURE wiring codes and recommended electrical connections are followed. When servicing, use only identical replacement parts. Disconnect log splitter from the power source before making adjustments or repairs. 3. Place the log splitter on a stable, flat, and level work surface where there is plenty of room for handling logs. 4. INSPECT THE LOG SPLITTER before each use. Keep guards in place and in working order. Replace damaged, missing, or failed parts before using. 5. Do not alter the log splitter. Altering the tool or exceeding its design capabilities and capacities could result in serious injury or fatality and will void the warranty. 6. MAKE SURE THE EXTENSION CORD is no longer than 25 ft. 14 gauge. Ensure the power cord is rated for outdoor use. Ground the log splitter and avoid contact with grounded surfaces during operation. See "Electrical Information" for further details. 7. MAKE all adjustments with the switch in the OFF position and the log splitter disconnected from the power source. 8. Never use the log splitter for any other purpose than splitting wood. Any other use can result in injury. Use extreme caution at all times. 9. PREPARE LOGS FOR SPLITTING. Make sure the ends of the logs are cut square. Cut off any branches flush with the trunk. 10. INSPECT EACH LOG before splitting. Make sure there are no nails or foreign objects in the log. 11. Only a single operator should load and operate the log splitter. Keep all others, including children and pets, a minimum of 20 feet away from the work area. 12. NEVER TRY TO SPLIT LOGS larger than the rated capacity of the tool. Attempting to do so could result in personal injury and damage to the tool. 5 13. Split only one log at a time. Do not attempt to split two logs on top of each other. 14. DO NOT put your hands or feet between the log and the splitting wedge or between the log and the push rod while the tool is in operation. WARNING: KEEP HANDS AWAY FROM SPLITS AND CRACKS WHICH OPEN IN THE LOG. THEY MAY CLOSE SUDDENLY AND CRUSH OR AMPUTATE YOUR HANDS. 15. Do not attempt to load a log while the push rod is in motion. When loading, place your hands on the sides of the log, not on the ends. 16. WAIT FOR THE PUSH ROD TO STOP MOVING before loading another log onto the log splitter. Do not try to remove a split log until the entire splitting cycle is completed. 17. Use only your hands to operate the control lever. Never use your foot, knee, rope, or extension device. 18. Never use your hands to remove a jammed log. If a jam should occur, release the ON/OFF push button. Follow the instructions in this manual for removing a jammed log. 19. Stack logs as you work. This will provide a safer, less cluttered work area. ELECTRICAL INFORMATION WARNING: TO AVOID ELECTRICAL HAZARDS, FIRE HAZARDS, OR DAMAGE TO THE TOOL, USE PROPER CIRCUIT PROTECTION. THE LOG SPLITTER IS WIRED AT THE FACTORY FOR 120-V OPERATION. CONNECT TO A 120V, 15-A CIRCUIT AND USE A15-A TIME DELAYED FUSE OR CIRCUIT BREAKER. TO AVOID SHOCK OR FIRE, IMMEDIATELY REPLACE THE POWER CORD IF IT IS WORN, CUT, OR DAMAGED IN ANY WAY. This log splitter has a 3-prong plug that is intended for use on a circuit that has a receptacle like the one illustrated in Fig.1. Do not modify the power cord plug. If it does not match the electrical outlet, have the proper outlet installed by a qualified electrician. WARNING: TO AVOID INJURY, USE ONLY IDENTICAL REPLACEMENT PARTS WHEN SERVICING THE LOG SPLITTER. WARNING: DO NOT TOUCH THE METAL BLADES ON THE POWER CORD PLUG WHEN REMOVING OR INSTALLING THE PLUG INTO AN ELECTRICAL OUTLET OR EXTENSION CORD. 6 WARNING: TO AVOID ELECTROCUTION: 1. Use only identical replacement parts when servicing this tool. Servicing should be performed by a qualified technician. 2. Do not use in wet or damp areas or expose to rain. GROUNDING INSTRUCTIONS IN THE EVENT OF A MALFUNCTION OR BREAKDOWN, grounding provides the path of least resistance for electrical current and reduces the risk of electric shock. This tool is equipped with an electric cord that has a POLARIZED plug. The plug MUST be plugged into a matching outlet that is properly installed and grounded in accordance with ALL local codes and ordinances. DO NOT MODIFY THE PLUG PROVIDED. If it will not fit the outlet, have the proper outlet installed by a qualified electrician. CAUTION: IN ALL CASES, MAKE CERTAIN THE RECEPTACLE IN QUESTION IS PROPERLY GROUNDED. IF YOU ARE NOT SURE, HAVE A CERTIFIED ELECTRICIAN CHECK THE RECEPTACLE. WARNING: IMPROPER USE OF EXTENSION CORDS MAY CAUSE INEFFICIENT OPERATION WHICH CAN RESULT IN OVERHEATING. USE AN EXTENSION CORD RATED FOR OUTDOOR OPERATION. GUIDELINES FOR USING EXTENSION CORDS USE THE PROPER EXTENSION CORD. Make sure your extension cord is in good condition. When using an extension cord, be sure to use one of heavy enough gauge to carry the current your product will draw. An undersized cord will cause overheating. The table below shows the correct size to use depending on cord length and nameplate ampere rating. If in doubt, use the next heavier gauge. The smaller the gauge number, the heavier the cord. Minimum Gauge for Extension Cords (AWG) (When using 120 V only) Ampere Rating More Than Not More Than 0 6 6 10 10 12 12 16 Total Length of Cord in feet 50 100 25 18 18 16 14 16 16 16 12 16 14 14 12 14 12 Not Recommended Make sure your extension cord is properly wired and in good electrical condition. 7 150 Always replace a damaged extension cord or have it repaired by a qualified person before using it. Protect your extension cords from sharp objects, excessive heat and damp or wet areas. Use a separate electrical circuit for your tools. This circuit should not be less than #12 gauge cord and should be protected with a 15-A, time-delayed fuse. Before connecting the motor to the power line, make sure the switch is in the OFF position and the electric current is rated the same as the current stamped on the motor nameplate. Running at a lower voltage will damage the motor. WARNING: THE EXTENSION CORD AND RECEPTACLE MUST BE GROUNDED WHILE IN USE TO PROTECT THE OPERATOR FROM ELECTRICAL SHOCK. 8 KNOW YOUR LOG SPLITTER 11 7 10 9 8 12 6 5 4 1 3 2 1 Motor 2 Handle 3 Fluid Drain/ Fill Knob w/Dipstick 4 Bleed Screw (must be open during operation) 5 Wedge 6 Work Table Guards 7 Hydraulic Control Lever 8 Wheel 9 Circuit Breaker 10 ON/OFF Power Switch 11 Ram 12 Beam 9 PACKAGE CONTENTS UNPACKING The log splitter requires the wheel assembly to be attached to the base. Please refer to Wheel Assembly on page 11 for assembly directions. Note: Do not discard box or any packing material until all parts are examined and accounted for. This log splitter has been filled with AW32 hydraulic oil at the factory. Refer to the photo and parts list should it become necessary to disassemble the unit for repair or replacement of parts. Inspect it for shipping damage. Fig. 2 Item List: 1 Log Splitter 2 Wheels 1 Wheel Shaft 1 Cotton Pin 2 Washers and 2 Nuts IF ANY PART OF THE LOG SPLITTER IS MISSING OR DAMAGED, DO NOT PLUG IN UNTILTHE DAMAGED PART IS REPAIRED OR REPLACED. PLEASE CALL 1-800-2321195 FOR ASSISTANCE. 10 ASSEMBLY Wheel Assembly 1. Insert the wheel shaft into the frame of the motor end of the log splitter and secure with the cotter pin. 2. Secure the wheels to the wheel shaft using the nuts and washers on both side. Cotter Pin Washer 11 Nut OPERATION WARNING: Read and thoroughly understand all instructions and safety information before operating this log splitter. Failure to do so may cause serious injury or death. Do not allow anyone to operate this log splitter who has not read this manual. As with all power equipment, a log splitter can be dangerous if assembled or used improperly. Do not operate this log splitter if you have doubts or questions concerning safe operation. Call our customer service department at 1-800-232-1195 to address these concerns. WARNING: ALWAYS WEAR SAFETY GLASSES, SAFETY GLOVES, SAFETY SHOES AND SUITABLE WORK CLOTHING WHEN OPERATING THIS LOG SPLITTER. NEVER WEAR JEWELRY, NECKTIES OR OTHER LOOSE CLOTHING WHICH COULD GET CAUGHT IN MOVONG PARTS. WARNING: KEEP HANDS AND FEET CLEAR OF RAM AND WEDGE AT ALL TIMES. WARNING: KEEP AWAY FROM FLAMMABLE LIQUIDS AND GASES BEFORE STARTING MACHINE. BEFORE OPERATING Select a work area Place the log splitter on a flat, stable surface. Make sure there is sufficient room for the unsplit logs and for the stacks of split logs. Make sure there is a safe electrical connection no more than 25 ft. from the work area. Checking the hydraulic fluid level (Fig.4) Fig. 4 This log splitter has been filled with AW32 hydraulic oil at the factory. 1 Warning: Lifting the log splitter is a two person operation. Once raised, make sure the log splitter is stable before performing any maintenance. 2 1. Lift up on the handle of the log splitter. Make sure the splitter is resting securely and will not fall. 2. Loosen the fluid drain knob (1). 3. Pull out the bolt with attached dipstick. 4. Wipe the fluid off the dipstick. 5. Put the dipstick back in the fluid tank and then pull it out again. 6. Check the fluid level. It should be between the two notches (2) near the end of the dipstick. 7. Add fluid, if needed. (See below for types) 8. Replace the dipstick and tighten the fluid drain knob. Hydraulic fluid - Use an AW32 hydraulic fluid for operation over 40°F. - Dexron® automatic transmission fluid for operation below 40°F. Note: Do not mix AW32 hydraulic fluid with Dexron® automatic transmission fluid. 12 Loosen the bleed screw (Fig.5) WARNING: ALWAYS LOOSEN THE BLEED SCREW PRIOR TO OPERATION. THIS WILL REMOVE ANY AIR TRAPPED IN THE HYDRAULIC SYSTEM. FAILURE TO RELEASE AIR FROM THE HYDRAULIC SYSTEM MAY DAMAGE THE SEALS AND PERMANENTLY DAMAGE THE LOG SPLITTER. Fig. 5 1. Turn the bleed screw (1) counterclockwise one or two turns to allow air to be released from the hydraulic system. 1 Note: A flow of air through the bleed screw should be detectable while the log splitter is in use. 2. Close the bleed screw after operation. Note: Check the bleed screw and make sure it is closed before and during transporting the log splitter to and from the jobsite and storage area. Hydraulic fluid may leak through the bleed screw opening if the bleed screw is not fully tightened. Failure to loosen the bleed screw will cause pressure to build up in the hydraulic tank and could damage the seals and affect the operation of the log splitter. Place a log on the log splitter WARNING: NEVER TRY TO SPLIT LOGS LARGER THAN THE RATED CAPACITY OF THE TOOL. ATTEMPTING TO DO SO COULD RESULT IN PERSONAL INJURY AND DAMAGE TO THE TOOL. Select/prepare a log for splitting: 1. Make sure there are no nails or foreign objects in the log. 2. Make sure the end of each log to be split is square. 3. Remove any branches by cutting them flush with the trunk. 4. Make sure each log is no longer than 21 in. and the diameter is 10 in. or less. Place a properly prepared log firmly on the worktable between the two worktable guards. The log should fit between the ram and the splitting wedge. 13 Operate the log splitter (Fig. 6) 1. Ensure the equipment is in safe working condition. Fig. 6 Operate the unit without loading to make sure it is working normally. Check all nuts, bolts and hydraulic fittings are tight. Check the switch, power cable and plug for damage to avoid electric shock. 2. Plug in the power cable. NEVER use an extension cord longer than 25 feet. Minimum cord gage must be 16. The power supply for this log splitter must have a protection device (circuit breaker) for over or under voltage. 3. Place a log on the beam against the ram. Make sure that 1 the log is securely on the beam and up against the ram. Logs should be cut with square ends and to a maximum 2 length of 20.5 inch in advance. Always use extra care when splitting logs with unsquare ends. 4. Loosen the bleed screw one or two turns if necessary. 5. Two controls must be activated to operate the log splitter. The hydraulic control lever (1) and the ON/OFF push button (2) must be held during the splitting process. If either control is released, the log splitter will stop operating. 6. Depress and hold the ON/OFF push button (2) with your right hand and allow the motor to cycle up to speed. 7. Push down on the hydraulic control lever (1). 8. Release the ON/OFF button and the control lever when the log is split. The push rod will then retract. Warning: If the log does not begin to split after 5 seconds of operation, release both controls. The motor or hydraulic fluid may overheat and damage the machine. Warning: Do not attempt to remove a jammed log with your hands or try to knock it off the worktable. Doing so may cause injury and may also damage the splitting wedge. Knock off the log with hammer. When finished splitting the logs, unplug the power cord and lock the bleed screw. 14 MAINTENANCE WARNING: DISCONNECT THE LOG SPLITTER FROM THE POWER SOURCE BEFORE PERFORMING ANY MAINTENANCE. Check hydraulic fluid at the beginning of each season and if the fluid level is low. Checking the hydraulic fluid level (Fig.7) Fig. 7 1 Warning: Lifting the log splitter is a two person operation. Once raised, make sure the log splitter is stable before performing any maintenance. 1. Lift up on the handle of the log splitter. Make sure the splitter is resting securely and will not fall. 2. Loosen the fluid drain knob (1). 3. Pull out the bolt with attached dipstick. 4. Wipe the fluid off the dipstick. 5. Put the dipstick back in the fluid tank and then pull it out again. 6. Check the fluid level. It should be between the two notches (2) near the end of the dipstick. 7. Add fluid, if needed. (See below for types) 8. Replace the dipstick and tighten the fluid drain knob. 2 Hydraulic fluid - Use an AW32 hydraulic fluid for operation over 40°F. - Dexron® automatic transmission fluid for operation below 40°F. Note: Do not mix AW32 hydraulic fluid with Dexron® automatic transmission fluid. Replace hydraulic fluid (Fig.7-8) Warning: Lifting the log splitter is a two person operation. Once raised, make sure the log splitter is stable before performing any maintenance. 1. Place a 1 Gallon (or larger) pan (3) under the splitting wedge end of the log splitter. 2. Loosen the fluid drain knob (1) and remove it. 3. Raise motor end of the log splitter to allow the fluid to drain into the pan. Lower motor end of the splitter when it is empty. Note: Dispose of used fluid properly. 4. Raise the splitting wedge end and make sure it is secure. 15 Fig. 8 3 1 5. Pour approximately 0.85 Gallon of approved hydraulic fluid (AW32 hydraulic fluid for operation over 40°F or Dextron automatic transmission fluid for operation below 40°F) into the tank. 6. Check the fluid level with the dipstick. Add more fluid if needed. 7. Replace the fluid drain knob (1) and tighten securely. 8. Lower the log splitter. Hydraulic fluid - Use an AW32 hydraulic fluid for operation over 40°F. - Dexron® automatic transmission fluid for operation below 40°F. Note: Do not mix AW32 hydraulic fluid with Dexron® automatic transmission fluid. Sharpen the splitting wedge After a period of use, the splitting wedge may need to be sharpened. Use a fine-toothed file or rasp to remove burrs or to refresh crushed areas. 16 TROUBLESHOOTING Use this troubleshooting information to remedy problems that may occur during the operation of the log splitter. Problem Logs will not split Cause Extension cord is too long or gauge is too low Incorrect positioning of the log. Hydraulic fluid leaks Push rod movement is jerky, makes unfamiliar noise or vibration The size or hardness, or density of the log may exceed the capacity of the splitter. Splitting wedge cutting edge is blunt or dull The bleed screw was not loosened and air is trapped in the hydraulic tank The hydraulic fluid is low and may need to be replenished The maximum pressure limiting adjustment setting has changed The bleed screw may not have been tightened before transporting the splitter The bleed screw may not have been loosened before operation and air is trapped in the hydraulic system The fluid drain knob may be loose. The hydraulic control valve assembly and/or seals may be worn. The hydraulic fluid level may be low. There may be air in the hydraulic system. 17 Action Check extension cord to ensure the gauge of the cord is 12or 14 AWG and that the cord length does not exceed 25 ft. Make sure the log is properly positioned on the worktable (See page 13, "Place a log on the log splitter ") Reduce the log size before placing it on the splitter. Sharpen the wedge (See page 16, "Sharpen the splitting wedge") Loosen the bleed screw one or two turns Check the hydraulic fluid level and refill if needed Contact a trained service Technician at 1800-232-1195 Tighten the bleed screw Loosen the bleed screw one or two turns. Tighten the knob Contact a trained service Technician at 1800-232-1195 Check the fluid level and refill, if needed. Loosen the bleed screw one or two rotations. EXPLODED VIEW AND PARTS LIST 18 Item 1 2 3 4 5 6 7 8 9 10 11 12 13 14 15 16 17 18 19 20 21 22 23 24 25 26 27 28 29 30 Stock # Description 56206-001 56206-002 56206-003 56206-004 56206-005 56206-006 56206-007 56206-008 56206-009 56206-010 56206-011 56206-012 56206-013 56206-014 56206-015 56206-016 56206-017 56206-018 56206-019 56206-020 56206-021 56206-022 56206-023 56206-024 56206-025 56206-026 56206-027 56206-028 56206-029 56206-030 Motor Nut M6 Rubber foot Right rubber foot Item 31 32 33 34 35 36 37 38 39 40 41 42 43 44 45 46 47 48 49 50 51 52 53 54 55 56 57 58 59 60 bolt M6×12 Left rubber foot Nut M8 Washer Bearing bush Claboard Steel ring10 Gear Gear shaft Steel ball 2.5 Round pin 2.5×4 Bolt M8×30 Spring washer 8 Flat washer 8 Bolt M8×55 Shaft Cover Oil seal 10×2.65G Bolt M6×12 Spring washer 6 Flat washer 6 Locking nut M10 Flat washer 10 Wheel Wheel shaft Pin3.2×20 19 Stock # Description 56206-031 56206-032 56206-033 56206-034 56206-035 56206-036 56206-037 56206-038 56206-039 56206-040 56206-041 56206-042 56206-043 56206-044 56206-045 56206-046 56206-047 56206-048 56206-049 56206-050 56206-051 56206-052 56206-053 56206-054 56206-055 56206-056 56206-057 56206-058 56206-059 56206-060 Bracket Bolt Rubber sleeve Hydraulic control lever Nut M10 Nut M10 Spring washer 10 Oil seal 9.5×2.65G Plastic cover BoltM6×20 Hexagon nut Bush for shaft Oil seal 4.87×1.8G Shaft Adjustment spring Cone valve Oil valve Screw Oil seal 11.8×2.2G Hexagon bolt Bolt Washer16×t1 Oil seal 14×1.8G spring Ⅱ Front cover Control valve Oil seal 11.2×1.8G Journey valve Oil seal 5.6×1.8G Spring Ⅰ Item 61 62 63 64 65 66 67 68 69 70 71 72 73 74 75 76 77 78 Stock # Description 56206-061 56206-062 56206-063 56206-064 56206-065 56206-066 56206-067 56206-068 56206-069 56206-070 56206-071 56206-072 56206-073 56206-074 56206-075 56206-076 56206-077 56206-078 Washer 6 Washer Oil seal 48.7×3.55G Nut M6 Front bracket Upper pad Push rod Tine plate Bolt M4×6 Down pad Nut M14 Rubber plug Work table guard Back bracket Beam Step bolt M6×50 Work table guard Rubber handle Item 79 80 81 82 83 84 85 86 87 88 89 90 91 92 93 94 95 96 20 Stock # Description 56206-079 56206-080 56206-081 56206-082 56206-083 56206-084 56206-085 56206-086 56206-087 56206-088 56206-089 56206-090 56206-091 56206-092 56206-093 56206-094 56206-095 56206-096 Bolt M8×50 Cylinder Ring58×52.5×4 Oil seal43.7×3.55G Piston stud stud Spring Rear cover Oil seal 3.6×1.8G Bleed screw Oil seal30×2.65G Washer FC30×38×5 Dipstick Oil seal 11.8×2.65G Knob Piston rod lock nut M14 TWO YEARS LIMITED WARRANTY WEN® log splitters are warranted (to the original purchaser) to be free from defects in materials and workmanship for a period of two (2) years from the date of original purchase. Log splitters used for commercial or for rental have a warranty period of 90 days from date of original purchase. Please fill out and mail the enclosed warranty card and mail it to Power Pro Technology along with a copy of the receipt. The information is required to process warranty claims. WEN® will repair or replace, at its discretion, any part that is proven to be defective in materials or workmanship under normal use during the two (2) year warranty period. Warranty repairs or replacements will be made without charge for parts or labor. Parts replaced during warranty repairs will be considered as part of the original product and will have the same warranty period as the original product. TO EXERCISE WARRANTY COVERAGE: Do not return to retailer! For warranty and technical support call the toll-free Customer Service Number: (800) 232-1195 and you will be informed of the nearest authorized service center. We will prearrange the repair with the center. WARRANTY COVERAGE: This warranty is conveyed to the original purchaser and is not transferable. Log splitters contain parts that will wear out with usage and parts that need maintenance. The warranty does not cover wear or maintenance parts. Specifically, the warranty does not cover hydraulic fluid. Warranty does not extend to log splitters damaged or affected by accidents, neglect, misuse, contaminated fuel, unauthorized alterations, use in applications beyond product design and any other modification or abuse. WEN® is not liable for any indirect, incidental or consequential damages from the sale or use of this product. Any implied warranties are limited to two (2) years as stated in this written limited warranty. Some states do not allow limitation on the length of an implied warranty. Some states do not allow the exclusion or limitation of incidental or consequential damages. This warranty gives you the specific legal right, and you may have other rights that vary by state. For questions / comments, technical assistance or repair parts – Please Call Toll Free at: 1-800-232-1195 (M-F 8am – 5pm) CST SAVE YOUR RECEIPTS. THIS WARRANTY IS VOID WITHOUT THEM. 21