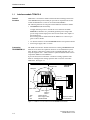
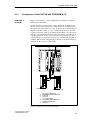
1
Preface, Contents
SIMATIC
Hardware structure
Installation of the software
Process Control System PCS 7
Connecting TM I/O to PCS 7
Commissioning
Configuration
Manual
Interface module TPM 478-2
Migration rack II
1
2
3
4
5
6
Appendices
Technical Data
A
Abbreviations
B
Literature index
C
Glossary
01/2007
C79000-G8076-C710-04
Safety Guidelines
This manual contains notices intended to ensure personal safety, as well as to protect the products and
connected equipment against damage. These notices are highlighted by the symbols shown below and
graded according to severity by the following texts:
!
!
!
Danger
indicates that death, severe personal injury or substantial property damage will result if proper precautions
are not taken.
Warning
indicates that death, severe personal injury or substantial property damage can result if proper
precautions are not taken.
Caution
indicates that minor personal injury can result if proper precautions are not taken.
Caution
indicates that property damage can result if proper precautions are not taken.
Notice
draws your attention to particularly important information on the product, handling the product, or to a
particular part of the documentation.
Qualified Personnel
Only qualified personnel should be allowed to install and work on this equipment. Qualified persons are
defined as persons who are authorized to commission, to ground and to tag circuits, equipment, and
systems in accordance with established safety practices and standards.
Correct Usage
Note the following:
!
Warning
This device and its components may only be used for the applications described in the catalog or the
technical description, and only in connection with devices or components from other manufacturers which
have been approved or recommended by Siemens.
This product can only function correctly and safely if it is transported, stored, set up, and installed
correctly, and operated and maintained as recommended.
Trademarks
SIMATIC®, SIMATIC HMI® and SIMATIC NET® are registered trademarks of SIEMENS AG.
Third parties
usingAll
forrights
their own
purposes any other
names
in this document which refer to trademarks
Copyright W Siemens
AG 2007
reserved
Disclaim
of Liability
might
infringe
upon
the
rights
of
the
trademark
owners.
The reproduction, transmission or use of this document or its
We have checked the contents of this manual for agreement
contents is not permitted without express written authority.
Offenders will be liable for damages. All rights, including rights
created by patent grant or registration of a utility model or
design, are reserved.
Siemens AG
Bereich Automation and Drives
Geschaeftsgebiet Industrial Automation Systems
Postfach 4848, D- 90327 Nuernberg
Index-2Aktiengesellschaft
Siemens
with the hardware and software described. Since deviations
cannot be precluded entirely, we cannot guarantee full
agreement. However, the data in this manual are reviewed
regularly and any necessary corrections included in
subsequent editions. Suggestions for improvement are
welcomed.
© Siemens AG 2007
Technical data subject to change.
Process Control System PCS 7Connecting TM I/O to PCS 7
C79000-G8076-C710-04
C79000-G8076-C710
Preface
Purpose of this
manual
This manual provides information on hardware components you can use to
interconnect an existing TELEPERM M I/O installation and the process control system SIMATIC PCS 7.
A combination of corresponding tools and programs enables communication
(Configuration and Operation) with the C&O system WinCC.
The information in this manual enables you to:
• commission the TPM 478-2 interface module
• operate migration rack II with PCS7/TM.
Manual
content
This documentation describes system-specific functions of the TPM 478-2
interface module and the use of migration rack II with PCS7/TM.
Topics included:
• Hardware assembly
• Software installation
• Commissioning
• Configuration
• TPM 478-2 interface module
• Migration rack II
• Technical data, abbreviations list, literatur listing, glossary.
Readers
The target group of readers is occupied in programming and process technology engineering.
Prerequisites
Prerequisite is basic knowledge on handling PCs and
working with WinCC/TM.
Also required is knowledge of the process control system TELEPERM M,
PCS7 and SIMATIC S7.
A number of technical descriptions and manuals are available for consolidation of this information. Please refer to the literature index in Appendix C.
Connecting TM I/O to PCS 7
C79000-G8076-C710-04
iii
Preface
Further support
Siemens offers you a number of training courses for the SIMATIC PCS7
automation system. For details, please contact your regional training center
or our central training center in:
1. D-90327 Nuremberg, Germany,
Phone 0911 / 895 3202 , Fax: 0911 / 895 3252
2. D-78187 Karlsruhe, Germany,
Phone 0721 / 595 2917, Fax: 0721 / 595 6087
iv
Connecting TM I/O to PCS 7
C79000-G8076-C710-04
Preface
Automation and
Drives, Service &
Support
Available worldwide 24 hours:
Nuremberg
Johnson City
Singapore
SIMATIC Hotline
Worldwide (Nuremberg)
Worldwide (Nuremberg)
Technical Support
Technical Support
(Free Contact)
(fee based, only with
SIMATIC Card)
Local time: Mon.-Fri. 7:00 to 17:00
Phone:
+49 (180) 5050-222
Fax:
+49 (180) 5050-223
Local time: Mon.-Fri. 0:00 to 24:00
E-Mail:
techsupport@
ad.siemens.de
Phone:
+49 (911) 895-7777
Fax:
+49 (911) 895-7001
GMT:
+1:00
GMT:
+01:00
Europe / Africa (Nuremberg)
America (Johnson City)
Asia / Australia (Singapore)
Authorization
Technical Support and
Authorization
Technical Support and
Authorization
Local time: Mon.-Fri. 7:00 to 17:00
Local time: Mon.-Fri. 8:00 to 19:00
Local time: Mon.-Fri. 8:30 to 17:30
Phone:
Fax:
+49 (911) 895-7200
+49 (911) 895-7201
Phone:
+1 423 461-2522
Phone:
Fax:
+1 423 461-2289
Fax:
+65 740-7001
E-mail:
authorization@
nbgm.siemens.de
+1:00
E-mail:
simatic.hotline@
sea.siemens.com
E-mail:
GMT:
-5:00
GMT:
simatic.hotline@
sae.siemens.com.sg
+8:00
GMT:
+65 740-7000
The languages of the SIMATIC Hotlines are generally German and English, in addition, French, Italian and Spanish are
spoken on the authorization hotline.
Connecting TM I/O to PCS 7
C79000-G8076-C710-04
v
Preface
Service & Support
on the Internet
In addition to our documentation, we offer our Know-how online on the Internet under
http://www.ad.siemens.de/support
Here you will find:
• Current product information leaflets, FAQs (Frequently Asked Questions),
Downloads, Tipps and Tricks.
• A newsletter providing up-to-date information on our products.
• The Knowledge Manager helps you find the documents you need.
• Users and specialists from all over the world share information in the
forum.
• Your local customer service representative for Automation & Drives in
our customer service representative data bank.
• Information on field service, repairs, spare parts and more under
”Services”.
vi
Connecting TM I/O to PCS 7
C79000-G8076-C710-04
Contents
1
2
3
4
Preface . . . . . . . . . . . . . . . . . . . . . . . . . . . . . . . . . . . . . . . . . . . . . . . . . . . . . . . . . . . . . . . .
iii
Contents . . . . . . . . . . . . . . . . . . . . . . . . . . . . . . . . . . . . . . . . . . . . . . . . . . . . . . . . . . . . . . .
vii
Hardware structure . . . . . . . . . . . . . . . . . . . . . . . . . . . . . . . . . . . . . . . . . . . . . . . . . . . . .
1-1
1.1
Interface module TPM 478-2 . . . . . . . . . . . . . . . . . . . . . . . . . . . . . . . . . . . . . .
1-2
1.2
Migration rack II . . . . . . . . . . . . . . . . . . . . . . . . . . . . . . . . . . . . . . . . . . . . . . . . .
1-4
Installation of the software . . . . . . . . . . . . . . . . . . . . . . . . . . . . . . . . . . . . . . . . . . . . . .
2-1
2.1
Installing and uninstalling the block library . . . . . . . . . . . . . . . . . . . . . . . . . .
2-2
Commissioning . . . . . . . . . . . . . . . . . . . . . . . . . . . . . . . . . . . . . . . . . . . . . . . . . . . . . . . .
3-1
3.1
PCS7/TM in M7-400 installation technique . . . . . . . . . . . . . . . . . . . . . . . . . .
3-2
3.2
Supply conception . . . . . . . . . . . . . . . . . . . . . . . . . . . . . . . . . . . . . . . . . . . . . . .
3-7
Configuration . . . . . . . . . . . . . . . . . . . . . . . . . . . . . . . . . . . . . . . . . . . . . . . . . . . . . . . . . .
4-1
4.1
General . . . . . . . . . . . . . . . . . . . . . . . . . . . . . . . . . . . . . . . . . . . . . . . . . . . . . . . .
4-2
4.2
4.2.1
Configuration input . . . . . . . . . . . . . . . . . . . . . . . . . . . . . . . . . . . . . . . . . . . . . .
Configuring the Memory Card of the FM456 . . . . . . . . . . . . . . . . . . . . . . . . .
4-3
4-3
4.3
Example of how to use the block editor to configure I/O . . . . . . . . . . . . . . .
4-5
4.4
Extended module configuration . . . . . . . . . . . . . . . . . . . . . . . . . . . . . . . . . . . .
4-7
4.5
4.5.1
Special features for the configuration of transparent
connection modules . . . . . . . . . . . . . . . . . . . . . . . . . . . . . . . . . . . . . . . . . . . . .
Configuration Notes for the Coupling Modules 6DS1333, 6DS1318 . . . . .
4-9
4-10
4.6
Configuring the connection modules 6DS1310-8AA/-8AB . . . . . . . . . . . . .
4-12
4.7
4.7.1
4.7.2
Substitute configuration for 6DS1504-8AA / 6DS1505-8AA . . . . . . . . . . . .
Rules for PCS7/TM . . . . . . . . . . . . . . . . . . . . . . . . . . . . . . . . . . . . . . . . . . . . . .
Substitute configuration for PCS7/TM . . . . . . . . . . . . . . . . . . . . . . . . . . . . . .
4-13
4-13
4-13
4.8
Table of TELEPERM M modules for input at ”Module type” . . . . . . . . . . . .
4-15
4.9
4.9.1
4.9.2
4.9.3
4.9.4
4.9.5
FM456-4 configuration . . . . . . . . . . . . . . . . . . . . . . . . . . . . . . . . . . . . . . . . . . .
Display elements of FM456-4 . . . . . . . . . . . . . . . . . . . . . . . . . . . . . . . . . . . . .
Diagnostics . . . . . . . . . . . . . . . . . . . . . . . . . . . . . . . . . . . . . . . . . . . . . . . . . . . . .
Reaction of the Output Modules in STOP or HALT State . . . . . . . . . . . . . .
Diagnosis Function: Time Measurement at FM456-4 . . . . . . . . . . . . . . . . .
Mutual Monitoring between CPU and TPM 478-2 . . . . . . . . . . . . . . . . . . . .
4-17
4-17
4-18
4-19
4-19
4-20
Connecting TM I/O to PCS 7
C79000-G8076-C710-04
vii
Contents
5
6
Interface module TPM 478-2 . . . . . . . . . . . . . . . . . . . . . . . . . . . . . . . . . . . . . . . . . . . . .
5-1
5.1
Product overview . . . . . . . . . . . . . . . . . . . . . . . . . . . . . . . . . . . . . . . . . . . . . . . .
5-2
5.2
Fields of application . . . . . . . . . . . . . . . . . . . . . . . . . . . . . . . . . . . . . . . . . . . . .
5-6
5.3
5.3.1
Configuration . . . . . . . . . . . . . . . . . . . . . . . . . . . . . . . . . . . . . . . . . . . . . . . . . . .
Configuration of the PCS7/TM with TELEPERM M I/O . . . . . . . . . . . . . . .
5-8
5-9
5.4
5.4.1
Operating method . . . . . . . . . . . . . . . . . . . . . . . . . . . . . . . . . . . . . . . . . . . . . . .
Implementation of TELEPERM M I/O in PCS7/TM . . . . . . . . . . . . . . . . . . .
5-11
5-14
5.5
Configuration . . . . . . . . . . . . . . . . . . . . . . . . . . . . . . . . . . . . . . . . . . . . . . . . . . .
5-17
5.6
I/O modules . . . . . . . . . . . . . . . . . . . . . . . . . . . . . . . . . . . . . . . . . . . . . . . . . . . .
5-18
5.7
Note on orders . . . . . . . . . . . . . . . . . . . . . . . . . . . . . . . . . . . . . . . . . . . . . . . . . .
5-20
Migration rack II . . . . . . . . . . . . . . . . . . . . . . . . . . . . . . . . . . . . . . . . . . . . . . . . . . . . . . .
6-1
6.1
6.1.1
Product overview . . . . . . . . . . . . . . . . . . . . . . . . . . . . . . . . . . . . . . . . . . . . . . . .
Use of the migration rack on PCS7/TM . . . . . . . . . . . . . . . . . . . . . . . . . . . . .
6-2
6-2
6.2
6.2.1
6.2.2
Wiring . . . . . . . . . . . . . . . . . . . . . . . . . . . . . . . . . . . . . . . . . . . . . . . . . . . . . . . . .
Supply and signals . . . . . . . . . . . . . . . . . . . . . . . . . . . . . . . . . . . . . . . . . . . . . .
Grounding . . . . . . . . . . . . . . . . . . . . . . . . . . . . . . . . . . . . . . . . . . . . . . . . . . . . . .
6-5
6-5
6-6
6.3
6.3.1
6.3.2
I/O bus system . . . . . . . . . . . . . . . . . . . . . . . . . . . . . . . . . . . . . . . . . . . . . . . . . .
Configuration of the I/O bus system . . . . . . . . . . . . . . . . . . . . . . . . . . . . . . . .
Configuration of the I/O slots . . . . . . . . . . . . . . . . . . . . . . . . . . . . . . . . . . . . . .
6-7
6-7
6-8
6.4
6.4.1
6.4.2
6.4.3
6.4.4
6.4.5
Connector pin-out . . . . . . . . . . . . . . . . . . . . . . . . . . . . . . . . . . . . . . . . . . . . . . .
Pin-out 64-pole G-connector, all slots . . . . . . . . . . . . . . . . . . . . . . . . . . . . . .
Pin-out X30, 25-pole Sub-D connector, process control signals . . . . . . . .
Migration rack connector panel . . . . . . . . . . . . . . . . . . . . . . . . . . . . . . . . . . . .
Rear view of the bus PCB . . . . . . . . . . . . . . . . . . . . . . . . . . . . . . . . . . . . . . . .
Front view of the bus PCB . . . . . . . . . . . . . . . . . . . . . . . . . . . . . . . . . . . . . . . .
6-10
6-10
6-10
6-11
6-12
6-13
6.5
Operating conditions . . . . . . . . . . . . . . . . . . . . . . . . . . . . . . . . . . . . . . . . . . . . .
6-14
Technical Data . . . . . . . . . . . . . . . . . . . . . . . . . . . . . . . . . . . . . . . . . . . . . . . . . . . . . . . . .
A-1
A.1
Technical data of the TPM 478-2 interface module . . . . . . . . . . . . . . . . . . .
A-2
A.2
TPM 478-2 connector and socket pin-out . . . . . . . . . . . . . . . . . . . . . . . . . . .
A-4
B
Abbreviations . . . . . . . . . . . . . . . . . . . . . . . . . . . . . . . . . . . . . . . . . . . . . . . . . . . . . . . . . .
B-1
C
Literature List . . . . . . . . . . . . . . . . . . . . . . . . . . . . . . . . . . . . . . . . . . . . . . . . . . . . . . . . . .
C-1
A
Glossary . . . . . . . . . . . . . . . . . . . . . . . . . . . . . . . . . . . . . . . . . . . . . . . . . . . . . . . . . . Glossary-1
viii
Connecting TM I/O to PCS 7
C79000-G8076-C710-04
1
Hardware structure
Contents
This chapter provides brief information which gives you a quick overview of
the TPM 478-2 interface module and migration carrier II.
In Chapter
Connecting TM I/O to PCS 7
C79000-G8076-C710-04
you find
on page
1.1
Interface module TPM 478-2
1-2
1.2
Migration carrier II
1-4
1-1
Hardware structure
1.1
Interface module TPM 478-2
General
functions
TPM 478-2 is an interface module with the M7-400 technological structure
of the SIMATIC M7 product family. It represents an expansion unit for the
central module FM 456-4, and it is used in the PCS7/TM PLC.
The following functions are integrated in the TPM 478-2 interface module:
• TELEPERM M I/O functionality.
A highly efficient processor controls the access functions to TELEPERM M I/O modules via a periodically updated process image. This
process image fetches input process data it writes them to the outputs of
the hardware I/O.
Process image data is transferred from the TPM 478-2 to the user program via driver blocks.
• two I/O bus interfaces for the TELEPERM M basic and expansion cabinet
• I/O bus logic supply with a +5 V bus.
Connecting
TELEPERM M I/O
The TPM 478-2 interface module interconnects existing TELEPERM M I/O
hardware of the basic and expansion cabinet of an AS 220/230/235 system.
Here, the basic central unit is replaced with a preinstalled module rack - namely the migration rack - which contains a system PCS7/TM and the add-on
components TPM 478-2 and FM456-4.
It provides the I/O bus connections A and B for existing expansion units.
Data are exchanged with existing expansion unit via I/O bus A and B of
TPM 478-2. See Figure 1-1.
PROFIBUS /
Ethernet
Migration rack
TPM478-2
PCS7/TM
I/O bus A
PS
CPU416-2DP
I/O bus B
Basic cabinet
FM456-4
TPM
PS
CPU
CP443-5 /
CP443-1
Interface module
Power supply module
Central module
Expansion cabinet
AS 220/230/235
Figure 1-1 TPM 478-2 for the connection of TELEPERM M I/O modules
1-2
Connecting TM I/O to PCS 7
C79000-G8076-C710-04
Hardware structure
Elements of
TPM 478-2
All connection and display elements of the TPM 478-2 interface module are
mounted on the front panel of the module, see Figure 1-2.
FEA
LED displays
PAA
PAB
RUN
I/O bus B
connection
I/O bus A
connection
+
I/O bus
connection
SV: 5 V-Bus
-
X2
Connecting cable
TPM 478-2
Figure 1-2 Arrangement of the connections and display modules of the TPM 478-2
interface module
Connecting TM I/O to PCS 7
C79000-G8076-C710-04
1-3
Hardware structure
Information
1.2
For additional information on the TPM 478-2 interface modules refer to
Chapter 5 in this manual.
Migration rack II
General
The migration rack II is a preassembled module rack with the dimensions of
the panel-mount system ES 902 which is required for operating a PCS7/TM
system in a TELEPERM M cabinet.
All system components such as DC power supply, CPU, FM456-4 and I/O
bus interface can be operated on the short backplane PCB.
The additional five I/O slots the migration rack II is equipped with can hold
TELEPERM M I/O modules taken from an AS 220 S-/AS 235 basic unit and
can be assigned freely to I/O bus A and B.
Features
For the PCS7/TM system, migration rack II provides five TELEPERM M
I/O slots for the installation of TELEPERM M I/O modules taken from an
AS 220 S-/AS 235 basic unit. All slots can be operated on I/O bus A or split
up in a 3 : 2 ratio between I/O bus A and B.
Other features are the simplified wiring (supply and process control messages) and the possibility of replacing certain mechanical components (connectors) in case of error.
The wiring features no loose ends, that is, installation technique is adapted to
AS 230/235.
The integrated backplane also provides distribution of specific signals and
voltages. Process control monitoring signals are now terminated on the backplane terminal blocks - same as in the AS 235. The existing cabinet wiring
can be used almost completely.
The front panel fuses for L+ (16A) and PM (4A) can be replaced from the
front in case of error. Due to the fastening mechanism on the side, the I/O bus
connectors can be replaced in case of error without having to remove the migration rack.
The migration rack is equipped with by-pass capacitors for the L+, PM, M24
and MZ voltages for the derivation of electrical disturbance to the shielding
and, thus to the metal case.
All position addresses of the slots are equipped with filters.
1-4
Connecting TM I/O to PCS 7
C79000-G8076-C710-04
Hardware structure
Information
Further information on Migration Rack II is found in Chapter 6 of this manual.
PS
405
CPU
416
FM
456
TPM
478-2
CP
443
SIMATIC PCS7
with
TELEPERM M I/O
Figure 1-3 Front view of migration rack II
Connecting TM I/O to PCS 7
C79000-G8076-C710-04
1-5
Hardware structure
1-6
Connecting TM I/O to PCS 7
C79000-G8076-C710-04
2
Installation of the software
Overview
In this Chapter you are shown how you can install the block library with the
help of a setup routine.
In this Chapter
This chapter treats the following topics:
In Chapter
2.1
Installation requirements
you find
Installing and uninstalling the block library
on Page
2-2
Software operating requirements are:
• Windows NT operating system
• Programming device or PC with
– 80486 CPU (or higher) and
– RAM memory
• Color monitor, keyboard and mouse, supported by Microsoft Windows
NT
• STEP 7 Basic software
• Free space u4 Mbytes on hard disk drive
• At least 1 MB space on drive C: for
Setup (Setup files are deleted after installation).
Connecting TM I/O to PCS 7
C79000-G8076-C710-04
2-1
Installation of the software
2.1
Installing and uninstalling the block library
Overview
The setup program of the included software installs the block library automatically.
Installation is menu controlled. Call the setup program with the usual
Windows 95 standard procedure for software installation.
Setup installs the basic blocks for the PLC in the PCS 7 Basis Blocks library
of the SIMATIC S7 catalog.
If a Software version is already
installed ...
If setup detects an existing installation on the system, a corresponding
prompt pops up, offering you the following choices:
• Abort installation (in order to uninstall the old software version under
Windows95 and the restart installation) or
• Continue installation and overwrite the old version with the new one.
Considering clean software maintenance, you should uninstall an existing old
version before you install the new one. To simply overwrite an old version
and then to uninstall it bears the risk that some components of the old installation might not be deleted.
Installing or uninstalling
STEP 7-Software
Details on installing and uninstalling STEP 7 software is found in
Chapter 2.3 of the STEP 7 documentation /31/.
Systems with
WinCC
Setup also installs the screen software in systems operating with WinCC.
Use in CFC
Information on the use of blocks in CFC is found in the ”CFC for S7 and M7,
Graphic connection of technological functions” User Manual.
2-2
Connecting TM I/O to PCS 7
C79000-G8076-C710-04
3
Commissioning
In this Chapter
In this Chapter you are shown how to
• mount the modules on profile rails
• commission a PCS7/TM.
Contents
This is found on the following pages:
In Chapter
Connecting TM I/O to PCS 7
C79000-G8076-C710-04
you find
on Page
3.1
PCS7/TM in M7-400 installation technique
3-2
3.2
Supply conception
3-7
3-1
Commissioning
3.1
PCS7/TM in M7-400 installation technique
Introduction
A PCS7/TM PLC in M7-400 installation technique is mounted in the same
way as a SIMATIC M7-400 PLC.
Note
Details on how to mount a SIMATIC M7-400 PLC are found in Manual /31/.
M7-400 mounting
and installatio
technology
Here a brief overview of the most important steps for mounting a PCS7/TM
PLC in M7-400 installation technique:
Mounting modules
Mount the module rack in the cabinet.
Grounding modules
Ground the module rack.
Removing the cover hood
Remove the covers of the power supply and central module.
Installing interface
modules
Remove the covers and insert the interface modules in the central module.
See also Figure 3-1 showing the arrangement:
• IF 961-DIO for acquisition and output of process control signals, e.g. cabinet lamp
• IF 962-COM for diagnostics with remote terminal
Note when inserting an interface module:
• Hold the interface module on the longitudinal sides of the front panel
• Slide the ends of the interface module into the lower and upper guide rail
of the slot
• Slide it in slowly until the front panel of the interface module is flush on
the module slot frame
• Screw-tighten the interface module.
!
Warning
Always switch off power when you insert or remove an interface module.
The bottom of interface modules is not covered. This is why you must always conform with EGB rules when handling these modules.
3-2
Connecting TM I/O to PCS 7
C79000-G8076-C710-04
Commissioning
Removing connector/socket covers
Remove the cover from the expansion connector on the TPM 478-2 interface
and the cover of the expansion socket on the central module FM 456-4.
See Figure 3-1.
TPM 478-2
FM 456-4
Expansion
connector
Expansion socket
Figure 3-1 Positions of the expansion connector/socket with corresponding cover.
Connecting TM I/O to PCS 7
C79000-G8076-C710-04
3-3
Commissioning
Interconnecting
modules
Place the central module FM 456-4 and the TPM 478-2 interface module on a
plane surface and carefully plug them together. Engage the included connection clamps on the upper and lower side of the modules.
FM 456-4
TPM 478-2
plane surface
Figure 3-2 Interconnecting the central module and interface module
Blind covers
3-4
Remove the blind covers from the module rack slots required.
Connecting TM I/O to PCS 7
C79000-G8076-C710-04
Commissioning
PS 405
Insert and screw-tighten the 24 VDC/24 VDC power supply module in the
outer left slot (slot 1). Select your mains voltage with the selector switch on
the power supply module.
Inserting modules
Insert the module group to the right side of the CPU (1) and swing it down
(2). See Figure 3-3.
1
2
Figure 3-3 Inserting the modules
Screw-tightening
the module unit
Screw-tighten central/expansion module unit.
Memory Card
Do not yet insert the Memory Card into the central module.
Inserting the key
switch
Set the key switch on the central module to STOP position.
Backup battery
Insert the backup batteries (2 pieces) in the power supply (time-of-day).
Connecting TM I/O to PCS 7
C79000-G8076-C710-04
3-5
Commissioning
Mains plug
PS 405/407
Insert the wired mains plug into the power supply module.
Front connector
IF 961-DIO
Wire and insert the preassembled front connector for the IF 961-DIO interface module according to your application.
PROFIBUS
connection
Connect the PROFIBUS system. See Figure 3-4.
PROFIBUS / Ethernet
PCS7/TM installation technique
M7-400
ET 200M
PROFIBUS-DP
ET 200M
Figure 3-4 Connecting PROFIBUS-DP
Note
Further information on how to connect the PROFIBUS-DP system is found
in manuals /17/ to /18/.
3-6
Connecting TM I/O to PCS 7
C79000-G8076-C710-04
Commissioning
3.2
Supply conception
Overview
The PLC system draws its power from a 24 VDC or 230 VAC power supply.
On startup (after power is returned or after a reset) the application is always
loaded from buffered CPU memory module.
The FM456-4 configuration is backed up on a Flash ROM Memory Card.
The lithium cell in the PS buffers the date and time-of-day as well as data on
the CPU’s memory module.
In order to resume with the last states and selected steps free of surge after a
voltage drop and when power is returned, we recommend a redundant supply
in the central PLC area. Even after load power loss, including the supply of
DP stations and/or TM I/O units, the buffered PLC can communicate with the
OS, generate process control failure messages and specifically apply configured failure and resume strategies.
We differentiate:
a) Redundant 24 VDC power supply by means of two diodes
wired in parallelism, switched in series to the PLC module rack of the 24
VDC version;
The redundant power supply busbar is arranged centrally on this system.
b) Uninterruptible power supply with distributed buffered operation;
A low-cost SITOP power DC-UPS 40 A is available.
Refer to Catalog KT 10, Power supply SITOP power, System wiring
SITOP connection.
This UPS system allows an uninterrupted supply/buffer operation transition.
The buffer units can be switched in parallel in order to adapt power to system
requirements. When the UPS is designed to operate on the basic unit, for example, you can use the smallest 7 Ah backup battery module to buffer power
loss times of approx. 4.5 h (with PCS7/TM) and approx. 1,6 h (with migration and TM I/O busses).
Buffer conception
On power loss the lithium cell buffers the programs in the PS. After power is
returned, restart is always executed with system and user data stored on the
system’s Memory Card.
In order to avoid a restart after voltage drops on supply side, the PLC can be
supplied redundant from two supply circuits with the help of two diodes, e.g.
once from a battery.
This buffers all power drops, independent of the supply for I/O peripherals,
and saves the respectively last system/operating states, thus allowing to resume operation.
Connecting TM I/O to PCS 7
C79000-G8076-C710-04
3-7
Commissioning
3-8
Connecting TM I/O to PCS 7
C79000-G8076-C710-04
4
Configuration
In this Chapter
This chapter provides information on how to configure TELEPERM M
I/O peripherals.
Contents
This is found on the following pages:
In Chapter
Connecting TM I/O to PCS 7
C79000-G8076-C710-04
you find
on Page
4.1
General
4-2
4.2
Input of the configuration
4-3
4.3
Menu sample for I/O configuration
4-5
4.4
Extended module configuration
4-7
4.5
Special features for the configuration of transparent
communication modules
4-9
4.6
Configuring the communication module 6DS1310
4-12
4.7
Substitute configuration for 6DS1504-8AA /
6DS1505-8AA
4-13
4.8
Table of the TELEPERM M modules for input with
”Module type”
4-15
4.9
FM456-4 configuration
4-17
4-1
Configuration
4.1
General
For information on configuration refer to the SIMATIC Manuals /8/, /31/,
/106/, /230/, /231/, /232/, /233/, /234/, /235/, /280/, /282/, /350/, /701/, /702/
and /703/. See Appendix C.
With a PCS7/TM PLC, the exchange of process values
between the PLC and process I/O modules generally takes place via process
image.
With an AS 2xx PLC data are exchanged via direct access to I/O modules
during runtime of the driver block.
The disadvantage of direct access is, for example, extremely long acknowledgement and response times on a “long” I/O bus or with I/O modules distributed from AS 235 over larger distances. This is improved with PCS7/TM and
an I/O communication module TPM 478, as a result of autarkic and processor
controlled mapping of I/O values on the TPM 478.
Standard driver blocks, e.g. system version G of the AS 235, address TELEPERM M I/O modules with the help of the hierarchical addresses “Module
number” and “Channel number”. These are entered in the block parameter
lists when driver blocks are being configured. Here, implicit condition is a
module-conform assignment of TELEPERM M I/O modules and drivers in
the configuration.
This implicit module assignment in TPM 478 is no longer available in the
application image in, or it is rudimentary and inconsistent. Therefore, supplementary configuration is required.
4-2
Connecting TM I/O to PCS 7
C79000-G8076-C710-04
Configuration
4.2
Configuration input
Data blocks from
the library
To begin with, data blocks DB1 and DB2 as well as data types UDT1 and
UDT2 must be copied from the library to the current project:
• call SIMATIC Manager
• open the current project and library Pcs7_tm
• select FM456 task\blocks
• select DB1, DB2, UDT1 and UDT2 and copy them to the block container
of the FM456-4 in the current project
I/O
configuration
DB1 and DB2 of the FM456-4 are configured in the block editor (View ³
Data view). Configuration of the interface to the TELEPERM M I/O bus only
requires:
• assignment of module names (MLFB) to
the module numbers (slot number) in the TELEPERM M
I/O module rack and
• the processing cycle for cyclic repetition
of the process image.
Information generated during the configuration of I/O peripherals are stored
in DB1 and DB2 of the FM456-4. In the editor, this can be entered and modified for every block number. Entries are not activated at the time of input.
These declarations in the configuration lists are activated on restart of the
FM456-4, after power is returned.
4.2.1
Configuring the Memory Card of the FM456
Required
Software
components
The Memory Card of the FM456-4 must contain the following SW components:
• the operating system M7-SYS Realtime V4.0
• the HW configuration
• the configured connections to the S7 CPU (refer to the Reference Manual
Driver block library for TM I/O, Chapter 4.5)
• the task TM_EA_S7 for operation of the interface module TPM478-2 and
communication with the S7 CPU
• I/O configuration data (DB1 and DB2)
The user must configure these software components on the Memory Card of
the FM456-4, including the operations described in the following sections.
How to configure the Memory Card of FM456-4:
Connecting TM I/O to PCS 7
C79000-G8076-C710-04
4-3
Configuration
M7-SYS
call SIMATIC Manager
•
•
•
•
•
•
Blocks
open the current project
select the M7 program of the FM456-4
PLC ³ Manage M7 target system ...
select the medium ”Memory Card”
select the ”Install OS” tab
select ³ install ”M7 RMOS32”(confirm all prompts)
å the Memory Card is formatted, M7-SYS will be installed.
PLC ³ Manage M7 target system ...
• select the medium ”Memory Card”
• select the ”Programs” tab
• select ³ install ”Blocks” (when prompted to write batch files to
\etc\inittab, confirm with ”Yes”)
å the HW configuration, configured connections and configuration
DBs are now copied.
System SW
4-4
Since the system software is not visible in SIMATIC Manager when the optional package M7-ProC/C++ has not been installed, the system SW and all
its components must be copied to Memory Card, using Windows Explorer:
• select the catalog \Siemens\Step7\S7libs\Pcs7_tm\hrs\P0000002\
• copy the file TM_EA_S7.EXE to mc:\romdir
• create a new catalog mc:\S7auto on Memory Card
• copy the file TM_EA_S7.BAT to mc:\S7auto
• copy the file BGRLISTE.TYP to mc:\romdir
• edit the file mc:\etc\inittab:
At the end of the file in block ”Init 2 - not synchronized user ...”
enter the line:
2 \s7auto\tm_ea_s7.bat
Connecting TM I/O to PCS 7
C79000-G8076-C710-04
Configuration
4.3
Example of how to use the block editor to configure I/O
The sample below shows the basic steps for configuration.
The entries are verified on startup of the FM456-4.
Possible inconsistencies are displayed and stored in the diagnostics buffer of
FM456-4.
To configure TELEPERM I/O modules, open SIMATIC-Manager, then open
the DB 1 you have generated during installation per double-click in the block
container of FM456-4. Next, select ”Data view” from the ”View” menu. This
opens, for example, the following view:
Table 4-1
Address
Name
Type
Start value
Actual value
Comment
0.0
BGNR000.BG_Typ
STRING [ 16 ]
’’
’6DS1601-8BA’
Module type (6DS1...)
18 . 0
BGNR000.Zyklus
INT
0
8
TPM478 processing cycle
20 . 0
BGNR001.BG_Typ
STRING [ 16 ]
’’
’6DS1603-8RR’
Module type (6DS1...)
38 . 0
BGNR001.Zyklus
INT
0
8
TPM478 processing cycle
40 . 0
BGNR002.BG_Typ
STRING [ 16 ]
’’
’6DS1701-8AA’
Module type (6DS1...)
58 . 0
BGNR002.Zyklus
INT
0
8
TPM478 processing cycle
60 . 0
BGNR003.BG_Typ
STRING [ 16 ]
’’
’6DS1702-8RR’
Module type (6DS1...)
78 . 0
BGNR003.Zyklus
INT
0
8
TPM478 processing cycle
80 . 0
BGNR004.BG_Typ
STRING [ 16 ]
’’
’6DS1607-8AB’
Module type (6DS1...)
98 . 0
BGNR004.Zyklus
INT
0
8
TPM478 processing cycle
100 . 0
BGNR005.BG_Typ
STRING [ 16 ]
’’
’6DS1401-8CA’
Module type (6DS1...)
118 . 0
BGNR005.Zyklus
INT
0
8
TPM478 processing cycle
120 . 0
BGNR006.BG_Typ
STRING [ 16 ]
’’
’6DS1603-8RR’
Module type (6DS1...)
138 . 0
BGNR006.Zyklus
INT
0
8
TPM478 processing cycle
140 . 0
BGNR007.BG_Typ
STRING [ 16 ]
’’
’’
Module type (6DS1...)
158 . 0
BGNR007.Zyklus
INT
0
8
TPM478 processing cycle
:
:
:
:
:
:
:
:
:
:
:
:
:
:
:
:
:
:
1238 . 0
BGNR061.Zyklus
INT
0
0
TPM478 processing cycle
1240 . 0
BGNR100.BG_Typ
STRING [ 16 ]
’’
’6DS1603-8RR’
Module type (6DS1...)
1258 . 0
BGNR100.Zyklus
INT
0
8
TPM478 processing cycle
1260 . 0
BGNR101.BG_Typ
STRING [ 16 ]
’’
’6DS1605-8BA
Module type (6DS1...)
1278 . 0
BGNR101.Zyklus
INT
0
8
TPM478 processing cycle
:
:
:
:
:
:
:
:
:
:
:
:
:
:
:
:
:
:
1558 . 0
BGNR113.Zyklus
INT
0
0
TPM478 processing cycle
1520 . 0
BGNR114.BG_Typ
STRING [ 16 ]
’’
’6DS1310-8AA’
Module type (6DS1...)
1538 . 0
BGNR114.Zyklus
INT
0
8
TPM478 processing cycle
1540 . 0
BGNR115.BG_Typ
STRING [ 16 ]
Module type (6DS1...)
’’
’’
:
:
:
:
:
:
:
:
:
:
:
:
:
:
:
:
:
:
Connecting TM I/O to PCS 7
C79000-G8076-C710-04
4-5
Configuration
In the “Name“ column you can see the slot number of the module to be configured. In the actual value column, enter the corresponding MLFB in the
”Module type” row and specify the processing cycle in the ”TPM478-processing cycle” row. See Table 4-3 in >Chapter. 4.7.
Caution
You can configure only one interrupt acquisition module 6DS1601-8AC
or ...-8BA with BGNR061. Although other module types a re not rejected,
they do not function on BGNR061.
This processing cycle configures process image updates on TPM 478. The
following cycles can be set:
TPM478 processing cycle =
2
4
8
16
32
64
10 ms
50 ms
100 ms
500 ms
1s
Free cycle (= residual time
Set .Zyklus = 1 for the interrupt generating module “SF61”. For additional
periodical monitoring of this module (e.g. for S 305), you must select the
above Zyklus+1 for the module. Then, it makes sense to enter .Zyklus = 33
for interrupt + monitoring cycle 1 sec. If the module is also to be read in the
PLC cycle, ensure that interrupt triggering on this module is enabled at both
edges - positive and negatice (bridge socket X3 with 6DS1601-8BA).
Furthermore, configure the following FM456-4 parameters in SIMATIC-Manager ³ HW Config:
– Properties FM456-4 → Basic parameters:
Interrupt Selection: Default is ”none”. Set it to ”Process” in order to
enable throughput of the process interrupt from the interrupt triggering
module.
– Properties FM456-4 → Addresses:
The parameters process image (OB PI) and in/output addresses (512)
within this mask must not be changed.
The reaction to the process interrupt has to be programmed by the user in the
OB selected within the addresses mask (e.g. OB40).
The 48 bits read from the group interrupt module by the system, are written
to the FM456-4 process image, and can be read from PIW 512 to PIW 516 by
the user application.
It normally makes sense, and for some modules it is also mandatory (see Table 4-3 in Chapter 4.7), to select a process image update cycle time which is
smaller than the time configured for the driver block on PLC processing level
(e. g. approx. by half). To limit load on the TPM 478, however, you should
not use faster cycles than actually required, and you should remove modules
not required anymore. With an improper configuration of TPM 478 (overload), take into account that faster cycles are processed with higher priority
than slower ones.
4-6
Connecting TM I/O to PCS 7
C79000-G8076-C710-04
Configuration
If you specifically assign all modules to the 100-ms cycle, cycle conflict is
switched off, but the respective cycle might be overloaded in this operation.
When you choose such an ”Overload configuration” (e.g. to obtain swift and
conflict-free processing as far as possible), you must nevertheless take into
account that the processing time for this cycle is increased accordingly.
4.4
Extended module configuration
In addition to transparent SIMATIC interface modules (see Table 4-3 in
Chapter 4.7), you must also configure the subordinate I/O modules. Do so by
opening DB2 in the block container of FM456-4, using the block editor.
After you select ”Data view” iin the ”View” menu, you can see the following
figure, for example:
Table 4-2
Name
Address
Type
Start value
Actual
value
Comment
0.0
NR0001.BGNR
INT
-1
114
Module no. of the TM module
2.0
NR0001.Kanal
INT
0
8
Channel number (Offset)
4.0
NR0001.S5_Typ
STRING [ 4 ]
’’
’DE2’
S5 Module type
10 . 0
NR0002.BGNR
INT
-1
114
Module no. of the TM module
12 . 0
NR0002.Kanal
INT
0
0
Channel number (Offset)
14 . 0
NR0002.S5_Typ
STRING [ 4 ]
’’
’DA1’
S5 Module type
20 . 0
NR0003.BGNR
INT
-1
114
Module no. of the TM module
22 . 0
NR0003.Kanal
INT
0
1
Channel number (Offset)
24 . 0
NR0003.S5_Typ
STRING [ 4 ]
’’
’DA1’
S5 Module type
30 . 0
NR0004.BGNR
INT
-1
114
Module no. of the TM module
32 . 0
NR0004.Kanal
INT
0
2
Channel number (Offset)
34 . 0
NR0004.S5_Typ
STRING [ 4 ]
’’
’DA1’
S5 Module type
40 . 0
NR0005.BGNR
INT
-1
114
Module no. of the TM module
42 . 0
NR0005.Kanal
INT
0
3
Channel number (Offset)
44 . 0
NR0005.S5_Typ
STRING [ 4 ]
’’
’DA1’
S5 Module type
50 . 0
NR0006.BGNR
INT
-1
-1
Module no. of the TM module
52 . 0
NR0006.Kanal
INT
0
0
Channel number (Offset)
54 . 0
NR0006.S5_Typ
STRING [ 4 ]
’’
’’
S5 Module type
60 . 0
:
:
:
:
:
62 . 0
:
:
:
:
:
64 . 0
:
:
:
:
:
The ”Name” column shows you the consecutive number of the configured S5
module.
Select the ”Actual value” column. Enter the slot number of the TELEPERM
module configured in DB1 in the ”Module no. of the TM module” (refer to
Table 4-1 in Chapter 4.3) row.
In the ”Channel number” row, enter the byte address. Configure the S5 module ID in the ”S5 module type” row.
Connecting TM I/O to PCS 7
C79000-G8076-C710-04
4-7
Configuration
Configuring input
modules
Channel number
NR0xxx.Kanal
This entry specifies the byte address for the
input area of the S5 module.
S5-Module type
NR0xxx.S5_Typ=’xy’
Specifies the S5 module ID.
.
The entry x and y can be defined with the
following values:
x = DI
x = AI
y = 1 ... 16
Configuring output
modules
Digital input modules
Analog value input module
Entry for 1 to 16 byte for digital input
or 1 to 16 channels for analog input
(corresponds with 2 to 32 bytes)
NR0xxx.Kanal
This entry specifies the byte address for the
output area of the S5 module.
NR0xxx.S5_Typ=’xy’
Specifies the S5 module ID.
The entry x and y can be defined with the
following values:
x = DQ
x = AQ
y = 1 ... 16
Deleting modules
in extended configurations
4-8
Digital output module
Analog value output module
Entry for 1 to 16 byte for digital output
or 1 to 16 channels for analog output
(corresponds with 2 to 32 bytes)
To delete the TELEPERM M slot (that is, the connection module), you must
delete the entry of the TM module in DB1 of FM456-4 and possible entries
of subordinate S5 modules in DB2 of FM456-4.
Connecting TM I/O to PCS 7
C79000-G8076-C710-04
Configuration
4.5
Special features for the configuration of transparent connection
modules
Take these special features into account when you configure transparent SIMATIC connection modules (6DS1310, 6DS1321 and 6DS1327):
• Modules 6DS1321-8AA and 6DS1327-8AA programmed directly with
this MLFB use respectively 8 or 16 successive module numbers (MNO).
Here you must configure a start MNO = n x 8 or n x 16 (or for the I/O bus
these numbers + 100). The counting method in the manuals is here “n” =
0, 1, 2, ... 7 or 15 = module number of the connection groups.
• Further TELEPERM modules entries in this used area of 8 or 16 module
numbers are permitted. However, they do not have any effect, that is,
these modules will not be addressed.
• When you configure BGNR = 32 for a connection module, for example,
enter a byte address Nrxxxx.Kanal = 3 x 64 = 192 to reach the start of
BGNR = 35, and with = 194 you reach a module with the byte address
channel = 2 within BGNR = 35.
Caution: ”Nrxxxx.Kanal” is always a byte address (applies to analog modules as well).
• Not allowed are start BGNR 56 and 156 for 6DS1321-8AA and 48 und
148 for 6DS1327-8AA, because otherwise the prohibited areas (BGNR =
61 ff or 161 ff) would be covered. In this case you must use the substitute
configuration to configure the required MNOs explicitly, that is, for every
MNO used by the connection module you must configure one separate
6DS1310-8AA.
• A granular MON mix of TELEPERM and SIMATIC modules with
6DS1327-8AA also requires a substitute configuration.
Such overlaps are currently not possible with 6DS1321-8AA, they must
be cleared.
• With 6DS1321-8AA, coding switch 6 must be set to OFF (EANK active),
otherwise the process control message S 313 is output.
• Special care must be exercised when entering data, since the configuration tool does not safely prevent an overlap of process images with the
modules mentioned above, or only shows the assignment without output
of an explicit error message; for example, the author must take the limitation of channels (maximum = 63) into account when he creates his configuration with 6DS1310.
– With confguration errors, e.g. if a driver block accesses a subordinate
I/O module which has not been configured and is therefore not existing because of a wrong configured channel number, possibly no acknowledgement error S305 will be signaled.
– In principle the corresponding module width has to be configured for
each S5 module with S5_Typ as far as possible. Especially combining
several modules has to be avoided.
Example: 2 byte binary input S5_Typ = DE2;
4 byte binary output S5_Typ = DA4;
Connecting TM I/O to PCS 7
C79000-G8076-C710-04
4-9
Configuration
4.5.1
Configuration Notes for the Coupling Modules 6DS1333, 6DS1318
Among the module operating manuals and the driver documentation for
TM_S5KS/TM_S5KE, the notes described below are relevant for confi-guring the coupling modules.
A migration from AS230 / AS235 / AS488/TM to PCS 7/TM-EA is possible,
if the links within the system configuration and its structure meets the following standard configuration:
Standard configuration, quantified project scope:
– Settings relating to the number of coupling modules:
Number of
coupling mod.
Number of
transm.
channels / mod
Number receive
channels / mod.
TM_S5KS/
S5KE
driver cycles
DB1cycle
2
2
1
1s
16 (500 ms)
4
2
0
1s
16 (500 ms)
4
2
1
2s
32 (1 s)
– Up to 6 TM_S5KS driver per channel KNR can send to a single module. The partner device transmits no more than 12 telegrams per
TM_S5KE cycle.
– With acyclic stress by process alarms, and by transmission times of
I/O modules behind coupling modules 6DS1322-8AA, the number of
coupling modules which can be used in the same cycle, may be reduced (recommendation: slot for the coupling module immediately in the
migration rack).
If a system departs from this standard scope (e.g. a larger number of coupling
modules or more driver blocks), such couplings often can be replaceble nevertheless. But sometimes changing the configuration may be necessary (e.g.
parameter adjustment, extension of TM_S5KE cycle).
Common settings:
– All TM_S5KS of a module have to be installed in the same cycle.
– The DB1 cycle for these coupling modules has always to be set faster
than the assigned TM_S5KE block.
Operating mode, settings for 6DS1333-8AB:
– The 6DS1333-8AB interface module works with high priority, on the
partner side ’low priority’ has to be set; 1 stop bit, even parity, same
baudrate. ED telegrams can be initiated only by the AS.
– For reading data from a partner device (with FETCH), and for monitoring a TM_S5KE has to be configured in the AS coupled with SIMATIC S5/S7. Only one TM_S5KE is used for each module, which has
been installed in the cycle list only once.
4-10
Connecting TM I/O to PCS 7
C79000-G8076-C710-04
Configuration
– Protocol 3964(R) and RK512 procedure.
The RK512 procedure is essential required. The 3964 or 3964R protocol is open selectable. The X5/11-12 jumper has to be set like configured on the partner side [optional parameter for (R)].
S7 protocol parameter = ’Standard settings’.
When coupling to SIMATIC S7, the setting ’RK512’ includes the
’3964’ protocol. Using 3964R is recommended because of the improved communication in disturbed environment.
– Coupling to SIMATIC S7: On 6DS1333-8AB the X5/13-14 jumper has
to be set for disabling the function ’check telegram’. This is also necessary for other devices without check function.
– Coupling to SIMATIC S7-300: If the X5/13-14 jumper has been installed, the 6DS1333-8AB sends the data type DAAR=n (TM_S5KS
block) for the coordination flag within the telegram array. The
P_RCV_RK S7 block then sets the flag with this number (e.g. M 0.1
for DAAR=1) after each receiving. The next telegram can be received
only, after the S7 software has reset this flag. This enabling has to be
done quickly.
Operating mode, settings for 6DS1318-8AB:
– The 6DS1318-8AB module has to be treated in the same manner as
the 6DS1333-8AB.
Connecting TM I/O to PCS 7
C79000-G8076-C710-04
4-11
Configuration
4.6
Configuring the connection modules 6DS1310-8AA/-8AB
With 6DS1310, a separate module number must be configured for every input/output, that is, one MNO is configured only for input modules, the other
only for output modules.
For subordinate S5 modules on a 6DS1310 you should only configure DB2
for word access with DI2 or DQ2, in order to insure that all accesses to module 1310 end at an odd address. This means that either one or two modules
are recognized per access. Every configured access (DI2, DQ2) must start
with an even address number, irrespective of the module assembly.
In this case, overlap of I/O addresses is permitted.
Possibly existing cycle cells must be disabled, that is, jumper J7/5-12 must be
removed from the module and the TM_A110 drivers must be assigned the
parameter BQ2 ≠ 3.
All running interfaces configured otherwise do not have to be changed.
Existing configurations can be migrated without changes.
Caution
The preferred configuration above (word operation) may not be operated on
S5 peripherals of 6DS1321 and 6DS1327 modules (this also applies to the
so-called substitute configuration of a ‘6DS1310’ for a 6DS1321 or
6DS1327)!
In this case the configuration rules as mentioned earlier in the chapter apply.
4-12
Connecting TM I/O to PCS 7
C79000-G8076-C710-04
Configuration
4.7
4.7.1
Substitute configuration for 6DS1504-8AA / 6DS1505-8AA
Rules for PCS7/TM
The signals ”Enable Manual” (EM) and ”Enable Automatic” (EA) only exist
once in 6DS1504-8AA and 6DS1505-8AA. It is therefore required to switch
over in the same way in all drivers defined for a module. Otherwise, the
function is not ensured. In any case, full SW control can only be reached if
the status is not established by hardware forcing of the ”Enable Manual” signal (connector X2) (refer to the operating instructions on the 6DS1504-8AA
or 6DS1505-8AA module).
4.7.2
Substitute configuration for PCS7/TM
For PCS7/TM the result is the following configuration of 6DS1504-8AA /
6DS1505-8AA :
Configuration rules
DB1
MNO=21;
Example of MNO
BG_Typ=6DS1310-8AA; Substitute configuration-always enter
1310-8AA!
.Cycle=....;
The cycle must always be faster than
the fastest cycle of the EG driver blocks
assigned to this module.
DB2
.Kanal=8
.S5_Typ=DE2
Kanal=0;
.S5_Typ=DA1;
.Kanal=1;
.S5_Typ=DA1;
Kanal=2;
.S5_Typ=DA1;
.Kanal=3;
.S5_Typ=DA1;
Only enter if operating EG driver type 0, 1 or 2 with
CNO=0.
Only enter if operating EG driver type 0, 1 or 2 with
CNO=0..
Only enter if operating EG driver type 0, 1/KNR=1 or
type 2/KNR=0.
Only enter if operating EG driver type 0, 1/KNR=1 or
type 2/KNR=0.
Only enter if operating EG driver type 0, 1 or 2 with
CNO=2.
Only enter if operating EG driver type 0, 1 or 2 with
CNO=2.
Only enter if operating EG driver type 0, 1/KNR=3 or
type 2/CNO=2.
Only enter if operating EG driver type 0, 1/KNR=3 or
type 2/CNO=2.
The remaining entries are only for 6DS1505-8AA:
.Kanal=4;
Connecting TM I/O to PCS 7
C79000-G8076-C710-04
Only enter if operating EG driver type 0, 1 or 2 with
CNO=4.
4-13
Configuration
.S5_Typ=DA1; Only enter if operating EG driver type 0, 1 or 2 with
CNO=4.
.Kanal=5;
Only enter if operating EG driver type 0, 1/KNR=5 or
type 2/KNR=4.
.S5_Typ=DA1; Only enter if operating EG driver type 0, 1/CNO=5 or
type 2/CNO=4.
Kanal=6;
Only enter if operating EG driver type 0, 1 or 2 with
CNO=6.
.S5_Typ=DA1; Only enter if operating EG driver type 0, 1 or 2 with
CNO=6.
.Kanal=7;
Only enter if operating EG driver type 0, 1/KNR=7 or
type 2/CNO=6.
.S5_Typ=DA1; Only enter if operating EG driver type 0, 1/KNR=7 or
type 2/CNO=6.
The configuration must be adapted every time a driver is installed or uninstalled. However, alternatively it is possible to initially configure all channels
and drivers and next link the unused drivers to a source in order to switch
over their manual/auto mode in synchronism to the other drivers.
Also, all TM_EG blocks assigned to one module must follow each other immediately in the same block. They must be switch on or off all at once.
4-14
Connecting TM I/O to PCS 7
C79000-G8076-C710-04
Configuration
4.8
Table of TELEPERM M modules for input at ”Module type”
Table 4-3
Input text for module type
(i.a. = MLFB no.)
6DS1310-8AA
6DS1310-8AB
6DS1318-8AB
6DS1321-8AA
6DS1322-8AA
6DS1327-8AA
6DS1333-8AB
6DS1400-8AA
6DS1400-8BA
6DS1401-8AA
6DS1401-8BA
6DS1402-8AA
6DS1402-8BA
6DS1403-8AA
6DS1403-8BA
6DS1403-8CA
6DS1403-8CB
6DS1500-8AA
6DS1500-8BA
6DS1501-8AA
6DS1501-8AB
6DS1501-8BA
6DS1501-8BB
6DS1502-8AA
6DS1502-8BA
6DS1503-8AA
6DS1503-8BA
6DS1504-8AA
6DS1505-8AA
6DS1600-8AA
6DS1601-8AA
6DS1601-8AC
6DS1601-8BA
6DS1602-8AA
6DS1602-8BA
6DS1603-8AA
6DS1603-8AB
6DS1603-8BA
6DS1603-8RR
6DS1604-8AA
6DS1605-8AA
Connecting TM I/O to PCS 7
C79000-G8076-C710-04
Module function
Interface module AG110, serial
Interface module AG110, serial
S5 interface, EG, serial
Interface FBG S5-EG, parallel
Interface for ES100K
Interface to S5 E/A, ET100
Interface module S5 ZG, serial
S-controller 1K
S-controller 1K
K-controller 1K
K-controller 1K
S-controller 2K
S-controller 2K
K-controller 2K
K-controller 2K
K-controller 2K
K-controller 2K
Control module Motor 1K
Control module Motor 1K
Control module ESG 1K
Control module ESG 1K
Control module ESG 1K
Control module ESG 1K
Control module Motor 3K
Control module Motor 3K
Control module ESG 3K
Control module ESG 3K
Control module Valve 4K
Control module Valve 8K
Binary input 16 NO contact
Binary input 48
Binary input 48 + INT
(version w 4)
Binary input 48 + INT
(version w 2)
Binary input 32
Binary input 32
Binary output 32 (100 mA)
Binary input 32 (100 mA)
Binary output 32 (100 mA)
Binary output 32 (100 mA)
Binary output 16 (400 mA)
Binary output 16 Relays
Comment
1)
1)
4) 5)
1) 2)
1) 2)
4) 5)
5)
5)
5)
5)
5)
5)
5)
5)
5)
5)
5)
5)
5)
5)
5)
5)
5)
5)
5)
5)
5) 6)
5) 6)
4-15
Configuration
6DS1605-8BA
6DS1607-8AB
6DS1613-8AB-2
6DS1613-8AB-4
6DS1613-8BB-2
6DS1613-8BB-4
6DS1615-8AA
6DS1620-8AA
6DS1621-8AA
6DS1700-8AA
6DS1700-8AB
6DS1700-8BA
6DS1701-8AA
6DS1701-8AB
6DS1702-8AA
6DS1702-8RR
6DS1703-8AB
6DS1703-8RR
6DS1713-8AB
6DS1717-8AA
6DS1717-8RR
6DS1719-8AA
6DS1719-8RR
6DS1720-8AA
6DS1730-8AA
6DS1731-8AA
6DS1731-8BA
6DS1731-8EA
6DS1731-8FA
6DS1731-8RR
Binary output 16 Relays
Count pulse input 8 PT
Dosing meter 2-channel operation
Dosing meter 4-channel operation
Dosing meter 2-channel operation
Dosing meter 4-channel operation
Binary input 48 24 V/48 V (INT); (version w 4)
Binary input 8 NO contacts
Binary input 8 BERO
Analog input 8 SV T
Analog input 8 SV T
Analog input 8 SV T
Analog input 8 HART
Analog input 8 HART
Analog output 4 PT
Analog output 4 PT
Measurement point expansion for ”1731”
Measurement point expansion for ”1731”
Analog input 4
Binary calculator module, can be structured
Binary calculator module, can be structured
Expansion to ”1717”
Expansion to ”1717”
Expansion to ”1717”
Analog input 8
Analog input 4
Analog input 4 Thermo
Analog input 4 Thermo
Analog input 4 Thermo
Analog input 4 Thermo
3)
3)
3)
3)
5)
5)
5)
5)
5)
4) 5)
4) 5)
1) Transparent SIMATIC communication module - extended configuration.
2) These modules can also be configured in windows, by
entering a “6DS1310-8AA” for every MNO
(”Replacement configuration). In this way you can cover the
complete address area (512 or 1024 channels).
3) The text to be entered differs from MLFB (“6DS1613-8BB”).
4) TPM 478 processing time is higher than that of the driver (with 1717= 10/
18 ms without/with analog values; with 1318/1333 even higher,
depending on the load). Therefore, use a slow cycle (e.g. 1 s).
Alternative: ”Overload configuration” (refer to the section on processing
cycles).
5) With these modules it is imperative that the
processing cycle configured in DB 1 is faster than the PLC cycle of the
corresponding driver blocks.
6) In most cases the substitute configuration described in Chapter 4.7
must be used for these modules.
The table applies to PCS7/TM as of V1.00. Other modules compatible to the
ones mentioned above can be configured by entering the corresponding text
from the table.
4-16
Connecting TM I/O to PCS 7
C79000-G8076-C710-04
Configuration
4.9
FM456-4 configuration
4.9.1
Display elements of FM456-4
Table 4-4
LED’s
RUN
STOP
USR1
USR2
off
on
x
x
FM456 has stopped
(flashing SD LED: Boot sequence)
2 Hz
off
x
x
Restart / Startup
on
off
x
x
FM has booted and system SW is running
on
off
2 Hz
x
Startup sequence has started
on
off
2 Hz
2 Hz
TPM478-2 not found or disrupted
on
off
0.5 Hz
x
TPM478 is initialized,
configuration DBs are interpreted
on
off
0.5 Hz
2 Hz
on
off
off
0.5 Hz
on
off
off
2 Hz
on
off
off
off
Connecting TM I/O to PCS 7
C79000-G8076-C710-04
Meaning
Could not find or load module list BGRLISTE.TYP
TPM478-2: Startup error
Error in configuration DB1/2
Start of cyclic processing
Startup successful without error
4-17
Configuration
4.9.2
Diagnostics
The precise cause of error can be read from the diagnostic buffer of
FM456-4. It contains messages showing the event ID 16qA100 in the field
”Additional info 1” and an error number:
Table 4-5
Additional info 1
Meaning of the error messages
Additional
info 2
Additional
info 3
16qA001
No TPM478 module found
-
-
16qA002
TPM478 reset error
-
-
16qA003
TPM478 startup error
-
-
16qA004
No file BGRLISTE.TYP found
-
-
16qA005
No memory for module list
-
-
16qA006
Module list write error
-
-
16qA011
8 ms task configuration error
-
-
16qA012
8 ms task startup error
-
16qA013
Basic task commissioning error
-
-
16qA014
Basic task startup error
-
-
16qA015
Connection task commissioning error
-
-
16qA016
Connection task startup error
-
-
16qA017
Error 1 connection task startup
-
-
16qA018
Error 2 connection task startup
-
-
16qA019
Error 3 connection task startup
-
-
16qA01A
Error 4 connection task startup
-
-
16qA01B
Connection initialization error
-
-
16qA01C
Interrupt generating error
-
-
16qA01D
Error on direct write access to I/O
-
-
16qA01E
Basic task startup error
-
-
16qA01F
Semaphore commissioning error
-
-
16qA021
Missing configuration DB1
-
-
16qA022
Configuration DB1 too short
-
-
16qA023
Missing DB for S5 submodules
Module no.
-
16qA024
Unknown module type
Module no.
-
16qA025
No access method
Module no.
-
16qA026
Module number in use by other module
Module no.
-
16qA027
Wrong I/O method
Module no. Channel no.
16qA028
Wrong module type for S5 submodules
Module no. Channel no.
16qA029
Wrong channel number for S5 submodules
Module no. Channel no.
The additional info in the ”Additional info 2” or ”Additional info 3” fields
describes the module no. or channel number at which the error was recognized (hexadecimal format).
4-18
Connecting TM I/O to PCS 7
C79000-G8076-C710-04
Configuration
4.9.3
Reaction of the Output Modules in STOP or HALT State
With transition from RUN state to STOP or HALT state of the CPU41x the
values at the TELEPERM M output modules normally remain unchanged.
This reaction can be changed by configuration.
For that the following pseudo module has to be defined within DB1 of the
FM456-4:
Module type:
STOP:NULL_TO_OUT
Cycle:
n = 0 or 0 < n < 21, with:
n = 0 (default value): The last output values survive if the
CPU goes to STOP or HALT.
0 < n < 21:
4.9.4
If the CPU goes to STOP or HALT,
the outputs are set to zero if a corres
ponding setting has been done on the
module. On this (n-1) * 250 msec
will be waited between occurrence
of the STOP/HALT state and the
zero output.
If the CPU changes from the STOP/
HALT state to the RUN state during
this waiting period, the last output
state survives.
Diagnosis Function: Time Measurement at FM456-4
This function gives information about the FM456-4 load, and about the communication running times between CPU41x and FM456-4.
But the interpretation of this data can only be done by the TELEPERM M
support.
With the following configuration of a pseudo module within the DB1 data
block of the FM456-4 this diagnosis function can be switched on/off:
Module type:
DIAG_FM456***
Cycle:
n = 0 or n > 0, with:
n = 0 (default value): Diagnosis / time measurement
deactivated on the FM456-4.
n > 0:
Connecting TM I/O to PCS 7
C79000-G8076-C710-04
Diagnosis / time measurement activated
on the FM456-4.
4-19
Configuration
4.9.5
Mutual Monitoring between CPU and TPM 478-2
With the following configuration of a pseudo module within the DB1 data
block of the FM456-4 the mutual monitoring between CPU and TPM 478-2
can be switched on/off:
Module type:
TPM478:NO_WATCHD
Cycle:
n = 0 or n > 0, with:
n = 0 (default value): Monitoring is deactivated.
n > 0:
4-20
Monitoring is activated.
Connecting TM I/O to PCS 7
C79000-G8076-C710-04
5
Interface module TPM 478-2
What does this
Chapter describe?
This chapter describes system-specific functions of the interface module
TPM 478-2.
This description includes the following topics:
• Product overview
• Areas of application
• Structure
• Operating method
• Configuration
• I/O modules
• Ordering note
Contents
In these sections you find on the following pages:
In Chapter
Connecting TM I/O to PCS 7
C79000-G8076-C710-04
you find
on Page
5.1
Product overview
5-2
5.2
Fields of application
5-6
5.3
Structure
5-8
5.4
Operating method
5-11
5.5
Configuration
5-17
5.6
I/O modules
5-18
5.7
Ordering note
5-20
5-1
Interface module TPM 478-2
5.1
Product overview
Contents
This chapter provides a brief overview of the interface module TPM 478-2.
What is a
TPM 478-2?
TPM 478-2 is an interface module which is designed in M7-400 technology
of the SIMATIC M7 product family. It is an expansion unit for the central
module FM 456-4, for use with PCS7/TM PLCs.
The following functions are integrated in the TPM 478-2 interface module:
• TELEPERM M I/O functionality.
A highly efficient processor controls the access functions to
TELEPERM M I/O modules via a periodically updated process image.This process image fetches input process data and it writes them to the
outputs of the hardware I/O.
Process image data is transferred from the TPM 478-2 to the user program
via driver blocks.
• two I/O bus interfaces for the TELEPERM M basic and expansion cabinet
• I/O bus logic supply with a +5 V bus.
Application
options
5-2
The example below explains how you can use the interface module:
Connecting TM I/O to PCS 7
C79000-G8076-C710-04
Interface module TPM 478-2
Connecting
TELEPERM M I/O
The TPM 478-2 interface module connects existing TELEPERM M I/O hardware of the basic and expansion cabinet of an AS 220/230/235 system.
Here, the basic central unit is replaced by a preinstalled module rack - namely the migration rack - equipped with a PCS7/TM (supplemented by
TPM 478-2 and FM456-4 components).
Data are exchanged with existing expansion units via I/O bus A and B of
TPM 478-2 (connection via TPM 478-2 and migration rack. See Figure 5-1).
PROFIBUS /
Ethernet
Migration rack
TPM478-2
PCS7/TM
I/O bus A
PS
CPU416-2DP
I/O bus B
Basic cabinet
FM456-4
TPM
PS
CPU
CP443-5 /
CP443-1
Interface module
Power supply module
Central processing unit
Expansion cabinet
AS 220/230/235
Figure 5-1 TPM 478-2 for the connection of TELEPERM M I/O modules
Connecting TM I/O to PCS 7
C79000-G8076-C710-04
5-3
Interface module TPM 478-2
Elements of
TPM 478-2
All connecting and display elements of the TPM 478-2 interface module are
mounted on its front panel, see Figure 5-2.
FEA
LED displays
PAA
PAB
RUN
I/O bus B
connection
I/O bus A
connection
+
I/O bus
connection
SV: 5 V-Bus
-
X2
Connecting cable
TPM 478-2
Figure 5-2 Arrangement of the connections and display modules of the TPM 478-2
interface module
5-4
Connecting TM I/O to PCS 7
C79000-G8076-C710-04
Interface module TPM 478-2
Configuration,
general
Various parameters are required to operata a TPM 478-2 module. For standard TELEPERM-M I/O, these parameters describe the current hardware
configuration for the automation task.
I/O configuration parameters are declared in data blocks DB1 and DB2 of the
FM456-4, using the data block editor. You can load modified project data to
the System Memory Card with the help of SIMATIC Manager.
All updated project data are loaded on system restart.
Configuration of
TPM 478
The TPM 478-2 parameters are automatically configured by the PLC software on system startup.
Note
Data blocks DB1 and DB2 are configured in the data block editor of
SIMATIC Manager.
This software is included in the PCS7 system software package.
I/O bus
topology
Note:
I/O bus A and B correspond with the two I/O bus systems of the basic/expansion cabinet or with those of a K-system for two lines with ES 100K.
Here, I/O bus B is physically branched off bus A via bus amplifier. Blocking
disturbances as a result of an error on bus A therefore also affect bus B.
Functions of the
interface modules
The TPM 478-2 interface module provides the following functions:
• Interfaces:
– I/O bus interface to TELEPERM M I/O
• TPM 478-2 I/O functions compatible to the TELEPERM M bus interface
• future-oriented hardware and software on the basis of the SIMATIC M7
product family:
– integrated design technology M7-400
– integrated interface specification of the FM 456-4
(ISA bus/backplane bus)
– SMD technology
• low power loss as a result of energy-saving technologies
• operation without fan cooling
Standards
The modules conform with following guidelines, amongst others:
• CE
• UL/CSA
• FM
Connecting TM I/O to PCS 7
C79000-G8076-C710-04
5-5
Interface module TPM 478-2
5.2
Fields of application
Automation task
The brief overview below describes the solutions required of the TPM 478-2
module. The module is optional to the PCS7/TM PLC
and offers the following solutions:
• Connection of TELEPERM M I/O hardware
(via TPM 478-2 and migration rack).
TELEPERM M I/O
process peripherals
To operate your PLC with TELEPERM M I/O, you require the TPM 478-2
module. The PLC and the TPM 478-2 are installed in a so-called migration
rack.
TPM 478-2 delivers the process image of your configured I/O modules to the
TELEPERM M I/O bus. The module is equipped with two I/O bus interfaces
for interconnecting TELEPERM M basic/expansion cabinets, as well as with
a +5 V bus.
The migration rack is designed for optimal arrangement of the module interfaces in the cabinet, according to TELEPERM M regulations. The rack directly replaces the previous PLC basic unit in the cabinet.
Special advantage is the complete mechanical preassembly for installation in
the cabinet.
Caution
A PCS7/TM in the migration rack cannot be used to replace redundant
AS 220H or AS 235H systems.
Compact systems AS 220K, AS 230K, AS 235K cannot be replaced by a
PCS7/TM in their existing cubicles. In this case the assembly is carried out
as in a migration from AS 220/230.
Details on the migration rack are found in the description /32/.
Properties of
TPM 478-2
The TPM 478-2 interface module offers:
• an interface to the TELEPERM M I/O bus
• I/O functions compatible to the TELEPERM M I/O interface
• ISA bus interface of FM456-4
• Diagnostic display for TELEPERM M I/O modules
• process image controlling
• implementation of two TELEPERM M I/O busses A and B
• interface connection via bus connector to TELEPERM M I/O bus systems of the basic/expansion cabinet
• ”+5 V bus” interface for the supply of TELEPERM M expansion modules
(cabinet connections)
5-6
Connecting TM I/O to PCS 7
C79000-G8076-C710-04
Interface module TPM 478-2
• backplane bus interface for the supply of the +5 V bus from the PLC’s
power supply module
• future-oriented hardware and software basis with the SIMATIC M7 and
S7 product family
– integrated installation technology S7-400
– integrated interface specifications of the ISA bus systems on the
FM456-4 and backplane bus
– modern SMD technology
• low power losses as a result of energy-saving technologies
• Conformity with the standards:
– CE
– UL/CSA
– FM
Connecting TM I/O to PCS 7
C79000-G8076-C710-04
5-7
Interface module TPM 478-2
5.3
Configuration
Configuration,
general
The TPM 478-2 module represents an FM 456-4 interface module which provides options for connecting TELEPERM M I/O (see Figure 5-3).
TPM 478-2 is interconnected to FM 456-4 via ISA bus connector, mounted
on the side of the module. PCS7/TM system software uses this ISA bus to
exchange data with the TPM 478-2.
The two TELEPERM M I/O bus systems (A and B) are interconnected using
the two connectors of the TPM 478-2; the power supply for the logic is connected separately (+5 V). The latter is connected to the backplane bus and
supplied by the master power supply of the PCS7 system.
TPM 478-2 periodically transfers I/O values sent to and received from then
I/O bus systems and controls them in a process image.
PS
CPU
416-2DP
FM
456-4
TPM
478-2
Backplane bus
+5 V
I/O
bus B
I/O bus B
ISA bus (internal bus)
PS
CPU 416-2DP
TPM 478-2
Power supply module
CPU
Interface module
+5 V I/O bus A
I/O bus A
Figure 5-3 Configuration, general
5-8
Connecting TM I/O to PCS 7
C79000-G8076-C710-04
Interface module TPM 478-2
5.3.1
Configuration of the PCS7/TM with TELEPERM M I/O
TPM 478-2 in
PCS7/TM
Figure 5-4 below shows you the configuration of the TPM 478-2 interface
module in the PCS7/TM:
Special measures are required when routing cables from the TPM 478-2 to
I/O bus A and B. These measures are already taken care of in the design of
the migration rack (see Figure 5-5). You can allocate all five I/O modules in
migration rack II to I/O bus A, or you can distribute them on bus A and B
(e.g three on I/O bus A and two on I/O bus B). In addition, you can interconnect up to three expansion units (EU) of the basic cabinet or four ES 100 K
expansion systems to I/O bus A. To I/O bus B you can connect up to four
expansion units of an expansion cabinet or up to four ES 100 K (all fully assembled). Mixed system configurations per I/O bus are permitted with up to
4 EU/ES 100 K (e.g. 3 EU + 1 ES 100 K).
7
8
1
2
PROFIBUS
6
5
3
TELEPERM M I/O
1
2
3
4
5
6
7
8
5
4
TELEPERM M I/O
I/O module TPM 478-2
PROFIBUS (CP443) interface
I/O bus B
I/O bus A
+5 V Logic supply
Connecting cable TPM 478-2
Module rack with slots
FM 456-4
Figure 5-4 TPM 478-2 in PCS7/TM on PROFIBUS
Connecting TM I/O to PCS 7
C79000-G8076-C710-04
5-9
Interface module TPM 478-2
Note
You install, wire and fuse the PCS7/TM by yourself. We provide the migration rack (refer to the section below) for easy installation and use of the modules. Details on PCS7/TM and migration racks, as well as connectable
hardware I/O modules are found in descriptions /2/ and /4/.
Migration rack
The migration rack is a preassembled module rack equipped with an integrated SIMATIC S7/M7-400 backplane bus, and with dimensions according to
the installation system ES 902 used in TELEPERM M cabinet systems. It
holds the configuration described in Figure 5-5 and is equipped with readyto-use cables and integrated fusing for L+ 24 V/16 A. I/O bus A and B can be
connected at the rear of the migration rack with the help of the two ribbon
cable connectors.
TPM 478-2 in the migration rack processes I/O bus A and B on which you
can operate up to seven TELEPERM M expansion units EU (3 on A; 4 on B)
or up to eight ES 100 K expansion systems (4 on A, 4 on B). Expansion units
and ES 100 K systems can also be operated on both I/O bus systems in mixed
mode, with max. 4 EU/ES per I/O bus).
Typical configurations are:
• 3 EU and 1 ES 100 K per I/O bus A and B
• at least 1 EE, and thus up to 3 ES 100 K on bus A and B
• 3 EUs of an AS 230-/AS 235 basic cabinet on bus A and 3 EU of an
AS 230-/AS 235 expansion cabinet on bus B (se Figure 5-5).
1
4
3
PROFIBUS / Ethernet
2
I/O bus A
1
2
3
4
EU
TPM 478-2 interface module
Migration rack
MO
PROFIBUS / Ethernet connection
Communication processor CP 443-5 / 443-1
14 MO
EU1
14 MO
EU5
14 MO
EU2
14 MO
EU6
14 MO
EU3
14 MO
AS 235: Basic cabinet
PCS 7/TM
EU4
Expansion cabinet
I/O bus B
Expansion units
Modules
Figure 5-5 Migration rack
5-10
Connecting TM I/O to PCS 7
C79000-G8076-C710-04
Interface module TPM 478-2
5.4
Operating method
Function,
general
The task of a TPM 478-2 interface module is to integrate the functions of
existing TELEPERM M I/O into a PCS7/TM.
Below we shall explain the general functions of the interface module.
Function of
TPM 478-2
Figure 5-6 shows a reduced block diagram of the TPM 478-2 interface module function. The function blocks are explained below.
ISA bus to FM456-4
Backplane bus S7/M7-400
+5 V
+5 V
TPM 478-2
Interface to ISA bus and interface logic
I/O processor
I/O bus interface
Bus A / Bus B
+5 V
TELEPERM M I/O
Figure 5-6 TPM 478-2 function
Connecting TM I/O to PCS 7
C79000-G8076-C710-04
5-11
Interface module TPM 478-2
Interface to the ISA
bus/backplane bus
The interface establishes the interconnection between the ISA bus and FM
456-4, independent of the backplane bus. It contains the interface for data
transfer.
The interface logic controls access to the RAM address area of FM 456-4.
This interface handles all data accesses as well as the TPM 478-2 parameters.
I/O processor
The KI/O processor consists of an 80C186 CPU, the I/O bus logic as well as
RAM and FEPROM chips. It interconnects the ISA and I/O bus interfaces.
The TPM 478-2 interface module establishes the connection to the I/O bus
system and controls the process image which is updated at every cycle. The
module also splits the I/O bus system into I/O bus A and B.
Function of
TPM 478-2
Figure 5-7 shows the functions of the interface module in a simplified form.
The various function blocks are described at a later point.
Interface (Process image)
Bus driver
+5 V (from backplane bus)
I/O bus
Bus driver
I/O bus A
I/O bus B
Figure 5-7 Function of TPM 478-2
Interface to the
I/O bus
The I/O bus interface is located on the TPM 478-2. The TPM 478-2 interface
module manages the process image and executes specific I/O instructions
required for generating the process image for TELEPERM M I/O modules.
These I/O instructions are decoupled and transferred to the I/O modules via
I/O bus A and B.
Bus drivers
The bus driver amplifies the signal for I/O bus B.
5-12
Connecting TM I/O to PCS 7
C79000-G8076-C710-04
Interface module TPM 478-2
Power supply to
I/O bus A and B
The interface module draws a 5-V power supply from the system’s backplane
bus and distributes it at two points to the expansion units of the respective
TELEPERM M I/O bus A and B.
Parameter assignment
TPM 478-2 is addressed and assigned its parameters automatically on system
startup by the configuration parameters for TELEPERM I/O (in the PCS7/
TM).
Configuration
parameters
Enter configuration parameters as follows:
Configuration parameters for
TELEPERM M I/O
Normal mode
Tool
Data block editor in SIMATIC-Manager
During operation SIMATIC Manager controls TPM 478-2 operations for the
configuration of TELEPERM M I/O.
Operator actions are not required. The jobs are processed by TPM 478-2 periodically. Changes can be effected in SIMATIC Manager. See Figure 5-8.
Access methods:
WinCC
SIMATIC Manager
CPU 416–DP
FM 456-4 / TPM 478-2
Figure 5-8 Access methods of TPM 478-2
Connecting TM I/O to PCS 7
C79000-G8076-C710-04
5-13
Interface module TPM 478-2
5.4.1
Implementation of TELEPERM M I/O in PCS7/TM
Function of
TPM 478-2
The TPM 478-2 interface module allows you to connect TELEPERM M
I/O to a PCS7/TM.
The general function is shown in Figure 5-9.
Startup behavior
of TELEPERM M
I/O peripherals
The TPM478-2 module periodically generates a process image of its connected TELEPERM M I/O. Here, the configuration parameters are fetched from
PCS7/TM system memory (System Memory Card) and then processed periodically by TPM 478-2.
You have declared these configuration parameters with the help of SIMATICManager. For additional notes refer to Technical Data /2/. On successful startup the LED ”RUN” on TPM 478-2 lights up.
If problems arise, refer to Table 5-1 and 5-2.
PCS7/TM
SIMATIC-Manager
Configuration parameters
TPM 478-2
Process image
Process image A
Process image B
I/O bus
I/O bus A
TELEPERM M I/O
I/O bus B
TELEPERM M I/O
Figure 5-9 Startup behavior of TELEPERM M I/O
5-14
Connecting TM I/O to PCS 7
C79000-G8076-C710-04
Interface module TPM 478-2
TPM 478-2:
Diagnostics of
I/O communication
At every startup of PCS7/TM, the TPM 478-2 software performs an initialization and self-test routine.
LEDs 6-10 on the TPM 478-2 front panel provide information on operation
and startup behavior of I/O communication, thus enabling quick diagnostics
if an error occurs. The I/O startup behavior of TPM 478-2 is shown in Table
4-1 (sequence from left to right).
The table shows only some of the important phases. Depending on the PLC
software version and user structure, there are additional dark phases. In every
situation only the RUN LED is lit after startup of the I/O bus system (cyclic
operation).
Table 5-1
Meaning
Coordination
Display
Initialization/Selftest
I/O bus system startup
EIO (red)
0
0
0
0
0
0
PQA (yellow)
0
x
x
0
x
0
PQB (yellow)
0
0
x
x
x
0
RUN (green)
0
0
0
0
x
x
0 ¢ LED is OFF
x ¢ LED is ON
Coordination
The fast coordination phase is hardly perceptible.
Initialization/
Selftest
After a successful init/self-test phase, TPM 478-2 performs the startup of the
I/O bus system.
If an error is detected, TPM 478-2 interrupts startup and goes into STOP (red
LED EIO is lit). TPM 478-2 is defective if it stays in STOP state even after
several reset operations. When you return a defective module to the Electronics Plant in Karlsruhe (EWK), Germany, specify which error displays have
occurred. See Table 5-2.
Table 5-2
Error displays on startup
Meaning
Display
Error in
local
RAM
DPRAM Address
error
bus error
Program
memory
error
Watchdog error
EIO (red)
x
x
x
x
x
PQA (yellow)
x
0
x
0
x
PQB (yellow)
0
x
x
0
x
RUN (green)
0
0
0
0
x
0 ¢ LED is ON
x ¢ LED is OFF
Connecting TM I/O to PCS 7
C79000-G8076-C710-04
5-15
Interface module TPM 478-2
Startup of the I/O
bus system
The RUN LED indicates successful startup. The I/O bus system operates in
cyclic mode, that is, the process image is updated periodically.
Meaning of status
and error displays/
diagnostics:
I/O communication
Table 5-3 describes the status and error displays relevant to I/O response.
They are listed in the order of their arrangement on the TPM 478-2 interface
module. TPM 478-2 is equipped with the following status and error displays:
Table 5-3
Status and error displays for cyclic operation
Display
5-16
Meaning
EIO (red)
Reserve
PQA (yellow)
Reserve
PQB (yellow)
Reserve
RUN (green)
active
Description
cyclic mode, the process image is updated at every cycle
Connecting TM I/O to PCS 7
C79000-G8076-C710-04
Interface module TPM 478-2
5.5
Configuration
As TPM 478-2 is configured by the PCS7/TM system, a special configuration
of this module is not required.
TPM 478-2 is configured automatically at system startup.
The Object Manager (OM) included in the TPM 478-2 module package must
be installed on the PCS7 system prior to initial commissioning.
Insert the installation disk in your floppy drive and run Setup. Follow the
on-screen instructions. After installation, the module is available in HW Config in SIMATIC-Manager, under SIMATIC 400, M7 Extensions.
Further notes on configuration is found in the Technical Data: Basic Software
for S7 and M7-STEP7 /231/, Order No. C79000-G7000-C502.
Connecting TM I/O to PCS 7
C79000-G8076-C710-04
5-17
Interface module TPM 478-2
5.6
I/O modules
Table 5-4 lists all TELEPERM M I/O modules you can operate in a
TELEPERM M expansion unit or in an ES 100 K expansion system on
PCS7/TM.
Table 5-4
Available TELEPERM M I/O modules
Designation
MLFB
Compatible, approved
versions
Controller modules
S-controller, single-channel
6DS1400-8BA
...-8AA
K-controller, single-channel
6DS1401-8BA
...-8AA
S-controller, dual-channel
6DS1402-8BA
...-8AA
K-controller, dual-channel
6DS1403-8CA
...-8AA;...-8BA;...-8CB
1 motor or 1 solenoid valve
6DS1500-8BA
...-8AA
1 positioning drive without RM
6DS1501-8BA
...-8AA
1 positioning drive with RM
6DS1501-8BB
...-8AB
Motors/solenoid valve, 3-channel
6DS1502-8BA
...-8AA
Positioning drives, 3-channel
6DS1503-8BA
...-8AA
4 control devices + 1 idle position
6DS1504-8AA
8/4 control devices + 2 idle
positions
6DS1505-8AA
Single control modules
Calculator modules
Binary calculator module
6DS1717-8AA
...-8RR
Binary expansion module
6DS1719-8AA
...-8RR
Analog expansion module
6DS1720-8AA
Signal modules/BE
16 BE
6DS1600-8AA
48 BE
6DS1601-8BA
...-8AA;...-8AC
32 BE
6DS1602-8BA
...-8AA
48 BE, 24 VDC/48 VDC
6DS1615-8AA
8 changeover contacts
6DS1620-8AA
8 proximity switches
6DS1621-8AA
Signal modules/BA
5-18
32 BA
6DS1603-8BA
16 BA
6DS1604-8AA
16 Relays
6DS1605-8BA
...-8AA;...-8AB;...-8RR
...-8AA
Connecting TM I/O to PCS 7
C79000-G8076-C710-04
Interface module TPM 478-2
Table 5-4
Available TELEPERM M I/O modules
Designation
MLFB
Compatible, approved
versions
Signal modules/AE
8 AE, galvanically separated
6DS1700-8BA
...-8AA;...-8AB;...-8BB;
6DS1701-8AA;...-8AB
8 AE, not galvanically separated
6DS1730-8AA
4 AE
6DS1731-8AA
...-8RR
4 AE, +
6DS1731-8BA
...-8RR
4 EEPROM
6DS1731-8EA
...-8RR
4 + EEPROM
6DS1731-8FA
...-8RR; 6DS1713-8AB
14 Thermal elements
6DS1703-8AB
...-8RR
4 AE
6DS1731-8RR
Signal modules/AA
4 AA
6DS1702-8AA
...-8RR
Counter modules
8 channels
6DS1607-8AB
Dosing meter modules
2 or 4 channels
6DS1613-8BB
-8AB
Communication modules
S5-110A, 4-channel
6DS1310-8AA
S5-110A, single-channel
6DS1310-8AB
S5-115/135/150, dual-channel
6DS1321-8AA
S5 central cabinet, dual-channel
6DS1318-8AB
6DS1333-8AB
S5 transparent, dual-channel
6DS1327-8AA
ES 100K on TM IO BUS
6DS1322-8AA
CP 581 TM
6DS1318-8AB
6DS1341-1AD;
6DS1337-1AD
Not available:
– Field multiplexer, FM driver
– Testable BI/BQ; DR; SIPART.
Connecting TM I/O to PCS 7
C79000-G8076-C710-04
5-19
Interface module TPM 478-2
5.7
Note on orders
Order number
The order number for the TPM 478-2 module is found in table 5-5, e.g. for
ordering spare parts.
Table 5-5
5-20
Order number
Product
Description
Order No.
TPM 478-2
Interface module TPM 478-2
6ES7478-2DA10-0AC0
Connecting TM I/O to PCS 7
C79000-G8076-C710-04
6
Migration rack II
What dows this
Chapter describe?
This chapter provides information on migration rack II and its use on
PCS7/TM.
Contents
This is found on the following pages:
In Chapter
Connecting TM I/O to PCS 7
C79000-G8076-C710-04
you find
on Page
6.1
Product overview
6-2
6.2
Wiring
6-5
6.3
I/O bus system
6-7
6.4
Connector pin-out
6-10
6.5
Operating conditions
6-14
6-1
Migration rack II
6.1
Product overview
6.1.1
Use of the migration rack on PCS7/TM
What is
migration rack II?
Migration rack II is a preassembled module rack equipped with an integrated SIMATIC S7/M7-400 backplane bus, with the dimensions of the panelmount system ES 902. It is absolutely required for operation of a PCS7/TM
system in a TELEPERM M cabinet.
All system components can be operated on the slots of the short backplane
PCB, e.g the DC power supply, CPU, FM456-4 and I/O bus interface.
Migration rack II also provides five slots for TELEPERM M I/O modules
taken from an AS 220 S-/AS 235 basic unit. These five I/O slots can be freely
assigned to I/O bus A and B.
Features
For the PCS7/TM system, migration carrier II provides five TELEPERM M
I/O slots for TELEPERM M I/O modules taken from an AS 220 S-/AS 235
basic cabinet. All these slots can be operated on I/O bus A or in a 3 : 2 ratio
on I/O bus A and B.
Another feature is the simplified wiring (supply and process control messages) and the possibility of replacing certain mechanical components (connectors) in case of error.
The wiring features no loose ends, that is, the installation technique is adapted to AS 230/235.
The integrated backplane also provides distribution of specific signals and
voltages. Same as in AS 235, the 24-V supply lines are terminated on pressfit nuts with hex bolts. The 5-V supply of the I/O bus is integrated in the
backplane, the wiring can be distributed from there. Process control monitoring signals are now terminated on the backplane terminal blocks - same as in
the AS 235. The existing cabinet wiring can be used almost completely.
The front panel-mount fuses for L+ (16A) and PM (4A) can be replaced from
the front in case of error. Due to the fastening mechanism on the side, the I/O
bus connectors can be replaced in case of error without having to remove the
migration rack.
The migration rack is equipped with by-pass capacitors for the L+, PM, M24
and MZ voltages for the derivation of electrical disturbance to the shielding
and, thus to the metal case.
All position addresses of the slots are equipped with filters.
6-2
Connecting TM I/O to PCS 7
C79000-G8076-C710-04
Migration rack II
PS
405
CPU
416
FM
456
TPM
478-2
CP
443
SIMATIC PCS7
with
TELEPERM M E/A
Figure 6-1 Front view of Migration Rack II (without wiring)
Connecting TM I/O to PCS 7
C79000-G8076-C710-04
6-3
Migration rack II
Migration rack II
Figure 6-2 Rear view of migration rack II
6-4
Connecting TM I/O to PCS 7
C79000-G8076-C710-04
Migration rack II
6.2
Wiring
6.2.1
Supply and signals
Power supply,
chassis ground
The power supply L+ and M24 from the W row is screw - terminated on the
1L+ and M24 screw terminals. The second 1L+ is wired to the two fuses
(16 A and 4 A). The fused voltages PM (4 A) and L+ (16 A) are screw-fastened on the respective press-fit nuts. Here you also find the connector for the
round cable which is wired to the M7 power supply.
The 5-V bus supply from TPM 478-2 is terminated on the 5 V and 0 V terminals.
Here you also interconnect 0V and M24 if this connection does not exist at
another location (0-V block). (Mandatory connection!)
Existing MZ or BS can be terminated on the respective press-fit nuts.
See also Figure 1-1 and “Grounding conception” in Chapter 2.2
PCM signals
A patch cord equipped with sub-D connectors on both ends is used to connect
Process Control Monitoring signals, inserted and secured on X30.
The load power supply L+ - of the DIO module is routed across a so-called
“Multi-Fuse”, in order to separate the system from the DIO if an error occurs
( e.g. short-circuit in the DIO connector).
Outputs are available on the screw terminals X31, X32 and X33, inputs on
X35, X36 and X37.
Cable routing
All cables are routed through the front and rear cable duct and, as far as required, secured in appropriate places with cable ties.
6DS1000
The power supply modules 6DS1000-... inserted in the EUs serve two major
purposes:
Supply of one or multiple EUs with fused L+ and PM,
as well as for the supply of modules via +5 V bus.
After installation of the PCS7/TM, you must switch off the front panel PS
switches for the +5 V bus system of 6DS1000. The assigned error LED is
irrelevant (can be covered up).
Connecting TM I/O to PCS 7
C79000-G8076-C710-04
6-5
Migration rack II
6.2.2
Grounding
Grounding
conception,
referencing
For the operation of a PCS7/TM in the migration rack with TELEPERM M
I/O modules, the TELEPERM M Installation Guidelines in the Manual
“TELEPERM M, Notes and Guidelines on Planning, Installation and Operation”, Order No. C79000-G8076-C417 apply.
Information on grounding conception is found there in Chapter 7.2, as well as
in the “AS 235 User Manual”, Order No. C79000-G8076-C295, Operating
instructions C79000-B8076-C295, Chapter 4.2, 4.3 and 4.3.1.
Protective earth
According to DIN VDE 0150, Section. 3.2.1, multiple grounding of plants
with DC power supply is not allowed for reason of stray corrosion. For this
reason, migration systems must have only one galvanic connection between
local earth and M24. That is, although shielding and protective ground are
respectively connected to local earth via shielding busbar and cabinet grounding bolt, chassis ground M24 is only connected to local earth at one point in
the system. That is, at the “Central Grounding Point“ - CGP - that applies to
all TELEPERM M systems of this plant.
According to “S7-400, M7-400 PLCs, Order No. C79000-G7076-C410”,
Chapter 4.6 and 4.7, the preassembled galvanic connection between M24 and
local earth related to the cabinet must be disconnected to establish a floating
potential assembly.
Grounding plate
The grounding plate between M24 and local earth is located on the left side
of module rack UR2.
Figure 6-3 Grounding plate
6-6
Connecting TM I/O to PCS 7
C79000-G8076-C710-04
Migration rack II
6.3
6.3.1
I/O bus system
Configuration of the I/O bus system
I/O bus A and B
Connection and termination of the 50-pole ribbon cables can vary, depending
on requirements.
Version 1: Bus A with 5 slots
Version 2: Bus A with 3 and bus B with 2 slots
Version 3: Bus A with 2 and Bus B with 3 slots
Version 4: Bus B with 5 slots
Of importance are only versions 1 and 2. These can be realized easily with
suitable ribbon cable connectors.
to version 1:
• Mount the ribbon cable for bus A on the upper mounting point
• Connect the ribbon cable connector to X34 and X12 by using a
C79451-A3496-D1 cable and 4 ribbon cable connectors (also for standalone use) or by crimping two additional ribbon connectors onto an existing cable (system substitution) (see Figure 4-2)
to version 2:
• Mount the ribbon cable for bus B on the upper mounting point
• Connect the bus B ribbon cable connector to X34 by using the first one of
two C79451-A3496-D2 cables with three ribbon cable connectors (also
for stand-alone use) or crimping an additional ribbon cable connector
onto an existing cable (system substitute to expansion cabinet)
• Mount the ribbon cable for bus A on the upper mounting point
• Connect the bus B ribbon cable connector to X12 by using the second one
of two C79451-A3496-D2 cables with three ribbon cable connectors (also
for stand-alone use) or crimping an additional ribbon cable connector
onto an existing cable (system substitute to basic cabinet)
Note:
The ribbon cable must be folded twice.
Note:
C79451-A3496-D2 consists of two ribbon cables.
to version 3:
• analog to 2.
to version 4:
• analog to 1.
Note
The specified C79451-A3496-D1 or -D2 ribbon cable sets are not part of the
migration rack.
Connecting TM I/O to PCS 7
C79000-G8076-C710-04
6-7
Migration rack II
6.3.2
Configuration of the I/O slots
Terminating resistors
The I/O slots are separated electrically and, with regard to signals, in a 3 : 2
ratio. This is why they can be configured separately. This includes the specification of position numbers as well as activation of pull-up resistors for
stand-slone applications.
Slots 1, 2 and 3 (Bus A) are wired to ribbon cable connector X12, slots 4 and
5 (Bus B) to ribbon cable connector X34.
To activate the pull-up resistors for stand-alone mode, insert the jumpers according to the table below.
You can reach the jumpers from the front (see Figure 6-6).
Jumper
X52
X52
Pull-up
1-3
ON
3-5
OFF
2-4
ON
4-6
OFF
Jumper
X53
X53
PMEMW_N_A
Pull-up
1-3
ON
3-5
OFF
2-4
ON
4-6
OFF
Signal
PMEMR_N_A
Signal
PMEMR_N_B
PMEMW_N_B
The pull-up resistors are switched off by default.
Caution
Do not switch on the pull-up resistors if you connect an expansion unit EU
or an ES 100 K expansion system!
6-8
Connecting TM I/O to PCS 7
C79000-G8076-C710-04
Migration rack II
Slot addresses
Two jumpers are available on every bus for setting the slot addresses for operation with TELEPERM-ME modules. The table below shows the respective
slot addresses.
These jumpers can also access from the front.
Bus A / Bus B
Position address
A10
A11
x
x
0
x
x
0
0
0
SL 1
13/113
29/129
45/145
61/161
Slot address
SL2
14/114
30/130
46/146
(62/162)
SL3
15/115
31/131
47/147
(63/163)
BUS A / Bus B
Position address
A10
A11
x
x
0
x
x
0
0
0
Slot address
SL 4
14/114
30/130
45/145
(62/162)
SL5
15/115
31/131
46/146
(63/163)
x = Jumper inserted
0 = Jumper not inserted
(62/162) =
unusable or impermissible combination,
SL can be used with bridge addresses.
Caution
Depending on the setting, you might create slots with the same slot address.
Double addressing must be prevented with an appropriate configuration.
Connecting TM I/O to PCS 7
C79000-G8076-C710-04
6-9
Migration rack II
6.4
6.4.1
6.4.2
Connector pin-out
Pin-out 64-pole G-connector, all slots
Pin
f
d
b
z
30
nc
BS
PM
MZ
32
L+
L+
M24
M24
Pin-out X30, 25-pole Sub-D connector, process control signals
Pin
Signal
1
free
3
DO6
5
Meaning
Pin
Signal
Meaning
2
DO7
AM 3
Watchdog trigger
4
DO5
AM 2
DO4
AM 1
6
L+
= 24 VDC for DO 4...DO 7
7
M24
= M24 for DO 4...DO 7
8
DO3
Reserve message output
9
DO2
Message output for horn
10
DO1
PCM signal OUTPUT cabinet
lamp CL
11
DO0
Reserve message output
12
L+
=24 VDC load power supply for
DO 0...DO 3, fused
13
M24
= M24 for DO 0... DO 3
14
M24
= M24 for DI 0 and DI 1
15
DI0
Reserve message input
16
DI1
INPUT LK 1
17
M24
= M24 for DI 2, DI 3
18
DI2
INPUT Monitor T 1
19
DI3
INPUT TK 1
20
M24
= M24 for DI 4 and DI 5
21
DI4
Message input
Bus redundancy display
22
DI5
Horn acknowledgement
23
M24
= M for DI 6 and DI 7
24
DI6
EM 1
25
DI7
EM2
Signal image: see X31 ... X33, X35 ... X37 in Section 4.3
Note
Pins 6, 7, 12, 13, 14, 17, 20, 23 are pre-wired.
6-10
Connecting TM I/O to PCS 7
C79000-G8076-C710-04
Migration rack II
Migration rack connector panel
X35
X36
X37
X31
X11
X8
X32
MZ
PM
X14
M24
X9
DQ7
M24
DQ6
M24
DO4
DQ2
DQ1
M24
X10
DQ0
Dl7
X13
1L+
DQ5
1L+
DQ3
L+
Dl6
Dl4
Dl3
X7
Dl2
X6
Dl1
0V
Dl0
5V
Dl5
6.4.3
X33
X15
BS
X16
X30
Figure 6-4 Migration rack connector panel
Signals on X31 ... X33, X35 ... X37: see section 4.2
Note
Connections X33-M24 and X37-M24 are general purpose outputs.
Connecting TM I/O to PCS 7
C79000-G8076-C710-04
6-11
Migration rack II
6.4.4
Rear view of the bus PCB
X12
X34
5V , 0V
from TBX
X6
X7
X35
X36
to
L+
M24
L+ to from SES F1 + F2from SES
16A /4A
M7 PS
X13
X37
X10
X31
X9
X32
X11
X33
M24 to
M7 PS
MZ
X8
X14
PM from
BS
F 4A
X15
X16
X30
Figure 6-5 Rear view of the bus PCB
6-12
Connecting TM I/O to PCS 7
C79000-G8076-C710-04
Migration rack II
6.4.5
Front view of the bus PCB
A
1
PMEMR_N_A
PMEMW_N_A
_
B
2
5
6
X52
B
_
N
_
R
M
AE
M
1P
5
B
_
N
_
W
M
E
MB
P 2
6
X53
A
BGNR
= 13
BGNR
= 14
X1 X12 X2
X81
BGNR B
= 15
A10
A11
A10 BGNR
A11
= 130
X51
X3
BGNR
= 131
X4 X34 X5
X82
X16 X15 X14 X8 X11 X9 X10 X13 X7
X80
X6
X83
Default TM bridge setting for I/O bus A and B
Figure 6-6 Front view of the bus PCB
Connecting TM I/O to PCS 7
C79000-G8076-C710-04
6-13
Migration rack II
6.5
Operating conditions
PCS7/TM with
TELEPERM M I/O:
You can use all TELEPERM I/O modules listed in ”Supplementary System
Documentation AS 388/TM and AS 488/TM”, Order No.
C79000-G8076-C700, Catalog PLT 112 and those published on the Intranet/
Internet TELEPERM M site.
Special notes:
Expansion units
Migration rack II, together with TPM 478-2, is approved for operation with
up to seven expansion units (3 in the basic cabinet, 4 for in the expansion
cabinet). The ribbon cable must be adapted as required.
If you include 1 to 4 ES 100 K per I/O bus, the max. number of addressable
I/O module racks is 2 x 4 EU/ES.
CP 581-TM
The module CP 581-TM can only be operated on a PCS7/TM in combination
with S5Kx drivers.
You can operate only one module of the type CP 581-TM per configuration
(migration rack plus basic cabinet plus expansion cabinet) (5-V supply condition). You cannot operate an additional N.V-24.
LED
Errors/failures/disturbances of the I/O bus system are not indicated by LEDs
on TPM 478-2. This can be recognized, for example, on driver failure
messages.
6-14
Connecting TM I/O to PCS 7
C79000-G8076-C710-04
A
Technical Data
In this
Appendix A
Appendix A treats the following topics:
In Chapter
Connecting TM I/O to PCS 7
C79000-G8076-C710-04
you find
on Page
A.1
Technical data of the TPM 478-2 interface module
A-2
A.2
Connector and socket pin-out of TPM 478-2
A-4
A-1
Technical Data
A.1
Technical data of the TPM 478-2 interface module
Logic characteristics data
Circuit structure:
• Microprocessors
– I/O processor: 80C186
Memory:
• RAM: 32 Kbytes
• FEPROM: 256 Kbytes
Interfaces:
• ISA bus
– parallel
– 16-bit data bus
– 24-bit address bus
• I/O bus
– parallel 8-bit data bus
– transmission speed approx. 300 Kbps
– max. 4 x 14 (+ 5) I/O modules on one I/O bus (A/B)
– Double address monitoring via One-Of-n-Check (OONC)
– Access monitoring via RDY
– External power supply (5-V bus) for module bus logic
Electrical data
Operating values:
• Power supply + 5 V " 5 %
• rated current 0.5 A
• Power loss 2.5 W
Interfaces
I/O bus A
I/O bus B
+5 V I/O bus
Mechanical data
Dimensions:
• Mounting width 2 mounting positions (50 mm)
• Height 290 mm
• Depth 210 mm.
Weight: 1.5 kg
A-2
Connecting TM I/O to PCS 7
C79000-G8076-C710-04
Technical Data
Ambient
conditions
Ambient conditions:
• Temperature range: 0 to +60 °C
• Storage temperature: -40 to +85 °C.
Type of protection: IP 20 to IEC 536
Standards
The module conforms to following guidelines, amongst others:
• CE
• UL/CSA
• FM
Connecting TM I/O to PCS 7
C79000-G8076-C710-04
A-3
Technical Data
A.2
TPM 478-2 connector and socket pin-out
Pin-out
The left side of the TPM 478-2 module front panel is equipped with a
50-pole Sub-D socket for connecting the I/O bus cable. I/O bus A and B are
connected respectively to the two 50-pole Sub-D sockets in the right section.
Refer to Table A-1 to A-3 for details on pin-out.
A-4
Connecting TM I/O to PCS 7
C79000-G8076-C710-04
Technical Data
Table A-1
Pin-out of the 50-pole-Sub-D socket at the left side of TPM 478-2, for
connecting the I/O bus
I/O bus
Connecting TM I/O to PCS 7
C79000-G8076-C710-04
ÍÍÍÍÍÍÍÍÍÍÍ
ÍÍÍÍÍÍÍÍÍÍÍ
ÍÍÍÍÍÍÍÍÍÍÍ
ÍÍÍÍÍÍÍÍÍÍÍ
17
1
50
18
Socket
Signal
1
0V
2
0V
3
+5 V Bus
4
+5 V Bus
5
+5 V Bus
6
+5 V Bus
7
+5 V Bus
Meaning
8
+5 V Bus
9
PMEMR_N
Peripheral Memory Read
10
PMEMW_N
Peripheral Memory Write
11
0V
12
-
nc
13
PRDY_N
Peripheral Ready
14
PESPA
Peripheral memory A
15
-
nc
16
PCPKL_N
Peripheral CPU clear
17
0V
18
INT1_N
19
INT2_N
Interrupt 2
20
PESPB
Peripheral memory B
Interrupt 1
21
-
nc
22
EANK_N
One-Of-N-Check
23
0V
24
PDB6
Peripheral Data Bus 6
25
PDB7
Peripheral Data Bus 7
26
PDB2
Peripheral Data Bus 2
27
PDB3
Peripheral Data Bus 3
28
PDB4
Peripheral Data Bus 4
29
PDB5
Peripheral Data Bus 5
30
PDB0
Peripheral Data Bus 0
31
PDB1
Peripheral Data Bus 1
32
0V
33
0V
34
PADB9
Peripheral Address Bus 9
35
PADB10
Peripheral Address Bus 10
36
PADB11
Peripheral Address Bus 11
37
PADB3
Peripheral Address Bus 3
38
PADB4
Peripheral Address Bus 4
39
PADB5
Peripheral Address Bus 5
40
PADB6
Peripheral Address Bus 6
41
PADB7
Peripheral Address Bus 7
42
PADB8
Peripheral Address Bus 8
43
PADB0
Peripheral Address Bus 0
44
PADB1
Peripheral Address Bus 1
45
PADB2
Peripheral Address Bus 2
46
0V
47
-
nc
48
-
nc
49
-
nc
50
0V
A-5
Technical Data
Table A-2
Pin-out 50-pole-Sub-D socket at the right side of TPM 478-2, for connecting I/O Bus A
I/O bus A
A-6
ÍÍÍÍÍÍÍÍÍÍÍ
ÍÍÍÍÍÍÍÍÍÍÍ
ÍÍÍÍÍÍÍÍÍÍÍ
ÍÍÍÍÍÍÍÍÍÍÍ
17
1
50
18
Socket
Signal
1
0V
2
0V
3
+5 V Bus
4
+5 V Bus
5
+5 V Bus
6
+5 V Bus
7
+5 V Bus
Meaning
8
+5 V Bus
9
PMEMR_N
Peripheral Memory Read
10
PMEMW_N
Peripheral Memory Write
11
0V
12
-
nc
13
PRDY_N
Peripheral Ready
14
PESPA
Peripheral memory A
15
-
nc
16
PCPKL_N
Peripheral CPU clear
17
0V
18
INT1_N
19
INT2_N
Interrupt 2
20
PESPB
Peripheral memory B
Interrupt 1
21
-
nc
22
EANK_N
One-Of-N-Check
23
0V
24
PDB6
Peripheral Data Bus 6
25
PDB7
Peripheral Data Bus 7
26
PDB2
Peripheral Data Bus 2
27
PDB3
Peripheral Data Bus 3
28
PDB4
Peripheral Data Bus 4
29
PDB5
Peripheral Data Bus 5
30
PDB0
Peripheral Data Bus 0
31
PDB1
Peripheral Data Bus 1
32
0V
33
0V
34
PADB9
Peripheral Address Bus 9
35
PADB10
Peripheral Address Bus 10
36
PADB11
Peripheral Address Bus 11
37
PADB3
Peripheral Address Bus 3
38
PADB4
Peripheral Address Bus 4
39
PADB5
Peripheral Address Bus 5
40
PADB6
Peripheral Address Bus 6
41
PADB7
Peripheral Address Bus 7
42
PADB8
Peripheral Address Bus 8
43
PADB0
Peripheral Address Bus 0
44
PADB1
Peripheral Address Bus 1
45
PADB2
Peripheral Address Bus 2
46
0V
47
-
nc
48
-
nc
49
-
nc
50
0V
Connecting TM I/O to PCS 7
C79000-G8076-C710-04
Technical Data
Table A-3
Pin-out 50-pole-Sub-D socket at the right side of TPM 478-2, for connecting I/O Bus B
I/O bus B
Connecting TM I/O to PCS 7
C79000-G8076-C710-04
ÍÍÍÍÍÍÍÍÍÍÍ
ÍÍÍÍÍÍÍÍÍÍÍ
ÍÍÍÍÍÍÍÍÍÍÍ
ÍÍÍÍÍÍÍÍÍÍÍ
17
1
50
18
Socket
Signal
1
0V
2
0V
3
+5 V Bus
4
+5 V Bus
5
+5 V Bus
6
+5 V Bus
7
+5 V Bus
Meaning
8
+5 V Bus
9
PMEMR_N
Peripheral Memory Read
10
PMEMW_N
Peripheral Memory Write
11
0V
12
-
nc
13
PRDY_N
Peripheral Ready
14
PESPA
Peripheral memory A
15
-
nc
16
PCPKL_N
Peripheral CPU clear
17
0V
18
INT1_N
19
INT2_N
Interrupt 2
20
PESPB
Peripheral memory B
Interrupt 1
21
-
nc
22
EANK_N
One-Of-N-Check
23
0V
24
PDB6
Peripheral Data Bus 6
25
PDB7
Peripheral Data Bus 7
26
PDB2
Peripheral Data Bus 2
27
PDB3
Peripheral Data Bus 3
28
PDB4
Peripheral Data Bus 4
29
PDB5
Peripheral Data Bus 5
30
PDB0
Peripheral Data Bus 0
31
PDB1
Peripheral Data Bus 1
32
0V
33
0V
34
PADB9
Peripheral Address Bus 9
35
PADB10
Peripheral Address Bus 10
36
PADB11
Peripheral Address Bus 11
37
PADB3
Peripheral Address Bus 3
38
PADB4
Peripheral Address Bus 4
39
PADB5
Peripheral Address Bus 5
40
PADB6
Peripheral Address Bus 6
41
PADB7
Peripheral Address Bus 7
42
PADB8
Peripheral Address Bus 8
43
PADB0
Peripheral Address Bus 0
44
PADB1
Peripheral Address Bus 1
45
PADB2
Peripheral Address Bus 2
46
0V
47
-
nc
48
-
nc
49
-
nc
50
0V
A-7
Technical Data
A-8
Connecting TM I/O to PCS 7
C79000-G8076-C710-04
Abbreviations
UP
User program
AS
Automation system
STL
Instruction list
O&M
Operating and monitoring
ME
Module error
MNO
Module number
MOD
Module
CFC
Continuous Function Chart
CP
Communication processor (bus interface module)
CPU
Central Processing Unit (central module)
DB
Data block
EANK
1–of–N–Check (Double addressing of modules on the TM I/O bus)
I/O
Input/Output
EU
TELEPERM M expansion unit
EN
Enable input
Connecting TM I/O to PCS 7
C79000-G8076-C710-04
B
B-1
Abbreviations
ES 100 K
Expansion system for TELEPERM M PLCs
FB
Function block
FC
Function Call (Function)
FM
Function module (Module)
IBS
Commissioning
IEC
International Electronical Commission
PCM
Process Control Message
MPI
Multi Point Interface
CNO
Channel number
OB
Organization block
OS
Operator Station
PIO
Output process image
PII
Input process image
PC
Personal Computer
PCS 7
Process Control System 7
PG
Programming device
PCS
Process control system
PCT
Process control technology
B-2
Connecting TM I/O to PCS 7
C79000-G8076-C710-04
Abbreviations
PS
Power Supply
ACKD
Acknowledgement delay
SCL
Structured Control Language
SFB
System function block
SFC
System function call (system function)
SINEC
Siemens Network Architecture
PLC
Programmable Logic Controller
STEP 7
Software development environment for SIMATIC S7 / M7
SSL
System Status List
S5
SIMATIC Line 5
S7
SIMATIC Line 7
TAC
Test and Commissioning.
TM
TELEPERM M
TPM
TELEPERM Process Module
WinCC
Windows Control Center (Operating & Monitoring System)
Connecting TM I/O to PCS 7
C79000-G8076-C710-04
B-3
Abbreviations
B-4
Connecting TM I/O to PCS 7
C79000-G8076-C710-04
C
Literature List
You can order the following manuals and instructions from your Siemens partner:
Number
/3/
Title
Description:
TELEPERM M
TPM 478-2 Interface Modules
Order
from
KA
Order Nr.
C79000-G8076-C710
Reg. 5
/8/
Reference Manual:
Automation System SIMATIC S7-400, M7-400
Module Data
C79000-G7076-C411
Part of
6ES7498-8AA01-8BA0
/10/
Manual:
PLC SIMATIC S7-400, M7-400
6ES7498-8AA01-8BA0
/11/
Manual:
TELEPERM M
I/O Modules (Function Mod., Signal Mod., Interf. and Calc. Mod.)
C79000-G8076-C030
C79000-G8076-C031
C79000-G8076-C032
/17/
Manual:
PROFIBUS Networks
(Architecturs, Installation, Configuration, Components)
6GK1970-5CA10-0BA0
/18/
/30/
Quick Guide:
PROFIBUS
6ZB5530-0AQ01-0BA7
Manual:
TELEPERM M
Notes and Guidelines for Planning, Installation and Operation
C79000-G8076-C417
/31/
Installation Guide:
PLC S7-400, M7-400
Assembly
/32/
Description:
TELEPERM M
Migration Rack II for PCS7/TM
KA
C79000-G8076-C710
Reg 6
Technical Description:
Migration TELEPERM M - SIMATIC PCS7
WinCC/TM
/TM-OCX(NORA)
KA
KA
C79000-T8076-C740
C79000-T8076-C741
/34/
/106/
/230/
/231/
LZN
C79000-G7076-C410,
Part of
6ES7498-8AA01-8BA0
Manual:
SIMATIC
Application Module FM 456, Assembly and Commissioning
C79000-G7076-C456
Manual:
SIMATIC
Standard Software for S7, Converting S5 Programs
C79000-G7076-C501
User Manual:
SIMATIC
Standard Software for S7 and M7 STEP 7 User Manual
C79000-G7076-C502
Part of
6ES7810-4CA02-8BA0
Connecting TM I/O to PCS 7
C79000-G8076-C710-04
C-1
Literature List
Number
/232/
Title
Order
from
Order Nr.
Manual:
SIMATIC
Statement List (STL) for S7-300 and S7-400, Programming
C79000-G7076-C505
Manual:
SIMATIC
Ladder Logic (LAD) for S7-300 and S7-400 Programming
C79000-G7076-C504
/234/
Programming Manual:
SIMATIC
System Software for S7-300 and S7-400 Program Design
C79000-G7076-C506
Part of
6ES7810-4CA02-8BA0
/235/
Reference Manual:
SIMATIC
System Software for S7-300 and S7-400 System and Standard
Functions
/233/
C79000-G7076-C503
/280/
Programming Manual:
SIMATIC
System Software for M7-300 and M7-400 Program Design
C79000-G7076-C851
Part of
6ES7802-0FA01-8BA0
/282/
User Manual:
SIMATIC
System Software for M7-300 M7-400 Installation and Operation
C79000-G7076-C850
Part of
6ES7802-0FA01-8BA0
/350/
User Manual:
SIMATIC
Standard Control
C79000-G7076-C195
User Manual:
SIMATIC
Modular PID Control
C79000-G7076-C121
Manual:
SIMATIC
Programming FBD for S7-300/400 Blocks
C79000-G7076-C508
/701/
/702/
/703/
C-2
Addendum for Manual
SIMATIC S7
C79000-Z7076-C412
Connecting TM I/O to PCS 7
C79000-G8076-C710-04
Glossary
I
ISA bus
Industry Standard Architecture Bus. Standard bus for AT compatible Personal
Computers.
M
Memory Card
The plug-in Memory Card can be used to store the complete software, or
parts thereof, of a CPU of function module, as well as static data.
M7-400
M7-400 is an AT-compatible automation computer of the SIMATIC product
family. It is designed in SIMATIC S7-400 technology.
P
PROFIBUS
Standardized bus system to DIN 19245 (PROFIBUS).
PS
Power supply module
R
RS232
Serial interface to DIN 66020.
S
SMD
Connecting TM I/O to PCS 7
C79000-G8076-C710-04
Abbreviation for Surface Mounted Device. Designation for surface-mount
chips.
Glossary-1
Glossar
T
TPM 478-2
Glossary-2
The TPM 478-2 interface module is used to interconnect the
TELEPERM M I/O bus.
Connecting TM I/O to PCS 7
C79000-G8076-C710-04