1
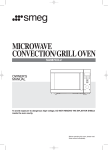
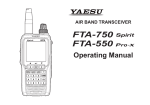
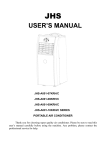
USER’S MANUAL
PORTABLE AIR CONDITIONER
TECHNICAL SPECIFICATION
MODEL : OAPC10
Voltage : 220-240V~ 50Hz
Power consumption: 890W
IMPORTANT SAFEGUARDS
Please read this manual
Inside you will find many helpful hints on how to use and maintain your air
conditioner properly. Just a little preventative care on your part can save you a
great deal of time and money over the life of your air conditioner. You will find
many answers to common problems inside this manual.
CAUTION
•
Contact the authorised service centre for repair of this unit
•
This air conditioner is not intended for use by young children or infirm persons,
without
•
Supervision.
•
Young children should be supervised to ensure that they do not play with the
appliance
•
If the power cord is damaged it must be performed by an authorised agent of
Omega Altise
SAFETY RULES
To prevent injury to the user or other people and to prevent property damage,
the following instructions must be followed. Incorrect operation due to not
reading the instructions may cause harm or damage.
•
Your air conditioner should be used in such a way that it is protected from
moisture (eg splashed condensation water) do not store or place the air
conditioner where it can fall or be pulled into water.
•
Always transport the air conditioner in a vertical position and stand it on a
stable, level surface during operation.
•
Turn off the product when not in use.
•
Always contact an authorised qualified person to carry out repairs.
•
If the supply cord is damages it must be repaired by a qualified repairer
•
Keep the are clear around the appliance. There needs to be a air path of at
least 30cm all around the unit from walls, furniture and curtains.
•
If the air conditioner is knocked over during use turn off the unit and unplug it
from the powerpoint.
•
Do not operate the air conditioner in a wet room such as a bathroom or laundry
•
Do not touch the unit with wet hands
•
Do not press buttons on the console with anything but fingers.
•
Do not remove fixed covers. Do not use this appliance if it is malfunctioning or
has been dropped or damaged
•
Never use the power point switch to start or stop the unit. Use the control
panel first.
•
Do not obstruct the inlet or outlet grill
•
Do not use harsh chemicals to clean the air conditioner
•
Do not run the unit near dangerous chemicals or insecticides or petrol
•
Do not use this appliance for functions other than those described in this
instruction manual.
ENERGY SAVING
•
Use the appliance in the recommended room size
•
Locate the unit where furniture cannot obstruct air flow
•
keep blinds and curtains closed to keep out the sun
•
Keep the filters clean
•
Keep doors and windows closed to keep cool air in and hot air out
Placement and Installation
Placement
Place the machine on flat and dry ground, and keep at least 30 cm from walls etc
(figure 1)
FIGURE 1
Installation
•
Spin adapter into exhaust pipe first, then spin the exhaust pipe into exhaust
connector (counter-clockwise) (figure 2)
•
Put adapter into window seal plate, adjust window open width in order seal
plate match window well, and the length of seal plate is adjustable.
FIGURE 2
FIG
Installation Errors
•
Free access of exhaust pipe is important, If air is not taken out it will affect
performance of the appliance.
•
Avoid sharp bends in the exhaust-pipe (figure 3)
Make sure air in exhaust pipe can run smoothly (figure 4)
FIGURE 3
FIGURE 4
Warning
Use only the exhaust pipe supplied. Longer or extended pipes may damage the
appliance
Note: extreme length of unfolding exhaust pipe is 1500mm, please shorten the
length as much as possible and keep it level as much as possible when
installing
Parts List
1
Front side (figure 5)
2
1. Handle
2. Control Panel
3
3. Air-outlet
4
4. Fan blade
6
5. Castor
8
5
7
Rear Side (figure 6)
6. Filter frame upper
9
10
7. Exhaust Connector
8. Power Cord Location
9. Filter frame lower
10. Rubber plug
11. Plug cap
12.Power Supply Cord
Accessories.. (figure 7)
12
11
FIGURE 7
1. Exhaust Pipe
2. Adapter
3. Remote control
4. Sealplate
Control Panel
10 11
9
8
7
12
6
1. ON/OFF (power) button
2. Mode (function) button
3. Sleep function button
4. “Temperature down” button
5. “Temperature up” button
6. Timer button
7. Speed (ventilation) button
8. Receiver for remote control
9. “Water Full” indicator
10. Indicator for compressor
15 16 17 18
14
13
5
4
3
2
19
1
11. High ventilation indicator
12. Low ventilation indicator
13. Timer operation indicator
14. Display window
15. Sleep operation indicator
16. Cooling operation indicator
17. Dehumidify operation indicator
18. Fan operation indicator
19. Power indicator
1. POWER: press this key to turn on/off machine. After machine turns on, default
value is cooling mode with low fan speed.
2. MODE: after machine turns on, for cooling only model, press this key to select
cooling, dehumidifying and fan mode.
3. FAN: after machine turns on, press this key to select fan speed (high and low).
4. DOWN: under cooling mode, press this key to downward setting temperature
from 16~31℃; under timer mode, press this key to downward on/off time.
5. UP: under cooling mode, press this key to upward temperature from 16~31℃;
under timer mode, press this key to upward on/off timer.
6. SLEEP: under cooling, press this key to turn on/off sleep function.
7. TIMER: under power-on or standby mode, press this key to setup on/off time
from 0~24.
Remote Control
1. Power
2. Timer
3. Down
5. Up
6. Fan
7. Sleep
4. Mode
Operation Methods
Cooling mode
•
After machine turns on, default value is cooling mode with 22
and low fan
speed.
•
Press “ MODE” to select cooling mode, cooling mode indictor turns on .
•
Press “ UP” or “ DOWN” to adjust temperature ( from 16
•
Press “ FAN” to select high or low fan speed.
to 31 ).
Fan mode
•
Press “ MODE” to select fan mode, fan mode indicator turns on .
•
Press “ FAN” to select fan speed, press “ UP” or “ DOWN” to select high speed
or low speed.
•
Temperature and sleeping function cannot be setup.
Timer mode
•
Under standby mode, press “TIMER” to setup the power-on time, press
“UP” and “DOWN” to adjust the timer (from 1 to 24). Timer indicator turns on.
•
Under power-on mode, press “TIMER” to setup power-off timer. Press “UP”
and “DOWN” to adjust the timer (from 1 to 24). Timer indicator turns on.
Dehumidifying mode
•
Press “MODE” to select dehumidifying mode, dehumidifying mode indicator
turns on .
•
Under dehumidifying mode, timer and sleeping function cannot be setup,
and fan speed is low.
Sleep mode
•
Press key “SLEEP” enter into sleeping mode, default value of fan speed is
low.
•
When sleeping mode turns on, under cooling mode, one hour later,
temperature will go up 1℃ from setting temperature , and then keep the
same ; under heating mode, one hour later, temperature will go down 1℃
from setting temperature , and then keep the same .
•
Sleep mode is invalid under dehumidifying and fan mode. Under water full,
machine standby and mode conversion, sleeping mode will be cancelled .
Compressor protection
If turned on and off or on at start up it takes 3 minutes for the compressor to
start..
Water Drainage
This machine has a auto-water-evaporating system. Condensed-water
cycle is used
to cool down the condenser, which not only improves
cooling efficiency, but also saves energy.
•
If inner water tank is full, “W.F” indicator will flashed on the screen , 8 seconds
later machine enter into standby mode, buzzer shouts , compressor stops and
all keys is invalid till machine recovers to be normal .
•
Pull out the plug to drain out water, power off the machine and restart it , the
machine will runs normally .
Maintenance
Note: in order to avoid electric shocks, please turn off at the control panel,
switch off the power point then unplug the appliance before cleaning
Cleaning
•
Please switch off at the control panel, then at the power point then unplug before
cleaning .
•
Use soft semi-dry cloth to clean the machine. Don’t use chemical agents, such
as benzene, alcohol, gasoline etc ; otherwise the machine surface can be
damaged.
•
Use only a moist cloth not a wet or dripping as if water enters the control panel
or the machine it will cause damage.
Filter
•
Clean the filters every two weeks, if filters are blocked by dust, machine
efficiency will be reduced .
•
Clean the filters in warm water with neutral detergent, then dry the cleaned filters
on a shady place.
Note: Don’t run the machine without filters.
Seasonal Cleaning
If the machine is not be unused for a long time, please follow these steps :
•
Pull out drainage plug upper / lower to empty any water out.
•
Let the machine run under fan mode for 2 hours to dry out the machine internals
•
Turn off the appliance, switch off the power point and remove the plug.
•
Clean and dry filters , then reinstall them .
•
Pull out exhaust pipe for safekeeping .
•
Put the machine into a plastic bag , and place it on a dry place.
Troubleshooting
Please contact professional serviceman without
Trouble
Cause
Power off
“P2” flashes on screen or
Machine
water-full indicator turns on
cannot work
Timer-off turns on
Machine autorestarts
frequently
Too noisy
Compressor
cannot work
Direct sunlight
Door and windows are open ,
many heat sources in the
room .
Filters are too dirty.
Air-inlet or air out-let is
blocked
Machine is not on flat ground.
Compressor time-delay
protection turns on
delay in following situation
Solution
Power on
Drain water out
Turn off machine for three minutes,
then restart it.
Draw the curtains
Close the door and windows, move
out heat sources.
Clean or replace filters
Remove blockage
Place it on flat and solid ground,
avoiding shaking
Wait for 3 minutes, then restart the
machine after temperature reduces .
Note: If the machine is not working please contact your authorised agent.
Technical Data
Model
Cooling capacity
OAPC10
BTU/h
Mains
10000
220-240V/50Hz/1Ph
Power consumption
W
890
Current
A
3.95
L/24h
24
Dehumidification
Refrigerant
R410A
Compressor
Rotary
Fan speeds
2
Thermostat
16-31
Timer
h
0-24
Dimensions(W*H*D)
mm
320 X 730 X 360
Net weight
kg
21