1
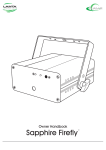
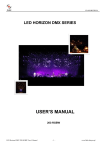
LED Moving Head Light
Using manual
Read it carefully before use it
1. DISPACKING
10. MAINTENANCE AND CLEANING
Thank you for using the products of our CO. For your own
safety, please read this manual before installing the device. This
Manual covers the important information of installing and using.
Please install and operate following the manual book. Meanwhile,
Please keep this manual well for using at any time.
Our moving wash is made of a new type of high temperature
Strength of engineering plastics and cast aluminum casing from
manufacturing, design beautiful smooth, fully embodies the
characteristics of modern lighting products. Products according
to strictly CE standards of production design, in full compliance
with international standards DMX512 protocol, single control and
can also be controlled in group with each other, suitable for
large-scale performances, theater studio and places of higher
Disco use.
The Moving head light adopt the powerful LED lamp which is
import in the foreign country. Once receive it, please handle it
carefully and check if there is some shatter because of
Transportation and the following fittings are ok:
Main light------- one
Hook:--------------one
This moving LED must be kept clean basically, which means dust,
dirt or draft of tobacco tar should not be stayed on/in the case,
otherwise, it will sharply decrease the output of the moving LED.
Regular cleaning can guarantee not only LED output but its life as
well. It is suggested to be cleaned by soft cloth with premium glass
detergent instead of using alcohol or solvent!
★Danger: Switch off power supply before any maintenance.
★The front glass is easily stained by the draft of tobacco tar, which
will decrease light output, so it should be cleaned once a week. As for
cooling fan, once a month .
★There is not any repairable part inside the device except for fuse.
★ only franchisers have the right for maintenance.
★ Change of Fuse
When the bulb is burnt, the fuse might also be burnt at the same
time. Only the fuse with same model and class need to be changed.
★Switch off power supply before changing fuse .
signal cable----one
Manual---------one
1
10
9. Wave Beam
2. CAUTION
The guy who install it and maintain it, you must follow:
-Have the qualification of technician.
-Follow the instruction
Attention: prevent water damp cut the power off when open the
machine. Keep Clear-High Voltage, the machine is in good condition
before sell. To confirm the safety, please control it under the
instruction.
-The factory will not take responsibility, if you don’t control it under
the instruction or change the machine personally or change the
instruction casually.
-Don’t connect power wire with other wire, confirm the power is
available to the machine, especially don’t outstrip the power.
-confirm plug connects with the power, and the switch button is off
before you connect with power.
-Confirm the power wire is not puckered or damaged by the sharp,
check it once in a while. –Cut the power when it is not work or
maintained. When you cut off power, pull up the plug not the wire to
avoid the damage.
-The level of protection is the first level; connect the green/yellow to
the ground. The connection and maintainment should be dong by the
career man.
-Don’t connect the machine to the dimmer equipment.
-Don’t make on and off action frequently or the working life will
become short.
-It may be smelly when the first use, it’s the common.
- To avoid hurting the eyes, please do not look at the lamp-house
steadily. Especially for the eye sicker .
9
2
3. INSTRUCTIONS
-The machine is moving head light used to make the decorate
effect.
-Don’t start the machine when its temperature changed drastically,
because the change of the temperature may damming the machine, start it
when temperature is in the common condition.
-Be carefully for the shock when install
-Don’t pull up the machine by the head of it, this may damage it, use the
special tools to transport it.
-The install place shouts not overheating over damp or too much dust, don’t
put wire on the ground to avoid hurting any man,
8.SKILL SPECIFICATION
Light Source: 3W LEDs
LED Quantity:108 pcs
Operation Modes: DMX, Master/Slave, Auto, Sound
DMX Channels: 12
Connection: DMX in/out, power cord in
Beam Angle: 10°/40°
Fixture Housing: ABS
Pan Tilt: 540°/230°
IP Rating: IP30
Dimensions: W490mm L295mm H161mm
Power Consumption: 384W
Weight: 13.5 Kg
- At the button of this product there is a hole for safety wire,
please make sure that the safety wire is done with it.
-When the machine is not installed or the screw is not tightening,
don’t start it.
-Caution: when lens is damaged visible, change to keep the
previous effect.
-It maybe injure the machine if it is controlled by the guy who is
not professional, lots of the damage is coming by this.
-Use the original packing when delivery it. Forbid change the
machine unless approved.
-The fault is not belonging to guarantee to keep in good repair, if
you don’t control it under the instruction. The short circuit, damage,
accidental contact, the damage by ultraviolet radiation, the blow up, all of
this not belong to guarantee to keep in good repair.
3
8
7. The Channel
channel
1
2
3
Channel instruction
Horizontal scan
Vertical scan
Dimmer
4
Strobe
5
6
7
8
9
10
red(R)
green(G)
blue(B)
white(w)
Scan speed
RGB macro
function
11
12
channel of
function control
reset
data
effect
0-540
0-280
0-100
000-006
007-065
066-069
070-128
129-132
133-191
192-195
196-255
0-100%
0-100%
0-100%
0-100%
scan
scan
adjust gamma
no strobe
strobe min to max speed
no strobe
Lightning Electromagnetic Pulse min
to max speed
no strobe
fade in srobe min to max speed
no strobe
fade out strobe min to max speed
adjust brightness
adjust brightness
adjust brightness
adjust brightness
000-004
no macro function
005-044
eight kinds of fixed color
045-049
050-094
095-099
100-149
150-154
155-166
167-178
179-190
191-202
203-214
215-226
227-238
239-250
no function
eight skip loop change color
no function
eight kinds of circle color
no function
red+green from dark to bright
green+red from bright to dark
green+blue from dark to bright
blue+green from bright to dark
blue+red from dark to bright
red+blue from bright to dark
red ,green+blue from dark to brigh
blue+red from dark to bright at the
same time green from bright to dark
251-255
000-127
128-255
output 100%at the same time
no fuction
automatic
4.Install The Equipment
-During installation, please make sure no inflammable thing within
0.5 meters.
WARNING: use the two hooks to fix the bottom of the machine. and
be sure the place where you installed is safe, it can stand ten times
weight than the light, test that if the place is out of shape in one our.
-You’d better add second protection to avoid the shed of lose of the
spare parts.
the light can be installed on the shelf. as shown in illustration
The strand wire is usually used in the shelf for the safety; the strand
wire should stand ten times weight than the machine. You should use
the stand wire which has safety lock pins, the strand wire pass
through the hole at the bottom, and then tie it to the fixity. Then
tighten it
5.The Connect of Main Frame
-Confirm the power before connect!
(European
Union)wire
(United states)wire
Brown
light blue
yellow/green
Black
White
green
Line
Mark
live line
null line
earth wire
L
N
6.Set of the display
-use the plug to connect the machine to the power.
The connect of DMX-512 and lights.
Connect the XLR-XLR control wire from DMX Pulse Output of the controller to
the light,
XLR connection: DMX output
XLR plug seat
1.
earth wire2. cathode 3. anode
DMX plug 1. earth wire 2. cathode 3. anode
Attention: The last DMX
signal wire must connect to the loop plug seat, pie a electric resistance
of 120Ω,between the signal-and signal+of the plug. then put them in the Pulse
DMX Output of the last one.
The display will close after 30 seconds no operation
5
6